1. Okwu mmalite
This manual provides detailed instructions for the PROZOR Bidirectional RCA Stereo Audio Switch (Model 4X2 2X4). This device allows you to connect multiple RCA audio sources to multiple outputs, or vice versa, providing flexible audio routing for your home theater or audio setup. It operates without external power, ensuring a pure audio signal path.
2. Atụmatụ
- Bidirectional Functionality: Supports both 4-input, 2-output (4x2) and 2-input, 4-output (2x4) configurations.
- Ọrụ na-agafe agafe: No external power supply or software required, ensuring a clean audio signal without interference.
- Nrụpụta siri ike: Features a solid metal casing and compact design for durability and strong resistance to interference.
- Njikọ ndị nwere ọla edo: Ensures stable signal transmission and minimizes audio loss.
- Included RCA Cable: Comes with a high-quality 1.5-meter shielded RCA stereo cable with gold-plated connectors.
- Bọtịnụ gbanyụọ: Allows you to completely turn off the audio system without physically disconnecting cables.
- Njikwa kensinammuo: Easy selection of active audio sources or outputs via rotary knobs.
3. Ihe ngwugwu
Biko lelee ihe dị n'ime ngwugwu ahụ mgbe ị meghere ya iji hụ na ihe niile dị na ngwugwu ahụ ma ghara imebi emebi:
- PROZOR Bidirectional RCA Stereo Audio Switch (Model 4X2 2X4)
- 1.5m RCA Stereo L/R Cable with Gold-Plated Connectors
- Akwụkwọ ntuziaka onye ọrụ

Ọgụgụ 3.1: Ihe ngwugwu
4. Ntọala na nwụnye
The PROZOR RCA Stereo Audio Switch is designed for simple plug-and-play operation without the need for external power. Follow these steps to set up your device:
4.1 Bidirectional Connection Modes
The switch supports two main configurations:
- 4 Inputs to 2 Outputs (4x2): Connect up to four audio source devices (e.g., TV, game console, CD player, PC) to the "IN/OUT 1-4" ports. Connect two output devices (e.g., amplifier, active speakers) to the "IN/OUT A-B" ports.
- 2 Inputs to 4 Outputs (2x4): Connect two audio source devices to the "IN/OUT A-B" ports. Connect up to four output devices to the "IN/OUT 1-4" ports.
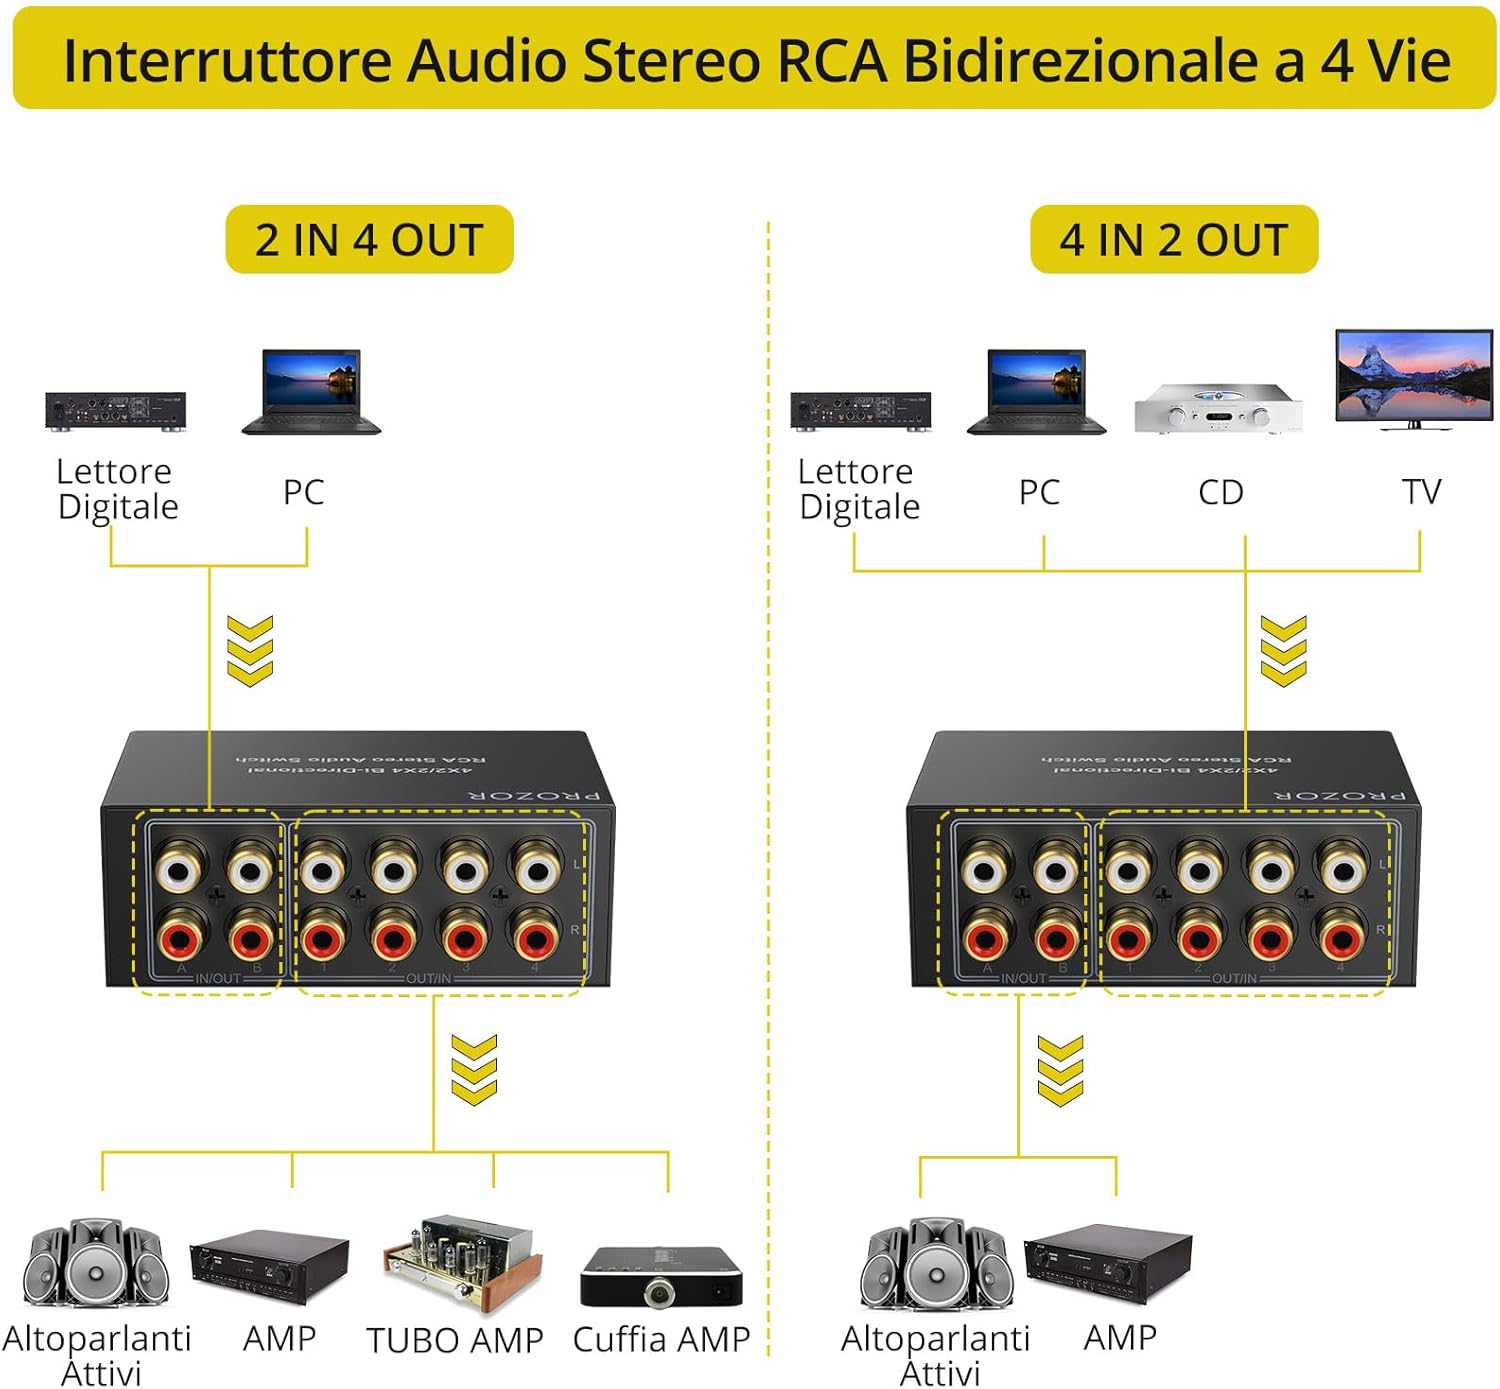
Figure 4.1: Bidirectional Connection Diagram

Figure 4.2: 2 Inputs to 4 Outputs Configuration

Figure 4.3: 4 Inputs to 2 Outputs Configuration
4.2 Nzọụkwụ Njikọ
- Identify your desired configuration (4x2 or 2x4).
- Connect your audio source devices to the appropriate RCA input ports (either 1-4 or A-B). Ensure left (white) and right (red) channels are matched.
- Connect your audio output devices to the remaining RCA ports. Ensure left (white) and right (red) channels are matched.
- Use the included 1.5m RCA cable for one of your connections, or use your own high-quality RCA cables.

Figure 4.4: Connecting RCA Cables

Figure 4.5: Compact Design with Accessible Ports
Video 4.1: Product Connection and Operation Demonstration. This video demonstrates how to connect various audio devices to the PROZOR RCA switch and how to select inputs/outputs.
5. Ntuziaka ọrụ
Once all connections are made, operate the switch using the front panel controls:
5.1 Selecting Inputs/Outputs
- Use the left rotary knob (labeled 1/2/3/4/OFF) to select one of the four input/output channels.
- Use the right rotary knob (labeled A/B) to select one of the two input/output channels.
- Ihe dị mkpa: Only one input can be selected for each output at a time. Simultaneous audio output from multiple sources is not supported.

Figure 5.1: Rotary Knobs for Selection
5.2 Using the OFF Function
The left rotary knob includes an "OFF" position. Turning the knob to "OFF" will mute all audio output from the device. This allows you to power down or silence your audio system without needing to disconnect any cables.
6. Nchọpụta nsogbu
If you encounter issues with your PROZOR RCA Stereo Audio Switch, please refer to the following common problems and solutions:
| Nsogbu | Ihe nwere ike ime | Ngwọta |
|---|---|---|
| Enweghị mmepụta ọdịyo. |
|
|
| Humming or static noise. |
|
|
| Audio is distorted or low volume. |
|
|
7. Nkọwapụta
| Njirimara | Nkọwa |
|---|---|
| Ụdị | NZUKWU |
| Nlereanya | 4X2 2X4 |
| Akụkụ ngwaahịa | 10.7 x 9.2 x 0.1 cm |
| Ibu Ibu | 350 grams |
| Ngwa dakọtara | DVD Player, TV, Console, Amplifier, PC (any device with RCA audio output/input) |
| Ụdị USB | RCA |
| Ọnụọgụ nke ọdụ ụgbọ mmiri | 4 (input/output) + 2 (input/output) |
| Ụdị nwụnye | USB |
| Achọrọ ike | None (Passive device) |
| Agba | Nwa |
8. Akwụkwọ ikike na nkwado
For warranty information, technical support, or customer service, please refer to the documentation included with your product or contact the seller directly. You can also visit the official PROZOR store for more information:


