1. Okwu mmalite
The COMPUTHERM Q7RF wireless room thermostat is designed for precise control of heating and air conditioning systems. This programmable device allows you to set individual temperature schedules for each day of the week, optimizing comfort and energy efficiency in your home or office. Its wireless design offers flexible placement of the thermostat unit, while the receiver unit connects directly to your boiler or air conditioning system, compatible with both 24V and 230V control circuits.
2. Ihe ngwugwu
Chọpụta na akụrụngwa niile dị na ngwugwu gị:
- 4 x COMPUTHERM Q7RF Room Thermostat (Transmitter Unit)
- 4 x COMPUTHERM Q7RF Receiver Unit
- Akwụkwọ ntuziaka (akwụkwọ a)
- Ịkwado skru na mgbidi
3. Ngwaahịa gafereview
The COMPUTHERM Q7RF system consists of two main components: the thermostat unit (transmitter) and the receiver unit. The thermostat unit measures the room temperature and allows you to set desired temperatures and programs. The receiver unit connects to your heating or cooling system and switches it on or off based on signals from the thermostat unit.

Nyocha 1: N'eluview of the COMPUTHERM Q7RF 4-piece set, showing multiple thermostat and receiver units.
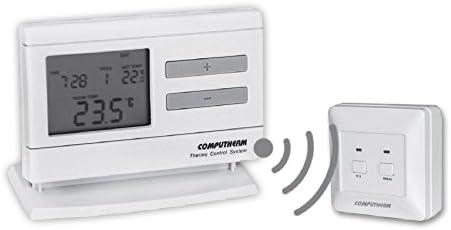
Figure 2: A single COMPUTHERM Q7RF thermostat unit communicating wirelessly with its receiver unit.
3.1 Thermostat Unit (Transmitter)
- Ngosipụta LCD: Shows current temperature, set temperature, time, day, and program status.
- bọtịnụ njikwa: For setting temperature, time, and programming schedules.
- Akụkụ batrị: Maka ọkọnọ ike.
3.2 Ngalaba nnata
- Ọnụ ụzọ waya: For connection to the heating/cooling system.
- Ndị Na-egosi Ọnọdụ: LEDs to show power and relay status.
- Manual Override Buttons: For temporary manual control.
4. Nkọwapụta
| Njirimara | Nkọwapụta |
|---|---|
| Ụdị | Kọmputa |
| Nlereanya | Q7RF |
| Na-agbanwe Voltage | 24V AC/DC, ... 250V AC, 50Hz |
| Oriri ike | 6W |
| Oke nha nha okpomọkụ | 3 – 45°C (in 0.1°C increments) |
| Oke okpomoku nwere ike imeghari | 5 – 40°C (in 0.5°C increments) |
| Izizi nha okpomọkụ | ±0.5C |
| Ụdị njikwa | Pịa bọtịnụ |
| Teknụzụ Njikọta | Wireless (Radio Frequency) |
| Atụmatụ pụrụ iche | Programmable, Compatible with various system voltages |
5. Ntọala na nwụnye
5.1 Thermostat Unit Placement and Battery Installation
- Họrọ ebe: Place the thermostat unit in a central area of the room where it can accurately measure the ambient temperature, away from direct sunlight, drafts, or heat sources.
- Wụnye batrị: Open the battery compartment on the back of the thermostat unit. Insert the required batteries (typically AA or AAA, refer to the unit's markings) ensuring correct polarity. Close the compartment.
- Ike Na: The display should light up, indicating the unit is powered.
5.2 Receiver Unit Wiring
WARNING: Electrical installation should only be performed by a qualified electrician. Disconnect power to the heating/cooling system before proceeding.
- Wụnye ihe nnata: Secure the receiver unit near your boiler or air conditioning system using the provided screws and wall plugs.
- Access Wiring Terminals: Open the cover of the receiver unit to expose the wiring terminals.
- Jikọọ na Sistemu: Connect the receiver unit to the two-wire room thermostat connection point of your boiler or AC system. Ensure connections are secure and follow the wiring diagram provided with your heating/cooling system and the receiver unit. The COMPUTHERM Q7RF is compatible with both 24V and 230V control circuits.
- Weghachi ike: Once wiring is complete and verified, close the receiver unit cover and restore power to your heating/cooling system.
5.3 Pairing the Units (If not pre-paired)
Refer to the specific instructions provided with your Q7RF set for pairing procedures. Typically, this involves pressing a pairing button on the receiver unit and then initiating a pairing sequence on the thermostat unit within a short timeframe. A successful pairing will usually be indicated by an LED on the receiver or a message on the thermostat display.
6. Ntuziaka ọrụ
6.1 Ịghọta Ngosipụta LCD
The LCD display provides all necessary information about the thermostat's current status and settings.

Ọgụgụ 3: Zuru ezu view of the COMPUTHERM Q7RF LCD display, illustrating various indicators such as program number, manual modification symbol, weekdays, time, set temperature, actual room temperature, low battery symbol, boiler ON state, and timed control symbol.
- Ụbọchị izu: Na-egosi ụbọchị dị ugbu a nke izu.
- Exact Time / Time Left: Displays the current time or time remaining for a manual modification.
- Nọmba mmemme: Shows the active program segment.
- Tọọ okpomọkụ: The desired temperature set by the user.
- Actual Room Temperature: The current temperature measured by the thermostat.
- Symbol for Manual Modification: Indicates that the thermostat is currently operating under a temporary manual override.
- Temp. Modified until next manual intervention: Shows the duration of a temporary temperature change.
- Symbol for Low Battery Voltage: Appears when batteries need replacement.
- Symbol for Boiler ON State: Indicates when the heating/cooling system is active.
- Symbol for Timed Control: Indicates that a programmed schedule is active.
6.2 Ịtọ Oge na Ụbọchị Ugbu a
- Pịa OGE bọtịnụ.
- Jiri ihe + or - buttons to adjust the hour, then press OGE ọzọ iji gosi.
- Repeat for minutes and day of the week.
6.3 Ndozi okpomọkụ akwụkwọ ntuziaka
- Na ọnọdụ arụ ọrụ nkịtị, pịa + or - bọtịnụ iji dozie okpomọkụ achọrọ.
- The new temperature will be maintained until the next programmed time slot or until manually overridden again.
6.4 Programming Daily/Weekly Schedules
The Q7RF allows for independent programming for each day of the week. You can typically set multiple time periods with different temperatures for each day.
- Pịa ỌRỤ bọtịnụ iji tinye ọnọdụ mmemme.
- Jiri ihe ỤBỌCHỊ button to select the day you wish to program (e.g., MON, TUE, etc.).
- Jiri ihe OGE na +/- buttons to set the start time for the first program period.
- Jiri ihe WETKWU EMLỌ na +/- buttons to set the desired temperature for this period.
- Pịa ỌRỤ again to move to the next program period for the same day, or use ỤBỌCHỊ ịkwaga n'echi ya.
- Repeat until all desired periods and days are programmed.
- Pịa Gbaa ọsọ or ỤZỌ ỌPỤPỤ button to save and exit programming mode.
7. Nlekọta
7.1 nnọchi batrị
When the low battery symbol appears on the LCD display, replace the batteries immediately to ensure continuous operation. Use new, high-quality alkaline batteries of the specified type.
- Open the battery compartment cover on the back of the thermostat unit.
- Wepu batrị ochie.
- Insert new batteries, observing correct polarity (+/-).
- Mechie mkpuchi oghere batrị.
7.2 Nhicha
Clean the thermostat and receiver units with a soft, dry cloth. Do not use abrasive cleaners, solvents, or spray directly onto the units, as this may damage the electronics or finish.
8. Nchọpụta nsogbu
| Nsogbu | Ihe nwere ike ime | Ngwọta |
|---|---|---|
| Ngosipụta thermostat bụ oghere | Batrị nwụrụ anwụ | Jiri ndị ọhụrụ dochie batrị. |
| Sistemụ kpo oku/ọkụ anaghị aza | 1. Receiver unit not powered 2. Units not paired 3. Wiring issue 4. Apụghị nso | 1. Check power supply to receiver. 2. Perform pairing procedure (Section 5.3). 3. Verify wiring connections (Section 5.2). 4. Move thermostat closer to receiver or check for obstructions. |
| Ọgụgụ okpomọkụ ezighi ezi | Thermostat placed in unsuitable location (direct sun, draft) | Relocate thermostat to a more central and stable temperature area. |
| Programmed schedule not active | Thermostat in manual override mode | Exit manual override mode (e.g., press RUN/AUTO button) to resume programmed operation. |
9. Akwụkwọ ikike na nkwado
COMPUTHERM products are manufactured to high-quality standards. For warranty information, please refer to the warranty card included with your product or contact your retailer. For technical support, please reach out to the COMPUTHERM customer service or your local distributor. Keep your purchase receipt as proof of purchase.


