1. Ntọala na Mgbakọ
This section guides you through the initial setup and assembly of your iScooter DX5 Electric Scooter. Ensure all components are present and undamaged before proceeding.
1.1 Unboxing na njirimara akụrụngwa
Carefully remove all items from the packaging. Lay them out and identify each component using the provided parts list in your physical manual. Keep the packaging for future transport or storage.

Image: All components of the iScooter DX5 Electric Scooter laid out on the floor, ready for assembly.
1.2 Nwụnye Handlebar
- Attach the handlebar stem to the fork using the provided bolts and Allen wrench. Ensure it is securely tightened.
- Connect the electrical cables from the handlebar to the main body. Secure any loose cables with zip ties.
Video: Detailed installation guide for the iScooter DX5 Adults Electric Scooter with Seat, demonstrating handlebar attachment, brake lever setup, and mirror installation.
1.3 Brake Lever and Mirror Installation
- Mount the brake levers onto the handlebar. Tighten the bolts using the appropriate tool.
- Kpuchie azụview mirrors into their designated slots on the handlebar. Adjust for optimal visibility.
1.4 Ntinye ọkụ isi
- Attach the headlight to the front fork using the provided screws.
- Connect the headlight's electrical cable to the corresponding connector.
1.5 Front Fender and Reflector Installation
- Secure the front fender to the fork using the provided hardware.
- Attach the reflectors to the sides of the front fork.
- Ensure the brake cable is routed correctly inside the fender stay.
1.6 Rear Shock Absorber Adjustment
Adjust the rear shock absorbers to your preferred stiffness using the provided wrench. Ensure both sides are adjusted evenly.
1.7 Ntinye n'ihu Wheel
- Separate the brake pads to create enough space for the brake rotor.
- Tilt the wheel to help the brake rotor slide easily between the brake pads.
- Insert the axle through the front wheel and fork. Secure with the nuts.
1.8 Footrest Installation
- Attach the footrests to the side of the scooter frame using the provided screws.
- Ensure they are securely fastened and can fold/unfold smoothly.
Ntinye oche 1.9
- Place the seat onto the designated mounting points on the rear rack.
- Secure the seat with the provided bolts and tighten them firmly.
1.10 Front Bag Installation
Attach the scooter bag to the front of the handlebar using the straps. Ensure it is securely fastened and does not obstruct steering or visibility.
2. Ntuziaka ọrụ
Familiarize yourself with the controls and features before your first ride.
2.1 Powering On/Off and NFC Unlock
- Ensure the battery disconnect switch (located on the side of the scooter) is in the 'ON' position.
- Tap the NFC smart card to the display to unlock and power on the scooter. The display will show 'READY'.
- To power off, tap the NFC card again or hold the power button.

Foto: Ofeview of the iScooter DX5 handlebar controls, including the NFC unlock area on the display.
2.2 Ụdị ọsọ
The iScooter DX5 features four speed modes, adjustable via the 'S' button on the handlebar:
- 1st Gear Mode: 15 MPH (Energy-saving mode)
- 2nd Gear Mode: 21 MPH (Urban commuting, steady speed)
- 3rd Gear Mode: 28 MPH (Balanced power, faster ride)
- 4th Gear Mode: 35 MPH (Turbo sprint, full power)

Image: The scooter's display showing the different speed modes and their corresponding maximum speeds.
2.3 Lighting and Horn
- Igwe ọkụ ihu: Press the headlight switch to turn on/off the front LED light.
- Ntụnye akara: Use the turn signal button to indicate left or right turns.
- Brake Lights: Integrated into the taillight, these automatically illuminate when braking.
- mpi: Press the horn button for an instant alert to pedestrians or traffic.

Foto: nso nso view of the iScooter DX5's front headlight, taillight, and integrated turn signals.
2.4 Mkpu mgbochi izu ohi
The scooter is equipped with a built-in anti-theft alarm. Refer to your physical manual for specific instructions on activating and deactivating the alarm system.
3. Nlekọta
Regular maintenance ensures the longevity and safe operation of your iScooter DX5.
3.1 Nlekọta Taya
- Regularly check tire pressure. Maintain recommended PSI for optimal performance and safety.
- Lelee taya maka mmebi, ntụpọ, ma ọ bụ mmebi tupu ị na-agbagharị.
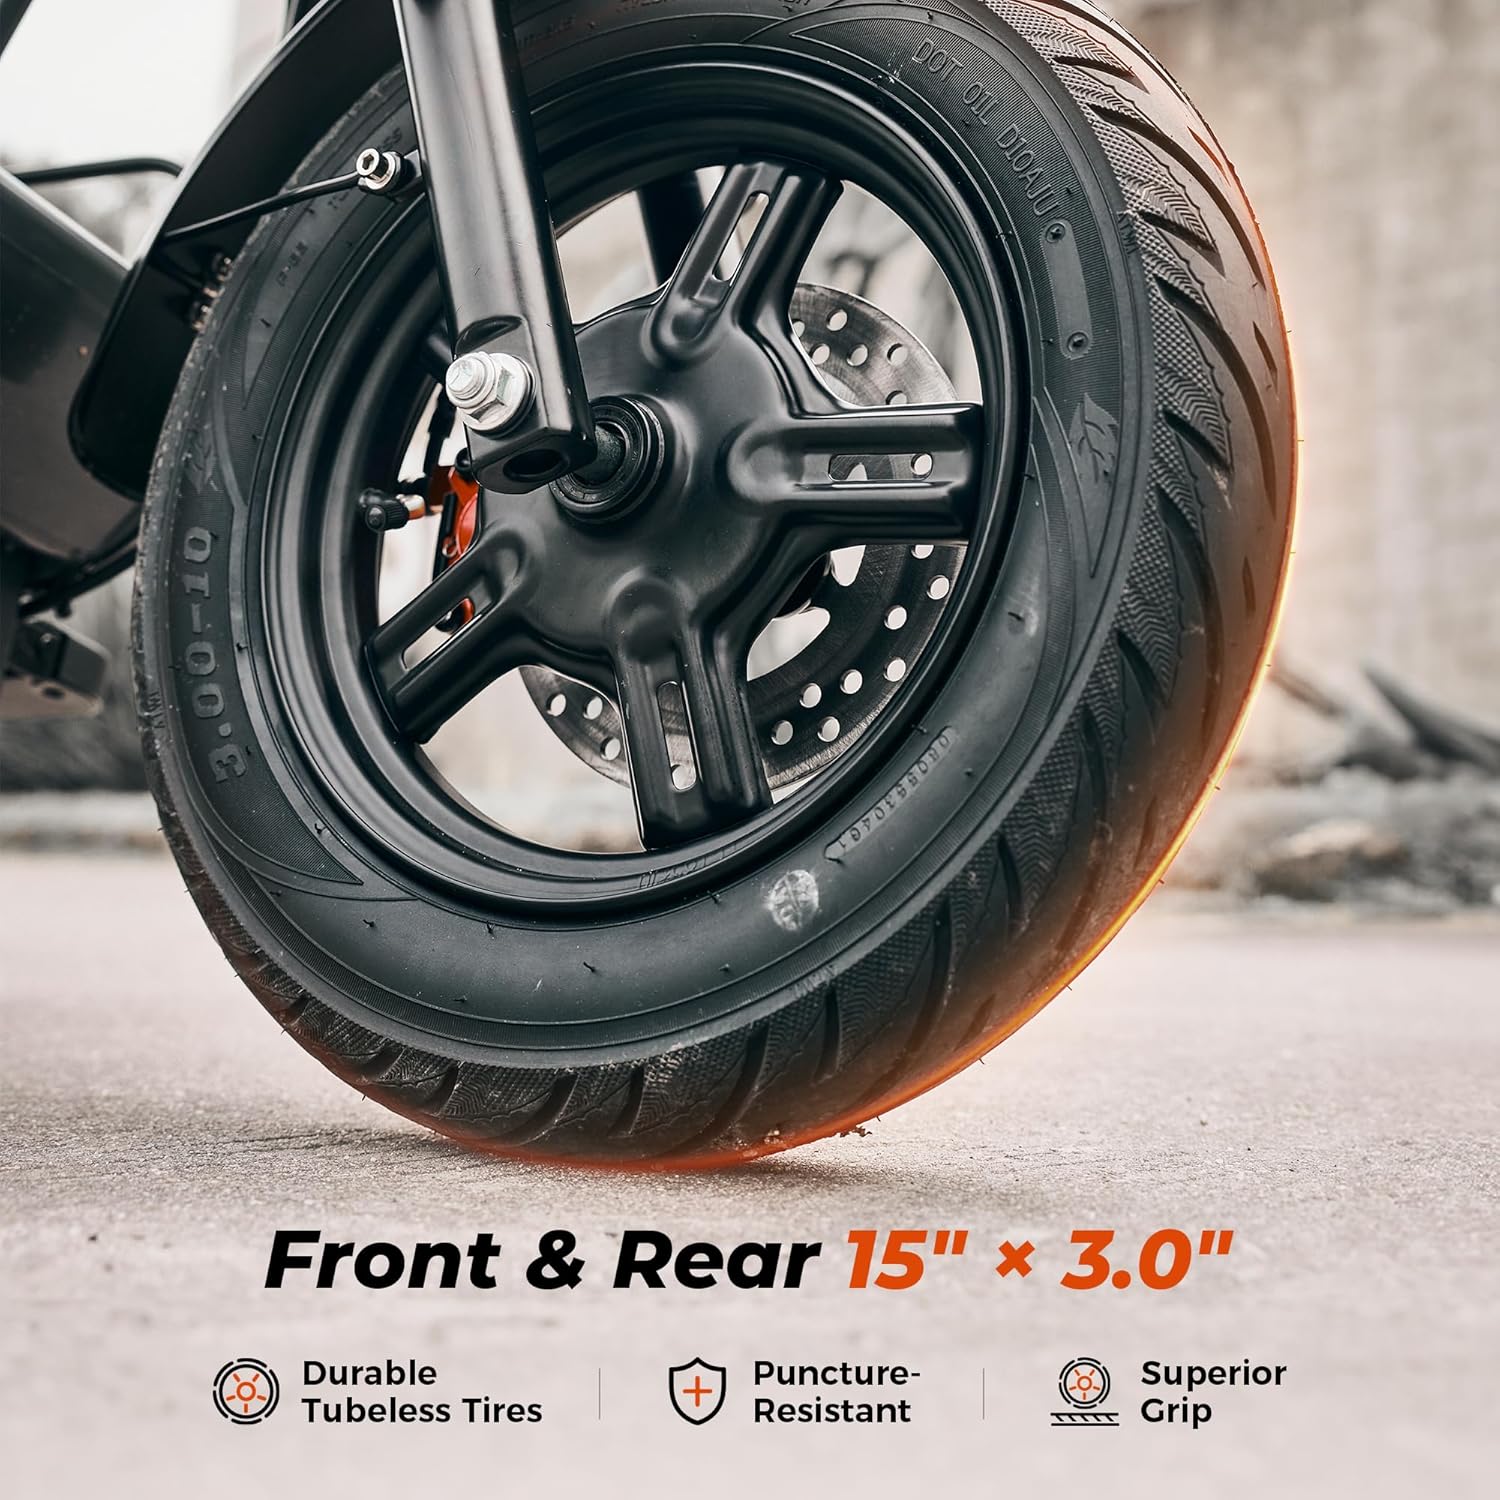
Image: Close-up of the iScooter DX5's durable 15-inch pneumatic tires, highlighting their tread and puncture resistance.
3.2 Brake System Inspection
- Check brake levers for proper function and responsiveness.
- Inspect brake pads and rotors for wear. Replace if necessary.
- Ensure brake fluid levels are adequate for hydraulic disc brakes.

Foto: Zuru ezu view of the iScooter DX5's dual hydraulic disc brakes, emphasizing their stopping power and design.
3.3 Nhicha na Nchekwa
- Na-ehicha skuta ahụ mgbe niile site na mgbasa oziamp ákwà. Zere ịsa ákwà nke nwere nrụgide dị elu.
- Debe skuuta ahụ n'ebe kpọrọ nkụ, dị jụụ, ebe anwụ na-anaghị anwụ kpọmkwem na oke okpomọkụ dị oke njọ.
3.4 Nlekọta batrị
- Avoid fully discharging the battery. Charge it regularly, even if not in use for extended periods.
- Use only the official iScooter charger.
4. Ọrụ Nchaji
Proper charging procedures are essential for battery health and safety.
4.1 Usoro Nchaji
- Ensure the scooter is powered off and the battery disconnect switch is in the 'OFF' position before charging.
- Locate the charging port on the side of the scooter.
- Connect the charger to a power outlet, then connect the charging cable to the scooter's charging port.
- The charger indicator light will typically turn red during charging and green when fully charged.
- Kwupu chaja ozugbo ochachachara.

Image: The iScooter DX5's 48V 15.6Ah battery, illustrating its capacity and charging time.
5. Nchọpụta nsogbu
This section provides solutions to common issues you might encounter with your iScooter DX5.
5.1 Scooter Not Turning On
- Check if the battery disconnect switch is in the 'ON' position.
- Ensure the battery is charged. Connect the charger and check the indicator light.
- Verify that the NFC card is correctly tapped to the display.
5.2 Oke ma ọ bụ Ike Ebelatala
- Check tire pressure; underinflated tires can reduce efficiency.
- Ensure the battery is fully charged. Battery performance can decrease in cold weather.
- Riding conditions (e.g., uphill, heavy load, aggressive acceleration) can affect range.
5.3 Braking Issues
- Inspect brake pads for wear and replace if necessary.
- Check brake fluid levels for hydraulic brakes.
- Ensure brake cables are properly adjusted and free from obstruction.
5.4 Mkpọtụ Ndị Na-adịghị Agbanwe Agbanwe
- Inspect all visible bolts and connections for tightness.
- Check for any foreign objects caught in the wheels or motor.
- If noises persist, contact customer support.
6. Nkọwapụta
Detailed technical specifications for the iScooter DX5 Electric Scooter.
| Njirimara | Nkọwapụta |
|---|---|
| Ụdị | iScooter |
| Aha Nlereanya | DX5 |
| moto | 1500W (Peak) Brushless Motor |
| Batrị | Batrị Lithium 48V 15.6Ah (748.8Wh) |
| Ọsọ kacha | 35 MPH |
| Max iche | 38-45 Miles (depending on conditions) |
| Taya | 15" x 3.0" Vacuum Pneumatic E-Motorcycle Tires |
| breeki | Igwe breeki hydraulic nke abụọ |
| Nkwusioru | Front Hydraulic Suspension & Rear Air Spring Suspension |
| Oke Ibu Ibu | 330 pound |
| Akụkụ ngwaahịa | 58.27"L x 26.8"W x 55.1"H |
| Ibu Ibu | 100 pound |
| Ogo Nguzogide Mmiri | IPX4 |
| Ngwa gụnyere | Electric Scooter, Scooter Bag |
7. Akwụkwọ ikike & Nkwado
Your iScooter DX5 Electric Scooter comes with a limited warranty. For specific details regarding warranty periods for different parts, please refer to the warranty information provided with your product packaging or contact iScooter customer support.
7.1 Nkwado ndị ahịa
For any questions, technical assistance, or warranty claims, please contact iScooter Customer Support. You can typically find contact information on the manufacturer's websaịtị ma ọ bụ n'ime akwụkwọ ngwaahịa gị.
Onye na-ere ahịa: iScooter Center
Nkọwa akwụkwọ ikike: We offer a 360-day or 180-day warranty on different parts.


