gafereview
This manual provides detailed instructions for the installation, setup, and operation of your hornbill T1-BVDHS-H Smart Front Door Lock. This advanced lock system integrates a 2K HD camera, doorbell, fingerprint recognition, keyless entry, and WiFi connectivity for enhanced home security and convenience.
Njirimara ngwaahịa
- Nchekwa agbakwunyere: Combines a 2K HD camera, doorbell kit, Bluetooth, built-in WiFi for app remote control, two-way audio, fingerprint ID, PIR Motion Detection, Auto & One-Touch Lock, rechargeable batteries, IC Card, physical keys, and double handles for comprehensive access.
- WiFi & Remote Access: Features 2.4G WiFi (no hub required) allowing remote viewing, unlocking/locking, and sharing access codes from anywhere.
- High-Definition Vision & Audio: Captures crystal-clear 2K footage up to 5m with a 160° wide-angle lens and provides two-way audio for smooth communication with visitors.
- Smart Alerts & Management: Receive instant alerts via the app when visitors press the keypad doorbell. Engage in live video chats to decide entry.
- Durability & Compatibility: Designed to withstand temperatures from -25°C to 70°C and is IP65-rated for resistance to rain and dust. Fits most US standard left/right-handed wooden doors with a thickness of 35-55mm (1.38"-2.17").
- Power & Assurance: Equipped with two 2500 mAh batteries (5000 mAh total) providing up to 120 days of use per full charge (based on 10 uses/day).
Ihe ngwugwu
The following components are included with your hornbill T1-BVDHS-H Smart Front Door Lock:
- Ogwe ihu
- Efere arịọnụ
- Azụ azụ
- Double Handles
- kposara
- Igodo
- Igodo igodo
- Mgbanaka Doorbell
Nkọwa nka nka
| Ụdị | mpi |
| Aha Nlereanya | T1-BVDHS-H |
| Ụdị mkpọchi | 2K Camera Keypad, Biometric, Deadbolt, Handle Lock Sets |
| Atụmatụ pụrụ iche | Built-in Wi-Fi, 2K HD, Doorbell, Two-Way Audio, Rechargeable Batteries, PIR Motion, Night Vision, App Remote Control, Fingerprint, Auto Lock, IP65 Weatherproof |
| Akụkụ (L x W x H) | 9 x 7.9 x 4.9 sentimita asatọ |
| Ihe onwunwe | Aluminom |
| Ibu Ibu | 3 pound |
| Agba | Nwa |
| Usoro njikwa | Ngwa, Remote, Metụ aka |
| Protocol Njikọta | Bluetooth |
| Ụdị njikwa | Amazon Alexa |
| Batrị | 2 batrị lithium polymer chọrọ (gụnyere) |
| Ụdị cell batrị | Lithium ion |
Ntuziaka nwụnye
Follow these steps carefully to install your hornbill T1-BVDHS-H Smart Lock.
1. Check Door Dimensions
Ensure your door meets the following requirements for proper installation:

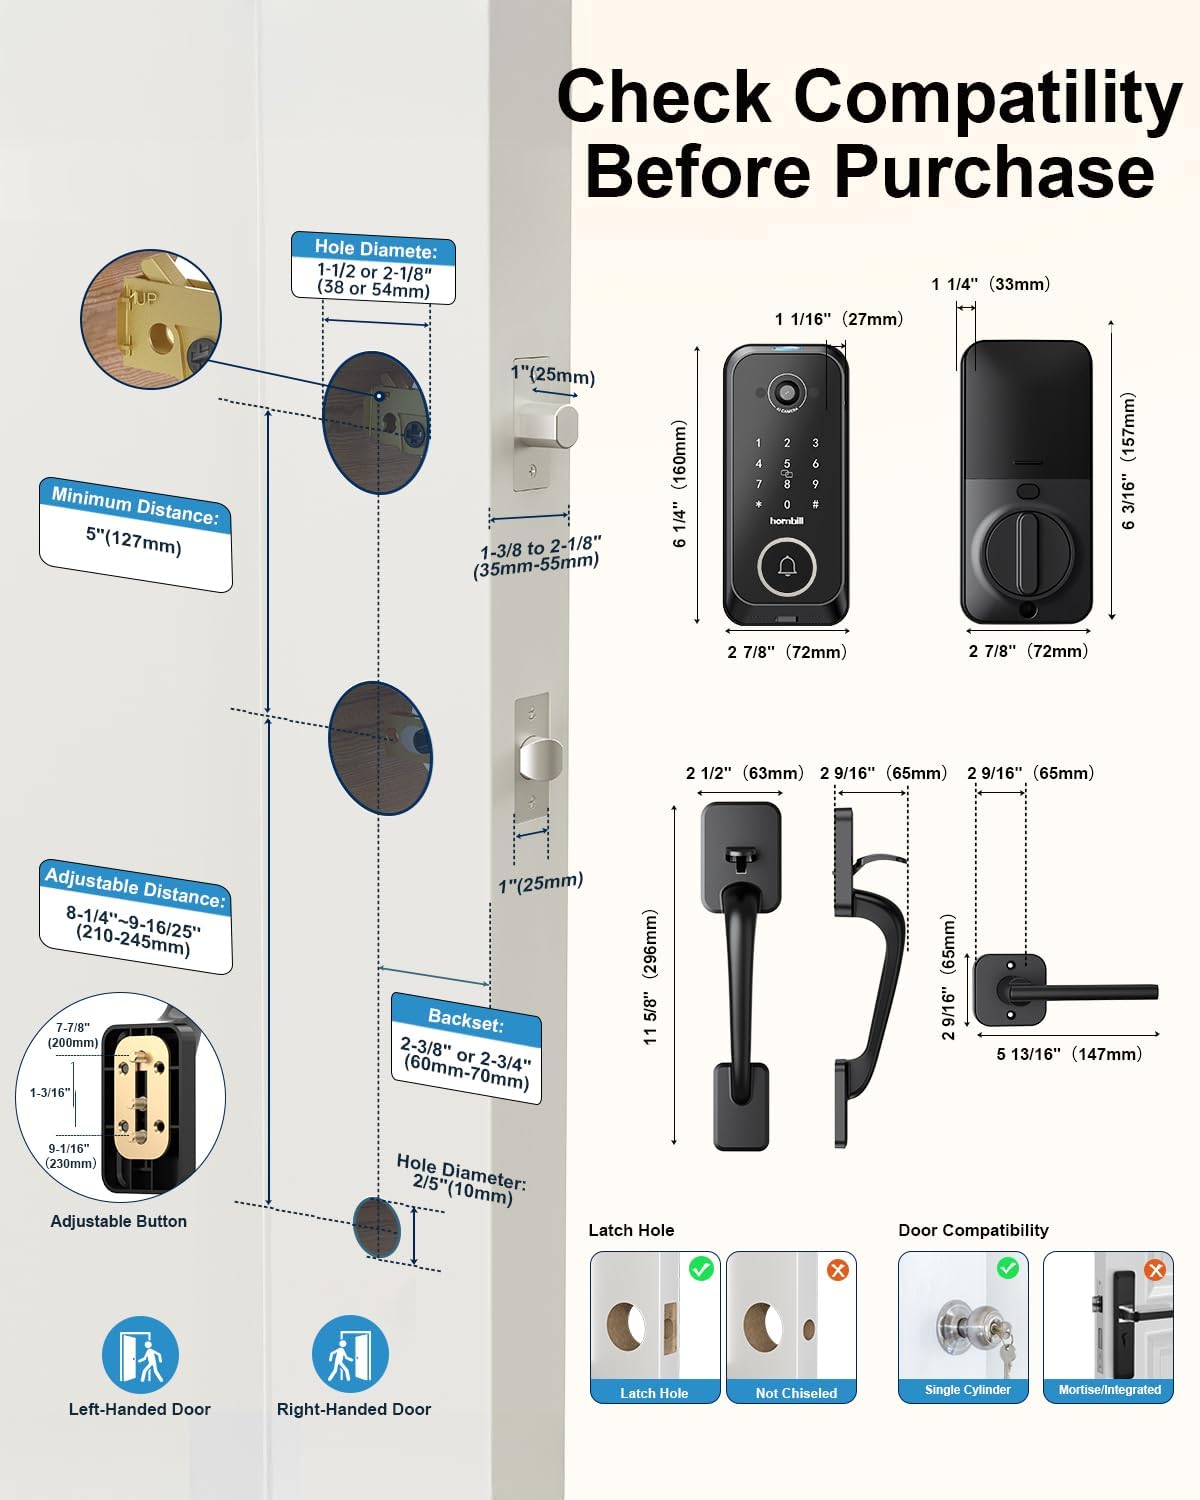
This image illustrates the necessary door dimensions: Hole Diameter (1-1/2" or 2-1/8"), Backset (2-3/8" or 2-3/4"), Door Thickness (1-3/8" to 2-1/8"). It also shows compatibility for left-handed and right-handed doors, and types of latch holes and door compatibility (single cylinder, not mortise/integrated).
2. Install the Exterior Lock, Adjust Deadbolt, and Mounting Plate
This video provides a comprehensive guide for the initial installation steps. It demonstrates how to install the exterior lock (0:05), adjust the deadbolt length to 2-3/8" or 2-3/4" ensuring the "UP" side faces upwards (0:10), and install the mounting plate by feeding the IC wire through the designated hole (0:30).
3. Install the Interior Lock and Test Deadbolt
Connect the IC wire to the port and the Wi-Fi cable to the connector on the interior lock. If the wires are too long, tuck them neatly into the hole in the mounting plate. Secure the interior lock in place with three screws. After installation, turn the knob several times to verify that the deadbolt extends and retracts smoothly without obstruction.
Refer to the video above from 0:50 for a visual demonstration of connecting the wires, securing the interior lock, and testing the deadbolt's functionality.
4. Pair the Doorbell Chime
Plug in the chime and hold the volume button until you hear one beep. Press the pairing button on the chime; two beeps confirm success. Press the music note button to select ringtones and the volume button to adjust volume.
Refer to the video above from 1:10 for a visual demonstration of pairing the doorbell chime and adjusting its settings.
Ntọlite mbụ
After physical installation, proceed with the app and lock setup.
This video provides a comprehensive guide for setting up your smart lock via the mobile application.
1. Tọgharịa mkpọchi
Light up the keypad, remove the battery for 5 seconds, then reinsert. Long press the double locking button for 10-15 seconds. Enter "000#" on the keypad when prompted for the initialization passcode. The lock will announce "Deleting administrator successful" upon reset.
Refer to the video above from 0:00 for a visual guide on how to reset the smart lock to its factory settings.
2. Mepụta Akaụntụ
Download the "ICSee Home" app from Google Play (Android) or the App Store (iOS). Tap "Register" and select "United States or CA" for your region. Register using an email address or phone number to log in.
Refer to the video above from 0:14 for a visual demonstration of the steps to create a new user account within the ICSee Home application.
3. Jikọọ ekwentị gị na Smart Lock
Ensure Bluetooth is on and connected to 2.4GHz WiFi. Stand near the lock. Tap "+" in the app, select "Smart Lock" from the device list, and click to begin pairing. Tap "Start Check" to adjust the unlock direction. Enter your 2.4G WiFi username and password. Tap "Complete" to finish.
Refer to the video above from 0:27 for a visual guide on pairing your smartphone with the smart lock via Bluetooth and connecting it to your home WiFi network.
4. Set a New Admin Code
Near the lock, tap the three vertical points in the top right corner of the app. Go to "Settings" > "Device info" > "Administrator Password" > "Modify administrator password" > "Confirm" to finish.
Refer to the video above from 1:29 for a visual guide on how to change the default administrator password for your smart lock through the app settings.
5. Set Fingerprints, Passcodes, and Keyfobs
- Set a passcode: Tap "Users" > "Password" > "Generate". Set a passcode with a name and time.
- Set an IC Card: Tap "Users" > "Card" > Choose a valid time and name it > Tap "Start Adding" > Hear "Please swipe your card" > Place the IC card against number 5 on the keypad for seconds.
- Set fingerprints: Tap "Users" > "Fingerprint" > Add fingerprint > Choose a valid time and name it > Tap "Start Adding" > Hear "Please press your finger on the sensor" > Place and remove your finger from the sensor 6 times.
Refer to the video above from 2:07 for a visual guide on adding new user credentials, including passcodes, IC cards, and fingerprints, to your smart lock.
6. Authorize Family Members
Tap "My Home" > "Family Management" and choose "My Home". Tap "Invite Family Member" and choose "APP Account". Enter the member's email or mobile number. Note: The invited family member must also have an ICSee Home account.
Refer to the video above from 3:19 for a visual guide on how to authorize and add family members to your smart lock system via the ICSee Home app.
Ntuziaka ọrụ
Learn how to use the various functions of your hornbill Smart Lock.
Vidiyo a na-egosi etu esi eme ya ngwa ngwaview of the camera lock's features and operation.
Ụzọ mmeghe
- Mkpisiaka: Place your registered finger on the sensor for quick access.
- Koodu mbanye: Enter your 6-9 digit code on the keypad.
- Kaadị IC: Swipe the registered IC card over the keypad.
- Igodo Anụ ahụ: Use the provided physical key for manual override in emergencies.
- Njikwa Ime ngwa ngwa: Use the ICSee Home app to unlock remotely from your smartphone.
Doorbell Functionality
When a visitor presses the doorbell button on the lock, you will receive an alert on your phone via the app. You can then engage in two-way audio communication and decide whether to unlock the door remotely.
This image shows a user receiving a doorbell notification on their phone and interacting with the visitor via the app.
Nchọpụta ngagharị
The lock features PIR Motion Detection. Enable this feature in the app's Lock Configuration page. You can set detection distances to 1m (Short), 2m (Medium), or 3m (Long).

This image illustrates the PIR motion detection feature, showing how it can detect a person approaching the door.
Auto-Lock and One-Touch Lock
The auto-lock feature can be set to automatically lock the door after a period of 5 to 900 seconds. For immediate locking, hold the "#" key on the keypad for 2 seconds.

This image highlights the auto-lock and one-touch lock functionalities of the smart lock.
Njikwa olu
The lock supports Google Assistant and Amazon Alexa for hands-free unlocking via voice commands (requires 2.4GHz WiFi connection).

This image demonstrates the voice control feature, showing a user unlocking the door using an Alexa device.
Nlekọta na nlekọta
Njikwa batrị
The lock uses two 2500 mAh rechargeable Lithium Polymer batteries (5000 mAh total), providing approximately 120 days of use per full charge (based on 10 uses/day). You will receive a 20% low-battery alert via the app. For emergency power, a USB-C port is available to power the lock if the batteries are drained. This port is for emergency use only, not for regular charging.

This image shows the dual rechargeable batteries and their charging capabilities.

This image illustrates the emergency USB-C power backup feature for the smart lock.
Nguzogide ihu igwe
The hornbill T1-BVDHS-H Smart Lock is IP65-rated, designed to withstand temperatures from -13°F to 158°F (-25°C to 70°C), making it resistant to rain, dust, and harsh outdoor conditions.

This image visually represents the lock's durability and resistance to extreme weather conditions.
Ịchọpụta nsogbu ndị a na-ahụkarị
If you encounter any issues with your hornbill Smart Lock, refer to the following common troubleshooting steps:
- Mkpọchi anaghị aza: Check battery level. Ensure batteries are properly installed. Use the emergency USB-C port if batteries are completely drained.
- Nsogbu njikọ ngwa: Verify your phone's Bluetooth is on and the lock is within range. Ensure your home WiFi is 2.4GHz and has a stable connection. Re-pair the lock with the app if necessary.
- Incorrect unlock direction: Perform an "Unlock Direction Self-Check" in the app settings to re-configure the lock's orientation.
- Passcode/Fingerprint not working: Ensure the correct passcode is entered. For fingerprints, ensure your finger is clean and placed correctly on the sensor. Re-register fingerprints or passcodes if issues persist.
- Doorbell chime not pairing: Follow the pairing instructions carefully. Ensure the chime is plugged in and within range.
For further assistance, refer to the support contact information provided in the Warranty and Support section.
Akwụkwọ ikike na nkwado ndị ahịa
hornbill provides a 30-day return policy, 1-year part replacement warranty, and lifetime customer support.
For any inquiries or technical assistance, please contact: support@hornbilllock.com

This image depicts customer support representatives, emphasizing the availability of assistance.


