1. Okwu mmalite
The AIYIMA T20 is a fully balanced tube preamplifier designed for high-fidelity audio systems. It features an ECC83/12AX7 tube design with a 180V high-voltage circuit, offering customizable sound through swappable vacuum tubes and op-amps. The unit supports both XLR and RCA inputs and outputs, and includes a 12V trigger for system integration.
Ịdọ aka ná ntị nchekwa dị mkpa:
The AIYIMA T20 requires a dedicated DC12V power adapter. Using incompatible or higher voltage power sources will cause permanent damage to the device. Always ensure the correct power adapter is used.
2. Ihe ngwugwu
Tupu ịmalite na ntọala, biko hụ na ihe niile dị na ngwugwu ahụ:
- 1 x AIYIMA T20 Tube Preampna -emegharị ihe
- 2 x ECC83 Tubes
- 1 x DC 12V ihe nkwụnye ọkụ
- 1 x Akwụkwọ ntuziaka onye ọrụ
- 1 x kaadị ikike

Image: Contents of the AIYIMA T20 package, including the preamplifier unit, two ECC83 tubes, a DC 12V power adapter, a user manual, and a warranty card.
3. Nhazi
3.1 njirimara akụrụngwa

Foto: Zuru ezu view of the AIYIMA T20's front and rear panels, highlighting the infrared receiving window, input mode indicator light, ECC83 vacuum tubes, display screen, ON/OFF/Volume control knob, XLR outputs, RCA outputs, RCA inputs, XLR inputs, 12V trigger output, and DC12V power input.
- Ogwe ihu: Infrared Receiving Window, Input Mode Indicator Light (Red: RCA / Blue: XLR), ECC83 Vacuum Tubes, Display Screen, ON/OFF/Volume Control Knob.
- Ngbanwe azụ: XLR-R/L Audio Out, RCA-R/L Audio Out, RCA-R/L Audio In, XLR-R/L Audio In, DAC Trigger Out, AMP Trigger Out, DC12V Power Input.
3.2 Tube nwụnye
The AIYIMA T20 comes with two ECC83 tubes. Carefully insert each tube into its designated socket on the top panel of the preamplifier. Ensure the pins align correctly with the socket holes and apply gentle, even pressure until the tube is fully seated. Avoid forcing the tubes to prevent damage to the pins or sockets.

Image: A hand carefully inserting an ECC83 vacuum tube into its socket on the AIYIMA T20 preamplifier, demonstrating the tube installation process.
3.3 Njikọ ọdịyo
Connect your audio sources (e.g., CD player, streamer, DAC) to the appropriate input ports on the rear panel. Connect your amplifier or active speakers to the output ports.
- Ntinye XLR: For balanced audio sources. Connect XLR cables from your source to the XLR-R/L Audio In ports.
- Ntinye RCA: For unbalanced audio sources. Connect RCA cables from your source to the RCA-R/L Audio In ports.
- Mpụta XLR: For balanced connection to an amplifier or active speakers. Connect XLR cables from the XLR-R/L Audio Out ports.
- Mpụta RCA: For unbalanced connection to an amplifier or active speakers. Connect RCA cables from the RCA-R/L Audio Out ports.
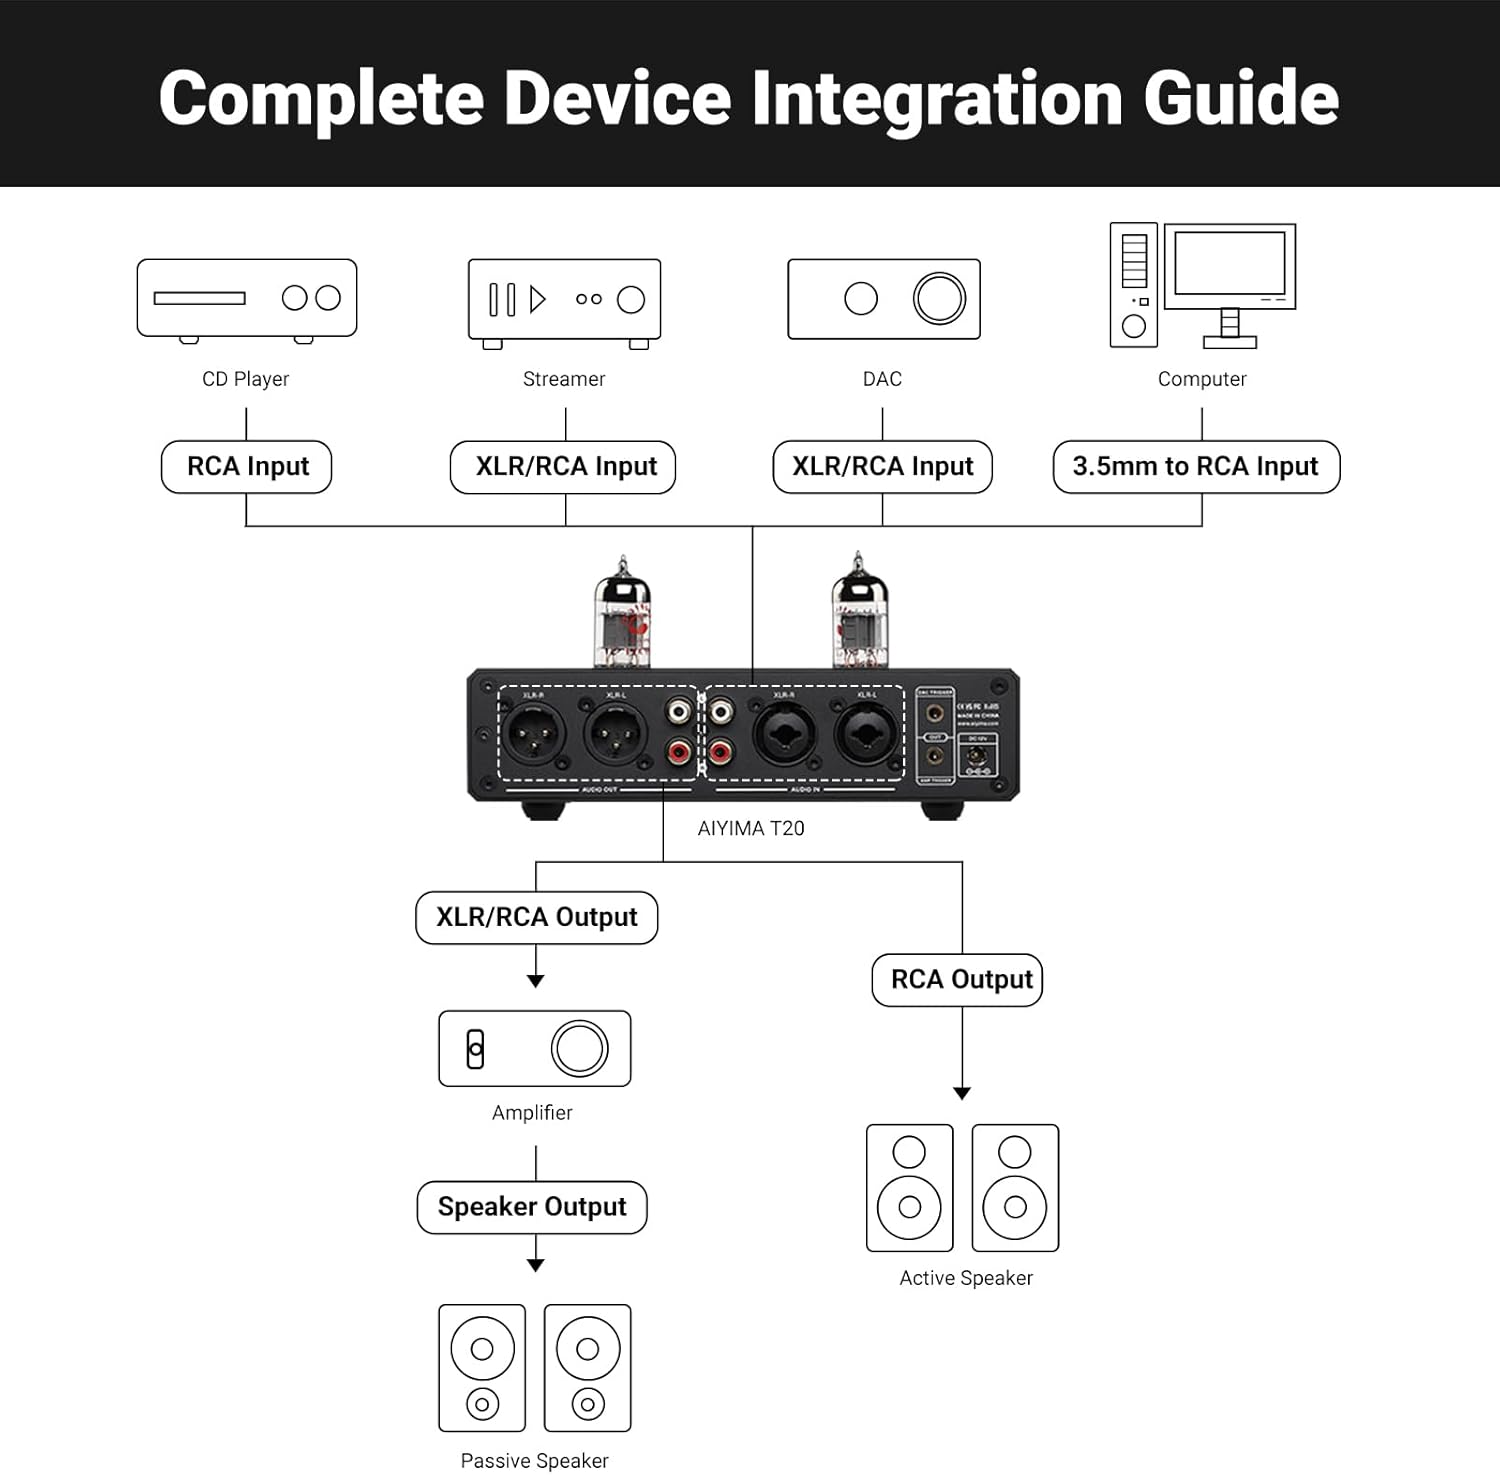
Image: A diagram illustrating various audio source connections (CD player, streamer, DAC, computer) to the AIYIMA T20's inputs, and its outputs connected to an amplifier for passive speakers or directly to active speakers.

Foto: nso nso views of the XLR output and input ports on the rear panel of the AIYIMA T20, showing the balanced connection options.
3.4 Njikọ ike
Connect the provided DC12V power adapter to the DC12V Power Input port on the rear panel of the T20, then plug the adapter into a wall outlet.

Image: A close-up of the DC12V power input port on the rear panel of the AIYIMA T20.
3.5 12V Trigger Integration
The 12V trigger allows for automated system control. Connect a 12V trigger cable from the T20's AMP TRIGGER OUT to a compatible power amplifier, or from a DAC's trigger output to the T20's DAC TRIGGER IN.

Image: A close-up of the 12V trigger input and output ports on the rear panel of the AIYIMA T20.
4. Ntuziaka ọrụ
4.1 Gbanyụọ/ Gbanyụọ na njikwa olu
The large knob on the front panel serves multiple functions:
- Mpempe akwụkwọ Na-agbanye ngwaọrụ.
- Ogologo Pịa: Na-agbanyụ ngwaọrụ ahụ.
- Tụgharịa: Na-edozi ọkwa olu.
- Pịa ugboro abụọ: Mebie ma ọ bụ mebie ụda olu.

Image: A close-up of the multi-functional volume control knob on the front panel of the AIYIMA T20.

Image: A close-up of the digital display screen on the AIYIMA T20, showing the current volume level.
4.2 Nhọrọ ọnọdụ ntinye
Press the 'MODE' button on the remote control or short press the volume knob to cycle through available input modes (RCA or XLR). The Input Mode Indicator Light on the front panel will illuminate red for RCA input and blue for XLR input.
4.3 Intelligent Soft-Start System
The T20 features a 20-second intelligent soft-start system. Upon powering on, the unit will undergo a warm-up sequence to optimize tube performance before audio output is enabled.
4.4 Ọrụ njikwa anya
The included remote control provides convenient access to various functions:
- ON / Gbanyụọ: Power on or off the unit.
- Mechie / Kpuchie: Kpochapụ ma ọ bụ mechie mmepụta ọdịyo.
- ON / OFF Display Screen: Toggles the display screen.
- MODE (Switch Input Mode): Na-agagharị site na isi mmalite ntinye.
- Volume Reduction / Volume Plus: Na-edozi ọkwa olu.

Image: The remote control for the AIYIMA T20, showing buttons for power, mute, display toggle, input mode selection, and volume adjustment.
5. Nlekọta
5.1 Tube Replacement
The ECC83 vacuum tubes are user-exchangeable, allowing for sound customization. To replace tubes, ensure the unit is powered off and disconnected from the power source. Carefully grasp the existing tube and gently pull it straight up from its socket. Insert the new compatible tube (e.g., 12AX7-S, 12AX7B, 7025, 12AX7) ensuring correct pin alignment before gently pushing it into place.
Image: A hand demonstrating the removal of a vacuum tube from the AIYIMA T20, illustrating the user-exchangeable tube feature.
5.2 Nwe-Amp Ndochi
The T20 also supports swapping op-amps for further sound customization. This procedure requires technical knowledge and should only be performed by experienced users. Ensure the unit is powered off and disconnected. Carefully remove the top cover of the unit. Locate the op-amp sockets on the PCB. Use an IC extractor tool to gently remove the existing op-amps (e.g., LME49720, OPA1612) and insert compatible replacements, paying close attention to orientation.

Image: A close-up of a replaceable op-amp chip on the circuit board of the AIYIMA T20, indicating its modular design.
5.3 Nhicha
To clean the unit, power it off and disconnect it from the power source. Use a soft, dry cloth to wipe the exterior. Avoid using liquid cleaners or abrasive materials, as these may damage the finish or internal components.
6. Nchọpụta nsogbu
| Nsogbu | Ihe nwere ike ime | Ngwọta |
|---|---|---|
| Enweghị ike | Power adapter not connected or faulty; incorrect power adapter used. | Ensure the DC12V power adapter is securely connected to both the unit and the power outlet. Verify that the correct DC12V adapter is being used. |
| Enweghị mmepụta ụda | Incorrect input selected; cables not connected properly; volume too low; unit in mute mode. | Check input selection (RCA/XLR). Verify all audio cables are securely connected. Increase volume. Ensure unit is not muted (double-click volume knob or use remote). Allow 20 seconds for soft-start warm-up. |
| Distorted or noisy sound | Loose tube or op-amp; faulty cables; interference; incorrect source signal. | Ensure tubes and op-amps are properly seated. Check audio cables for damage or loose connections. Try different cables. Ensure source signal is clean. |
| Njikwa anya anaghị arụ ọrụ | Batrị agwụla ma ọ bụ tinye ya n'ụzọ na-ezighi ezi; ihe mgbochi n'etiti remote na unit. | Replace remote control batteries. Ensure there is a clear line of sight to the infrared receiving window on the unit. |
7. Nkọwapụta
| Njirimara | Nkọwa |
|---|---|
| Nlereanya | T20 |
| Ụdị Tube | ECC83 / 12AX7 (User Swappable) |
| Ee-Amps | LME49720 & OPA1612 (User Swappable) |
| Ntinye | XLR (Balanced), RCA (Unbalanced) |
| Nsonaazụ | XLR (Balanced), RCA (Unbalanced) |
| Ratio Signal-to-Noise (SNR) | ≥112dB |
| Mgbagwoju anya Harmonic Mgbagha + mkpọtụ (THD+N) | 0.003% |
| Oke dị ike (DR) | 109dB |
| Nzaghachi ugboro ugboro | 20Hz-20kHz ± 0.2dB |
| Ntinye ike | DC12V |
| Akụkụ ngwaahịa (L x W x H) | 7.48 x 5.59 x 1.81 sentimita (190 x 142 x 46 mm) |
| Ibu Ibu | 2.2 pound (1015g) |
| Atụmatụ pụrụ iche | 180V elu-Voltage Tube Core, 12V Trigger, Intelligent Soft-Start System, All-Metal Construction |
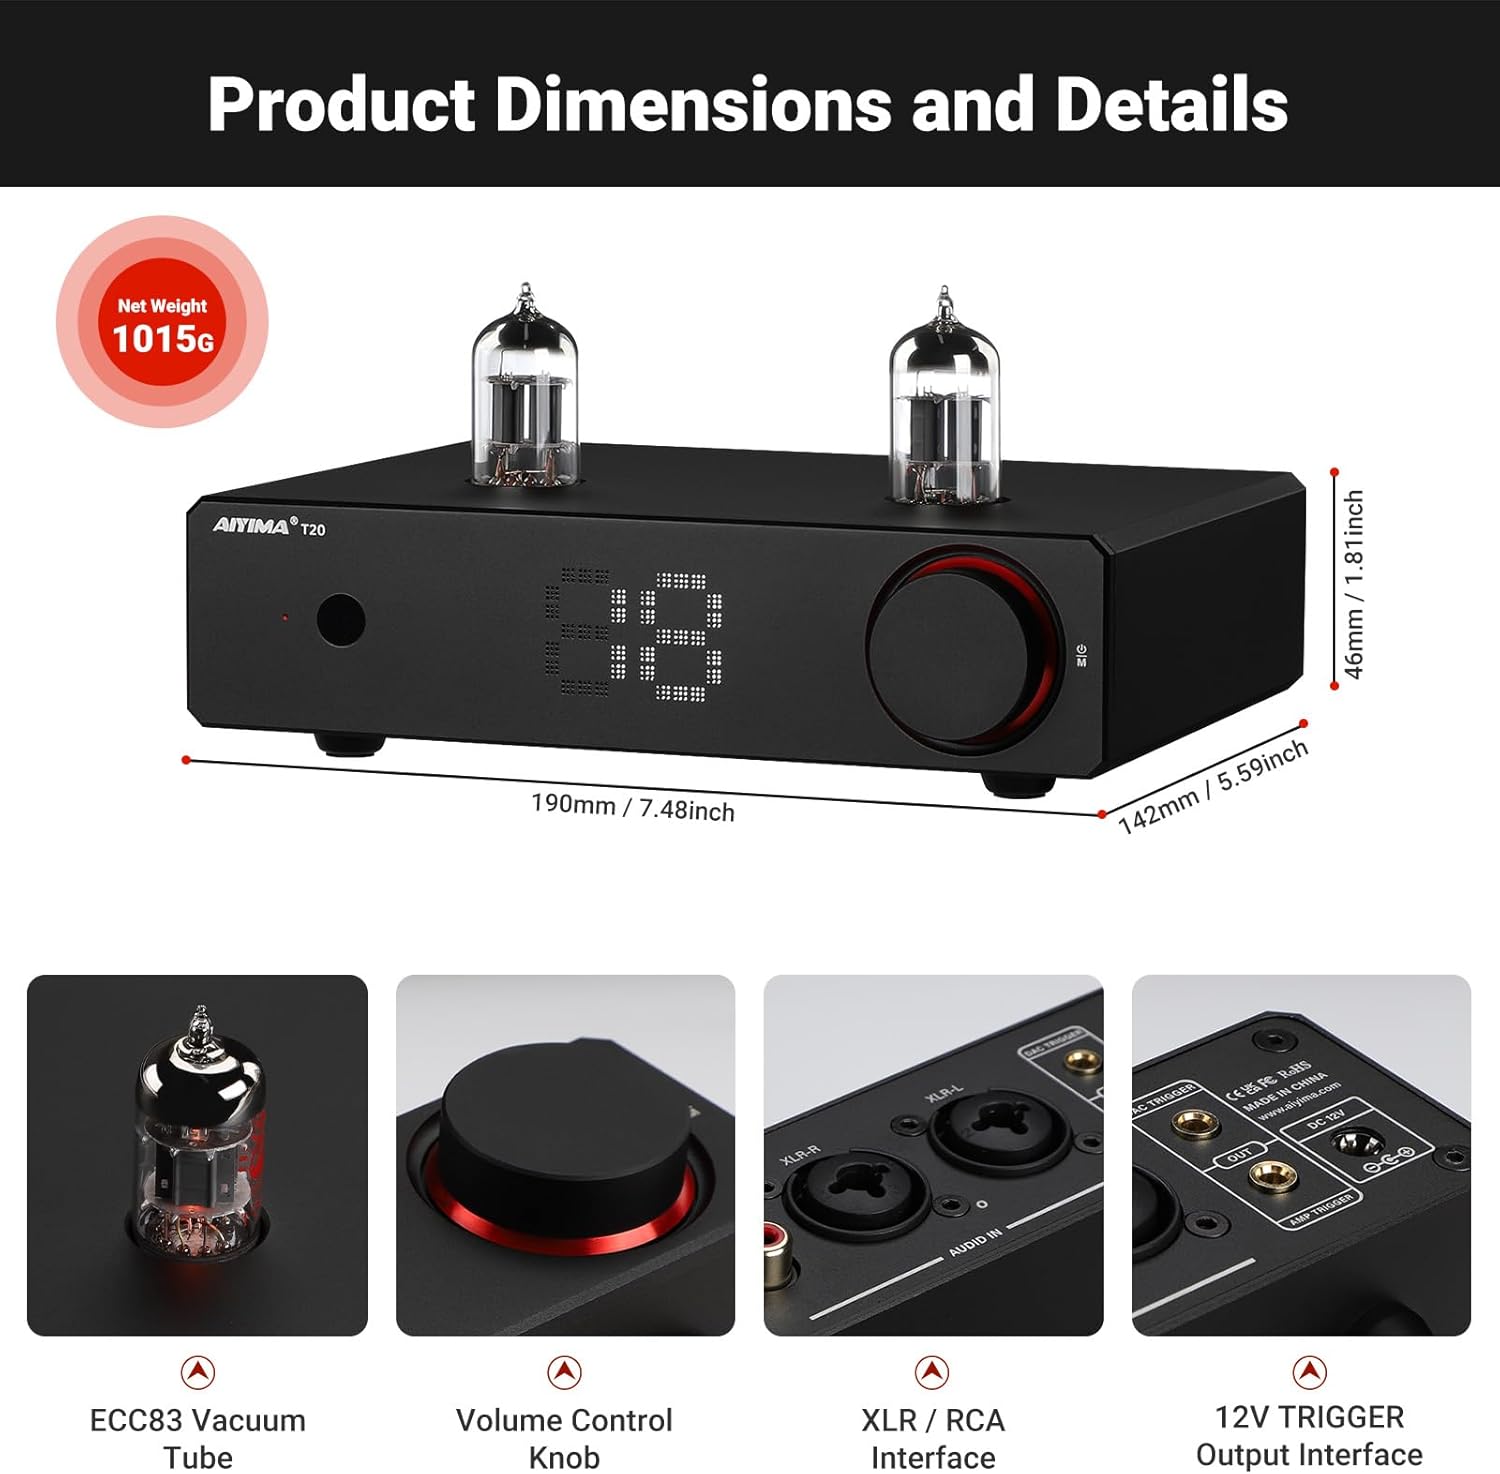
Image: Diagram showing the dimensions of the AIYIMA T20 preamplifier in millimeters and inches, along with its net weight.


Foto: Views of the AIYIMA T20's internal components, including the high-quality gold-plated PCB board, German WIMA capacitors, Japanese Nikicon capacitors, Japanese NJW1195 Volume IC, and RCA gold-plated connectors.
8. Videos ngwaahịa
AIYIMA T20 Fully Balanced Preamp gafereview
Vidiyo: Efereview of the AIYIMA T20 Fully Balanced Preampihe ngosi, ihe ngosiasinnhazi ya, atụmatụ ya, na ọrụ ya.
AIYIMA T20 Tube Pre zuru okeamp Atụmatụ
Video: A detailed look at the features of the AIYIMA T20 Fully Balanced Tube Preamplifier, including its tube design, connectivity options, and build quality.
9. Akwụkwọ ikike na nkwado
The AIYIMA T20 includes a Warranty Card. Please refer to this card for detailed information regarding warranty coverage, terms, and conditions. For technical support, service inquiries, or further assistance, please contact AIYIMA customer service through their official channels or the retailer from whom the product was purchased.


