Okwu mmalite
The JBL Horizon 3 is a versatile radio alarm clock designed to enhance your daily routine. It features clear digital audio via DAB/DAB+/FM radio and Bluetooth connectivity for streaming from smart devices. Key functions include a sunrise simulation alarm, customizable sleep mode with natural sounds, and internal memory for favorite stations. Its portable design makes it suitable for various environments, from bedside tables to outdoor settings, delivering powerful and clear JBL sound.
This manual provides essential information for setting up, operating, and maintaining your JBL Horizon 3 to ensure optimal performance and longevity.
Melite
1. Mwepu na ntinye
- Jiri nlezianya wepụ ihe niile dị na nkwakọ ngwaahịa.
- Place the JBL Horizon 3 on a stable, flat surface. Ensure adequate ventilation around the unit.
- For optimal radio reception, extend the spiral antenna fully.

Foto 1: N'ihu view of the JBL Horizon 3, displaying the time and alarm status on its digital screen.
2. Njikọ ike
- Connect the provided power cable to the power input port on the back of the unit.
- Tinye nsọtụ nke ọzọ nke eriri ọkụ n'ime oghere mgbidi.
- The device will power on automatically or can be turned on using the power button.
Onyonyo 2: N'okpuru view of the JBL Horizon 3, illustrating the power connection point and the battery compartment.
3. Initial Setup (Time and Date)
- Upon first power-on, the device may prompt you to set the time and date. Follow the on-screen instructions.
- Alternatively, use the JBL ONE application for easier configuration.
Ntuziaka ọrụ
1. Njikwa karịrịview

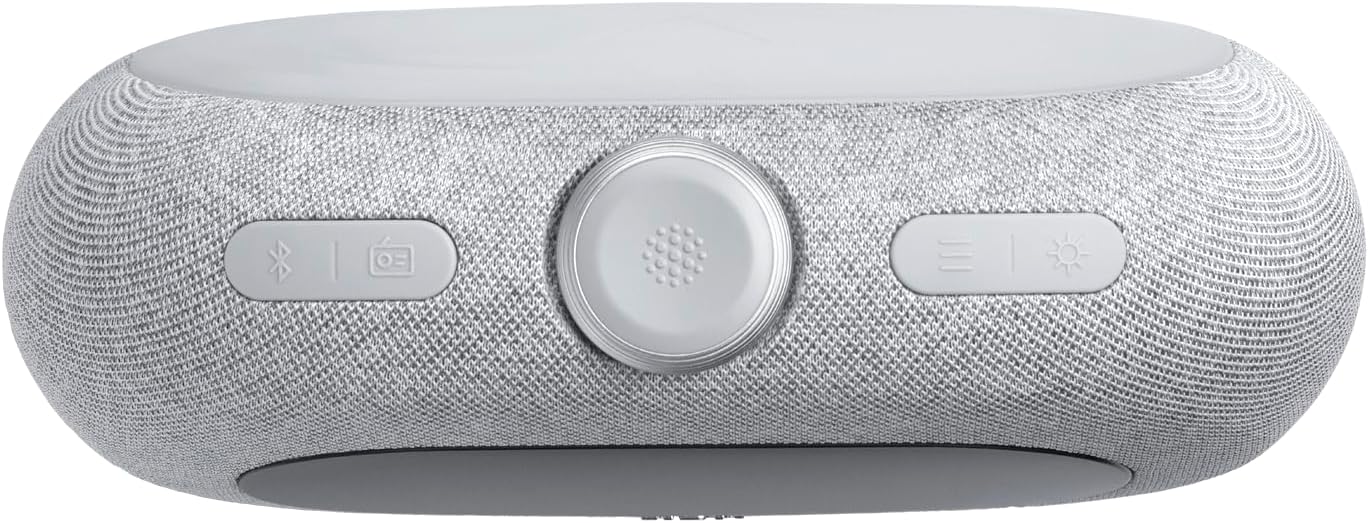
Foto 3: Top view of the JBL Horizon 3, highlighting the main controls including the rotary dial, function buttons, and alarm presets.
- Ọkpụkpọ rotary: Used for adjusting volume, navigating menus, and setting time/alarms.
- Bọtịnụ ike: Gbanyụọ/gbanyụọ unit
- Bọtịnụ Bluetooth: Na-eme ka ọnọdụ njikọta Bluetooth rụọ ọrụ.
- Radio Button (DAB/FM): Toggles between DAB and FM radio modes.
- Bọtịnụ ọkụ ambient: Controls the ambient light settings.
- Alarm Presets (1, 2, 3): Quick access to saved alarm settings.
2. Radio Operation (DAB/DAB+/FM)
- Pịa Redio button to switch between DAB/DAB+ and FM modes.
- In DAB mode, the device will automatically scan for available stations. Use the rotary dial to browse.
- In FM mode, use the rotary dial to tune to a specific frequency or press the scan buttons to find the next available station.
- To save a favorite station, long-press one of the numbered preset buttons (1-3).
3. Bluetooth gụgharia
- Pịa Bluetooth button to enter pairing mode. The display will show "Pairing".
- On your smart device, enable Bluetooth and select "JBL Horizon 3" from the list of available devices.
- Once connected, you can stream audio from your device to the JBL Horizon 3.
4. Ntọala mkpu
- Pịa otu n'ime Ntọala oti mkpu buttons (1-3) to configure an alarm.
- Use the rotary dial to set the alarm time, alarm source (radio, natural sound, Bluetooth), and volume.
- Enable the sunrise simulation feature for a gradual wake-up experience.
- To snooze, press the rotary dial when the alarm sounds.
5. Sleep Mode and Ambient Light
- Activate sleep mode to fall asleep to soothing natural sounds or a chosen radio station.
- Jiri ihe Ambient Light button to adjust the color and brightness of the integrated LED light.
- Further customization of sleep sounds and ambient light is available through the JBL ONE application.
Nlekọta
- Nhicha: Use a soft, dry cloth to clean the surface of the device. Do not use abrasive cleaners or solvents.
- Nchekwa: Mgbe ọ naghị eji ya ogologo oge, chekwaa ngwaọrụ ahụ n'ebe dị jụụ na nkụ.
- Nlekọta batrị: If the device uses an optional battery, ensure it is charged regularly to maintain its lifespan.
Nchọpụta nsogbu
- Enweghị ike: Ensure the power cable is securely connected to both the device and the wall outlet. Check if the outlet is functional.
- Nnabata redio adịghị mma: Fully extend the spiral antenna. Try repositioning the unit to improve signal strength. Perform a new station scan.
- Okwu njikọta Bluetooth: Ensure Bluetooth is enabled on your smart device and the JBL Horizon 3 is in pairing mode. Move your device closer to the Horizon 3.
- Oti mkpu na-adịghị ada: Verify that the alarm is enabled and the volume is set to an audible level. Check the alarm time.
- Display Too Bright/Dim: Adjust the display brightness settings via the device controls or the JBL ONE application.
Nkọwapụta
| Njirimara | Nkọwa |
|---|---|
| Akụkụ ngwaahịa (L x W x H) | 22.5 x 3.81 x 14.2 cm |
| Ibu | 780 grams |
| Ụdị | JBL |
| Nọmba nlereanya | Horizon 3 |
| Agba | Agba ntụ |
| Ụdị ngosi | Dijitalụ |
| Atụmatụ pụrụ iche | Display, USB Port, LED Light |
| Isi Iyi Ike | Corded Electric (with optional battery) |
| Ojiji ime ime/n'èzí | Ime ụlọ |
| Ihe onwunwe | Plastic, Metal (frame) |
| Batrị achọrọ | Ee |
| Ngwa gụnyere | 1 JBL Horizon 3 unit, 1 spiral antenna, 1 warranty card and safety instructions, 1 quick start guide, Power cables (up to 4 cables depending on regional SKUs) |
Akwụkwọ ikike na nkwado
Ozi akwụkwọ ikike
The JBL Horizon 3 comes with a 2-afọ akwụkwọ ikike. Please refer to the included warranty card and safety instructions for detailed terms and conditions.
Nkwado ndị ahịa
Maka enyemaka ọzọ, nkwado teknụzụ, ma ọ bụ akwụkwọ ikike, biko gaa na nkwado JBL gọọmentị website or contact their customer service. Contact information can typically be found in the included documentation or on the JBL brand websaịtị.


