1. Okwu mmalite
This manual provides comprehensive instructions for the safe and effective operation of your Jumper T14 2.4GHz ELRS Radio Controller. Please read this manual thoroughly before using the device to ensure proper setup, optimal performance, and to prevent damage or injury. Keep this manual for future reference.
2. Ozi nchekwa
Always operate the radio controller in a safe and responsible manner. Failure to follow safety guidelines can result in property damage, serious injury, or even death.
- gburugburu: Operate in open areas, away from people, animals, and obstacles. Avoid flying near power lines, roads, or crowded places.
- Nchekwa batrị: Use only recommended batteries. Do not overcharge or over-discharge. Store batteries in a fireproof bag.
- Nyochaa tupu ụgbọ elu: Always perform a thorough pre-flight check of your aircraft and radio controller before each use.
- Firmware: Keep your radio controller's firmware updated to the latest stable version for optimal performance and security.
- Mmiri na mmiri: Keep the radio controller away from water and high humidity.
- Ụmụaka: This product is not a toy. Keep out of reach of children under 16 years of age. Adult supervision is required for minors.
3. Ngwaahịa gafereview
The Jumper T14 is a compact and ergonomic 2.4GHz ELRS radio controller designed for FPV drones and other RC applications. It features CNC Hall Gimbals, an OLED screen, and runs on EdgeTX firmware.
3.1. Radio System Components

Foto 3.1: Detailed diagram of the Jumper T14 Radio Controller, highlighting key components and controls on the front, back, and side views. This includes switches, dials, gimbals, screen, module compartment, and charging port.
- Ogwe ihu:
- VS-M CNC Hall Gimbals: High-precision gimbals for smooth control.
- 2.42" OLED Screen: Clear display for EdgeTX interface.
- Bọtịnụ ike: For turning the unit on/off.
- Switches (2-position, 3-position): Configurable for various functions.
- Dials (S1, S2): Rotary controls for fine adjustments.
- Kpebie bọtịnụ: For adjusting stick trims.
- SYS Button: System menu access.
- PAGE Button: Ntugharị ibe.
- RTN Button: Return/back button.
- Ọkụ egosi ọnọdụ: Provide operational feedback.
- Ngbanwe azụ:
- Standard JR Module Compartment: For external RF modules.
- External Cooling Fan: Helps dissipate heat from internal components.
- Tray batrị: Na-echekwa batrị ahụ.
- Side/Top Panel:
- USB-C 10W Fast Charging Port: Maka chaja na njikọ data.
- Bọtịnụ DFU: Device Firmware Upgrade mode button.
- Trainer Port: For connecting to a simulator or another radio.
- Mgbanwe nwa oge: Spring-loaded switch.
- Latching Switch: Stays in position until toggled.
- Adjustable and Foldable Antenna: Maka nnyefe mgbaàmà.
- Reserved Antenna DIY Port: For custom antenna modifications.
- Aka nwere ike mpịaji: For portability and comfortable grip.
3.2. Key Features Visuals
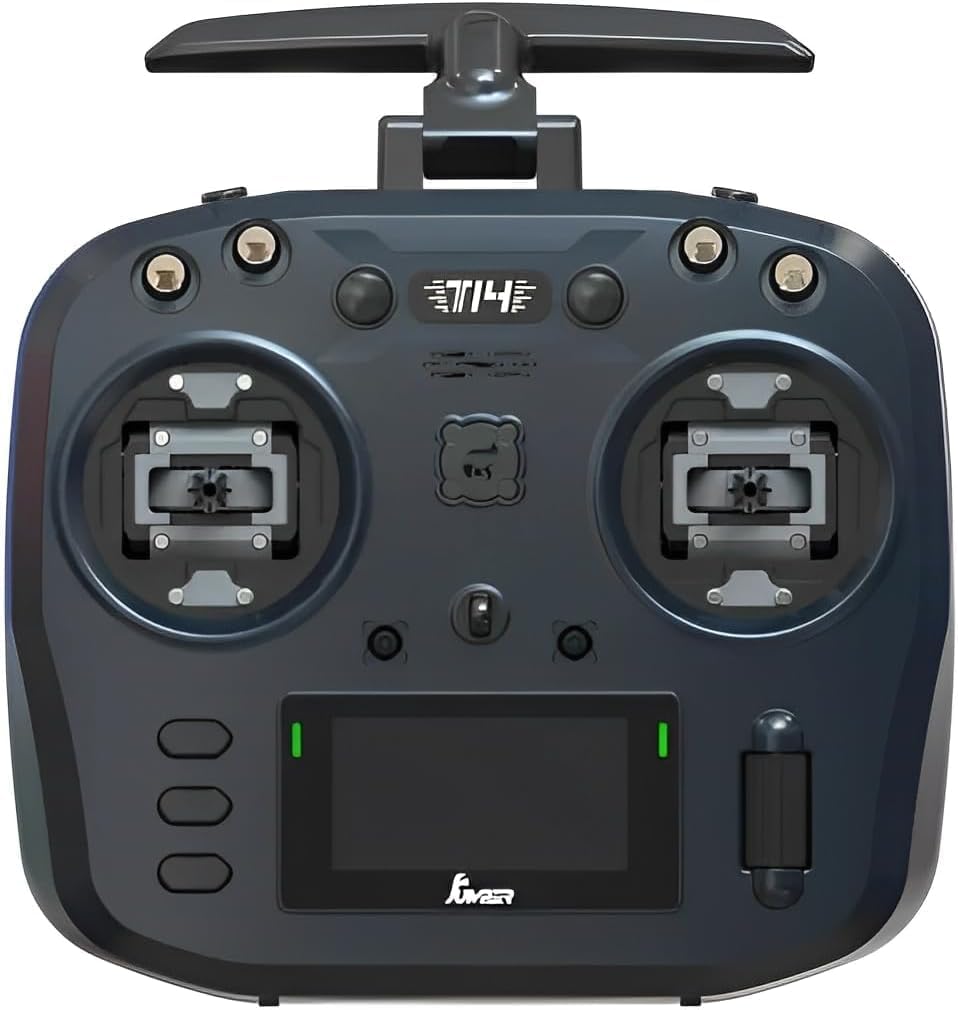
Foto 3.2: N'ihu view of the Jumper T14, showcasing the dual gimbals, OLED screen, and various control switches and dials.

Foto 3.3: N'azụ view of the Jumper T14, showing the JR module bay, cooling fan, and battery compartment cover.

Foto 3.4: Detail of the USB-C port, used for charging the internal battery and connecting to a computer for firmware updates or simulator use.

Foto 3.5: Illustration highlighting the precision CNC Hall Sensor Gimbals, which provide accurate and durable control inputs.
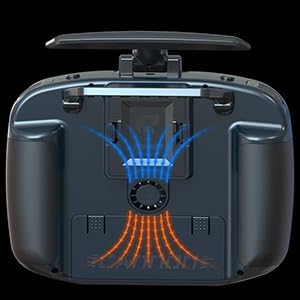
Foto 3.6: Diagram illustrating the internal cooling fan system, designed to maintain optimal operating temperatures for the internal electronics.

Foto 3.7: View of the bi-directional foldable antennas, which can be adjusted for optimal signal transmission and folded for compact storage.
4. Nhazi
4.1. Ntinye batrị na Nchaji
The Jumper T14 uses a rechargeable battery (not specified in input, assuming common RC battery types like 18650 or LiPo). Ensure the battery is fully charged before first use.
- Mepee mkpuchi nke ebe batrị dị n'azụ redio ahụ.
- Insert the battery, ensuring correct polarity if applicable.
- Mechie mkpuchi nke batrị batrị nke ọma.
- Connect the supplied USB-C cable to the USB-C port on the top of the radio and to a compatible USB power adapter (e.g., 5V/2A).
- The OLED screen or indicator lights will show charging status. Disconnect once fully charged.
4.2. Initial Power On and EdgeTX Setup
Upon first power-on, the radio will guide you through initial setup steps for the EdgeTX firmware.
- Press and hold the Power Button until the OLED screen illuminates.
- Follow the on-screen prompts to calibrate gimbals, set date/time, and configure basic radio settings.
- Navigate menus using the scroll wheel and SYS/PAGE/RTN buttons.
4.3. ELRS Binding
To bind your Jumper T14 with an ELRS receiver, follow the standard ELRS binding procedure:
- Ensure your ELRS receiver is powered on and in binding mode (typically by cycling power three times).
- On the T14, navigate to the ELRS LUA script or the internal module settings within EdgeTX.
- Select the "Bind" option. The radio will transmit a binding signal.
- Once the receiver's LED indicates a successful bind (refer to your receiver's manual), the process is complete.
5. Ntuziaka ọrụ
5.1. Njikwa ntọala
- Gimbal: Control the primary movements of your aircraft (Throttle, Rudder, Aileron, Elevator).
- Mgbanwe: Used for arming, flight modes, special functions, etc. Assign functions in EdgeTX.
- Ọkpọ oku: Typically used for fine-tuning parameters like camera tilt, gain, or volume.
- Kpebie bọtịnụ: Adjust the neutral position of the gimbals for stable flight.
5.2. Model Setup in EdgeTX
EdgeTX offers extensive customization for different models. Refer to the official EdgeTX documentation for detailed instructions on advanced model setup.
- From the main screen, press the SYS button to enter the System menu.
- Navigate to "Model Select" or "Model Setup" to create a new model or edit an existing one.
- Configure internal or external RF module settings (e.g., ELRS protocol, power output).
- Set up mixes, inputs, outputs, and special functions according to your aircraft's requirements.
6. Nlekọta
- Nhicha: Use a soft, dry cloth to clean the radio controller. Avoid abrasive cleaners or solvents.
- Nchekwa: Store the radio in a cool, dry place, away from direct sunlight and extreme temperatures. Remove the battery if storing for extended periods.
- Mmelite femụwe: Regularly check for and install the latest EdgeTX firmware updates from the official EdgeTX websaịtị (www.edgetx.org) to ensure optimal performance and access to new features.
- Gimbal Care: The CNC Hall Gimbals are durable, but avoid excessive force or impact. Keep them free from dust and debris.
7. Nchọpụta nsogbu
| Nsogbu | Ihe nwere ike ime | Ngwọta |
|---|---|---|
| Redio anaghị agbanye ọkụ. | Batrị dị ala ma ọ bụ nke nwụrụ anwụ; ntinye batrị na-ezighi ezi. | Charge the battery; ensure battery is correctly installed with proper polarity. |
| No signal to receiver. | Not bound; incorrect ELRS settings; antenna issue. | Perform binding procedure; verify ELRS protocol and power settings in EdgeTX; check antenna connection. |
| Gimbals not responding correctly. | Needs calibration; physical obstruction. | Recalibrate gimbals via EdgeTX system menu; check for debris around gimbals. |
| Ihuenyo ahụ tọgbọ chakoo ma ọ bụ kpọnwụrụ akpọnwụ. | Firmware issue; system crash. | Try restarting the radio. If persistent, attempt DFU mode and reflash firmware. |
8. Nkọwapụta
| Njirimara | Nkọwa |
|---|---|
| Akụkụ ngwaahịa | 9 x 6 x 1.5 sentimita asatọ |
| Ibu Ibu | 14.4 ounces |
| ASIN | B0F9WQSDGF |
| Onye nrụpụta tụrụ aro afọ | Afọ 16 na karịa |
| Onye nrụpụta | jumper |
| Gimbal | CNC Hall Sensor Gimbals |
| Modul RF | Built-in 2.4GHz ELRS |
| Ngosipụta | Ihuenyo OLED 2.42" |
| Firmware | EdgeTX |
| Ịchaji | USB-C 10W Fast Charging |
9. Akwụkwọ ikike na nkwado
For warranty information and technical support, please refer to the official ARRIS websaịtị ma ọ bụ kpọtụrụ ndị ahịa ha ozugbo. Debe ihe akaebe nke ịzụrụ ihe maka akwụkwọ ikike.
Onye nrụpụta: jumper
Akara: ARRIS
Nkwado n'ịntanetị: Visit the ARRIS official website for FAQs, firmware downloads, and contact information. ARRIS Store on Amazon


