1. Okwu mmalite
This manual provides detailed instructions for the safe and efficient use of your Rfiver Mobile TV Stand with Power Outlet, Model B0F89BJFHH. Please read this manual thoroughly before assembly and operation to ensure proper setup and to prevent damage or injury. Keep this manual for future reference.
2. Akụrụngwa Ngwaahịa
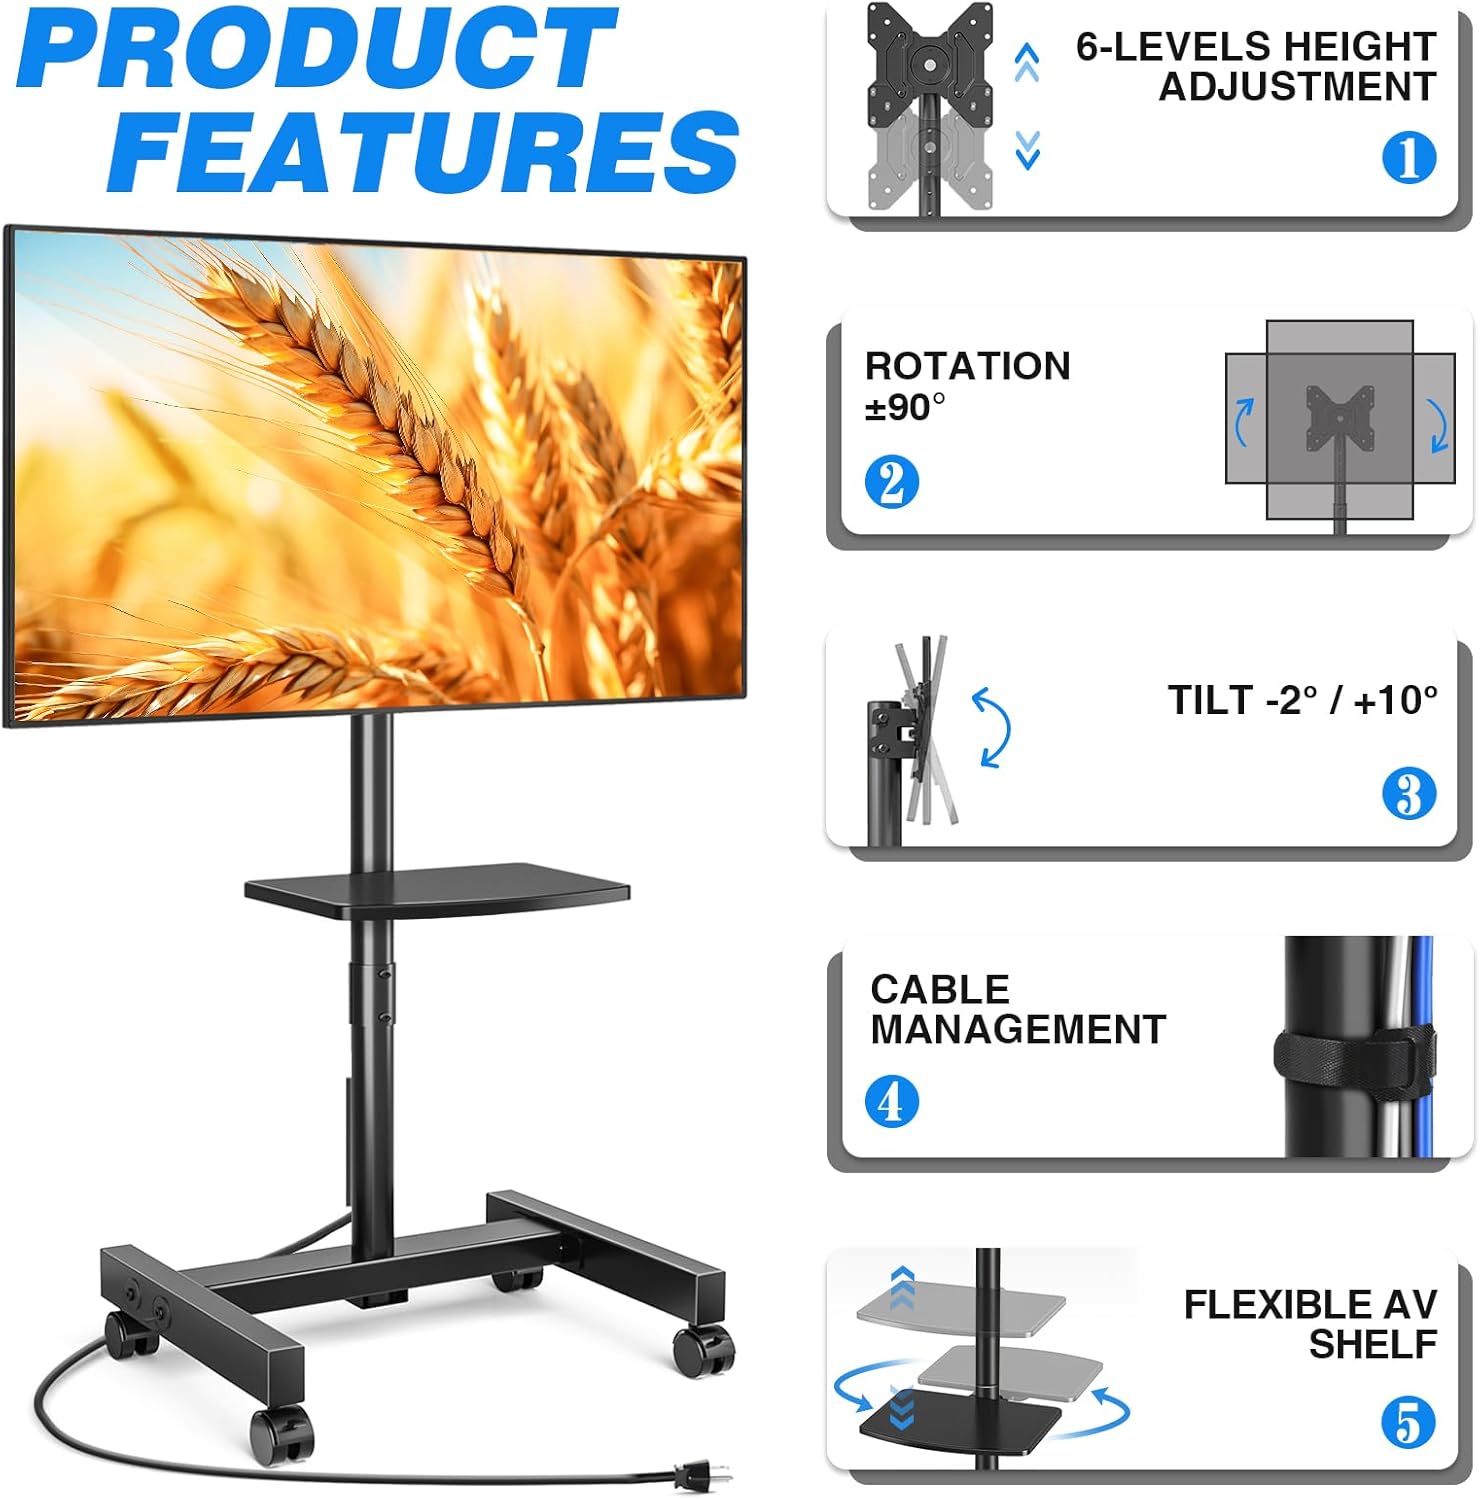
The Rfiver Mobile TV Stand is designed for versatility and convenience, offering a range of features to enhance your viewahụmahụ.
- Ndakọrịta sara mbara: Supports most 13-50 inch LCD/LED/OLED Flat/Curved screens or monitors with a maximum load capacity of 55 lbs. Compatible with VESA mounting patterns from 75x75mm to 200x200mm.
- Njikọ Ike Agbakwunyere: Features a built-in power strip with 4 AC outlets (120V/12A) and a 6.5-foot heavy-duty extension cord. Includes a one-touch power switch for electrical safety.
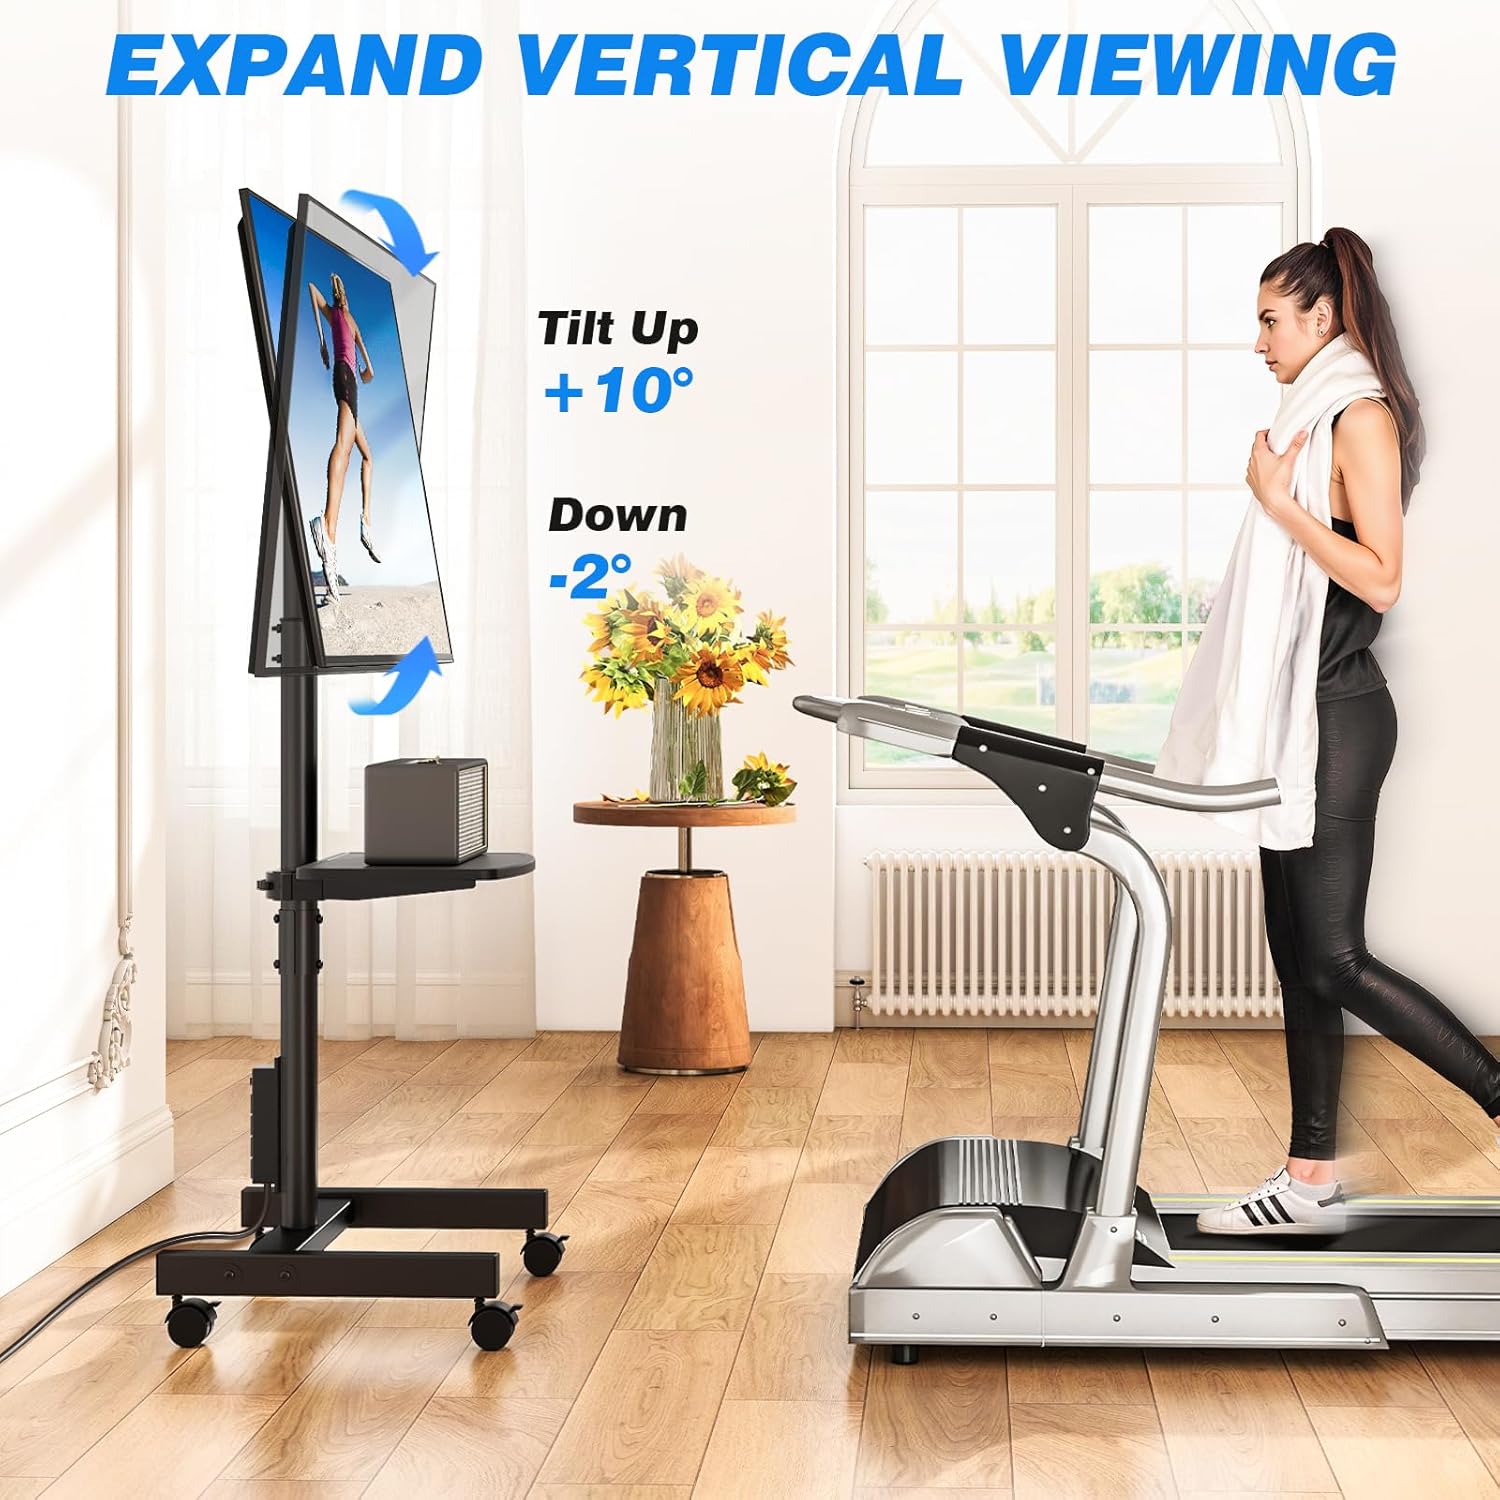
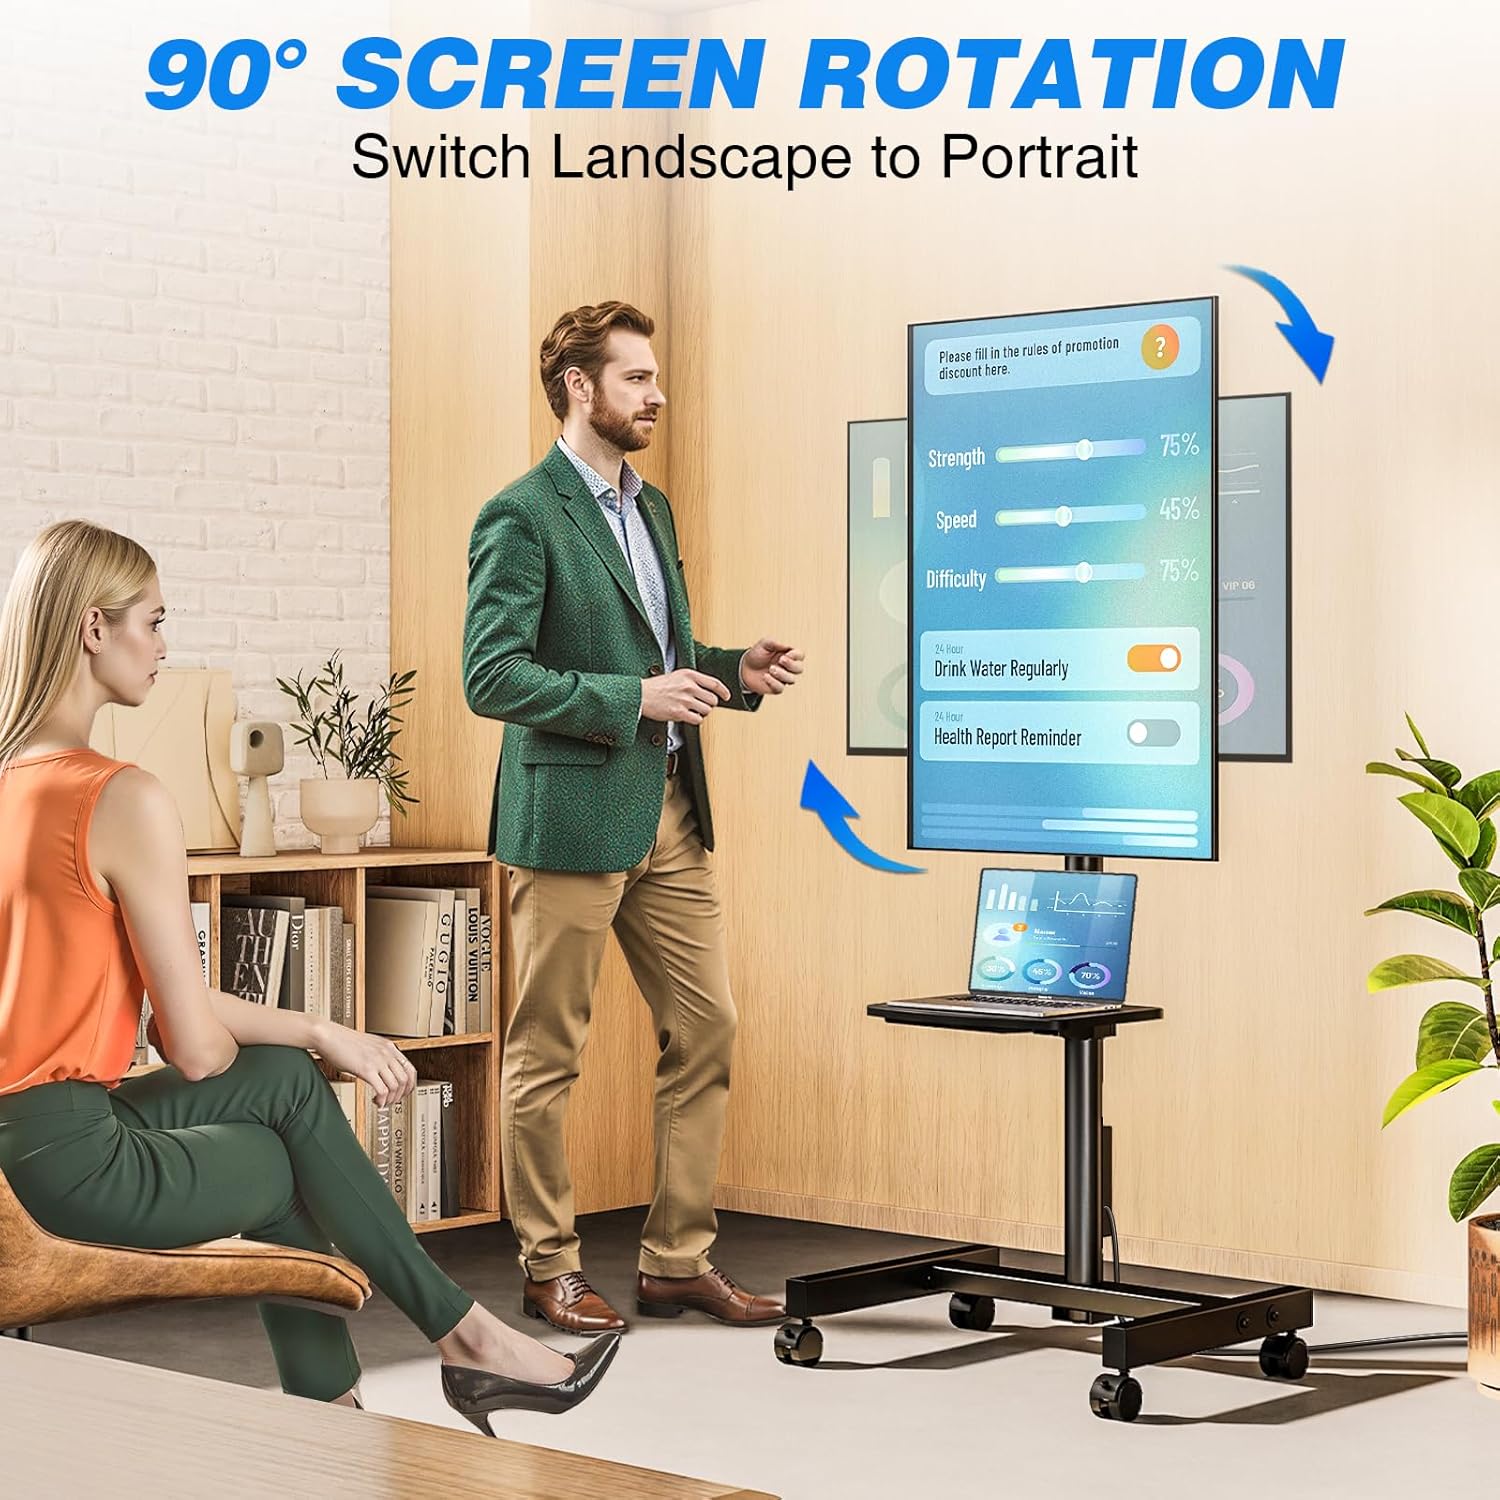
- Ndozi akụkụ na-agbanwe agbanwe: Allows TV rotation between portrait and landscape modes (90 degrees). Tilt angle adjustment from +10° to -2° for optimal viewing.
- Ndozi elu: Offers 6 levels of height adjustment to position the screen at eye level.
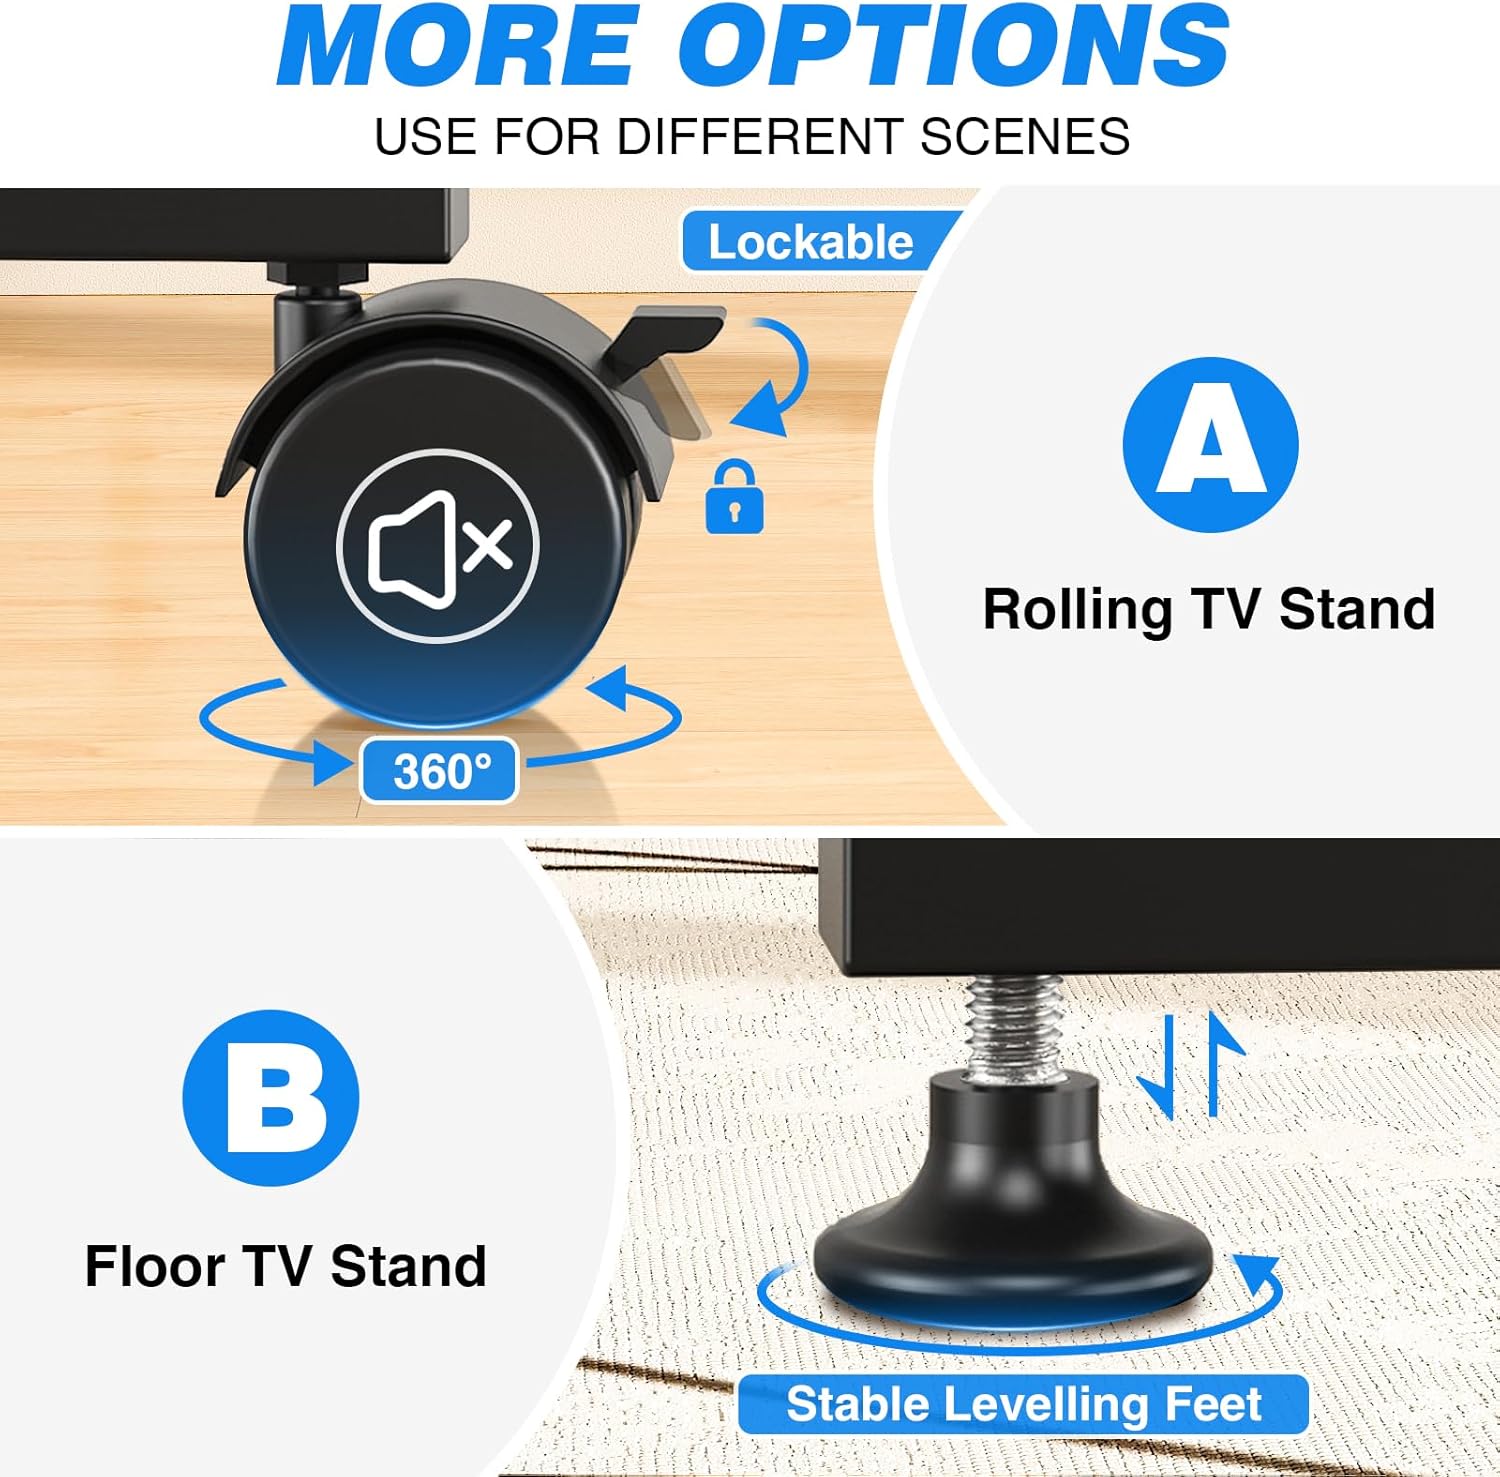
- Mobile or Fixed Use: Comes with both 360° rotating lockable castors for easy mobility and adjustable feet for stable, stationary use on various surfaces.
- Ichekwa oghere: Compact design allows placement close to walls or behind furniture. Integrated cable management system keeps wires organized.
- Adjustable Media Shelf: Includes a shelf for media devices or accessories.
Njirimara karịrịview
Ọwa Ike Agbakwunyere

Enwere ike idozi Viewna akụkụ
Nhọrọ ngagharị
Product Dimensions and VESA Compatibility
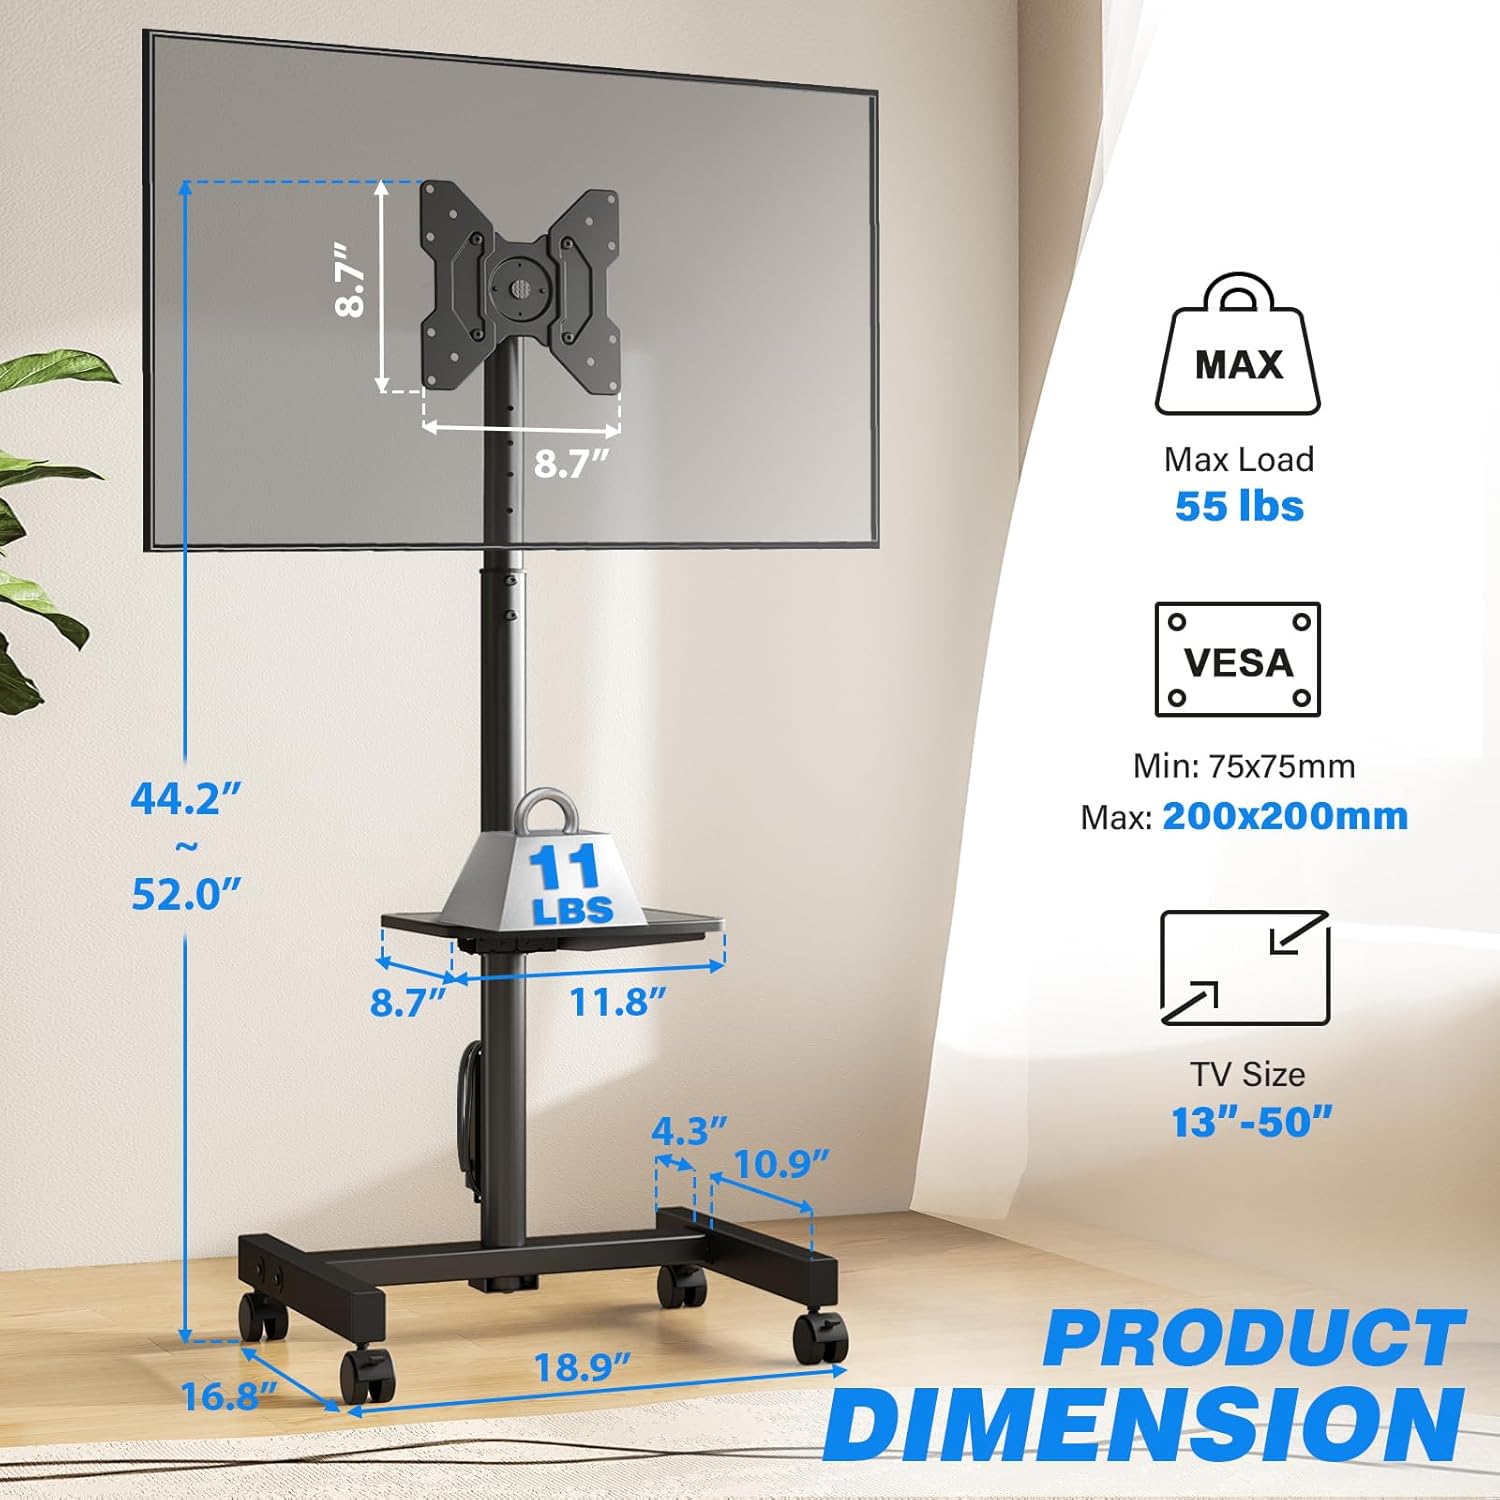
Oke ndozi ịdị elu

Video ngwaahịa
Vidiyo a na-enye nkọwa zuru okeview of the Rfiver Rolling TV Stand's features, including height adjustment, adjustable storage shelf, 90-degree vertical assembly, tilt functionality, cable management, integrated power outlet, and VESA compatibility.
3. Nkọwapụta
| Njirimara | Uru |
|---|---|
| Ụdị | Rfiver |
| Nọmba nlereanya | B0F89BJFHH |
| Ibu Ibu | 12.45 pound |
| Akụkụ ngwaahịa | 18.8 x 16.8 x 52 sentimita asatọ |
| Agba | Nwa |
| Ihe onwunwe | Ọla |
| Ụdị nkwụnye | Ala Ugwu |
| Ụdị mmegharị | Tugharia |
| Ngwa dakọtara | Nyochaa, Television |
| Oke Tilt Angle | +10°/-2° |
| Ndakọrịta nha TV | 13-50 sentimita asatọ |
| Oke Ibu Ibu | 55 n'arọ |
| Ndakọrịta VESA | 75x75mm ruo 200x200mm |
| Ọpụpụ Ike | 4 AC outlets (120V/12A), 6.5ft cord |
4. Ozi nchekwa
Biko debe ihe nchekwa nchekwa ndị a iji gbochie mmerụ ahụ ma ọ bụ mebie ngwaahịa a:
- Agafela ikike ibu kacha nke 55 lbs (25 n'arọ).
- Ensure your TV's VESA mounting pattern is within the supported range (75x75mm to 200x200mm).
- Always follow assembly instructions carefully. Incorrect assembly can lead to product failure.
- Distribute weight evenly on the media shelf. Do not overload.
- When moving the stand, ensure all wheels are unlocked. Lock wheels when the stand is in its desired position to prevent accidental movement.
- Debe ụmụaka na anụ ụlọ n'ebe kwụ n'oge mgbakọ na mgbanwe.
- Agbalịla ịgbanwe ngwaahịa ahụ. Mgbanwe ọ bụla nwere ike imebi akwụkwọ ikike ahụ ma mepụta ihe egwu nchekwa.
- Ensure the power outlet is properly grounded and rated for the connected devices. Do not exceed the power strip's electrical limits (120V/12A).
5. Ihe ngwugwu
Before beginning assembly, verify that all parts are present and undamaged. Refer to the included assembly instructions for a complete list of components and hardware.
- TV Stand Base (with pre-installed power outlet)
- Vertical Support Pole
- Ihe nrịbama TV
- Adjustable Media Shelf
- Set of 360° Rotating Lockable Castors
- Set of Adjustable Leveling Feet
- Hardware Kit (screws, washers, spacers for TV mounting and stand assembly)
- Ngwa Mgbakọ (dịka ọmụmaatụ, Allen wrench, wrench mepere emepe)
- Akwụkwọ ntuziaka onye ọrụ
6. Ntuziaka Mgbakọ
Assembly typically requires two people. Follow the step-by-step instructions provided in the separate assembly guide included with your product. Ensure all connections are secure before mounting your TV.
- Bupụ ma nyochaa: Carefully unpack all components and compare them against the parts list in your assembly guide.
- Kpọkọta ntọala: Attach the vertical support pole to the base. Decide whether to install the lockable castors for mobility or the adjustable leveling feet for a stationary setup.
- Install Media Shelf: Secure the adjustable media shelf to the vertical support pole at your desired height.
- Tinye eriri igwe onyonyo: Secure the TV mounting brackets to the back of your television using the appropriate screws, washers, and spacers from the hardware kit. Ensure VESA compatibility.
- Wụnye TV ahụ: Carefully lift and attach the TV (with brackets) to the main mounting plate on the stand. Secure it according to the assembly guide.
- Njikwa USB: Route all cables through the integrated cable management system to maintain a tidy appearance.
Note: Detailed diagrams and specific hardware identifiers are found in the dedicated assembly manual.
7. Ntuziaka ọrụ
7.1 Na-edozi ịdị elu
The TV stand offers 6 levels of height adjustment. To adjust the height:
- Loosen the locking mechanisms on the vertical support pole.
- Carefully raise or lower the TV to the desired viewelu elu.
- Securely tighten all locking mechanisms to prevent the TV from slipping.
7.2 Tilting the TV
The TV mount allows for a tilt range of +10° (up) to -2° (down).
- Locate the tilt adjustment knobs or bolts on the TV mounting bracket.
- Loosen them slightly.
- Adjust the TV to your preferred tilt angle.
- Tighten the knobs/bolts firmly to secure the TV in place.
7.3 Rotating the TV (Portrait/Landscape)
The TV can be rotated 90 degrees to switch between portrait and landscape orientations.
- Ensure there is sufficient clearance around the TV to rotate it without hitting obstacles.
- Carefully rotate the TV to the desired orientation.
- The mount is designed to hold the TV securely in both positions.
7.4 Using the Integrated Power Outlet
The stand includes a power strip with 4 AC outlets.
- Plug the stand's 6.5-foot power cord into a wall outlet.
- Connect your TV and other media devices to the 4 AC outlets on the power strip.
- Use the one-touch power switch to turn the power strip on or off, conserving energy when devices are not in use.
7.5 Moving the Stand (with Castors)
If you have installed the lockable castors:
- Ensure all castor locks are disengaged before moving.
- Gently push the stand to its new location.
- Once in position, engage all castor locks to prevent unwanted movement.

8. Nlekọta
- Nhicha: Jiri nwayọ hichaa ihe nkwụnye ahụ, damp akwa . Zere ihe nhicha ma ọ bụ ihe mgbaze nke nwere ike imebi njedebe.
- Nyochaa ngwaike: Periodically check all bolts and screws to ensure they remain tight and secure. Retighten as necessary.
- Njikwa USB: Ensure cables are neatly routed and not pinched or stressed.
- Castors/Feet: If using castors, keep them free of debris. If using leveling feet, ensure they are stable and adjusted correctly.
9. Nchọpụta nsogbu
| Nsogbu | Ihe nwere ike ime | Ngwọta |
|---|---|---|
| TV is not stable/wobbles | Loose bolts; uneven floor; overloaded. | Check and tighten all assembly bolts. Ensure the stand is on a level surface. If using leveling feet, adjust them. Do not exceed weight capacity. |
| TV cannot be tilted/rotated | Locking mechanisms are too tight; obstruction. | Loosen tilt/rotation bolts slightly. Check for any cables or objects obstructing movement. |
| Igwe ọkụ anaghị arụ ọrụ | Stand's power cord unplugged; power switch off; circuit breaker tripped. | Ensure the stand's power cord is securely plugged into a live wall outlet. Press the one-touch power switch on the power strip. Check your home's circuit breaker. |
| Stand is difficult to move (with castors) | Castor locks engaged; debris in castors. | Disengage all castor locks. Clean any hair or debris from the castor wheels. |
10. Akwụkwọ ikike na nkwado
Rfiver products are designed for durability and performance. For warranty information, technical support, or to order replacement parts, please refer to the warranty card included with your product or visit the official Rfiver website. Please have your model number (B0F89BJFHH) ready when contacting support.
Ozi mkpọtụrụ:
- Websaịtị: Rfiver Official Store on Amazon
- Email: Refer to product packaging or official website for customer service email.


