1. Okwu mmalite
This manual provides detailed instructions for the installation, operation, maintenance, and troubleshooting of your GIGABYTE B550M Gaming X WIFI6 AMD AM4 mATX Motherboard. Please read this manual thoroughly before beginning installation to ensure proper setup and optimal performance.

Figure 1: GIGABYTE B550M Gaming X WIFI6 Motherboard Overview
2. Nhazi
Ihe ngwugwu 2.1
Before proceeding, verify that all items are present in your motherboard package:
- GIGABYTE B550M Gaming X WIFI6 Motherboard
- SATA Cable
- Magnetic WiFi Antenna
- Ntuziaka ntinye ọtụtụ asụsụ
- Motherboard Driver CD/USB (if included)
Video 1: GIGABYTE B550M Gaming X WIFI6 Unboxing. This video demonstrates the contents of the motherboard package and initial handling.
2.2 Motherboard Layout and Connectors
Familiarize yourself with the motherboard's layout and various connectors before installation.

Foto 2: Nhazi nke ihe eji arụ ọrụ na motherboard
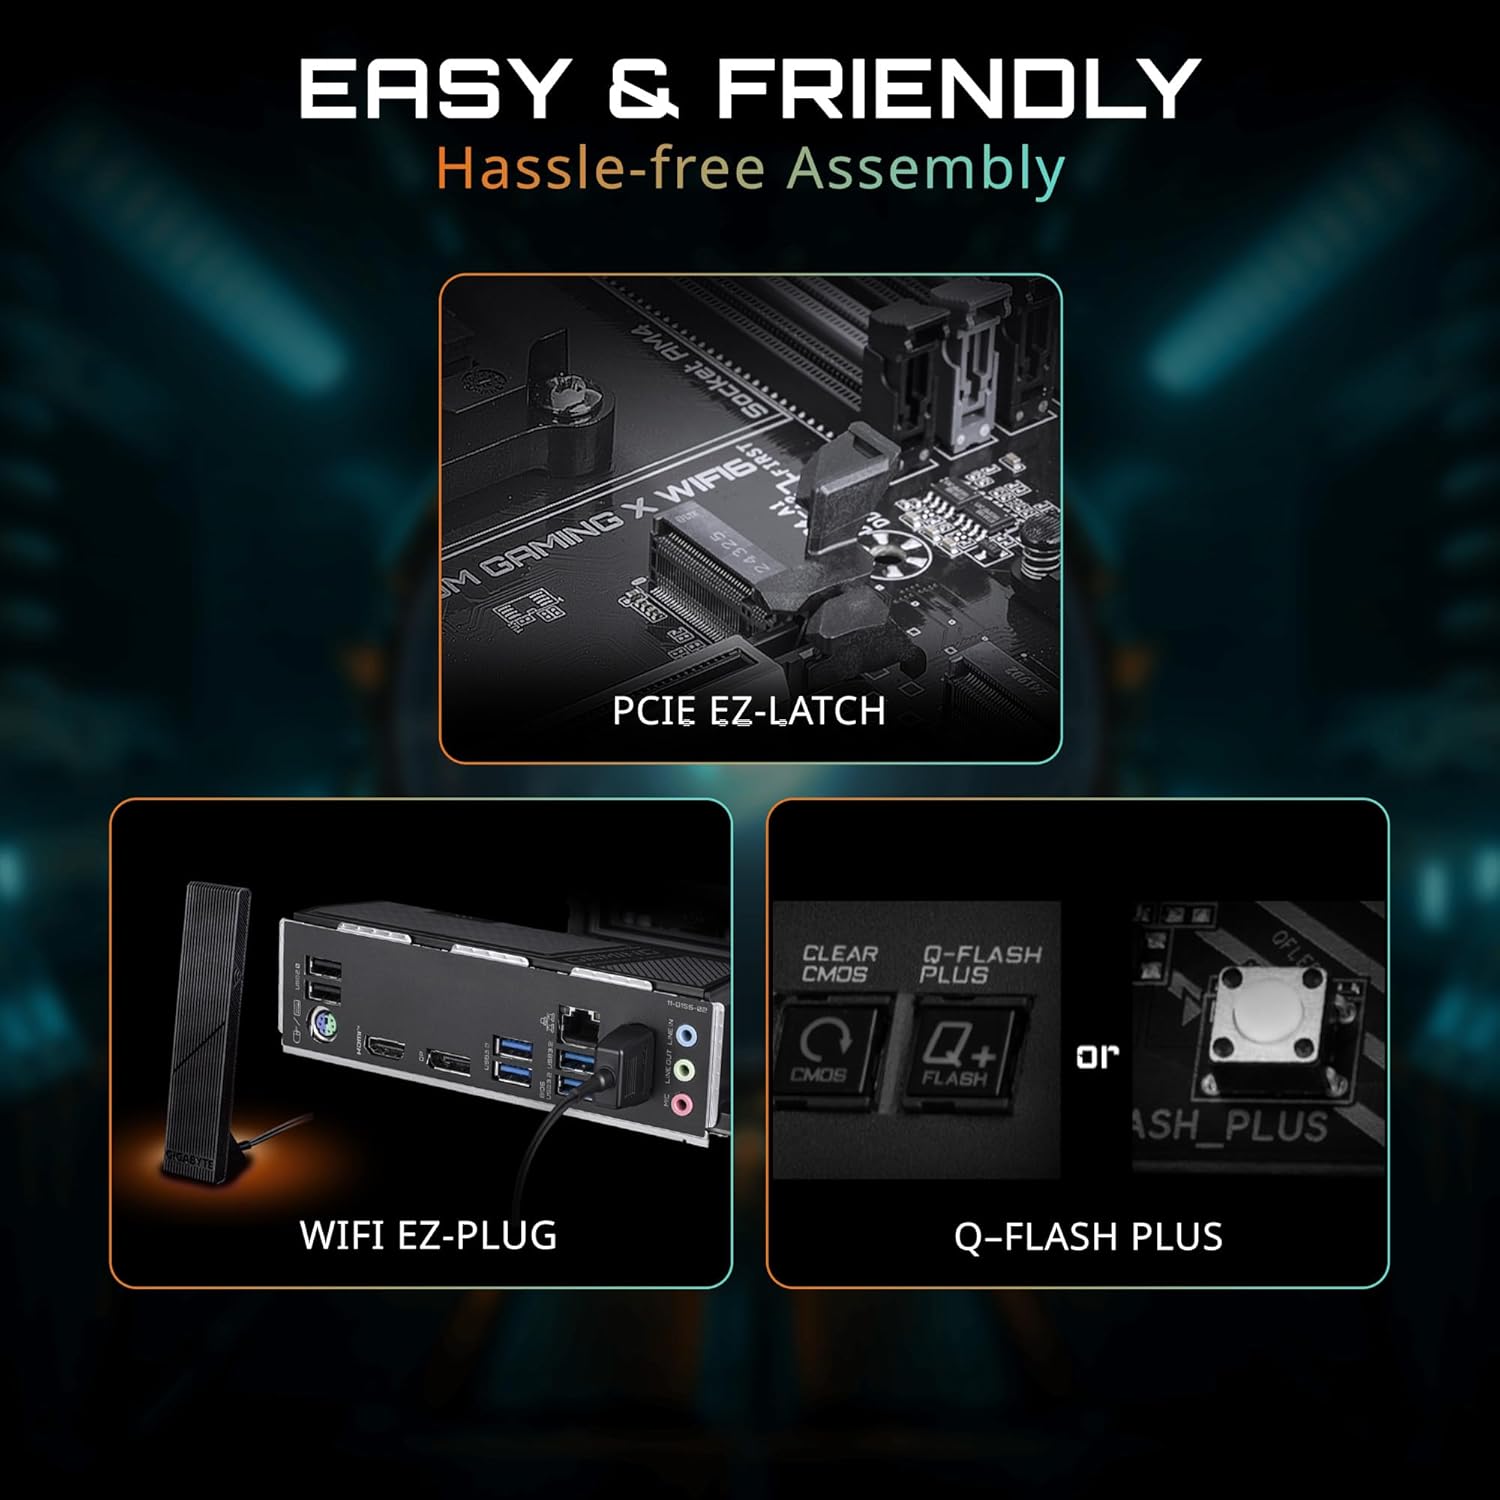
Foto 3: Ogwe I/O nke dị n'azụ
2.3 Ntinye akụrụngwa
Follow these steps for installing essential components:
- Nwụnye CPU: Carefully open the CPU socket lever. Align the triangular mark on the CPU with the mark on the socket. Gently place the CPU into the socket without force. Close the lever to secure the CPU.
- Nwụnye CPU cooler: Wụnye ngwa nju oyi CPU gị dịka ntuziaka onye nrụpụta ya siri dị. Gbaa mbọ hụ na ngwa mado ọkụ kwesịrị ekwesị.
- Nwụnye RAM (Ebe nchekwa): Open the clips on the DDR4 memory slots. Align the notch on the memory module with the key in the slot. Press down firmly on both ends of the module until the clips snap into place. For dual-channel performance, refer to your motherboard manual for specific slot pairing.
- Nwụnye M.2 SSD: Locate the M.2 slots. Remove the M.2 screw/standoff. Insert the M.2 SSD at an angle into the slot. Push it down gently and secure it with the screw/standoff. The motherboard features PCIe EZ-Latch for tool-less M.2 installation.
- Nwụnye kaadị eserese (PCIe): Open the retention clip on the PCIe 4.0 x16 slot. Align your graphics card with the slot and press down firmly until it is seated. The PCIe EZ-Latch simplifies removal. Secure the card to your chassis with screws.
- Ntinye Ngwaọrụ SATA: Connect SATA data cables from your storage devices (HDDs/SSDs) to the SATA ports on the motherboard. Connect SATA power cables from your power supply to the devices.
- Njikọ nnweta ike: Connect the 24-pin ATX power connector and the 8-pin (or 4+4-pin) CPU power connector from your power supply to the corresponding ports on the motherboard.
- Njikọ Paferent: Connect the power button, reset button, HDD LED, power LED, and front panel USB/audio headers to their respective pins on the motherboard. Refer to the motherboard manual for pin assignments.
- WiFi Antenna Connection: Screw the magnetic WiFi antenna onto the designated connectors on the rear I/O panel. The WiFi EZ- nkwụnye design ensures easy connection.

Figure 4: Easy Assembly Features (PCIe EZ-Latch, WiFi EZ-Plug, Q-Flash Plus)
3. .rụ ọrụ
3.1 Boot mbụ na ntọala BIOS
After assembling your system, connect a monitor, keyboard, and mouse. Power on your PC. Press the designated key (usually DEL or F2) during startup to enter the BIOS/UEFI setup. Here you can configure boot order, system time, and other advanced settings. The motherboard supports Q-Flash Plus for BIOS updates without a CPU, memory, or graphics card installed.
3.2 Nwụnye ọkwọ ụgbọala
Once your operating system is installed, install the necessary drivers for your motherboard components. These can typically be found on the included driver CD/USB or downloaded from the official GIGABYTE website. Essential drivers include chipset, LAN, audio, and Wi-Fi drivers.
3.3 Ngwa ngwa
GIGABYTE provides various software utilities to enhance your user experience:
- Ngwakọta RGB: Customize the RGB lighting effects on your motherboard and connected compatible devices.
- Smart fan 6: Monitor and control your system's fan speeds and temperatures for optimal cooling and noise levels.
- App Center: A centralized platform to manage and update GIGABYTE utilities and drivers.
Video 2: GIGABYTE B550 Motherboards - OverviewVidiyo a na-enye nkọwa zuru okeview of the features and capabilities of GIGABYTE B550 series motherboards.
4. Nlekọta
Regular maintenance helps ensure the longevity and stable performance of your motherboard.
- Nhicha: Periodically clean dust from your PC case and motherboard components using compressed air. Ensure the system is powered off and unplugged before cleaning. Avoid using liquids.
- Mmelite BIOS: Lelee GIGABYTE website for the latest BIOS updates. BIOS updates can improve compatibility, stability, and performance. Use the Q-Flash or Q-Flash Plus utility for safe updating.
- Mmelite ọkwọ ụgbọala: Keep your drivers updated to ensure optimal performance and compatibility with new software and hardware. Download drivers only from the official GIGABYTE websaịtị.
5. Nchọpụta nsogbu
Ọ bụrụ na ị na-enwe nsogbu na motherboard gị, tụlee usoro nchọpụta nsogbu ndị a:
- Enweghị ike/enweghị buut:
- Check all power connections (24-pin ATX, 8-pin CPU, GPU, SATA).
- Gbaa mbọ hụ na agbanyere ọkụ ọkụ.
- Try booting with minimal components (CPU, one RAM stick, graphics card if no integrated graphics).
- Enweghị Ngosipụta:
- Verify monitor cable connections and monitor input selection.
- Tinyegharịa kaadị eserese na modul ebe nchekwa.
- Test with a different monitor or graphics card if possible.
- Akwụsịghị / Mkpọka Sistemu:
- Lelee okpomọkụ CPU na GPU. Gbaa mbọ hụ na jụrụ oyi nke ọma.
- Gbaa ngwaọrụ nyocha ebe nchekwa ka ịlele mperi RAM.
- Update BIOS and all drivers to the latest versions.
- Network Connectivity Issues (Wired/Wireless):
- Hụ na eriri LAN ejikọtara nke ọma ma ọ bụ na eriri WiFi ejikọtara ya nke ọma.
- Install or update LAN/WiFi drivers.
- Lelee ntọala netwọk na sistemụ arụmọrụ gị.
Ọ bụrụ na nsogbu dịgidere, lelee nkwado GIGABYTE websaịtị ma ọ bụ kpọtụrụ nkwado ọrụ aka ha.


