1. Okwu mmalite
This manual provides detailed instructions for the installation, operation, and maintenance of your ESX Vision VMX900DAB Universal 1-DIN Multimedia Receiver. Please read this manual thoroughly before using the device to ensure proper functionality and to maximize your user experience.
The ESX Vision VMX900DAB is a versatile 1-DIN multimedia receiver featuring a 9-inch multi-angle touchscreen display. It integrates advanced connectivity options including wireless Apple CarPlay and Android Auto, DAB+ digital radio, Bluetooth hands-free calling and audio streaming, and a comprehensive media player. The unit is designed for universal compatibility and offers a removable monitor for enhanced security.
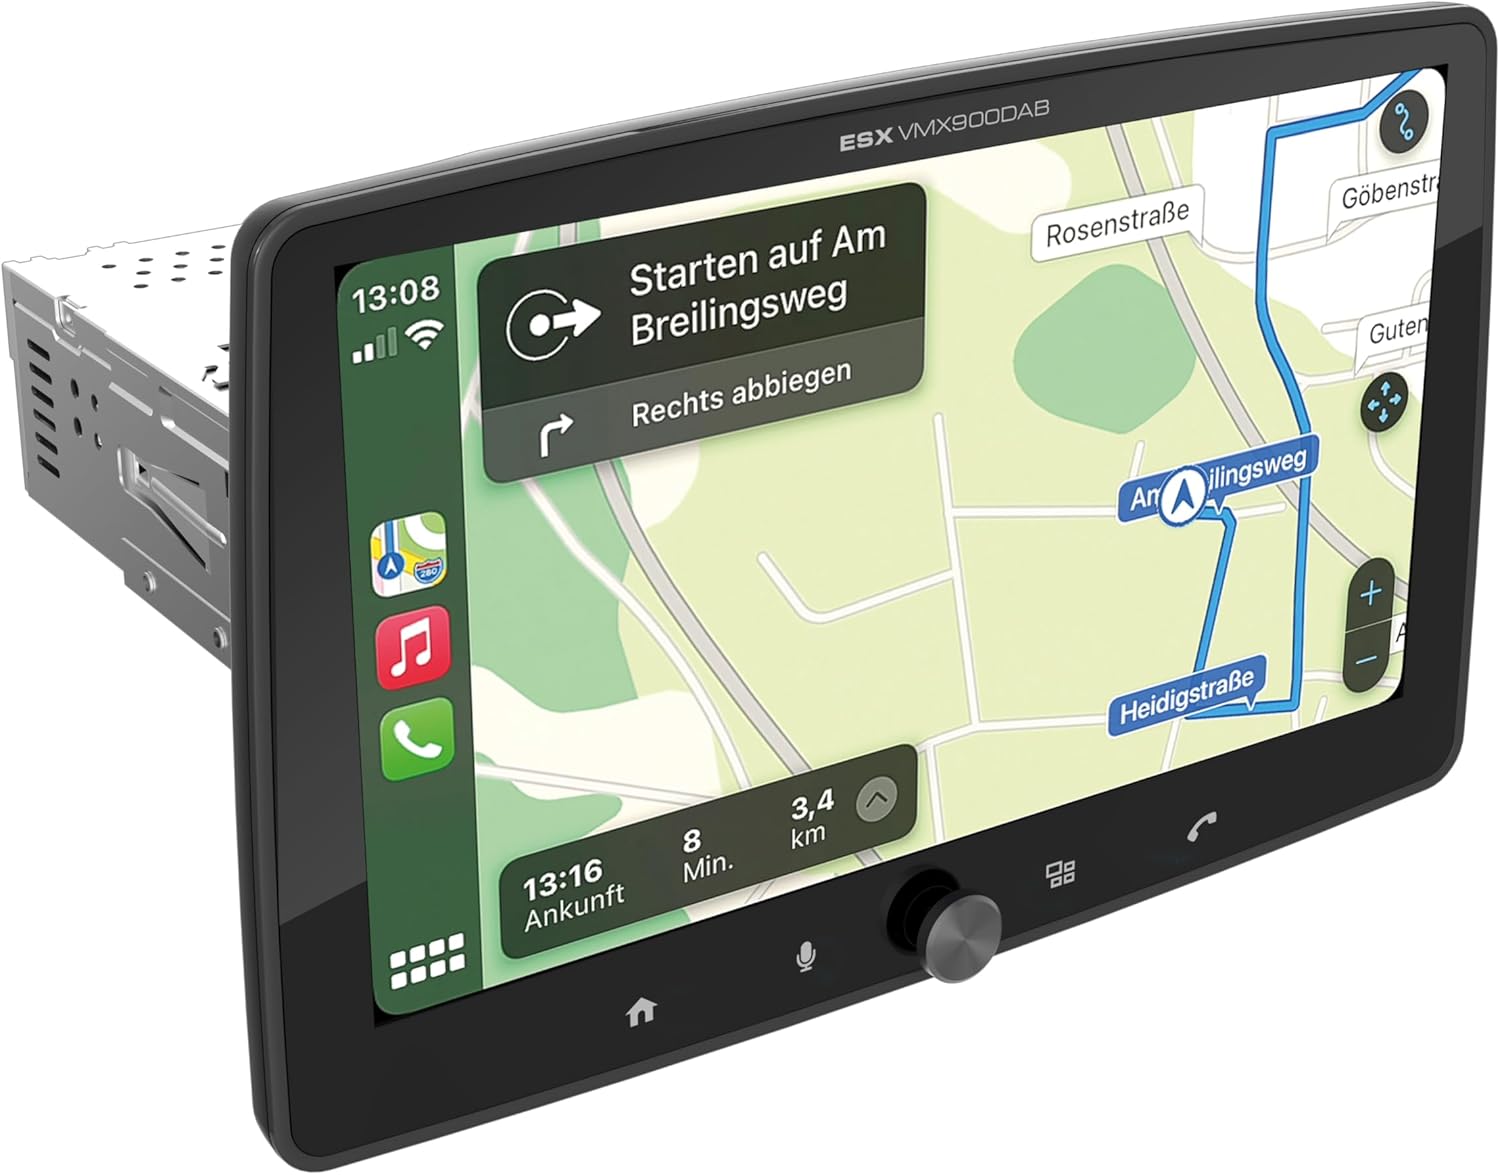
Figure 1.1: ESX Vision VMX900DAB with navigation interface.
2. Ntọala na nwụnye
Ihe ngwugwu 2.1
Tupu nrụnye, hụ na ihe niile dị na ya:
- ESX Vision VMX900DAB Main Unit
- Detachable 9-inch Touchscreen Monitor
- Power/Speaker Wiring Harness
- Igwe okwu mpụga
- Antenna GPS
- DAB+ Antenna
- USB Extension Cables
- Mounting Hardware (brackets, screws)
- Akwụkwọ ntuziaka (akwụkwọ a)

Figure 2.1: Included accessories and components.
2.2 Mounting the Main Unit
- Gbaa mbọ hụ na agbapụrụ batrị ụgbọ ala tupu ịmalite nrụnye.
- Insert the 1-DIN main unit into the vehicle's dashboard opening.
- Secure the main unit using the provided mounting brackets and screws.
2.3 Ijikọ Monitor
The 9-inch monitor is detachable and connects to the main unit via a click system.
- Align the monitor's connector with the slot on the main unit.
- Gently push the monitor until it clicks securely into place.
- To remove, press the release button (if applicable) and pull the monitor away.

Figure 2.2: Detachable monitor with click system.
2.4 Njikọ njikọ
Refer to the wiring diagram provided with the unit for specific connections. Key connections include:
- Power and Speakers: Connect the main wiring harness to the vehicle's power supply and speakers.
- Igwe okwu na mpụga: Plug the external microphone into its dedicated input for optimal hands-free call quality.
- Antenna GPS: Connect the GPS antenna and mount it in a location with a clear view nke eluigwe maka ezi n'ọnọdu.
- DAB+ Antenna: Connect the DAB+ antenna for digital radio reception.
- ọdụ ụgbọ mmiri USB: Two USB-A ports are available. One for media playback and charging (1.5A), and another specifically for Apple CarPlay/Android Auto and charging (1.5A).
- RCA tupuampNsonaazụ dị mma: Six 4V RCA outputs (FL/FR/RL/RR/SUB1/SUB2) are available for connecting external ampndị na -enye ndụ.
- AUX RCA Inputs: Stereo audio and video inputs (L/R/VIDEO) for external audio/video sources.
- Camera RCA Inputs: Dedicated inputs for front and rear cameras.
- Njikwa Wheel Steel: Analog steering wheel remote control input (learnable) for integration with vehicle controls.
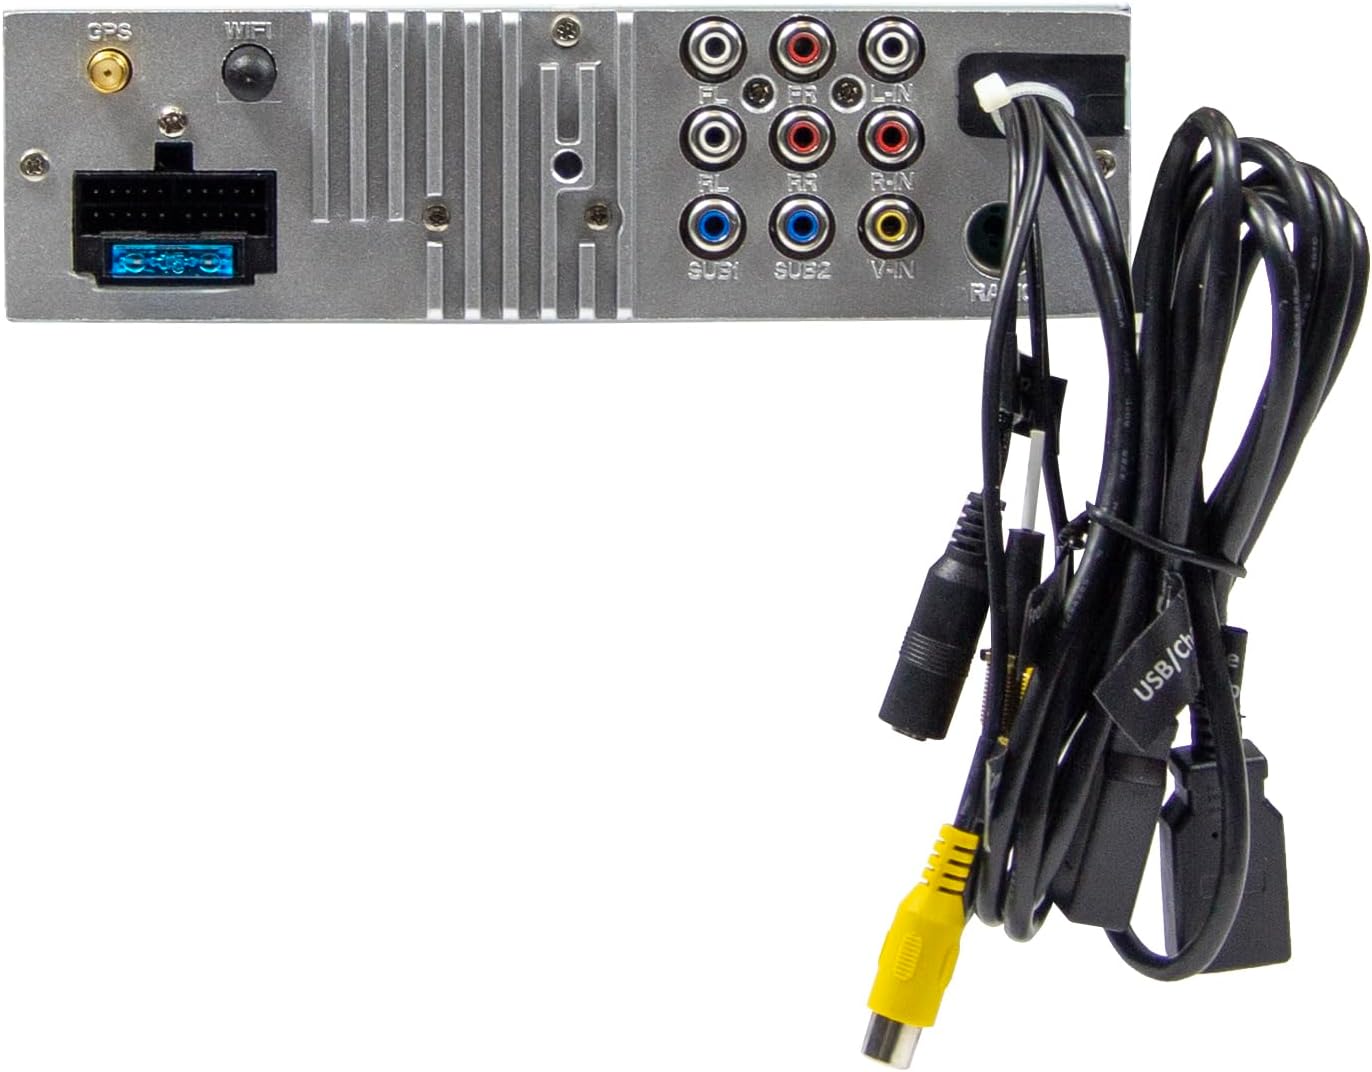
Foto nke 2.3: Njikọ azụ nke isi ihe dị na ya.
3. Ntuziaka ọrụ
3.1 Power On/Off and Basic Controls
- Ike Na: The unit will power on automatically with the vehicle's ignition.
- Gbanyụọ: The unit will power off automatically with the vehicle's ignition.
- Njikwa olu: Use the large rotary knob on the front panel to adjust the volume.
- Igodo ọrụ: Four function keys on the front panel provide quick access to common features.
- Ihuenyo mmetụ aka: All primary functions are controlled via the 9-inch touchscreen.
3.2 Ihuenyo Mbụ na Nsoroụzọ
The home screen provides access to all main functions and applications.

Figure 3.1: Main menu/home screen.
3.3 Apple CarPlay na gam akporo Auto
The VMX900DAB supports both wireless and wired (via USB) Apple CarPlay and Android Auto.
- Njikọ ikuku: Enable Bluetooth and Wi-Fi on your smartphone and follow the on-screen prompts to connect.
- Njikọ waya: Connect your smartphone to the dedicated USB-A port using a compatible USB cable.
- Once connected, your smartphone's compatible apps (navigation, music, calls, messages) will be mirrored on the receiver's display.

Figure 3.2: Apple CarPlay interface.
3.4 Radio Functions (DAB+/FM/AM)
- DAB+ Redio: Select the DAB+ icon from the home screen. The unit will scan for available digital radio stations.
- Redio FM/AM: Select the Radio icon. Use the touchscreen to tune to stations, save presets, and access RDS functions.
3.5 Bluetooth Hands-Free and Audio Streaming
- Na-ejikọta: Enable Bluetooth on your smartphone and search for the VMX900DAB. Select the device and confirm pairing.
- Oku na-anaghị aka: Once paired, you can make and receive calls directly through the receiver. The external microphone ensures clear voice transmission. Your phonebook can be synchronized.
- Ngụgharị ọdịyo: Stream music wirelessly from your smartphone to the receiver.
3.6 Mgbasa ozi
The unit supports various audio, video, and photo formats via USB.
- Akwadoro File Ụdị: AVI, FLV, MOV, MKV, WMV, WMA, MP3, FLAC, JPEG, PNG, BMP.
- Insert a USB drive into the media USB-A port. Select the USB icon from the home screen to browse and play media files.
3.7 Monitor Adjustment
The monitor can be tilted and adjusted in height to achieve the optimal viewing angle and prevent obstruction of vehicle controls.

Figure 3.3: Adjustable monitor mechanism.
3.8 Nhazi
- Startup Logo: Customize the startup logo in the settings menu.
- RGB Key Illumination: Select from various RGB colors and animation effects for the key illumination.
- Asụsụ menu: Supported languages include DEU, ENG, SWE, ITA.
4. Nlekọta
4.1 Na-ehicha ngalaba ahụ
- Use a soft, dry cloth to wipe the display and unit surfaces.
- For stubborn marks on the screen, use a screen cleaner specifically designed for electronic displays and a microfiber cloth.
- Do not use abrasive cleaners, solvents, or harsh chemicals, as these can damage the finish or screen.
4.2 Nlekọta n'ozuzu
- Zere ikpughe akụkụ ahụ na oke okpomọkụ, ìhè anyanwụ kpọmkwem maka ogologo oge, ma ọ bụ oke iru mmiri.
- Gbaa mbọ hụ na ikuku ikuku dị na gburugburu unit ahụ iji gbochie ikpo oke ọkụ.
- When removing the monitor, handle it carefully to avoid damage to the connectors.
5. Nchọpụta nsogbu
If you encounter issues with your VMX900DAB, refer to the following common problems and solutions:
| Nsogbu | Ihe nwere ike ime | Ngwọta |
|---|---|---|
| Enweghị ike | Incorrect wiring; Blown fuse; Vehicle ignition off | Check power connections; Replace fuse; Turn on vehicle ignition |
| Enweghị ụda | Olu dị oke ala; Ogbi agbanyere; Okwu waya okwu | Increase volume; Deactivate mute; Check speaker connections |
| Bluetooth anaghị ejikọ | Bluetooth off on phone/unit; Incorrect pairing process | Ensure Bluetooth is on; Re-attempt pairing process |
| Apple CarPlay/Android Auto not starting | Incorrect USB port; Faulty USB cable; Phone not compatible/configured | Use the dedicated USB port; Try a different USB cable; Check phone settings for CarPlay/Android Auto |
| Nnabata redio adịghị mma | Antenna not connected; Poor antenna placement; Weak signal area | Check antenna connection; Adjust antenna position; Try in a different location |
| Monitor not displaying | Monitor not securely attached; Connector issue | Ensure monitor is fully clicked into place; Check for debris in connector |
If the problem persists after attempting these solutions, please contact ESX customer support or your authorized dealer.
6. Nkọwapụta
| Njirimara | Nkọwapụta |
|---|---|
| Nọmba nlereanya | VMX900DAB |
| Ngosipụta | 9-inch Multi-angle Touchscreen |
| Ụdị Ihe | 1-DIN Universal |
| Njikọta | USB, Bluetooth, Auxiliary |
| Atụmatụ pụrụ iche | Wireless Apple CarPlay, Wireless Android Auto, Detachable Monitor with Click System |
| Redio Tuner | DAB+ (Digital Radio), FM/AM with RDS |
| Bluetooth | Hands-free function, Audio Streaming |
| ọdụ ụgbọ mmiri USB | 2x USB-A (1.5A charging, one dedicated for CarPlay/Android Auto) |
| Max Music Power | 4 x 80 W |
| Tupu-amparụpụtaghị ihe | 6x RCA (4V) (FL/FR/RL/RR/SUB1/SUB2) |
| Ntinye AUX | RCA (L/R/VIDEO) |
| Ntinye igwefoto | RCA (Front/Rear) |
| Akwadoro File Ụdị | AVI, FLV, MOV, MKV, WMV, WMA, MP3, FLAC, JPEG, PNG, BMP |
| Igwe okwu mpụga | gụnyere |
| Njikwa Wheel Wheel | Analog (learnable) |
| Nnata GPS | gụnyere |
| Asụsụ Nchịkọta | DEU, ENG, SWE, ITA |
| Mkpokọta ike mmepụta | 320 Watt |
| Nhazi ọwa ụda gburugburu | 4.2 |
| Ọnọdụ mmepụta ọdịyo | Stereo |
7. Akwụkwọ ikike na nkwado
For warranty information, please refer to the documentation provided at the time of purchase or contact your authorized ESX dealer. Warranty terms and conditions may vary by region and retailer.
For technical support or further assistance, please contact ESX customer service or visit the official ESX websaịtị maka akụrụngwa nkwado.


