1. Ngwaahịa gafereview
The Marantz AV10 is a high-performance AV Receiver designed to deliver an exceptional home theater experience. It features 15.4 channels, advanced HDMI connectivity, USB, Ethernet, multiroom capabilities, and support for immersive audio formats like Dolby Atmos and DTS:X. The unit is engineered for superior audio quality and seamless integration into modern home entertainment systems.
Akụkụ ndị bụ isi:
- Ogo ọdịyo pụrụiche: Immerse in rich, detailed sound with advanced processing.
- Mmekọrịta na-enweghị ntụpọ: Connect all audio and video components effortlessly.
- Cutting-Edge Processing: Experience immersive sound with advanced technologies.
- Njikwa kensinammuo: Fine-tune your audio experience with ease.
- Nhazi mara mma: Elegant and robust, complementing modern home theater setups.
- Nkà na ụzụ na-egosi n'ọdịnihu: Stay ahead with support for upcoming audio advancements.
2. Nhazi
2.1 Mwepu na ntinye
Carefully remove the Marantz AV10 from its packaging. Ensure all accessories are present. Place the receiver on a stable, level surface with adequate ventilation to prevent overheating. Avoid placing it near heat sources or in enclosed cabinets without proper airflow.
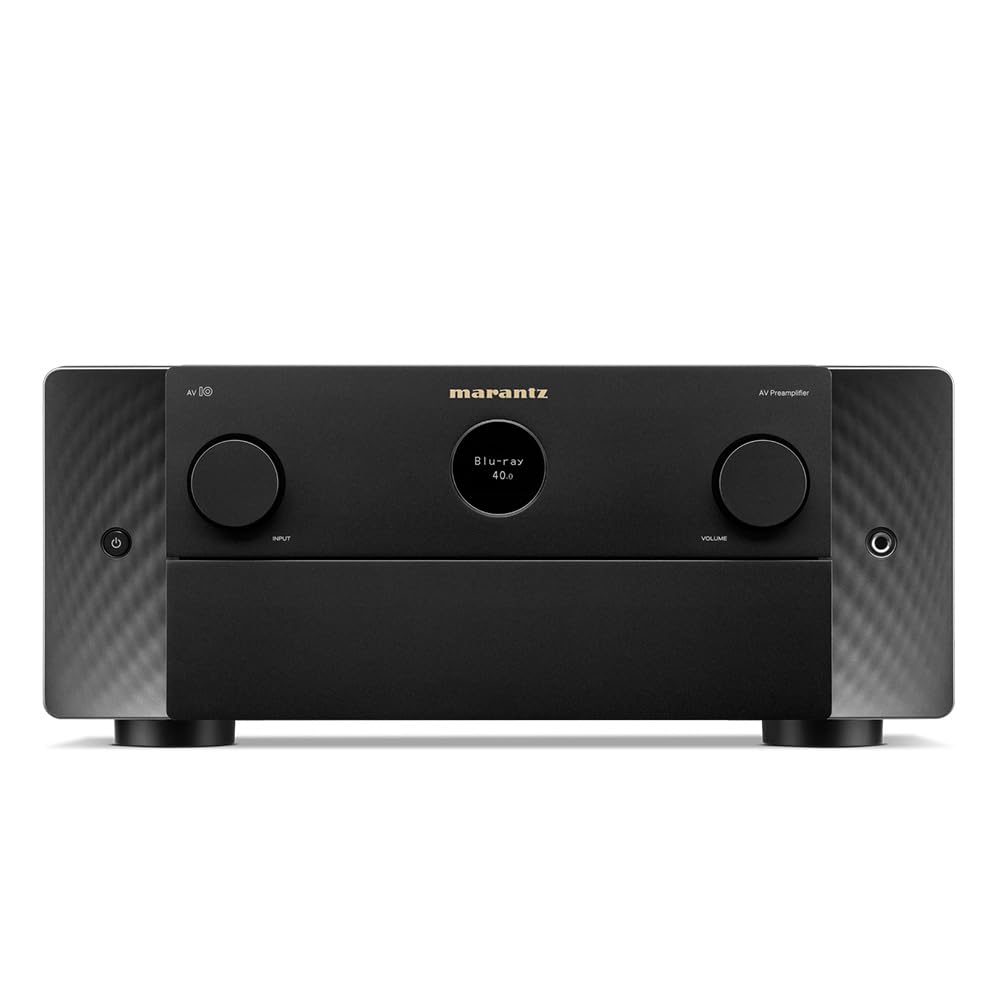
N'ihu view of the Marantz AV10 AV Receiver, showcasing its sleek design with input and volume knobs, and a central display.
2.2 Njikọ
Before making any connections, ensure the AV10 receiver and all connected devices are powered off and unplugged from the wall outlet.
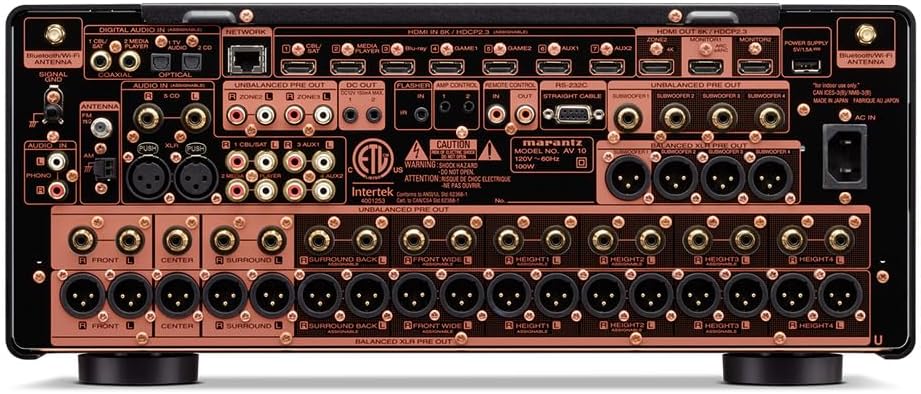
Rear panel of the Marantz AV10 AV Receiver, illustrating the comprehensive array of input and output ports including HDMI, XLR, RCA, Ethernet, and speaker terminals.
- Njikọ HDMI: Connect your video sources (Blu-ray player, game console, streaming device) to the HDMI IN ports. Connect your TV or projector to the HDMI OUT (MONITOR) port. The AV10 supports 8K/60Hz and 4K/120Hz with eARC.
- Njikọ ọdịyo: Use the appropriate analog or digital audio inputs for devices without HDMI. For high-quality audio, utilize the balanced XLR pre-outs for connecting to external power ampndị na -enye ndụ.
- Njikọ netwọk: Connect an Ethernet cable to the NETWORK port for wired internet access, or attach the included Wi-Fi antennas for wireless connectivity.
- USB: Use the USB port for media playback from compatible storage devices.
- Njikọ Ọkà Okwu: Connect your speakers to the corresponding speaker terminals. Ensure correct polarity (+ to + and - to -) for optimal sound. The AV10 supports up to 15.4 channels.
2.3 Speaker Configuration
The Marantz AV10 offers flexible speaker configuration options. Use the on-screen setup assistant (accessible via your TV connected to the HDMI OUT) to guide you through the process. This includes assigning channels, setting speaker sizes, and configuring crossover frequencies.
For optimal sound, utilize the Audyssey MultEQ XT32 room correction system. Connect the supplied setup microphone to the front panel's SETUP MIC jack and follow the on-screen instructions to calibrate your speakers to your room's acoustics.
3. Ọrụ
3.1 Njikwa ntọala
The front panel of the AV10 provides essential controls for daily operation:

Close-up of the input selector knob on the Marantz AV10, used to switch between various audio and video sources.
- Bọtịnụ ike: Gbanyụọ ma ọ bụ gbanyụọ unit ahụ.
- Ntinye Nhọrọ: Rotates to select the desired input source (e.g., Blu-ray, Game, Media Player).
- Mpịakọta Mpịakọta: Na-edozi ọkwa olu nna ukwu.
- Ngosipụta: Shows current input, volume level, audio format, and other status information.
The included remote control provides full access to all functions and settings, including menu navigation, sound modes, and zone control.
3.2 Ọdịyo nke Ọtụtụ Ụlọ
The AV10 supports multi-room audio playback, allowing you to enjoy different audio sources in various zones of your home. Utilize the built-in HEOS technology, Wi-Fi, Bluetooth, or Apple AirPlay 2 to stream music from popular services like Spotify, Pandora, and Amazon Music throughout your home.
3.3 Njikwa olu
Control your Marantz AV10 effortlessly using voice commands. The receiver is compatible with major voice assistants, allowing you to adjust volume, change tracks, switch inputs, and more, hands-free.
4. Nlekọta
- Nhicha: Regularly wipe the unit with a soft, dry cloth. Do not use abrasive cleaners or solvents.
- Igwe ikuku: Ensure the ventilation openings on the top and sides of the unit are not blocked to prevent overheating.
- Mmelite femụwe: Periodically check for firmware updates via the network connection to ensure optimal performance and access to new features.
5. Nchọpụta nsogbu
If you encounter issues with your Marantz AV10, refer to the following common troubleshooting steps:
- Enweghị ike: Ensure the power cord is securely connected and the power outlet is functional.
- Enweghị ụda: Check all audio cable connections, ensure the correct input source is selected, and verify speaker connections and volume levels.
- Enweghị vidiyo: Verify HDMI cable connections, ensure the correct input source is selected, and check your TV/projector input settings.
- Okwu njikọ netwọkụ: Confirm your Ethernet cable is connected or Wi-Fi antennas are properly attached. Check your router and internet connection.
- Njikwa anya anaghị arụ ọrụ: Dochie batrị ndị dị na njikwa remote. Hụ na enweghị ihe mgbochi ọ bụla n'etiti remote na sensọ IR nke receiver.
For more detailed troubleshooting, consult the full online manual or contact Marantz customer support.
6. Nkọwapụta
| Njirimara | Nkọwapụta |
|---|---|
| Ụdị | Marantz |
| Nọmba nlereanya | AV10 |
| Ọwa | 15.4 |
| Teknụzụ Njikọta | HDMI |
| Mgbakọta ọdụ ụgbọ mmiri HDMI | 10 |
| Ọnọdụ mmepụta ọdịyo | Stereo, Gburugburu |
| Nhazi ọwa ụda gburugburu | 5.1 (Supports up to 15.4 with external ampliification) |
| Ndekọ vidiyo | H.264, H.265/HEVC |
| Njirimara Pụrụ Iche | Multiroom |
| Ụdị njikwa | Njikwa anya |
| Ngwa dakọtara | Speaker, Tablet, PC, Smartphone, Television, Personal Computer, Game Console |
| Ibu Ibu | 37 pound |
| Akụkụ ngwugwu | 23 x 22 x 13 sentimita asatọ |
7. Akwụkwọ ikike na nkwado
The Marantz AV10 AV Receiver comes with a manufacturer's warranty. Please refer to the warranty card included in your product packaging for specific terms and conditions. For technical support, product registration, or service inquiries, visit the official Marantz websaịtị ma ọ bụ kpọtụrụ ngalaba ọrụ ndị ahịa ha.
Online resources, including a comprehensive user manual and FAQs, are available on the Marantz support page.


