1. Okwu mmalite
Thank you for choosing the TECPHILE K936 Wireless Keyboard and Mouse Combo. This product is designed to provide versatile and efficient input for multiple devices, featuring both Bluetooth 5.0 and 2.4GHz USB connectivity. This manual will guide you through the setup, operation, and maintenance of your new keyboard and mouse.
2. Ihe ngwugwu
- TECPHILE K936 Wireless Keyboard
- TECPHILE Wireless Mouse
- USB Receiver (stored in the mouse battery compartment)
- USB-C eriri USB
- Keyboard Protective Cover
- Akwụkwọ ntuziaka onye ọrụ
3. Ngwaahịa gafereview
Familiarize yourself with the components of your TECPHILE K936 Wireless Keyboard and Mouse Combo.

Foto nke 3.1: The TECPHILE K936 Wireless Keyboard and Mouse Combo in Grey. The keyboard features a full layout with a numeric keypad, and the mouse is a compact, ergonomic design.

Foto nke 3.2: Diagram showing the dimensions of the keyboard (368mm x 121mm) and mouse (110mm x 63mm x 30mm).
Atụmatụ ahụigodo:
- Multi-device connectivity: 3 x Bluetooth 5.0, 1 x 2.4GHz USB
- Dedicated function keys (F1-F12) with multimedia controls
- Enwere ike ibugharị batrị lithium 300mAh
- Ụdị-C ọdụ ụgbọ mmiri
- Automatic sleep mode for power saving
- Scissor-leg key structure for comfortable typing
- Transparent protective cover included
Ké Atụmatụ:
- Dual-mode connectivity: 1 x Bluetooth, 1 x 2.4GHz USB
- Optical movement detection technology
- Ambidextrous imewe
- Quiet click buttons
4. Nhazi
4.1 Nchaji izizi
Before first use, fully charge both the keyboard and mouse. Connect the provided USB-C charging cable to the charging port on the keyboard and mouse, and the other end to a 5V/1A power adapter (not included) or a computer USB port. The charging indicator light will show charging status and turn off when fully charged.
Note: Only use a 5V/1 Amp power adapter for charging to ensure optimal battery life.

Foto nke 4.1: Illustration of the keyboard's battery specifications: 2-4 hours charging time, 300mAh battery capacity, and up to 180 days standby time.
4.2 Jikọọ ahụigodo
The keyboard supports up to three Bluetooth connections and one 2.4GHz USB connection.

Foto nke 4.2: Diagram illustrating the keyboard's ability to connect to multiple devices via Bluetooth (3 channels) and 2.4GHz USB.
2.4GHz USB Connection:
- Locate the USB receiver inside the mouse's battery compartment.
- Tinye eriri USB n'ọdụ ụgbọ mmiri dị na kọmputa gị ma ọ bụ ngwaọrụ gị.
- Turn on the keyboard. The keyboard should automatically connect.
Bluetooth Connection (BT1, BT2, BT3):
- Gbanwuo ahụigodo.
- Pịa ma jide Fn key and one of the Bluetooth keys (BT1, BT2, ma ọ bụ BT3) for 3-5 seconds until the corresponding indicator light flashes rapidly. This indicates pairing mode.
- Na ngwaọrụ gị (kọmputa, mbadamba, ama ama), gaa na ntọala Bluetooth wee chọọ ngwaọrụ ọhụrụ.
- Select "TECPHILE Keyboard" from the list of available devices to pair.
- Once paired, the indicator light will stop flashing and remain solid for a few seconds before turning off.
- Repeat for other Bluetooth channels to connect to additional devices.
4.3 Ijikọ òké
The mouse supports one Bluetooth connection and one 2.4GHz USB connection.
2.4GHz USB Connection:
- Ensure the USB receiver is plugged into your device.
- Switch the mouse to 2.4GHz mode using the switch on the bottom of the mouse.
- The mouse should automatically connect.
Njikọ Bluetooth:
- Switch the mouse to Bluetooth mode using the switch on the bottom of the mouse.
- Press and hold the Bluetooth pairing button on the bottom of the mouse for 3-5 seconds until the indicator light flashes.
- Na ngwaọrụ gị, gaa na ntọala Bluetooth wee chọọ ngwaọrụ ọhụrụ.
- Select "TECPHILE Mouse" from the list to pair.
5. Ntuziaka ọrụ
5.1 Switching Between Devices (Keyboard)
To switch between connected devices on the keyboard, simply press the Fn key along with the corresponding connection key (BT1, BT2, BT3, ma ọ bụ 2.4G for USB). The keyboard will switch to the selected device instantly.
5.2 Switching Between Devices (Mouse)
To switch between 2.4GHz USB and Bluetooth modes on the mouse, use the toggle switch located on the bottom of the mouse.
5.3 Function Keys (Keyboard)
The keyboard features dedicated function keys (F1-F12) that can be used in conjunction with the Fn key for various multimedia and system controls.
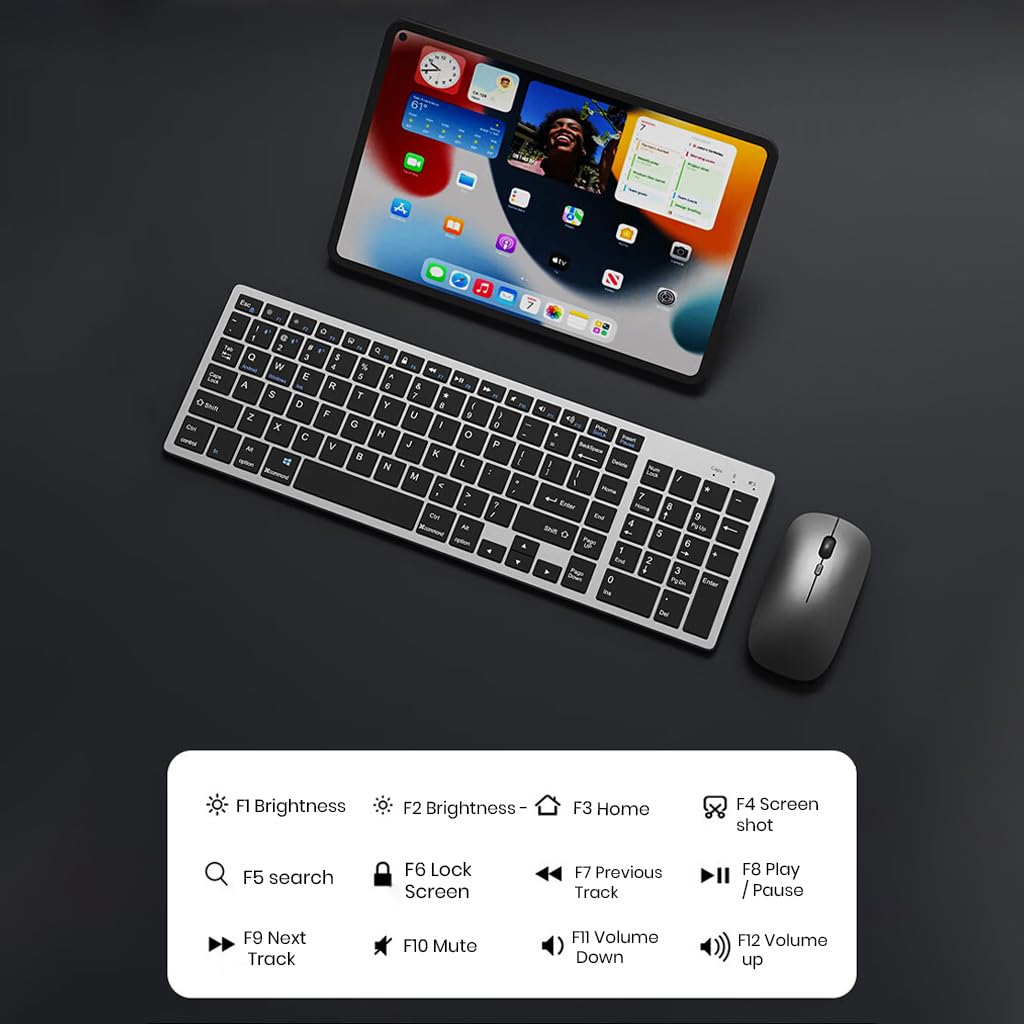
Foto nke 5.1: The keyboard displaying its function keys and their associated actions, such as brightness control, home, screen shot, search, lock screen, media playback, and volume control.
- Fn+F1: Ihie gbadara agbada
- Fn+F2: Ihie Up
- Fn+F3: Ụlọ
- Fn+F4: nseta ihuenyo
- Fn+F5: ọchụchọ
- Fn+F6: Ihuenyo mkpọchi
- Fn+F7: Egwu gara aga
- Fn+F8: Gwuo/kwụsịtụ
- Fn+F9: Track na-esote
- Fn+F10: Ogbi
- Fn+F11: Mpịakọta ọnụ
- Fn+F12: Elu elu
5.4 Ọnọdụ nchekwa ike
The keyboard and mouse are equipped with an automatic sleep mode to conserve battery life. If inactive for 10 minutes, the devices will enter sleep mode. To wake them up, simply press any key on the keyboard or move/click the mouse.

Foto nke 5.2: Diagram illustrating the auto-sleep mode and how to reactivate the keyboard and mouse by pressing any key.
6. Nlekọta
- Nhicha: Use a soft, dry cloth to clean the keyboard and mouse. For stubborn dirt, a slightly damp cloth can be used, ensuring no liquid enters the device.
- Mkpuchi mkpuchi: Utilize the included transparent protective cover for the keyboard to guard against dust and accidental spills.
- Nchekwa: Chekwaa ngwaọrụ ndị a n'ebe dị jụụ, kpọrọ nkụ pụọ na ìhè anyanwụ kpọmkwem na oke okpomọkụ.
- Ịchaji: Always use a 5V/1A power adapter for charging to prevent damage and ensure battery longevity.

Foto nke 6.1: The keyboard shown with its transparent protective keyskin, designed to prevent dust and spills.
7. Nchọpụta nsogbu
| Nsogbu | Ihe nwere ike ime | Ngwọta |
|---|---|---|
| Keyboard/Mouse not connecting via 2.4GHz USB. | USB receiver not properly inserted, low battery, incorrect mode selected. |
|
| Keyboard/Mouse not connecting via Bluetooth. | Not in pairing mode, device's Bluetooth is off, already connected to max devices, low battery. |
|
| Njikọ nkwụsịtụ ma ọ bụ nke na-adịghị arụ ọrụ. | Ndakpọchi anya, anya site na onye nnata/ngwaọrụ, obere batrị. |
|
| Keyboard keys not responding. | Low battery, device in sleep mode, connection issue. |
|
8. Nkọwapụta
| Njirimara | Nkọwa |
|---|---|
| Ụdị | TECPHILE |
| Nlereanya | K936 |
| Teknụzụ Njikọta | Keyboard: 3 x Bluetooth 5.0, 1 x 2.4GHz USB; Mouse: 1 x Bluetooth, 1 x 2.4GHz USB |
| Ngwa dakọtara | Laptọọpụ, Kọmputa nkeonwe, Smartphone, Mbadamba ụrọ |
| Sistemụ nrụọrụ | Android, iOS, Windows, macOS |
| Batrị ahụigodo | 300mAh Lithium Ion (Rechargeable) |
| Nchaji ọdụ ụgbọ mmiri | USB Ụdị-C |
| Oge Nchaji | 2-4 awa (ihe dị ka.) |
| Oge Njikere | Ruo ụbọchị 180 |
| Nha ahụigodo (LxWxH) | 36 x 13 x 1.5 cm |
| Nha òké (LxWxH) | 11 x 6.3 x 3 cm (ihe dị ka) |
| Ibu Ibu | 661 g (combo) |
| Teknụzụ nchọpụta ngagharị | Ngwa anya |
| Ntuzi aka | Ambidextrous |
9. Akwụkwọ ikike na nkwado
TECPHILE products come with a standard warranty. For warranty claims, technical support, or any product-related inquiries, please contact TECPHILE customer service through the retailer where the product was purchased or visit the official TECPHILE websaịtị maka ozi kọntaktị.
Biko dowe ihe akaebe nke ịzụrụ ihe maka ebumnuche ikike.
Manufacturer/Importer: TECPHILE, 2nd Floor, A36, Block B, Naraina Industrial Area Phase 2, Naraina, New Delhi, Delhi, 110028


