Ngwaahịa gafereview
The Dasqua 9999-0040 Digital Outside Micrometer and Micrometer Stand Set is designed for precise external measurements. The digital micrometer features a high resolution and accuracy, conforming to DIN863 standards, and is equipped with a large digital display, carbide-tipped anvils, and a hardened measuring spindle. It offers IP65 protection against coolant and fluids, making it suitable for various industrial environments. The accompanying micrometer stand provides a stable platform for measurements, featuring a fully adjustable clamp with non-marring rubber pads and a lacquered cast iron base.

Figure 1: Dasqua 0-25mm/0-1-Inch IP65 Digital Outside Micrometer and Micrometer Stand Set.
Atụmatụ igodo
- Micrometer dijitalụ:
- Resolution: 0.001mm / 0.00005-inch
- Accuracy: 0.003mm / 0.00015-inch
- Conforms to DIN863 standards
- Large, easy-to-read digital display
- Carbide-tipped anvils
- Hardened and ground measuring spindle
- IP65 protection for coolant and fluid resistance
- Class A in electrostatic discharge
- Micrometer Stand:
- Fully adjustable micrometer clamp
- Non-marring design
- Lacquered cast iron base
- Clamping capacity: 5/8-inch
- Flat frame style

Figure 2: Key features of the Dasqua Digital Micrometer, including clear graduation lines, precision ratchet thimble, and IP65 protection.

Figure 3: Key features of the Dasqua Micrometer Stand, highlighting flexible rotary joints and clamp with rubber pads.
Melite
1. Micrometer Battery Installation (if applicable)
The digital micrometer requires a CR2032 button cell battery for operation. While the product specifications state "No" for batteries required, user reviews indicate the use of a 2032 battery. Please check your specific unit for battery compartment location, typically under a cover on the digital display unit.
- Locate the battery compartment cover on the back or side of the digital display.
- Carefully open the cover using a small screwdriver or coin.
- Fanye batrị CR2032 ọhụrụ nwere akụkụ dị mma (+) chere ihu n'elu.
- Dochie mkpuchi nke batrị batrị nke ọma.
2. Micrometer Stand Assembly
The micrometer stand typically comes pre-assembled. Ensure all knobs and joints are tightened for stability before use.
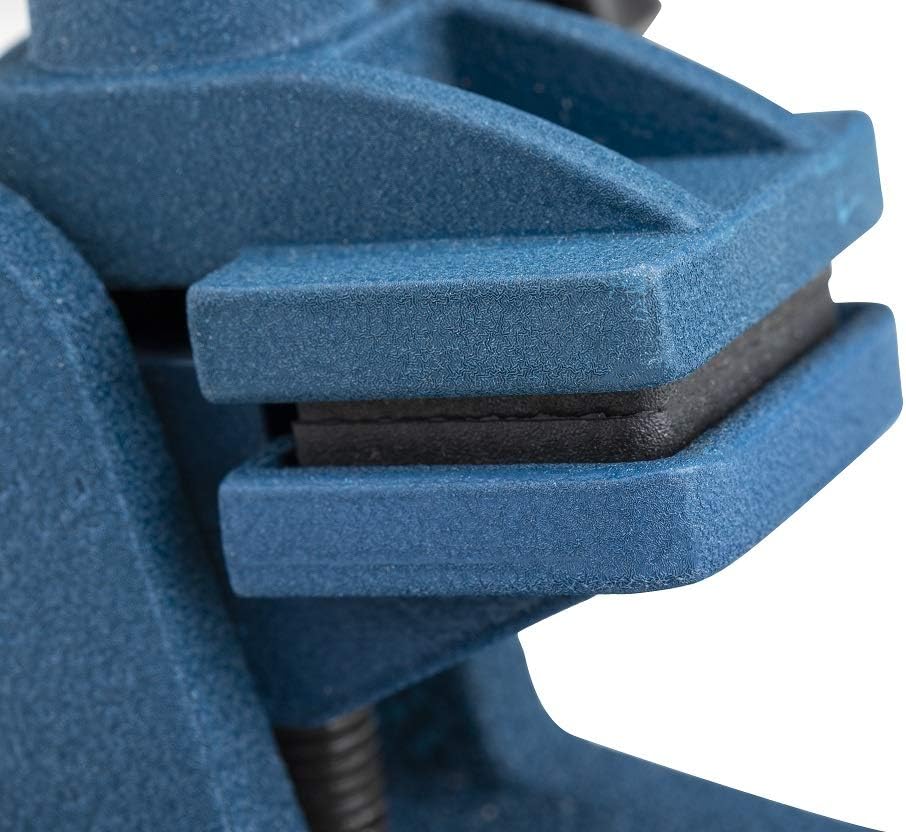
Ọgụgụ 4: nso nso view of the micrometer stand's clamp, showing the protective rubber pads.
Ntuziaka ọrụ
1. Gbanyụọ / gbanyụọ
Pịa Gbanye/ Gbanyụọ button to turn the micrometer on or off.
2. Unit Conversion (mm/inch)
Pịa In/mm button to switch between millimeter (mm) and inch (in) measurement units.
3. Zero Setting
Before taking a measurement, ensure the micrometer is clean and the anvils are closed. Press the ZERO button to set the display to zero. This establishes the reference point for your measurements.
4. Absolute/Incremental Measurement
Pịa ABS button to toggle between absolute and incremental measurement modes. Absolute mode measures from the set zero point, while incremental mode allows for relative measurements from any point.
5. Iwere nha
- Clean the measuring surfaces of the object and the micrometer anvils.
- Open the micrometer by rotating the thimble or ratchet stop.
- Place the object between the measuring anvils.
- Slowly close the micrometer using the ratchet stop until it clicks 2-3 times. This ensures consistent measuring pressure.
- Read the measurement directly from the digital display.
6. Using the Micrometer Stand
- tọpụ clamping knob on the micrometer stand.
- Carefully place the micrometer into the clamp, ensuring the protective rubber pads are in contact with the micrometer body to prevent marring.
- Adjust the angle and position of the micrometer using the flexible rotary joints as needed for comfortable and stable measurement.
- Mee ka clamping knob to secure the micrometer in place.
Nlekọta
- Nhicha: After each use, wipe the micrometer and stand with a clean, lint-free cloth. For the micrometer, pay special attention to the measuring surfaces and the spindle. Avoid using harsh chemicals or abrasive materials.
- Nchekwa: Store the micrometer and stand in their protective case when not in use. Keep them in a dry, clean environment away from direct sunlight, extreme temperatures, and corrosive substances.
- Ngbanwe batrị: Replace the CR2032 battery when the display becomes dim or does not turn on. Refer to the "Setup" section for battery installation instructions.
- Nhazi For professional applications, periodic calibration by a qualified technician is recommended to maintain accuracy.
Nchọpụta nsogbu
| Nsogbu | Ihe nwere ike ime | Ngwọta |
|---|---|---|
| Ngosipụta anaghị agbanye. | Batrị nwụrụ anwụ ma ọ bụ arụnyere na-ezighi ezi. | Lelee nghazi batrị. Dochie batrị ma ọ dị mkpa. |
| Ọgụgụ na-ezighi ezi. | Micrometer not zeroed correctly; dirt on measuring surfaces; excessive measuring force. | Ensure micrometer is zeroed before use. Clean measuring surfaces. Use the ratchet stop for consistent pressure. Consider professional calibration. |
| Ngosipụta na-egosi "E" ma ọ bụ koodu mperi. | Internal error or low battery. | Try turning the micrometer off and on again. Replace battery. If problem persists, contact customer support. |
Nkọwapụta
| Njirimara | Nkọwa |
|---|---|
| Nọmba nlereanya | 9999-0040 |
| Oke nha | 0-25mm / 0-1-Inch |
| Mkpebi | 0.001mm / 0.00005-inch |
| Izi ezi | 0.003mm / 0.00015-inch |
| Ogo nchekwa | IP65 (Coolant & Fluid Resistant) |
| Standard Conformance | DIN863 |
| Anvils | Carbide-tipped |
| Spindle | Hardened and Ground |
| Igwe ọkụ eletrik | Klas A |
| Micrometer Stand ClampIkike | 5/8-anụ ọhịa |
| Micrometer Stand Base | Lacquered Cast Iron |
| Ibu Ibu | 6 pounds (total set) |
| Akụkụ ngwaahịa | 9 x 6 x 3 sentimita asatọ |
| Mba onye si | China |
| UPC | 769053114439 |
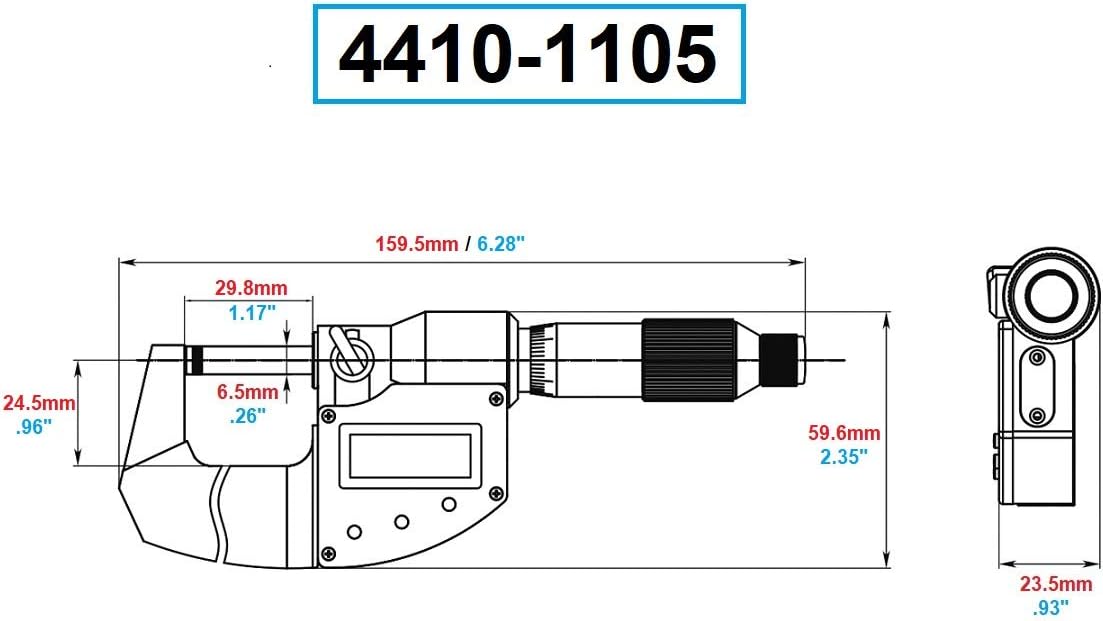
Figure 5: Dimensional drawing of the Dasqua Digital Micrometer, showing key measurements.

Figure 6: Dimensional drawing of the Dasqua Micrometer Stand, showing key measurements.
Akwụkwọ ikike na nkwado
Dasqua products are manufactured to high standards and undergo strict quality control. For specific warranty information, including terms, conditions, and duration, please refer to the documentation included with your product or contact Dasqua customer support directly.
For technical assistance, troubleshooting beyond this manual, or to inquire about replacement parts, please visit the official Dasqua website or contact their authorized service centers. You can often find contact information on the product packaging or the manufacturer's websaịtị.
Note: Warranty terms may vary by region and retailer. Always retain your proof of purchase.


