Okwu mmalite
The Nous D1T 16A Smart DIN Rail Switch is an advanced device designed for intelligent control and energy monitoring within your electrical system. Featuring Tasmota firmware, it offers extensive customization and seamless integration with various smart home platforms like Home Assistant, MQTT, and Matter. This manual provides essential information for safe installation, operation, and maintenance of your Nous D1T switch.

Figure 1: Nous D1T Smart DIN Rail Switch and its packaging.
This image displays the Nous D1T smart switch, a compact device designed for DIN rail mounting, alongside its product packaging. The switch features clear labeling for power and load connections, an indicator light, and a button for manual control and pairing. The packaging highlights key features such as "16A DIN Smart Switch D1T" and compatibility with Tasmota and MQTT.
Ozi nchekwa
Na-edebe ihe nchekwa nchekwa ndị a mgbe niile:
- Installation should only be performed by a qualified electrician.
- Ensure power is disconnected at the main circuit breaker before installation or maintenance.
- Do not exceed the maximum load of 16A.
- Na-arụ ọrụ n'ime oke okpomọkụ nke -25 ° C ruo 70 Celsius.
- Do not expose the device to moisture or extreme environments.
Ntọala na nwụnye
1. Nwụnye anụ ahụ
The Nous D1T is designed for mounting on a standard DIN rail within your electrical panel.
- Kwụpụ ike: Before beginning, ensure the main power supply to your electrical panel is completely turned off. Verify with a voltagọ bụ onye nyocha.
- Ịkwanye: Clip the Nous D1T onto the DIN rail. Ensure it is securely fastened.
- Wiring: Connect the live (L) and neutral (N) wires from your power source to the "N Power" and "L Power" terminals on the top of the device. Connect the neutral (N) and live (L) wires of your load (appliance/circuit) to the "N Load" and "L Load" terminals on the bottom. Refer to the wiring diagram below.

Figure 2: Nous D1T wiring diagram.
This image illustrates the Nous D1T smart switch with its electrical connection points clearly labeled. The top terminals are for incoming power (N Power, L Power), and the bottom terminals are for connecting to the load (N Load, L Load). The diagram also shows the maximum wire diameter of 2.5mm and the DIN rail mounting mechanism.
2. Initial Configuration (Tasmota)
The Nous D1T comes pre-flashed with Tasmota firmware, allowing for flexible configuration.
- Ike Na: Restore power to your electrical panel. The device will create a Wi-Fi access point (AP) named "tasmota-XXXXXX".
- Connect to AP: Using a computer or smartphone, connect to the "tasmota-XXXXXX" Wi-Fi network.
- Nweta Web Ihuenyo: Mepee a web nchọgharị wee gaa na 192.168.4.1. This will open the Tasmota web interface.
- Hazie Wi-Fi: In the Tasmota interface, go to Configuration > Configure Wi-Fi. Select your home Wi-Fi network (2.4 GHz only) and enter the password. Save the settings. The device will restart and connect to your network.
- Find Device IP: Once connected to your home network, the device will obtain a new IP address. You can find this IP address through your router's connected devices list or by using a network scanner tool.
- Access Device: Mepee a web browser and navigate to the device's new IP address to access its Tasmota interface.

Figure 3: Tasmota Web Interface - Main Status Page.
This image shows the main status page of the Tasmota web interface for the Nous D1T. It displays real-time data such as Voltage, Current, Frequency, and Power. It also includes energy consumption metrics (Energy Today, Energy Yesterday, Energy Total) and a manual pairing code for Matter integration. A toggle button for the relay is visible at the bottom.
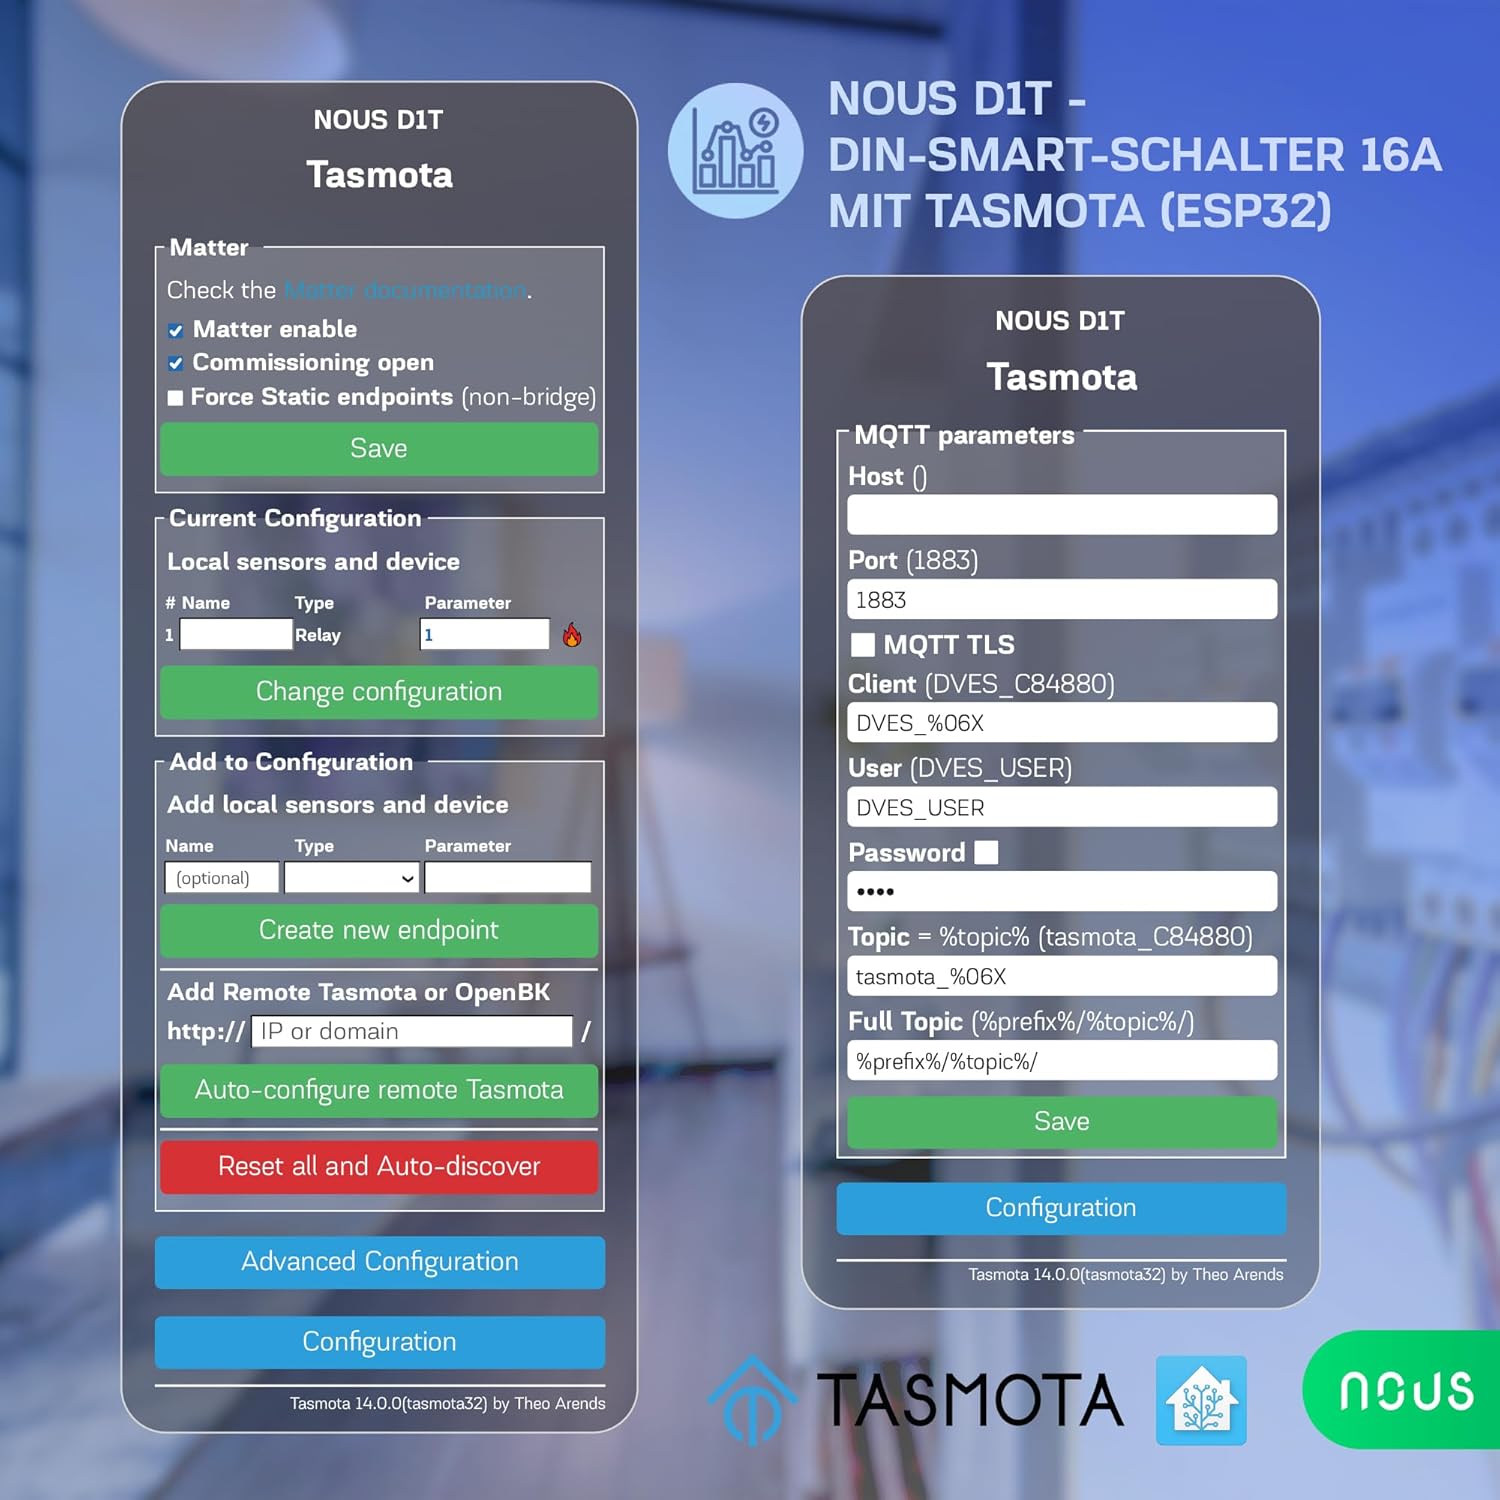
Figure 4: Tasmota Web Interface - Configuration Menu.
This image displays the comprehensive configuration menu within the Tasmota web interface. Options include configuring Wi-Fi, MQTT, Domoticz, Timer, KNX, Matter, Logging, and more. It also provides options to reset, backup, or restore the configuration, offering advanced control over the device's functionality.
Operating the Nous D1T
1. Njikwa Mgbatị/Mgbanyụ Isi
- Bọtịnụ akwụkwọ ntuziaka: Press the physical button on the device to toggle the connected load On or Off.
- Web Ihuenyo: Access the Tasmota web interface (Figure 3) and use the "Toggle 1" button to control the relay.
2. Nleba anya ike
The Nous D1T provides real-time and historical energy consumption data.
- Data ezigbo oge: View current Voltage, Current, Frequency, and Power directly on the Tasmota main status page (Figure 3).
- Data akụkọ ihe mere eme: The interface also displays accumulated energy consumption for "Energy Today," "Energy Yesterday," and "Energy Total." This data can be used to analyze energy usage patterns and optimize consumption.
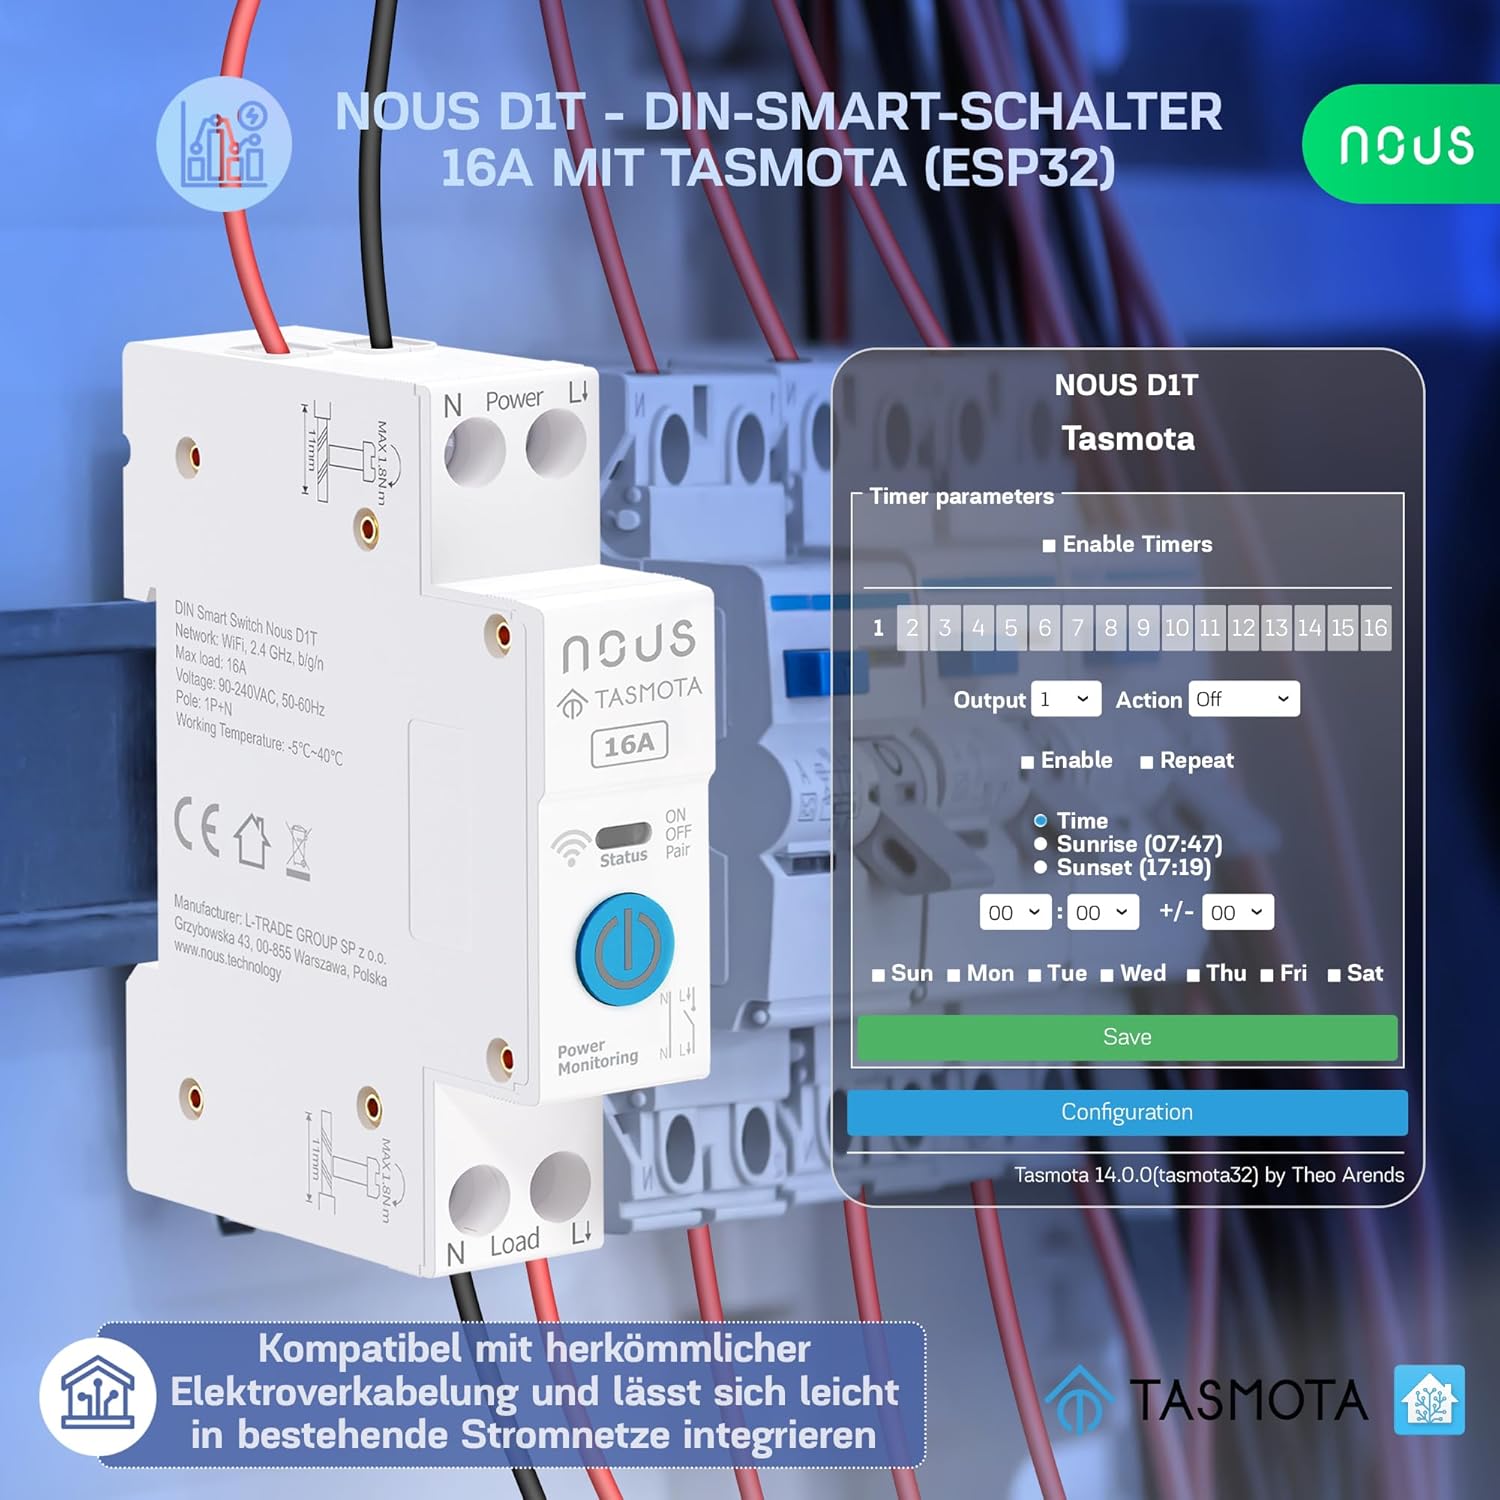
Figure 5: Tasmota Web Interface - Energy Monitoring.
This image highlights the energy monitoring capabilities of the Nous D1T via its Tasmota web interface. It shows various energy metrics including Voltage, Current, Frequency, Active Power, Apparent Power, Reactive Power, Power Factor, and accumulated energy usage for the current day, previous day, and total. This allows users to track and manage their power consumption effectively.
3. Smart Home Integration (MQTT, Matter, Home Assistant, Voice Control)
The Nous D1T is highly compatible with various smart home ecosystems:
- MQTT: Configure MQTT parameters (Host, Port, Client, User, Password, Topic) in the Tasmota interface (Configuration > Configure MQTT) to integrate with MQTT brokers for advanced automation.
- Ihe: Enable Matter support via the Tasmota interface (Configuration > Configure Matter) for seamless integration with Google Home, Amazon Alexa, and Apple HomeKit.
- Onye enyemaka ụlọ: The Tasmota firmware allows for easy discovery and integration with Home Assistant, providing a centralized control platform for your smart devices.
- Njikwa olu: Once integrated with Matter or Home Assistant, you can control the Nous D1T using voice commands via Amazon Alexa or Google Assistant.

Figure 6: Tasmota Web Interface - Matter and MQTT Configuration.
This image displays the configuration options for Matter and MQTT within the Tasmota web interface. For Matter, it shows checkboxes for enabling Matter, commissioning open, and forcing static endpoints. For MQTT, it provides fields to enter the Host, Port, Client, User, Password, and Topic, enabling robust integration with smart home systems.
Nlekọta
- Mmelite femụwe: Regularly check for and apply Tasmota firmware updates to ensure optimal performance, security, and access to new features. Updates can typically be performed via the Tasmota web interface (Nkwalite ngwa ngwa ngalaba).
- Nhicha: Ensure the device is clean and free from dust. Disconnect power before cleaning. Use a dry, soft cloth. Do not use liquid cleaners.
- Ọnọdụ gburugburu: Gbaa mbọ hụ na gburugburu ebe ọrụ ka dị n'ime oke okpomọkụ na iru mmiri akọwapụtara iji gbochie mmebi.
Nchọpụta nsogbu
Okwu na azịza ndị nkịtị:
- Ngwaọrụ anaghị aza:
- Lelee ọkọnọ ike na ngwaọrụ ahụ.
- Verify Wi-Fi connectivity. Ensure the device is within range of your 2.4 GHz Wi-Fi network.
- Restart the device by cycling its power.
- Enweghị ike ịnweta Web Ihuenyo:
- Ensure your device (computer/smartphone) is on the same network as the Nous D1T.
- Verify the IP address of the Nous D1T. It might have changed if your router assigns dynamic IPs.
- Try accessing the device by its hostname (e.g., `tasmota-XXXXXX.local` if mDNS is enabled).
- Incorrect Energy Readings:
- The device may require calibration for accurate energy monitoring. Refer to Tasmota documentation for calibration procedures (e.g., using `PowerSet`, `VoltageSet`, `CurrentSet` commands in the console). This typically involves connecting a known load and adjusting parameters.
- Matter/MQTT Integration Issues:
- Double-check all configuration parameters (host, port, credentials, topics).
- Ensure your MQTT broker or Matter controller is running and accessible.
- Check Tasmota console logs for error messages related to MQTT or Matter connection.
Tọgharia Factory:
If issues persist, a factory reset can restore the device to its default Tasmota configuration. This will erase all Wi-Fi and custom settings.
- Method 1 (Button): Press and hold the physical button for approximately 40 seconds until the indicator light flashes rapidly, then release.
- Usoro 2 (Web Ihuenyo): In the Tasmota web interface, gaa na Configuration > Reset Configuration and select the appropriate reset option (e.g., "Reset 1" for Wi-Fi and module settings).
Nkọwapụta
| Njirimara | Nkọwapụta |
|---|---|
| Nọmba nlereanya | D1T |
| Ụdị | NOUS |
| Akụkụ (L x W x H) | 8.2 x 5 x 1.5 cm (3.23 x 1.97 x 0.59 inch) |
| Ibu | 110 grams (0.24 lbs) |
| Nrụ ọrụ Voltage | 240 volts |
| Enyere aha ugbu a | 16 Amperes |
| Ụdị ọrụ | ON-Gbanyụọ |
| Ụdị kọntaktị | Na-emepe emepe |
| Ụdị njikọ | Na-akpachapụ anya |
| Ụdị njedebe | Ịghasa |
| Circuit .dị | 1-ụzọ |
| Ụdị Actuator | Nkịtị |
| Okpomọkụ na-arụ ọrụ | -25°C ruo 70°C |
| Ihe onwunwe | PC/ABS (V0) |
| Mba onye si | China |
Ozi akwụkwọ ikike
Specific warranty information for the Nous D1T Smart DIN Rail Switch is not available in the provided product details. Please refer to the manufacturer's official website or contact your point of purchase for warranty terms and conditions.
Nkwado
For technical assistance, troubleshooting beyond this manual, or general inquiries, please contact NOUS customer support. Visit the official NOUS websaịtị maka nkọwa kọntaktị na ihe ndị ọzọ.
You can also find extensive community support and documentation for Tasmota firmware online, which may assist with advanced configurations and troubleshooting.