1. Okwu mmalite
The CYSSJF Wireless Bed Alarm and Fall Prevention System is designed to assist caregivers in monitoring individuals such as the elderly, those with dementia, or children. This system includes a motion detector, a plug-in receiver, and a panic call wrist button, providing a comprehensive solution for remote monitoring and immediate assistance.
The motion sensor detects movement and sends a signal to the receiver, alerting caregivers. Additionally, the panic call wrist button allows the monitored individual to directly request help. The system is pre-paired for ease of use, requiring only the receiver to be plugged into a power supply.
2. Ngwa ngwaahịa
Ngwungwu ahụ gụnyere ihe ndị a:
- 1 x Motion Detector
- 1 x Plug-in Receiver
- 1 x Panic Call Wrist Button
3. Atụmatụ igodo
- Nleba anya zuru oke: Integrates a motion sensor and a call button for versatile alert options.
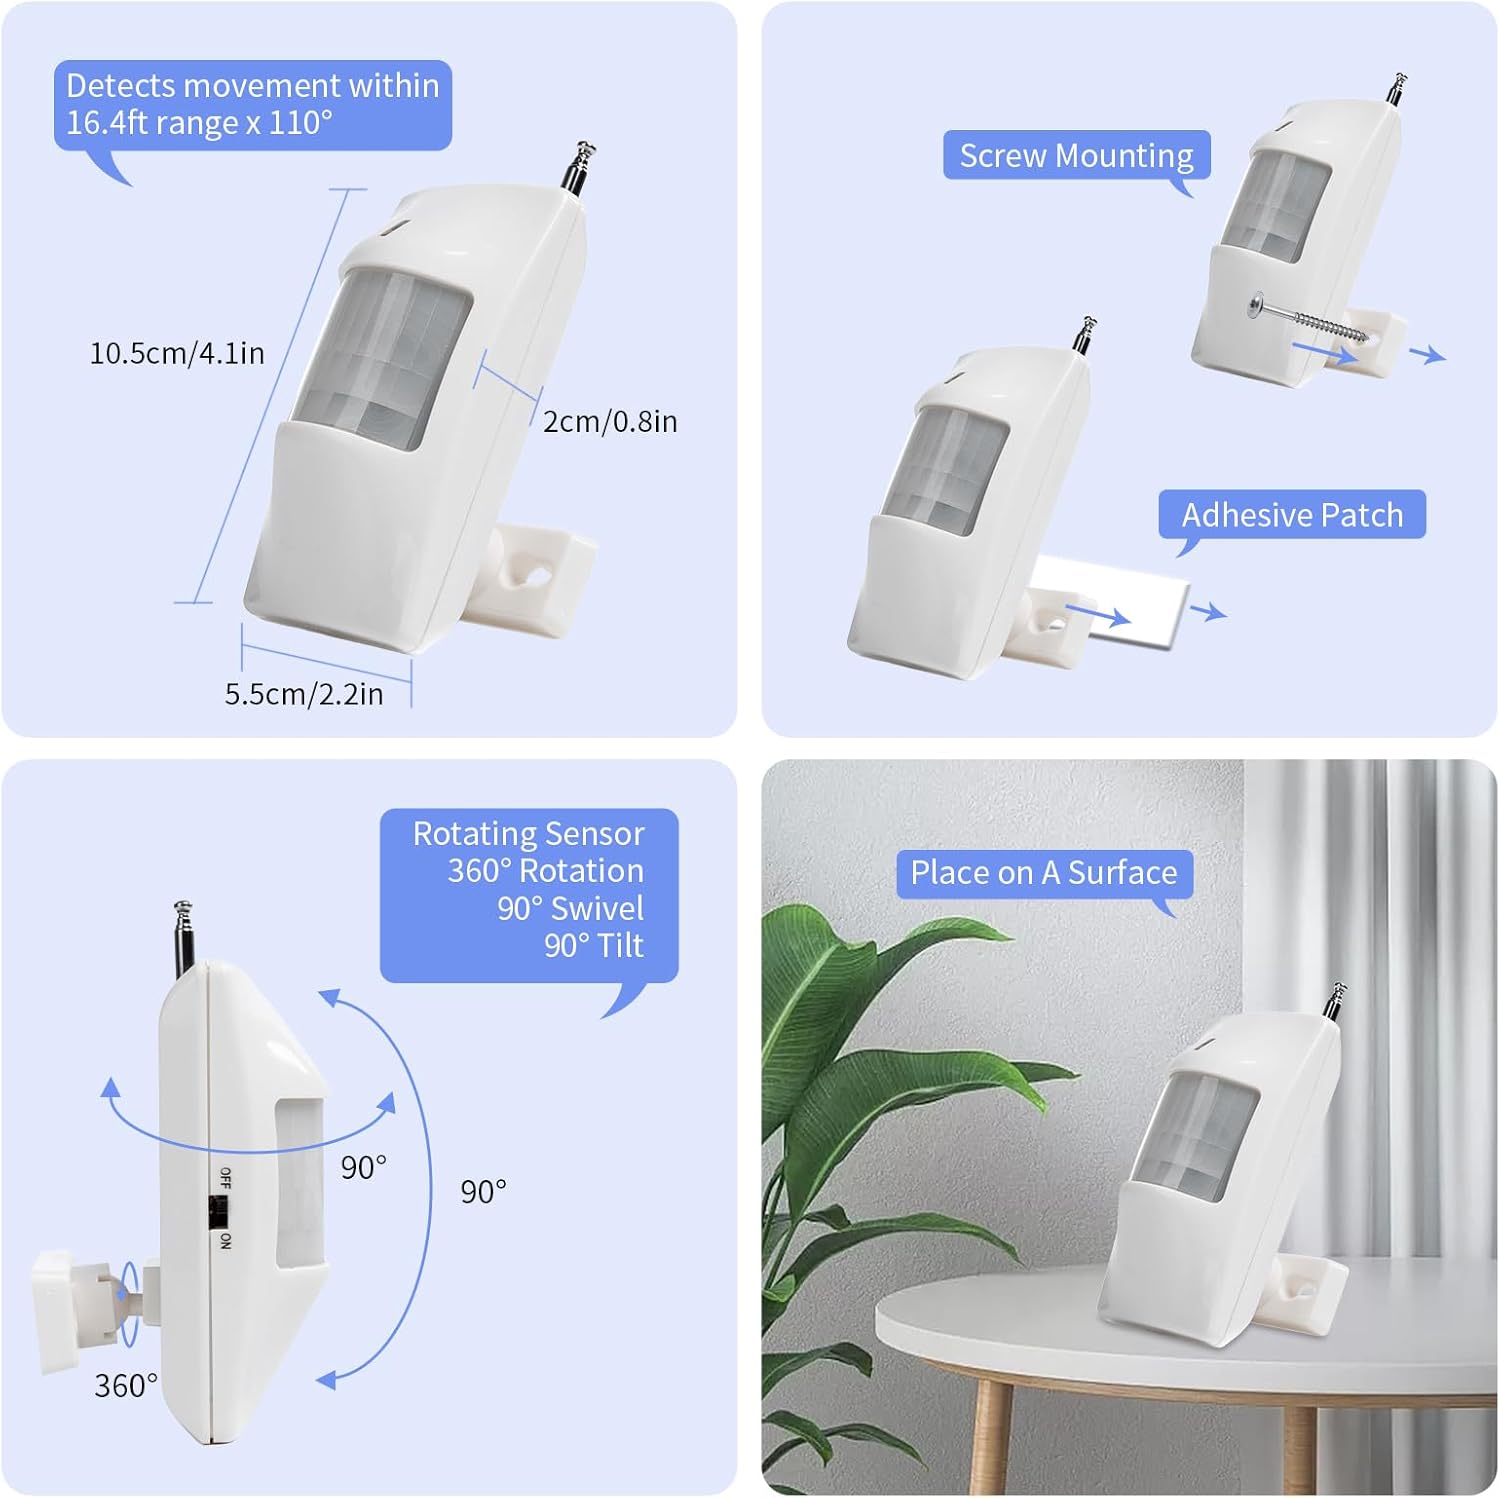
- Nkwanye mgbanwe: Motion sensor can be positioned under a bed for fall detection or at a doorway for exit monitoring.
- Wide Wireless Range: Motion detector transmits signals to receivers up to 500ft (150m) in open areas and 10-50m indoors.
- Adjustable Motion Sensor: Features 360° rotation, 90° swivel, and 90° tilt for optimal angle adjustment.
- Ntinye ahaziri ahazi: Receiver offers 40 ringtones and 4 adjustable volume levels.
- Silent Mode with Visual Alert: Includes a silent mode with an LED flash for visual alerts, suitable for the visually impaired or quiet environments.
- Long Ring Mode: Default setting ensures the alarm continues to ring until manually stopped, providing persistent alerts.
- Nkwụnye ma kpọọ: Pre-paired for immediate use upon plugging in the receiver.


4. Nhazi ntuziaka
4.1 Ike mbido
- Plug the receiver into a standard power outlet. The system is pre-paired and ready for immediate use.
- Ensure the motion detector has batteries installed and its switch is in the "ON" position.
4.2 Adjusting Ringtones and Volume
The receiver offers 40 ringtones and 4 volume levels.
- To change the ringtone: Press the "Sound button" on the receiver to cycle through the 40 available ringtones.
- To adjust volume: Press the "Volume button" on the receiver to select one of the 4 volume levels.
4.3 Registering Additional Buttons/Sensors
If you have additional call buttons or motion sensors, they can be registered to the receiver.
- For Call Buttons (including wrist watch type):
- Long press the "Volume button" on the receiver until the red light flashes slowly.
- While the red light is flashing, press the call button you wish to register.
- A successful registration is indicated by the receiver ringing.
- For Infrared Motion Sensors:
- Ensure the infrared sensor is switched ON.
- Long press the "Volume button" on the receiver until the red light flashes slowly.
- While the red light is flashing, pass your hand over the infrared sensor.
- A successful registration is indicated by the receiver ringing.
- Ihe dị mkpa: When registering the infrared sensor, ensure no people or animals are within its sensing range to avoid false registrations.
5. Ntuziaka ọrụ
5.1 Nchọpụta ngagharị
Position the motion detector in the desired monitoring area. Common placements include:
- Under the bed: To detect when a person's foot is about to touch the ground, signaling they are getting out of bed.
- At a doorway: To monitor when a person leaves a room.
When motion is detected within its 16.4ft range and 110° angle, the motion detector sends a signal to the receiver, triggering an alert.


5.2 Call Button Operation
The panic call wrist button allows the user to manually request assistance. Press the red button on the wrist device to send an alert signal to the receiver.
5.3 Ịnata ọkwa
When the receiver receives a signal from either the motion detector or a call button, it will:
- Sound the selected ringtone at the set volume level.
- Flash its LED indicator light.
In the default "long ring mode," the receiver will continue to ring and flash until the "stop help button" (likely the volume button or a dedicated stop button on the receiver) is pressed.

6. Nlekọta
6.1 Nhicha
Wipe the devices with a soft, dry cloth. Do not use abrasive cleaners or solvents, as these can damage the product.
6.2 nnọchi batrị
The motion detector and call button are battery-powered. Replace batteries when the indicator light on the device no longer illuminates or the signal strength weakens.
- Refer to the specific device for battery type and replacement instructions.
6.3 nrụpụta nrụpụta
If you experience persistent issues or wish to clear all registered devices, a factory reset can be performed.
7. Nchọpụta nsogbu
| Nsogbu | Ihe nwere ike ime | Ngwọta |
|---|---|---|
| Receiver not sounding/flashing. |
|
|
| Motion sensor not detecting movement. |
|
|
| Call button not triggering alert. |
|
|
8. Nkọwapụta
| Njirimara | Nkọwa |
|---|---|
| Nlereanya | SJ-PR1+K-CPM+SW2-1+1+1 |
| Ụdị | CYSSJF |
| Agba | Ọcha |
| Isi Iyi Ike | Battery Powered (for detector/button), Plug-in (for receiver) |
| Akụkụ ngwaahịa | 6.3"L x 3.6"W x 4.3"H |
| Noise Level (Audible) | Up to 113 Decibels |
| Ụdị nkwụnye | Tabletop Mount (for receiver), Swivel Mount (for motion sensor) |
| Ihe Nchịkwa Ihe Nchịkwa | Motion (Infrared) |
| Ikuku iche | Up to 500ft (150m) in open area; 10-50m indoors |
| Oke nchọpụta ngagharị | 16.4ft (5m) x 110° |
| Ụda ụda | 40 nhọrọ |
| Ọkwa olu | 4 nhazi ọkwa |
| Onye nrụpụta | Quanzhou Shuojiang Electronic Commerce Co., Ltd. |
9. Akwụkwọ ikike na nkwado
Akwụkwọ ikike onye nrụpụta: This product comes with a 1 Year Manufacturer Warranty.
For technical support or warranty claims, please contact the manufacturer directly or refer to the product's purchase platform for seller contact information.


