Okwu mmalite
The ASUS A31 Black ATX Mid-Tower Gaming Case is designed for high-performance PC builds, offering a blend of aesthetic appeal and functional design. This manual provides detailed instructions and information to help you assemble, operate, and maintain your system within this chassis.
Key features of the ASUS A31 case include:
- Easy Build, Direct Performance: Designed for mainstream ATX builds, offering compatibility with 360mm AIO coolers and high-end graphics cards like the RTX 5090/4090.
- Real Panorama, Direct View: Features dual-sided tempered glass panels and a frameless, pillar-free design for an unobstructed view nke esịtidem components.
- BTF Hidden Connector Design: Modular cables are concealed behind the motherboard, aligning with hidden connectors for a clean, polished look.
- Optimized for Liquid Cooling: Supports AIO coolers with up to 80mm clearance for superior thermal performance.
- Striking 8° Angled Base Design: Enhances airflow efficiency for cooling and expands the viewing angle for ARGB lighting effects.
- Seamless Cable Management: Includes a dedicated cable cover and 34mm of space behind the motherboard tray for effortless cable routing.
- Color-paired Modular Cables: Ensures a cohesive and uninterrupted aesthetic for your build.
Melite
Proper assembly is crucial for optimal performance and aesthetics. Follow these general guidelines for setting up your ASUS A31 case.
Accessing the Interior
The ASUS A31 features tool-free side panels for easy access to the interior. Gently pull the tempered glass panels to remove them, providing full access for component installation.

Image: ASUS A31 case with the side panel removed, revealing the spacious interior for component installation.
Motherboard and Component Installation
Install your ATX motherboard into the chassis, securing it with the provided standoffs and screws. The case offers ample space for various components, including large CPU coolers and graphics cards.
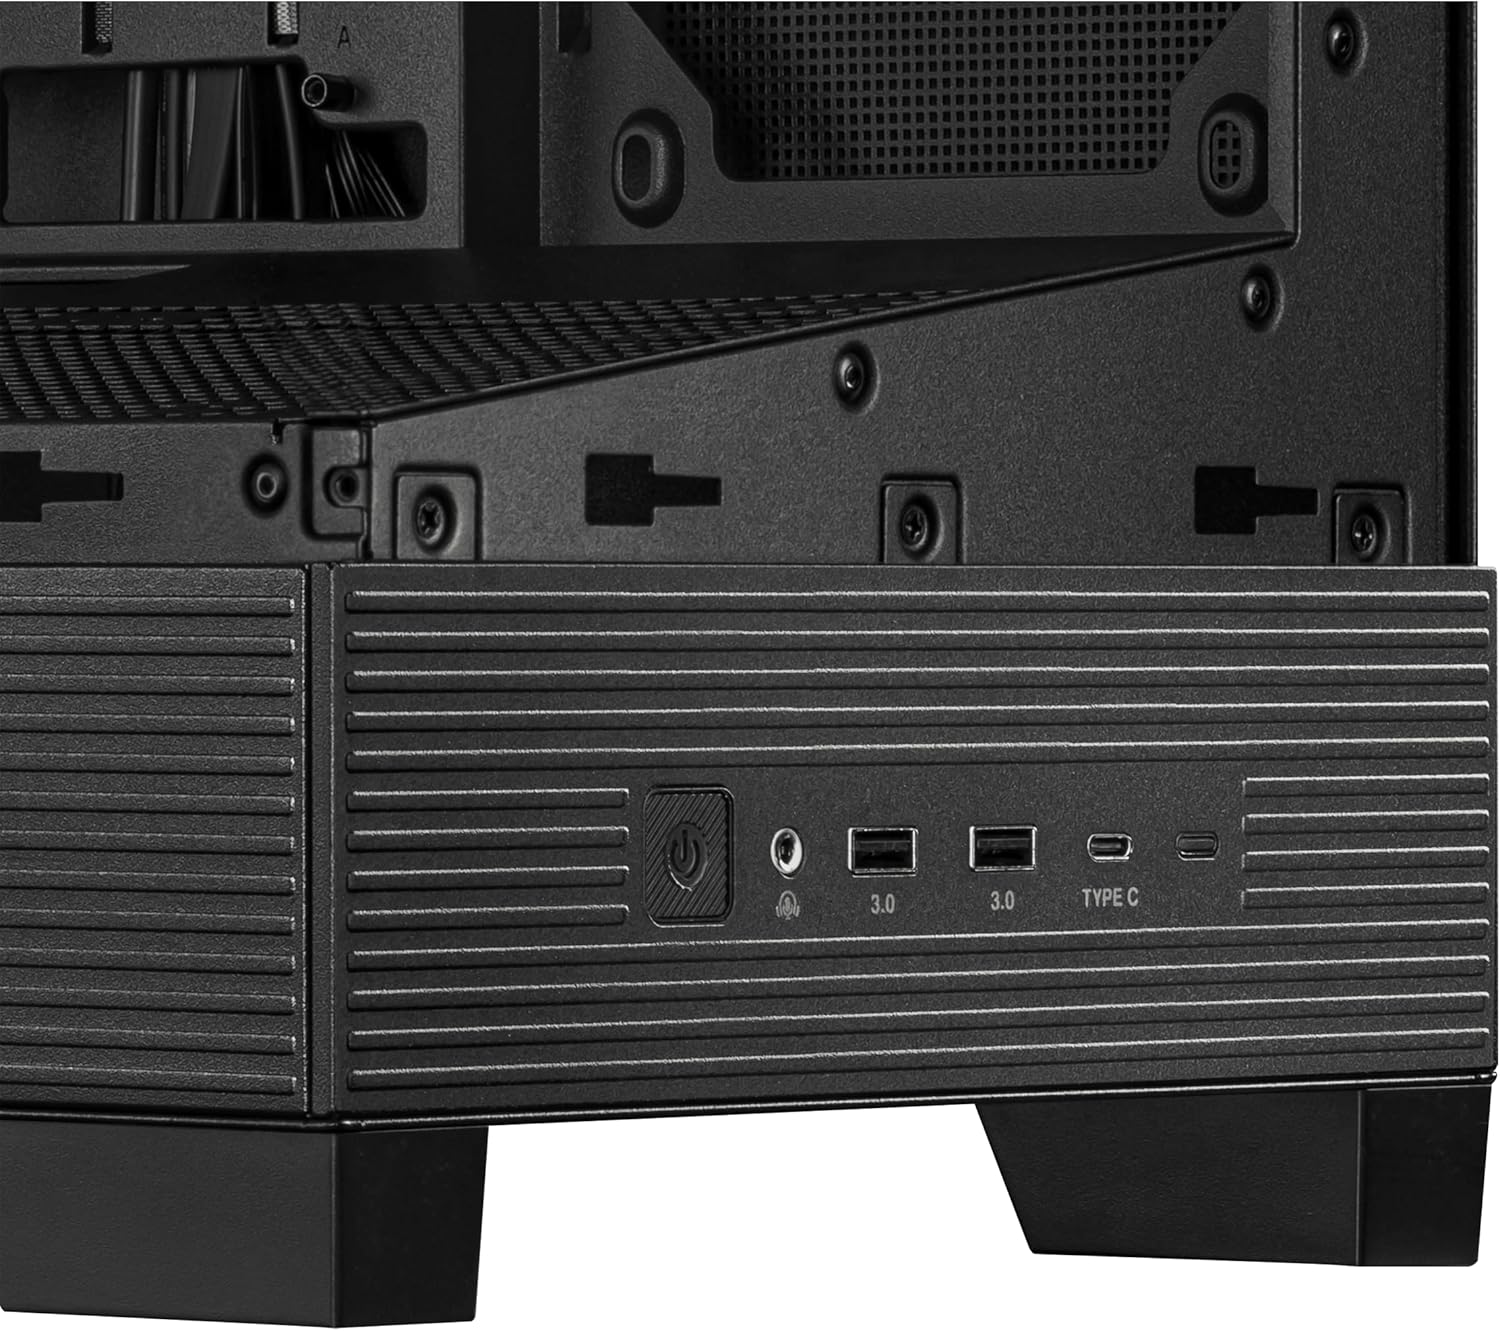
Foto: Ime view of the ASUS A31 case, highlighting the motherboard tray and integrated cable management channels.
Ntinye akụrụngwa Ike (PSU)
The PSU is typically mounted at the bottom rear of the case. Ensure proper orientation for optimal airflow, usually with the fan facing downwards to draw cool air from below the chassis. The case supports ATX power supplies.
Video: This video demonstrates the installation of a power supply unit (PSU) within a PC case, including considerations for cable routing and fan orientation. While the specific case may differ, the general principles apply to the ASUS A31.
Njikwa USB
Utilize the dedicated cable cover and 34mm of space behind the motherboard tray for seamless cable management. This helps maintain optimal airflow and a clean aesthetic. The BTF Hidden Connector Design further aids in concealing modular cables.

Foto: Ime ime n'azụ view of the ASUS A31 case, illustrating the cable management routes and tie-down points behind the motherboard tray.
Nwụnye Sistemu jụrụ oyi
The ASUS A31 supports 360mm AIO coolers and up to six fans for comprehensive cooling. Install your fans and radiators in the designated mounting points, ensuring proper airflow direction (intake/exhaust).
Video: This short video provides a quick overview of a mid-tower chassis, showcasing its internal layout and potential for cooling solutions. It highlights the space available for fans and radiators, relevant for the ASUS A31's cooling capabilities.
Na-arụ ọrụ
Once your PC is fully assembled, operating the ASUS A31 is straightforward.
Ogwe ihu I/O
Ogwe I/O n'ihu na-enye ohere dị mma maka ọdụ ụgbọ mmiri na njikwa dị mkpa:
- Bọtịnụ ike: Used to power on/off your system.
- Tọgharịa bọtịnụ: Used to restart your system.
- ọdụ ụgbọ mmiri USB 3.0 (x2): Maka mbufe data dị elu na ngwaọrụ dakọtara.
- Ọdụ ụgbọ mmiri Ụdị-C: For versatile connectivity with modern devices.
- Jacks ọdịyo: Maka ijikọ ekweisi na igwe okwu.
Foto: nso nso view of the ASUS A31's front I/O panel, featuring the power button, USB 3.0 ports, USB Type-C port, and audio jacks.
Nlekọta
Regular maintenance ensures the longevity and optimal performance of your PC.
Nchacha uzuzu uzuzu
The ASUS A31 features magnetic dust filters on the top and bottom panels. Regularly remove and clean these filters to prevent dust buildup, which can impede airflow and increase component temperatures.
Tempered Glass Care
Handle the tempered glass panels with care. Use a soft, lint-free cloth and a mild glass cleaner to remove smudges and dust. Avoid abrasive materials that could scratch the glass.
Nchọpụta nsogbu
Ọ bụrụ na ị na-enwe nsogbu n'oge mgbakọ ma ọ bụ mgbe ị gachara, tụlee usoro nchọpụta nsogbu ndị a:
- Enweghị ike: Ensure all power cables (24-pin ATX, 8-pin CPU, GPU power) are securely connected. Check the power supply switch and wall outlet.
- Enweghị Ngosipụta: Verify that your monitor is connected to the graphics card (not the motherboard integrated graphics, unless intended) and that the graphics card is properly seated and powered.
- ekpo oke ọkụ: Check fan orientation for proper airflow. Ensure CPU cooler and GPU fans are spinning. Clean dust filters.
- Okwu njikwa eriri USB: If side panels are difficult to close, re-route cables to utilize the dedicated cable management space more effectively.
- Ngwa ndị tọgbọrọ chakoo: Ensure all components (motherboard, GPU, storage drives) are securely fastened to prevent movement or disconnections.
Nkọwapụta
| Njirimara | Nkọwa |
|---|---|
| Ụdị | ASUS |
| Usoro | A31 TG Black |
| Nọmba Nlereanya ihe | A31 TG Black |
| Ibu Ibu | 18.1 pound |
| Akụkụ ngwaahịa | 20 x 17.1 x 9.1 sentimita asatọ |
| Agba | OJI |
| Ndakọrịta Motherboard | ATX |
| Ụdị ikpe | Mid Tower |
| Eji akwadoro | Gaming, Home, Professional |
| Ihe onwunwe | Alloy Steel, Plastic, Igwe ọkụ |
| Ụdị Nkwanye Ike | Ugwu azụ |
| Usoro jụrụ oyi | MMA |
| Ọnụọgụ nke ọdụ ụgbọ mmiri USB 3.0 | 2 |
Akwụkwọ ikike
Maka ozi zuru ezu gbasara akwụkwọ ikike, biko lee kaadị akwụkwọ ikike dị na ngwaahịa gị ma ọ bụ gaa na nkwado ASUS gọọmentị. websaịtị. Debe ihe akaebe nke ịzụrụ ihe maka akwụkwọ ikike ọ bụla.
Nkwado
If you require further assistance or have questions not covered in this manual, please visit the official ASUS support website or contact their customer service. You can find contact information and additional resources on the ASUS websaịtị.


