1. Ozi nchekwa dị mkpa
Please read this entire instruction manual before installation and assembly. If you have any questions regarding any instructions or warnings, please contact your local distributor for assistance. Keep this manual for future reference.
- This product is designed for installation by qualified personnel only.
- Ensure the mounting surface can safely support the combined weight of the equipment and all attached hardware and components.
- Use mounting screws as provided and DO NOT overtighten.
- Ezubere ngwaahịa a maka naanị ime ụlọ.
- Do not mount on drywall alone.
2. Nkọwapụta ngwaahịa
| Nọmba nlereanya | CM2365 |
| Nha TV dakọtara | 23 ruo 65 sentimita asatọ |
| Ike ibu | Ruo 110 lbs (50 n'arọ) |
| Ụdị nrịgo VESA | 100x100mm, 200x100mm, 200x200mm, 300x300mm, 400x200mm, 400x400mm |
| Ndozi atụgharị | 0° to -25° (downward) |
| Ndozigharị Swivel | 360° (left-right) |
| Ndozi ọkwa | ±3° |
| Ndozi elu | 16.89" to 24.76" (from ceiling to center of mounting plate) |
| Ihe onwunwe | Ọla |
| Agba | Nwa |
This mount is designed for flat ceilings and is suitable for various environments including homes, bars, restaurants, fitness centers, schools, and offices.
3. Ihe ngwugwu
Verify that all components are present and undamaged. If any parts are missing or damaged, please contact WALI customer support.

Figure 3.1: All Parts Included
- TV Ceiling Mount Assembly (Ceiling Plate, Extension Pole, TV Bracket)
- Ngwa ngwa mgbanaka (skru dị iche iche, igwe na-asa akwa, oghere, arịlịka)
- Akwụkwọ ntuziaka onye ọrụ
- Tools (Allen wrench, open-end wrench)
4. Ntọala na nwụnye
Before beginning, ensure you have the necessary tools and understand all instructions. Professional installation is recommended for safety.
4.1. Choose a Suitable Ceiling Type
This mount is compatible with brick, concrete, and wood joist ceilings. DO NOT mount on drywall alone.

Figure 4.1: Compatible Ceiling Types
4.2. Nzọụkwụ Nwụnye
- Attach Brackets to TV Back: Secure the TV mounting brackets to the back of your television using the appropriate screws and spacers from the hardware kit. Ensure they are tightened securely.
- Install Ceiling Plate: Position the ceiling plate on your chosen ceiling location. Mark the drill holes. Drill pilot holes and then secure the ceiling plate using the provided anchors and screws.
- Assemble Extension Pole: Attach the extension pole to the ceiling plate. Adjust the height as desired and secure it with the provided bolts and nuts. Ensure all connections are tight.
- Hang TV on Mount: Carefully lift the television with the attached brackets and hook it onto the extension pole's TV bracket. Secure the TV to the mount using the safety screws.

Figure 4.2: Easy Installation Steps
Video 4.1: WALI TV Ceiling Mount Installation Guide. This video demonstrates the step-by-step installation process for the WALI ceiling TV mount, including securing the mount to the ceiling and attaching the TV.
5. Ọrụ na Mgbanwe
The WALI CM2365 ceiling TV mount offers various adjustments for optimal viewakụkụ .
5.1. Ndozi elu
The mount features 2-inch incremental height adjustments, allowing you to set the TV from 16.89 inches to 24.76 inches (from the ceiling to the center of the mounting plate).
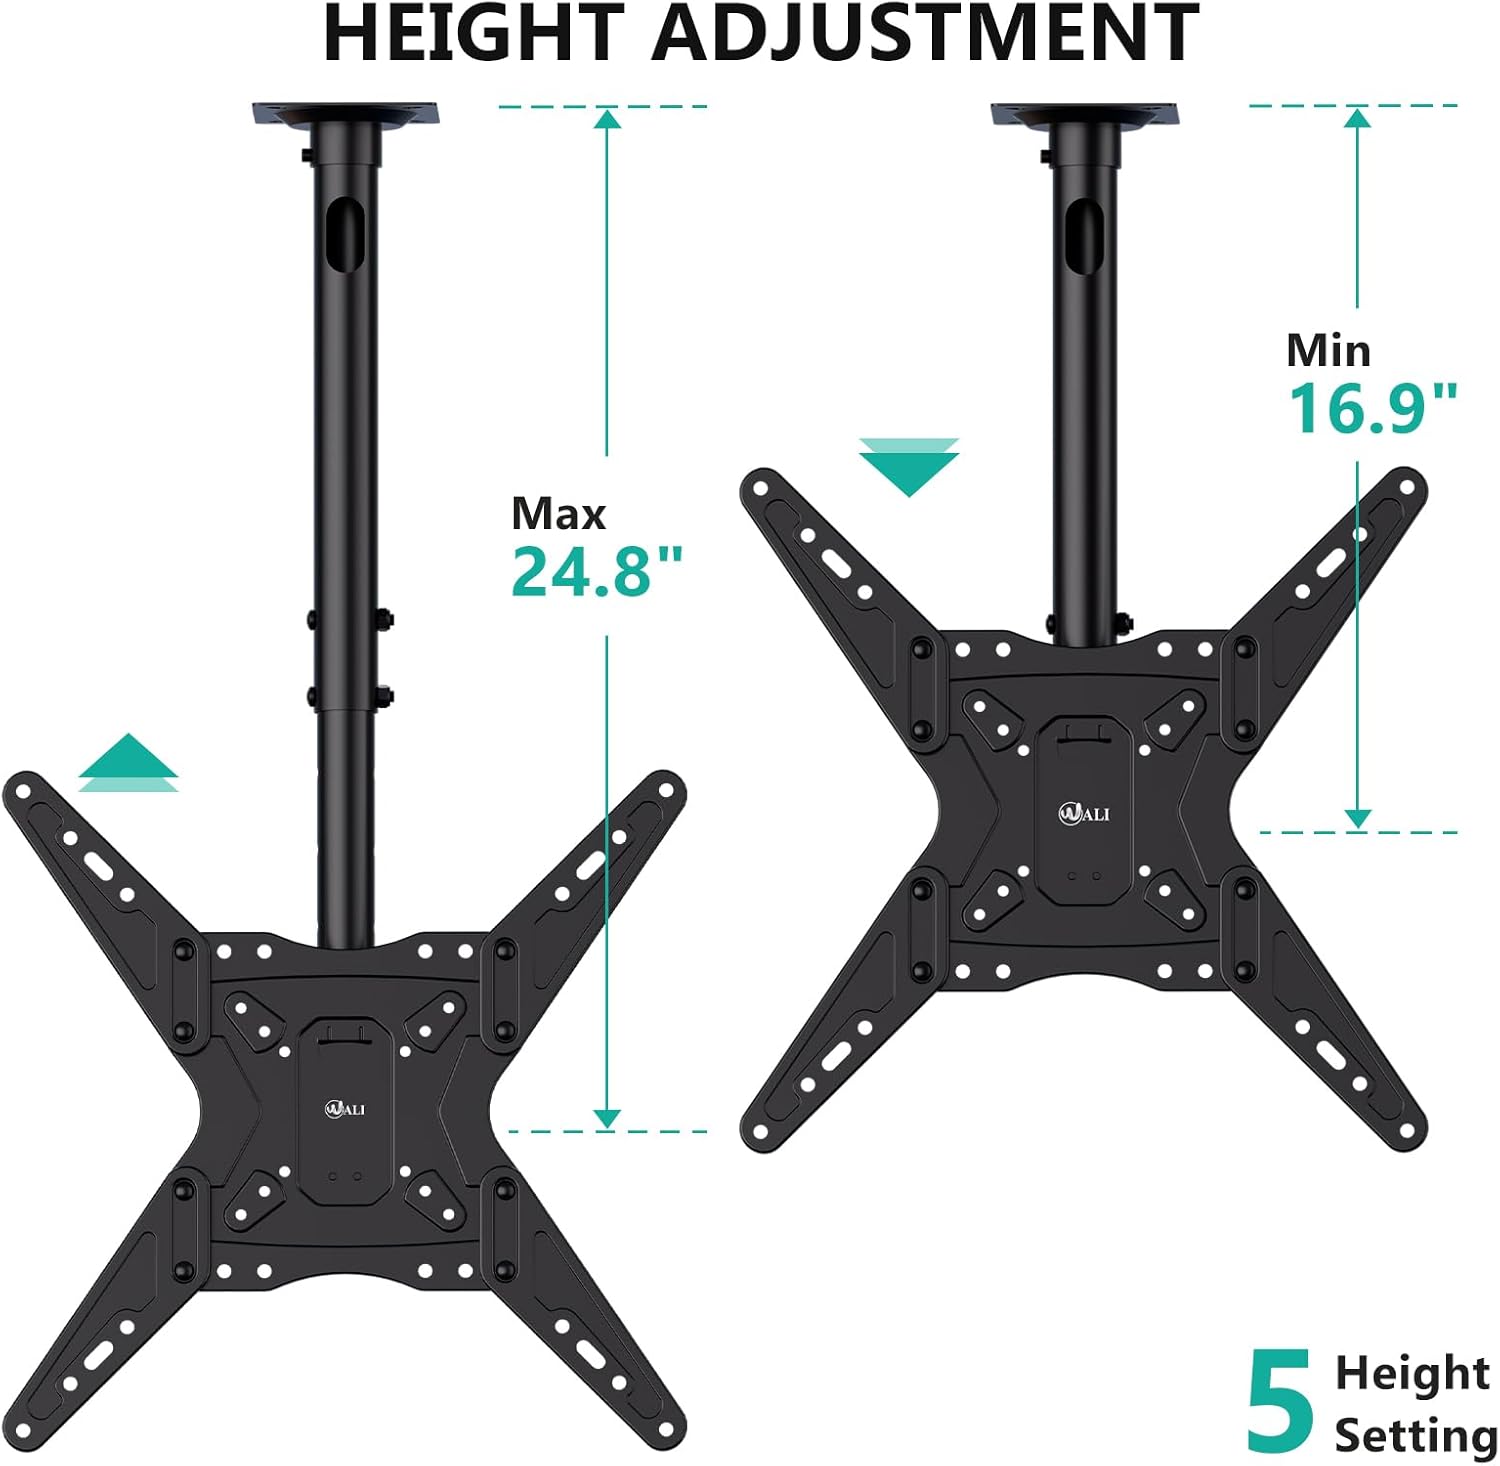
Figure 5.1: Height Adjustment Range
5.2. Tilt, Swivel, and Level Adjustments
- Gbaa: The TV can be tilted down by 25° to reduce glare and optimize viewing.
- Swivel: A 360° left-right swivel range allows for flexible positioning.
- Ọkwa: The TV can be rotated ±3° after installation to ensure a perfectly level screen.

Figure 5.2: Adjustment Overview
Video 5.1: WALI Ceiling TV Mount 65 Inch Features. This video showcases the various features and adjustments of the WALI ceiling TV mount, including tilt, swivel, and height adjustments, demonstrating its versatility for different viewihe ndapụta.
6. Nlekọta
Regular maintenance ensures the longevity and safe operation of your WALI CM2365 Ceiling TV Mount.
- Nhicha: Jiri ákwà dị nro ma kpọọ nkụ hichaa ihe e ji etinye ihe n'elu ya iji wepụ uzuzu. Ejila ihe nhicha ma ọ bụ ihe mgbaze.
- Nyocha: Lelee skru na njikọ niile iji hụ na ha kwụgidere. Tinyegharịa ọzọ ma ọ dị mkpa.
- Oke ibu: Agafela ikike ịdị arọ kacha nke 110 lbs.
7. Nchọpụta nsogbu
If you encounter any issues with your WALI CM2365 Ceiling TV Mount, refer to the following common solutions:
- TV abụghị ọkwa: Use the ±3° level adjustment feature to correct the angle. Ensure all mounting screws are tightened evenly.
- Ugwu ahụ adịghị mma: Double-check all ceiling and TV connections. Ensure the mount is securely fastened to a compatible ceiling type and that the TV's weight does not exceed the maximum capacity.
- Difficulty adjusting tilt/swivel: Ensure no cables are obstructing movement. Check if any locking mechanisms are engaged and release them if necessary.
For further assistance, please contact WALI customer support.
8. Nkwado na Akwụkwọ ikike Ndị Ahịa
WALI provides experienced and friendly US-based customer support, available to assist 7 days a week.
- Ozi mkpọtụrụ: Please refer to the product packaging or the official WALI websaịtị maka nkọwa kọntaktị kachasị ọhụrụ maka nkwado ndị ahịa.
- Akwụkwọ ikike: A na-enye nkọwa akwụkwọ ikike kpọmkwem site na nkwakọ ngwaahịa ma ọ bụ na gọọmentị onye nrụpụta. website. Please consult these resources for information regarding your product's warranty coverage.