1. Ngwaahịa gafereview
The Yottamaster M.2 NVMe SATA Enclosure is a high-performance external storage solution designed for M.2 NVMe PCIe and SATA M-Key / B+M SSDs. Featuring a 10Gbps USB 3.2 Gen2 USB-C interface and UASP acceleration protocol, it ensures rapid data transfer. Its tool-free design and aluminum alloy casing provide convenient installation and efficient heat dissipation. The enclosure supports various SSD sizes (2230, 2242, 2260, 2280) and is compatible with a wide range of devices.

Figure 1: Yottamaster M.2 NVMe SATA Enclosure. This image displays the sleek, gray aluminum enclosure, highlighting its compact and portable design.
2. Kedu ihe dị na Igbe ahụ
- M.2 NVMe SATA Enclosure
- USB-C ka USB data USB
- USB-C to USB-A Adapter (integrated with cable)
- Thermal Pad
- Silicone Screw/Fastener
- Akwụkwọ ntuziaka onye ọrụ
3. Ntọala na nwụnye
The Yottamaster M.2 NVMe SATA Enclosure features a tool-free design for quick and easy SSD installation.
- Mepee ihe mkpuchi ahụ: Press the release button on the back of the enclosure and slide out the internal tray.
- Fanye SSD: Gently insert your M.2 NVMe or SATA SSD into the M.2 slot on the internal tray. Ensure the SSD is fully seated.
- SSD echekwara: Use the provided silicone screw/fastener to secure the end of the SSD to the tray. This prevents movement and ensures proper contact.
- Apply Thermal Pad (Optional but Recommended): Remove the protective film from the thermal pad and place it directly onto the SSD's chips. This aids in heat dissipation.
- Mechie ihe mkpuchi ahụ: Wepu tray dị n'ime azụ n'ime aluminom casing ruo mgbe ọ pịrị na-enweghị nchebe n'ime ebe.

Figure 2: Visual guide for the tool-free installation of an M.2 SSD into the enclosure. The image shows the steps: pressing the release button, sliding out the tray, inserting the SSD, and reassembling the enclosure.
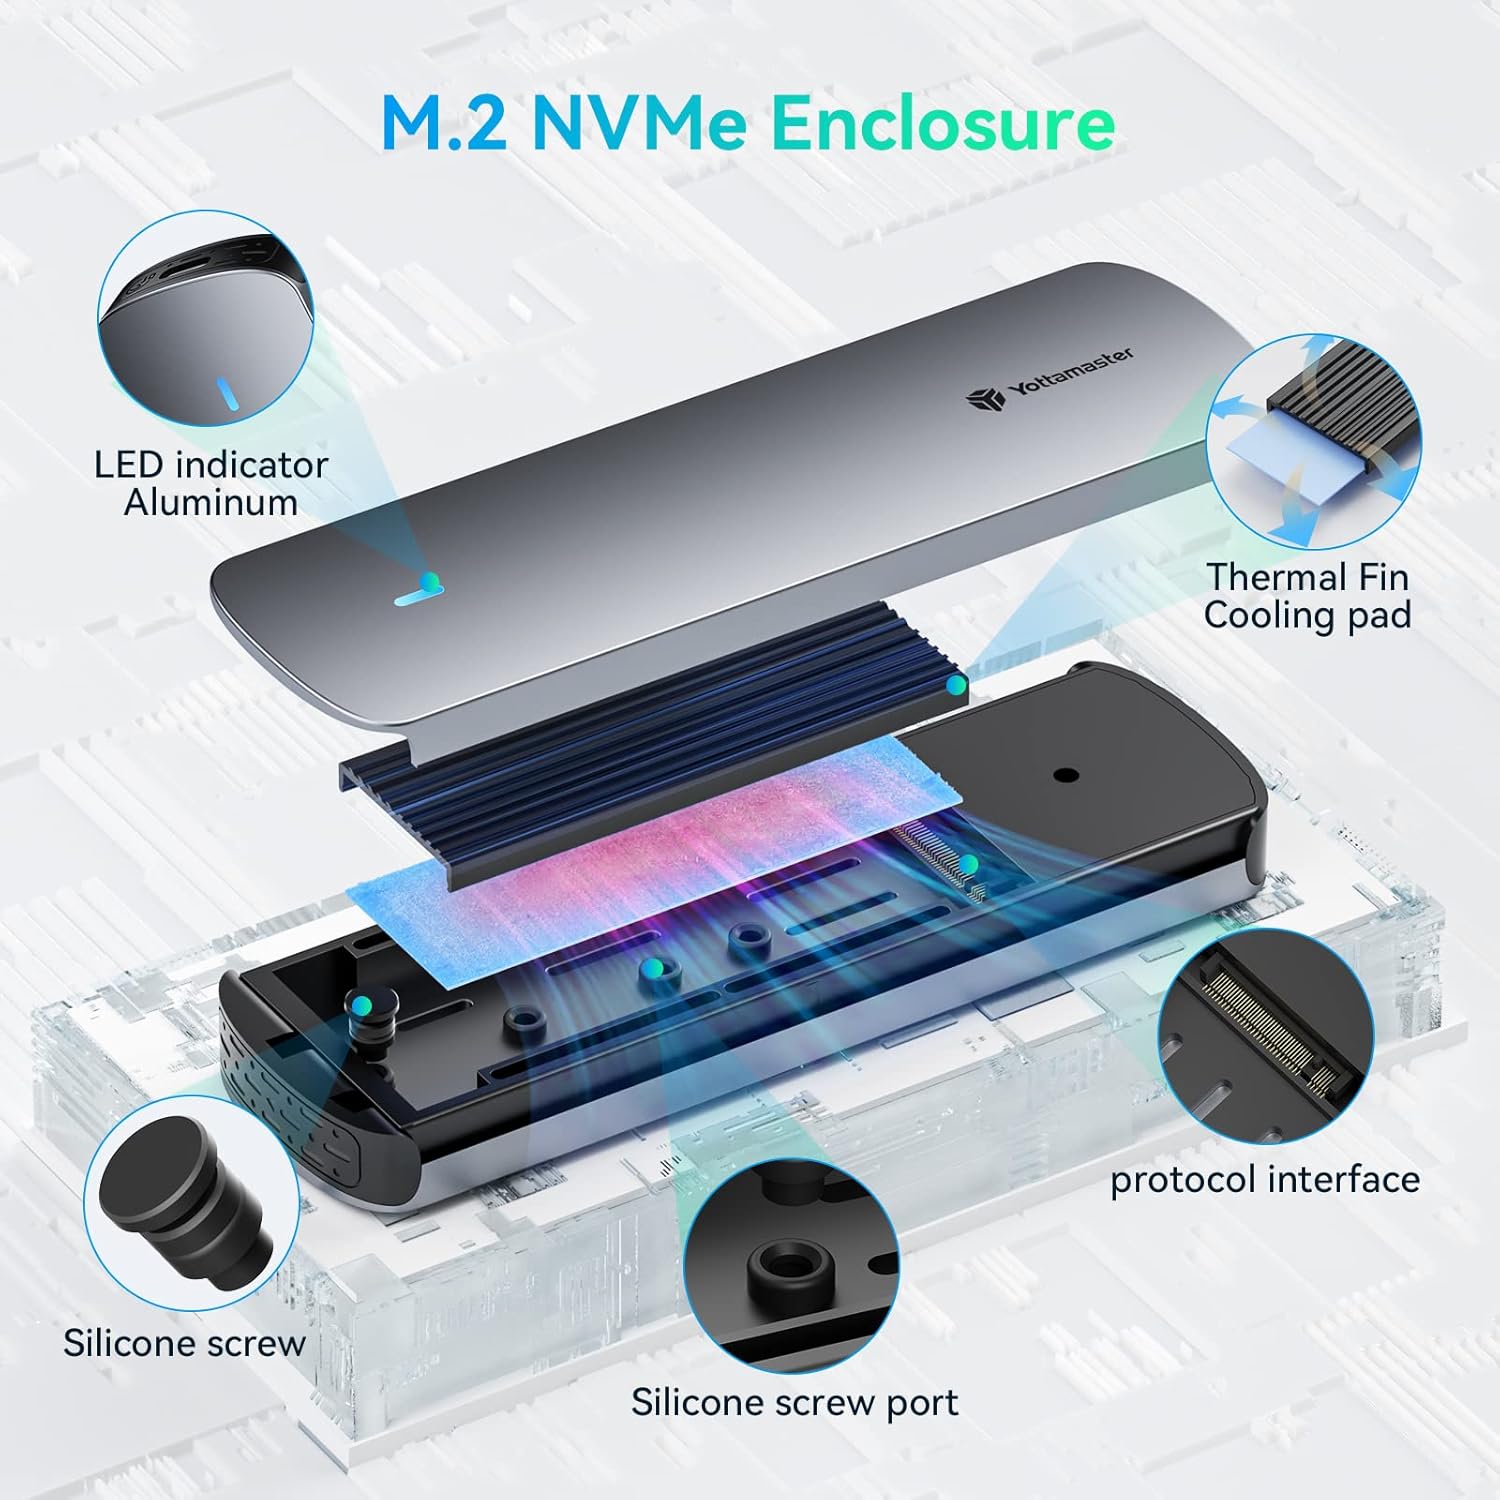
Ọgụgụ 3: Ihe gbawara view illustrating the internal components of the enclosure, including the aluminum top cover, LED indicator, thermal fin, cooling pad, protocol interface, silicone screw, and silicone screw port.
Video 1: Official Yottamaster video demonstrating the M.2 NVMe SATA Enclosure, including its features and ease of use. This video provides a visual overview of the product and its functionality.
4. Ntuziaka ọrụ
4.1 Njikọta
Connect the enclosure to your device (PC, smartphone, laptop, smart TV, router, gaming console) using the provided USB-C to USB-C data cable. The cable also includes a USB-A adapter for broader compatibility.

Figure 4: The included 2-in-1 USB-C to USB-C/USB-A data cable, along with examples of compatible devices such as smartphones, tablets, game consoles (Switch, PS5/PS4), and laptops (MacBook, ASUS, Lenovo).
4.2 Atụmatụ Amamihe
- Intelligent Sleep Technology: The enclosure automatically enters sleep mode after 10 minutes of inactivity. This conserves energy and extends the lifespan of your SSD.
- Ihe ngosi LED: A built-in LED indicator provides clear visual monitoring of the SSD's status, allowing you to stay informed at a glance.
5. Ndakọrịta
The enclosure is compatible with NVMe PCIe and SATA M-Key / B+M connectors M.2 SSDs. It supports SSD sizes of 2230, 2242, 2260, and 2280. It is suitable for use with PCs, smartphones, laptops, smart TVs, routers, and gaming consoles.

Figure 5: A detailed chart showing compatibility with NVMe M Key, NVMe B+M Key, and SATA B+M Key interfaces, as well as supported SSD sizes (2230, 2242, 2260, 2280).
6. Arụmọrụ
Equipped with a 10Gbps main control scheme and supporting the UASP acceleration protocol, this enclosure ensures rapid data transfer. The external USB 3.2 Gen2 USB-C output interface provides a maximum transfer rate of 10Gbps, delivering exceptional speed and efficiency for various tasks including working, shooting, and gaming.

Figure 6: Graphic illustrating the 10Gbps high-speed transfer capability of the enclosure, emphasizing its efficiency compared to slower USB standards.

Figure 7: Depiction of various usage scenarios for the enclosure, including working on a laptop, professional video shooting, and gaming, highlighting its versatility.
7. Nkọwapụta
- Akara: Yottamaster
- Nọmba nlereanya: nvme1
- Agba: Agba ntụ
- Ngwa ngwa ngwa: USB Ụdị C
- Ọsọ mbufe data: 10Gbps (USB 3.2 Gen2)
- Compatible SSD Types: NVMe PCIe M-Key / B+M, SATA B+M M.2 SSDs
- Supported SSD Sizes: 2230, 2242, 2260, 2280
- Atụmatụ pụrụ iche: Fast Data Transfer, Indicator Light, Lightweight, Plug and Play, Portable, Intelligent Sleep Technology
- Ngwa dakọtara: Desktops, Laptops, Smartphones, Smart TVs, Routers, Gaming Consoles
- Ibu ihe: 4.6 ounces
- Akụkụ ngwugwu: 7.24 x 4.25 x 1.1 sentimita asatọ
8. Nchọpụta nsogbu
- Achọpụtaghị mbanye:
- Ensure the SSD is correctly inserted and secured in the enclosure.
- Verify the USB cable is securely connected to both the enclosure and the host device.
- Try connecting to a different USB port or a different host device.
- For new SSDs, ensure they are initialized and partitioned in your operating system's Disk Management (Windows) or Disk Utility (macOS).
- Ọsọ mbufe nwayọ:
- Ensure you are using a USB 3.2 Gen2 (10Gbps) compatible port on your host device. Older USB 2.0 or 3.0 ports will result in slower speeds.
- Verify your SSD itself supports 10Gbps speeds.
- Check the integrity of the USB cable.
- Ensure the thermal pad is correctly installed to prevent thermal throttling.
- Enclosure Overheating:
- Ensure the thermal pad is correctly installed between the SSD and the aluminum casing.
- Avoid prolonged heavy data transfers in poorly ventilated areas.
- Ihe ngosi LED anaghị agba ọkụ:
- Lelee njikọ eriri niile.
- Ensure the host device is powered on and providing sufficient power to the USB port.
9. Akwụkwọ ikike na nkwado
For warranty information, technical support, or further assistance, please refer to the official Yottamaster websaịtị ma ọ bụ kpọtụrụ ndị ahịa ha ozugbo. Debe akwụkwọ nnata ịzụrụ maka akwụkwọ ikike.


