1. Okwu mmalite
This manual provides detailed instructions for the installation, operation, and maintenance of your VANBAR DC209Pro Mirror Dash Cam. Please read this manual thoroughly before using the product to ensure proper function and safety. The VANBAR DC209Pro is an advanced mirror-type dash cam featuring a separated camera design, 4K front recording, 2.5K rear recording, and integrated safety features like Blind Spot Detection (BSD) and Lane Change Assist (LCA).
2. Ngwaahịa gafereview
The VANBAR DC209Pro is designed to provide comprehensive vehicle surveillance and driving assistance. It includes a main mirror unit, a separated front camera, a waterproof rear camera, and essential accessories for installation and operation.
Akụkụ ndị bụ isi:
- Ultra HD Recording: 4K (3840x2160P) front camera and 2.5K (2560x1440P) rear camera.
- Separated Camera Design: Allows flexible installation of the front camera.
- Advanced Safety Systems: Blind Spot Detection (BSD) and Lane Change Assist (LCA).
- Ọhụụ Abalị Kachasị Elu: Equipped with IMX415 CMOS sensor and HDR technology for clear low-light recording.
- GPS agbakwunyere: Records speed, direction, and allows route playback.
- Nlekota Ebe A Na-adọba Ụgbọala Awa 24: G-sensor activated recording for vehicle protection.
- Njikwa olu: Hands-free operation for various functions.
- Type-C Power Interface: Enhanced charging speed, stability, and durability.
- 128GB MicroSD Card Included: High-durability Class 10 card for immediate use.
- TS Format Recording: Ensures data integrity and prevents file nrụrụ aka.
Ọdịnaya ngwugwu:
- VANBAR DC209Pro Mirror Dash Cam Main Unit
- Igwefoto ihu
- Rear Camera (Waterproof)
- 128GB MicroSD kaadị
- Modul GPS
- Igwe ọkụ ọkụ sịga
- Hardwire Kit (for 24-hour parking monitoring)
- Rear Camera Extension Cable (8m)
- Mounting Straps (2 sizes)
- Anti-reflection Film
- Akwa nhicha
- Akwụkwọ ntuziaka onye ọrụ
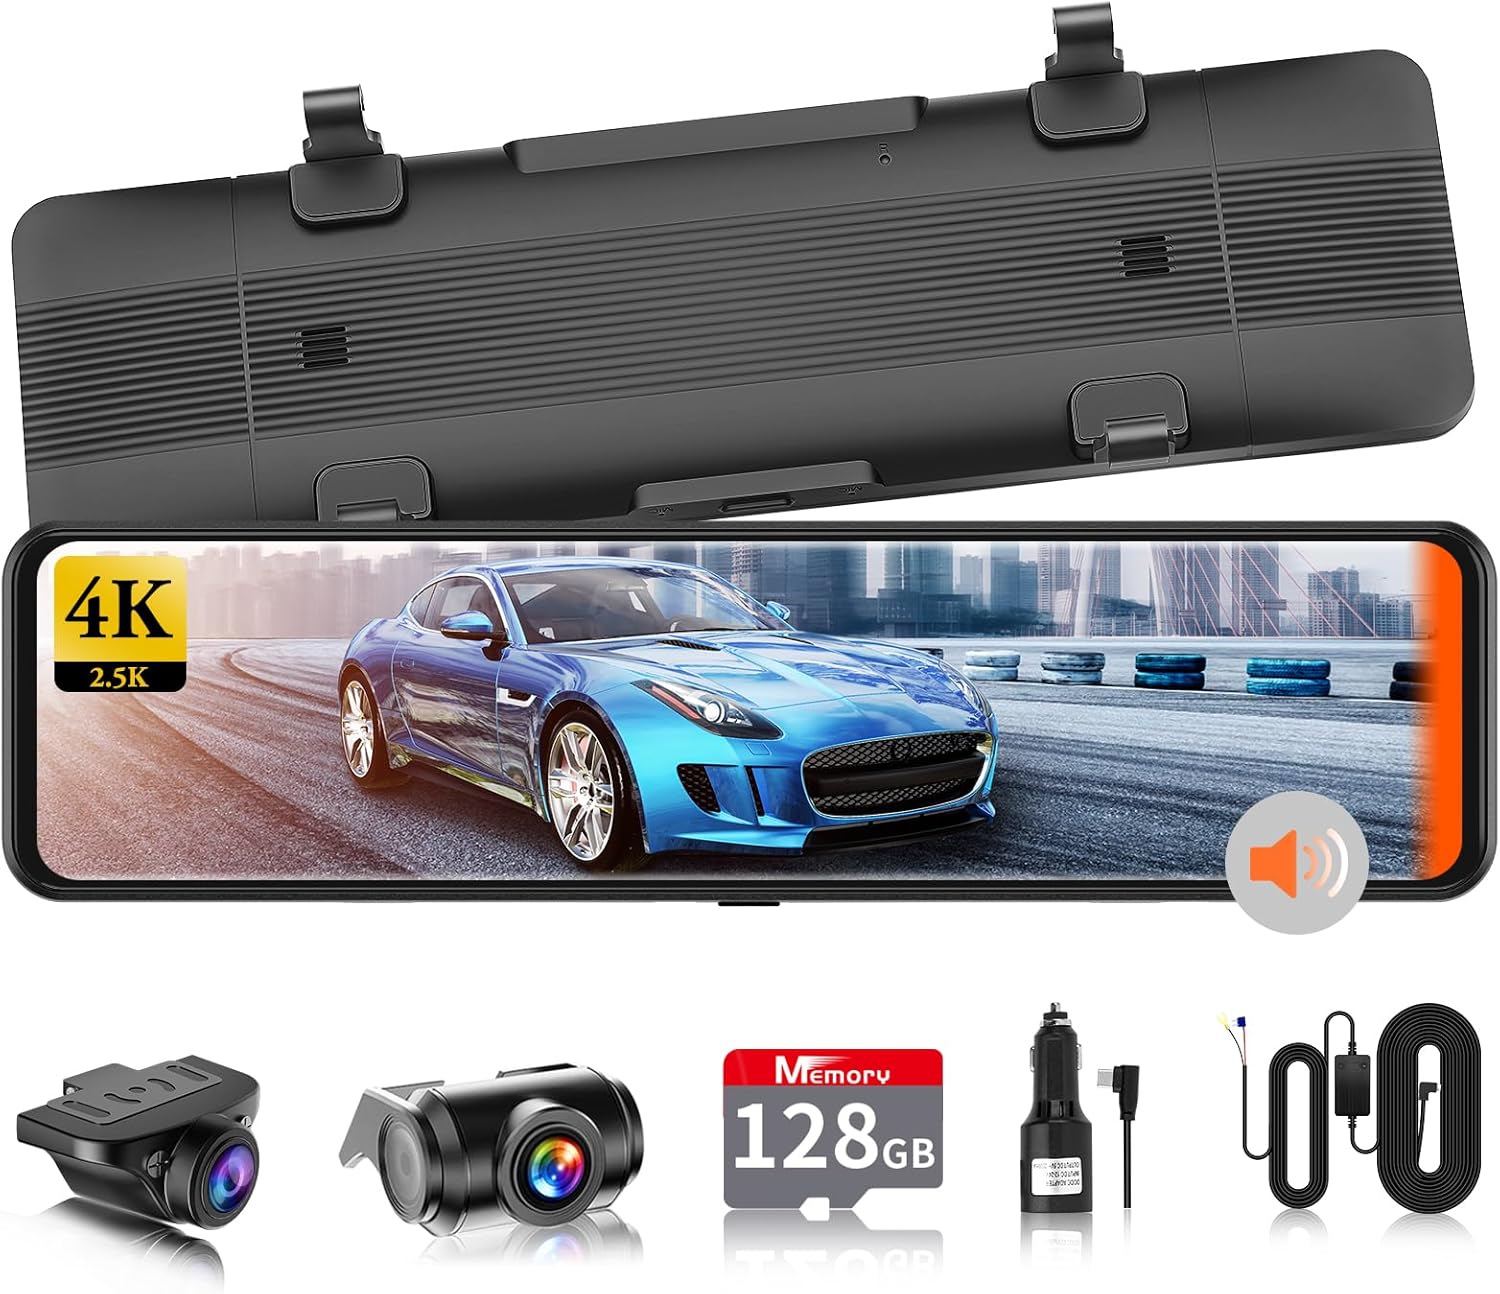
Foto 2.1: Isi ihe dị na ya na ihe ndị ọzọ dị na ya.

Foto 2.2: Ofeview of the DC209Pro's core functions.
3. Nhazi
3.1 Lelee tupu ntinye
Before permanent installation, connect all components (main unit, front camera, rear camera, power cable) and test the system to ensure all functions are working correctly. Use the provided cigarette lighter power cable for this test.
3.2 Ntinye Kaadị MicroSD
Insert the included 128GB MicroSD card into the designated slot on the main unit. Ensure it is inserted correctly until it clicks into place.
3.3 Ntinye nke isi
- Attach the main mirror unit to your vehicle's existing rearview jiri eriri rọba enyere enyo. Hụ na e kechiri ya nke ọma ma ghara igbochi gị. view.
- Apply the anti-reflection film to the mirror screen to reduce glare during daytime use.
3.4 Nwụnye igwefoto n'ihu
The front camera is separated from the main unit. Mount it on your windshield, ideally behind the rearview mirror, to ensure a clear view of the road ahead without obstructing your driving visibility. Connect it to the main unit using the provided cable.
3.5 Nwụnye igwefoto n'azụ
The rear camera is waterproof and can be installed either inside or outside the vehicle. For external installation, typically above the license plate, ensure the camera is securely mounted and the cable is routed safely to the main unit. The included cable is 8 meters long. If a dedicated bracket is required for your vehicle type, please consult our service center.

Foto 3.1: Ọpụample of rear camera installation.
3.6 Njikọ ike
- Connect the cigarette lighter power cable to the main unit and your vehicle's cigarette lighter socket.
- For 24-hour parking monitoring, install the included hardwire kit (buck line) according to the instructions provided with the kit. This allows the dash cam to receive power even when the engine is off.
3.7 GPS Module Connection
Connect the GPS module to the main unit. Position the module in an area with a clear view of the sky for optimal signal reception, typically on the dashboard or near the windshield.
4. Ntuziaka ọrụ
4.1 Gbanyụọ ma ọ bụ gbanyụọ
- Akpaaka: The device will automatically power on and begin recording when the vehicle engine starts (power is supplied). It will power off automatically when the engine is turned off.
- Akwụkwọ ntuziaka: Pịa ma jide bọtịnụ ike dị na isi ngwaọrụ ahụ iji gbanye ma ọ bụ gbanyụọ ngwaọrụ ahụ n'aka.
4.2 Ọrụ ihuenyo
The DC209Pro features an IPS full-touch 2.5D screen. Navigate through menus and settings by swiping and tapping the screen, similar to a smartphone. The user interface (UI) is designed for intuitive operation.

Image 4.1: Intuitive UI design for easy navigation.
4.3 Ndekọ ndabere
Once powered on, the dash cam will automatically start loop recording. Video files are saved to the MicroSD card. When the card is full, the oldest unprotected filea ga-edegharị s.
4.4 Njikwa olu
The DC209Pro supports voice commands for hands-free operation. Refer to the detailed user manual for a list of available voice commands.
5. Advanced Atụmatụ
5.1 Blind Spot Detection (BSD)
The BSD system detects obstacles (vehicles, pedestrians) in your blind spots, areas not visible in your side mirrors or directly behind your vehicle. When an object is detected, the system provides visual alerts (colored frames on the screen: blue for safe distance, yellow for dangerous distance) and audible warnings to alert the driver.
5.2 Enyemaka mgbanwe uzo (LCA)
The LCA system detects vehicles rapidly approaching from adjacent lanes behind you. When such a vehicle is detected, an orange indicator appears on the left or right side of the monitor (depending on the direction of the approaching vehicle), accompanied by an audible warning. Both BSD and LCA detection ranges and speeds can be adjusted based on driving habits.

Image 5.1: Visual representation of BSD and LCA functionality.
Ọrụ GPS 5.3
The integrated GPS module records your vehicle's driving speed, direction, and location data along with the video footage. This data can be reviewed on a computer using dedicated playback software, allowing you to track your route.

Image 5.2: GPS tracking and route playback interface.
5.4 24-Hour Parking Monitoring
With the hardwire kit installed, the dash cam can monitor your vehicle for 24 hours. The built-in 3-axis G-sensor detects impacts or vibrations while parked. Upon detection, the device automatically starts recording and saves the footage to a dedicated folder, preventing it from being overwritten by loop recording. This feature is crucial for recording hit-and-run incidents or vandalism.
5.5 G-Sensor (Impact Recording)
During driving, if the G-sensor detects a sudden impact or collision, it automatically triggers emergency recording. This footage is then locked and saved in a separate folder, ensuring critical evidence is protected and not overwritten.
5.6 Backup Guide Line
When reversing, the rear camera display automatically shows adjustable backup guidelines. You can customize the length and angle of these lines to match your vehicle and parking preferences. The adjusted settings will be saved for future use.

Image 5.3: Adjustable backup guidelines for precise parking.
5.7 Night Vision and HDR Technology
The DC209Pro utilizes an IMX415 sensor and HDR (High Dynamic Range) technology to capture clear and detailed footage even in challenging low-light conditions, such as city streets at night or areas with minimal streetlights. This significantly improves visibility compared to standard dash cams, ensuring license plates and other crucial details are recorded.
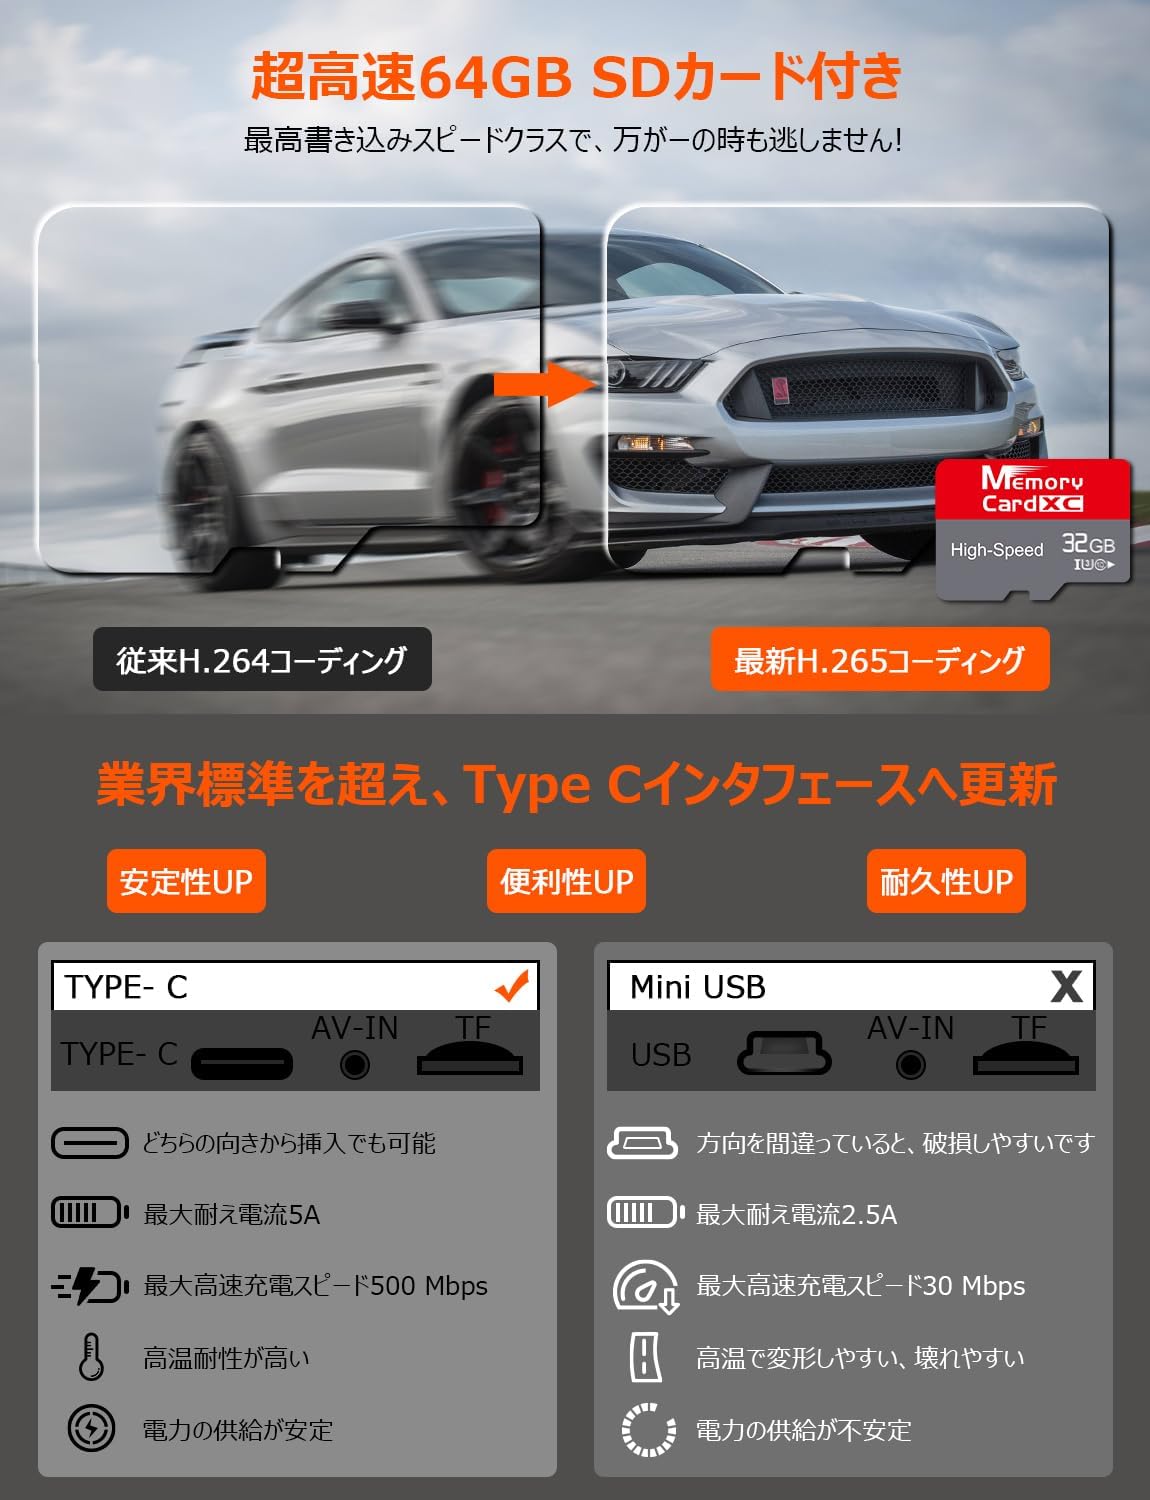
Image 5.4: Enhanced night vision with SONY IMX415 sensor.
5.8 Type-C Power Interface
The DC209Pro features a Type-C power interface, offering improved charging speed, stability, convenience, and durability compared to traditional Mini USB (Type-B) interfaces. This design addresses common issues like power drops, reboots, and deformation in high temperatures.

Foto 5.5: Advantages of Type-C power interface.
6. Nlekọta
Nlekọta Kaadị MicroSD 6.1
The included 128GB Class 10 MicroSD card is designed for high durability. To maintain optimal performance and prevent data loss, it is recommended to format the MicroSD card periodically (e.g., once a month) through the dash cam's settings menu. Avoid removing the card while the device is powered on or recording.
6.2 Nhicha
Regularly clean the camera lenses and the mirror screen with a soft, dry, lint-free cloth. Do not use abrasive cleaners or solvents, as they may damage the surfaces. Ensure the rear camera lens is kept clear of dirt and debris, especially if externally mounted.
7. Nchọpụta nsogbu
If you encounter any issues with your VANBAR DC209Pro, please refer to the following common troubleshooting steps. For more detailed solutions, consult the full user manual or contact customer support.
- Ngwaọrụ anaghị agbanye: Ensure the power cable is securely connected to both the dash cam and the power source (cigarette lighter or hardwire kit). Check the vehicle's power outlet for functionality.
- Nsogbu ndekọ: Ensure the MicroSD card is inserted correctly and has sufficient free space. Format the card if necessary. Check recording settings in the menu.
- Ogo vidiyo na-adịghị mma: Clean the camera lenses. Ensure the protective film has been removed from the lenses. Adjust exposure settings if available.
- Mfu nke akara GPS: Ensure the GPS module is positioned with a clear view of the sky. Avoid placing it under metallic objects that may interfere with the signal.
- Screen reflection: Apply the included anti-reflection film to the mirror screen.
8. Nkọwapụta
| Njirimara | Nkọwapụta |
|---|---|
| Aha Nlereanya | DC209Pro |
| Nha ihuenyo | 11 sentimita asatọ |
| Mkpebi igwefoto n'ihu | 4K (3840x2160P) |
| Mkpebi igwefoto azụ | 2.5K (2560x1440P) |
| Ihe mmetụta onyonyo | IMX415 CMOS |
| Atụmatụ pụrụ iche | BSD, LCA, GPS, WDR, HDR, G-Sensor, Loop Recording, 24-Hour Parking Monitor, Voice Control, Backup Guide Line, LED Signal Compatible |
| Ike Okwu | Ụdị-C |
| Nchekwa gụnyere | 128GB MicroSD Card (Class 10) |
| Ụdị nkwụnye | Adhesive (Mirror Straps) |
| Akụkụ ngwaahịa | 26 x 7.2 x 4.3 cm |
| Ibu ngwaahịa | 1.07 n'arọ |
9. Akwụkwọ ikike na nkwado
9.1 Akwụkwọ ikike ngwaahịa
The VANBAR DC209Pro Mirror Dash Cam comes with a 3-afọ akwụkwọ ikike site na ụbọchị ịzụrụ. Akwụkwọ ikike a na-ekpuchi ntụpọ n'ichepụta ma na-ahụ na ọrụ a pụrụ ịdabere na ya n'okpuru ojiji nkịtị. Biko dowe ihe akaebe nke ịzụrụ ihe maka akwụkwọ ikike.
9.2 Nkwado ndị ahịa
For any questions, technical assistance, or warranty claims, please contact VANBAR customer support. Our support team is dedicated to providing prompt and helpful assistance. Contact details can typically be found on our official websaịtị ma ọ bụ site na ikpo okwu ịzụrụ ihe.
We recommend checking our official website for the latest software updates and frequently asked questions (FAQs).


