Okwu mmalite
This manual provides comprehensive instructions for the Douk Audio T7 7-Band Equalizer Balanced XLR/RCA Preamplifier. Please read this manual carefully before operating the device to ensure proper use and optimal performance.
Ntuziaka nchekwa dị mkpa
- Gụọ ntuziaka ndị a.
- Debe ntuziaka ndị a.
- Ṅaa ntị n'ịdọ aka ná ntị niile.
- Soro ntuziaka niile.
- Ejila ngwa a n'akụkụ mmiri.
- Jiri akwa kpọrọ nkụ hichaa naanị.
- Akwụsịla oghere ikuku ikuku ọ bụla. Wụnye dị ka ntuziaka onye nrụpụta si dị.
- Awụnyela n'akụkụ ebe okpomọkụ ọ bụla dị ka radiators, ndekọ okpomọkụ, stovu, ma ọ bụ ngwa ndị ọzọ (gụnyere amplifiers) nke na-emepụta okpomọkụ.
- Chebe eriri ọkụ ka ị ghara ịgagharị ma ọ bụ tuo ya, ọkachasị na plọg, ebe nchekwa dị mma, na ebe ha si na ngwa ahụ pụta.
- Jiri naanị mgbakwunye / ngwa ndị nrụpụta akọwapụtara.
- Kwupu ngwa a n'oge oke mmiri ozuzo ma ọ bụ mgbe ejighi ya ogologo oge.
- Tụtụ aka n'aka ndị ọrụ ruru eru. A na-achọ ọrụ mgbe ngwa ahụ mebiri emebi n'ụzọ ọ bụla, dị ka eriri ọkụ ma ọ bụ plọg mebiri emebi, mmiri mmiri wụfuru ma ọ bụ ihe dabara n'ime ngwa ahụ, ekpughere ngwa ahụ na mmiri ozuzo ma ọ bụ mmiri, anaghị arụ ọrụ nke ọma. , ma ọ bụ ahapụla ya.
Ihe ngwugwu

The image displays the Douk Audio T7 unit, a DC 12V power adapter, and a diagram showing the dimensions and weight of the unit and package.
Ngwungwu ahụ gụnyere:
- 1 x Douk Audio T7 7-Band Equalizer Preampna -emegharị ihe
- 1 x DC 12V ihe nkwụnye ọkụ
Njirimara ngwaahịa
- 7-Band EQ Equalizer: Independent frequency band control (64Hz/125Hz/250Hz/500Hz/2KHz/4KHz/8KHz) with a range of -6dB to +6dB. Allows precise adjustment of treble, midrange, and bass to compensate for speaker characteristics and room acoustics.
- XLR Balanced Preampntughari: Supports both XLR and RCA inputs and outputs. Delivers high-quality audio to amplifiers or active speakers with excellent channel separation, resolution, soundstage, and a clean background.
- Bypass Design & High Performance: Features a bypass mode that can be activated by turning off the power, allowing for the enjoyment of the original audio signal without equalization. The T7 boasts a Signal-to-Noise Ratio (SNR) exceeding 104dB, a frequency response range of 20Hz-20kHz, and a distortion level as low as 0.003%, ensuring accurate audio reproduction.
- Attractive and Robust Design: Housed in a black aluminum alloy chassis, providing effective shielding, a cool aesthetic, and durable construction. Ideal for audiophiles seeking high-fidelity sound.
- Akụkụ dị mma: Operates without a volume control, outputting a predetermined level. Both XLR and RCA outputs function simultaneously.
Njikwa na Njikọ
Ogwe ihu

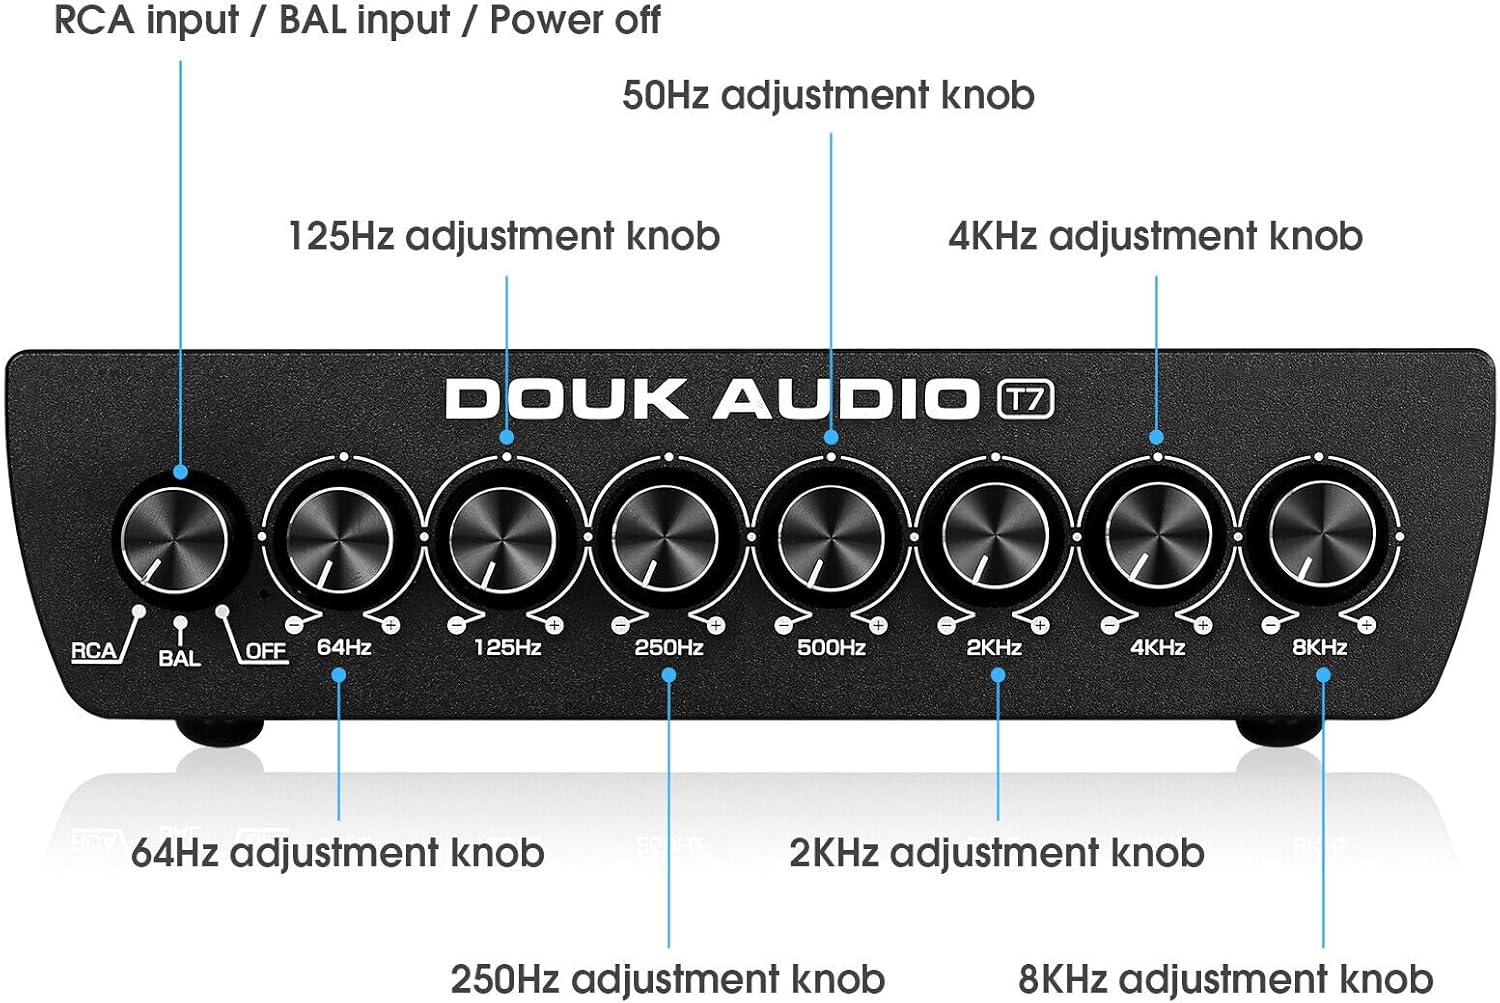
This image shows the front panel of the Douk Audio T7, highlighting the input selector knob (RCA/BAL/OFF) and the seven equalizer adjustment knobs for 64Hz, 125Hz, 250Hz, 500Hz, 2KHz, 4KHz, and 8KHz.
Ogwe ihu nwere njikwa ndị a:
- Input Selector Knob (RCA/BAL/OFF): Selects between RCA input, Balanced (XLR) input, or activates bypass mode (OFF).
- 64Hz Adjustment Knob: Adjusts the gain for the 64Hz frequency band.
- 125Hz Adjustment Knob: Adjusts the gain for the 125Hz frequency band.
- 250Hz Adjustment Knob: Adjusts the gain for the 250Hz frequency band.
- 500Hz Adjustment Knob: Adjusts the gain for the 500Hz frequency band.
- 2KHz Adjustment Knob: Adjusts the gain for the 2KHz frequency band.
- 4KHz Adjustment Knob: Adjusts the gain for the 4KHz frequency band.
- 8KHz Adjustment Knob: Adjusts the gain for the 8KHz frequency band.
Ogwe azụ
This image illustrates the rear panel connections of the Douk Audio T7, showing the Balanced XLR/RCA inputs, Balanced XLR/RCA outputs, and the DC 12V power input.
Paịpụ azụ na-enye njikọ ndị a:
- Balanced XLR Input (L/R): For connecting balanced audio sources using XLR cables.
- RCA Input (L/R): For connecting unbalanced audio sources using RCA cables.
- Balanced XLR Output (L/R): Maka ijikọ na amplifiers or active speakers using XLR cables.
- RCA Output (L/R): Maka ijikọ na amplifiers or active speakers using RCA cables.
- DC 12V n'ime: Power input for the included 12V DC adapter.
Ntuziaka nhazi
1. Njikọ ike
Connect the included DC 12V power adapter to the "DC 12V IN" port on the rear panel of the T7. Plug the adapter into a suitable power outlet.
2. Njikọ Ntinye Audio
For RCA Input: Connect your audio source (e.g., CD player, DAC, phone, tablet PC, TV set-top box, laptop) to the "RCA Input" jacks on the rear panel using RCA cables.
For Balanced XLR Input: Connect your audio source to the "Balanced XLR Input" jacks on the rear panel using XLR cables.
3. Njikọ Mbupụ Ọdịyo
Connect the "RCA Output" jacks or "Balanced XLR Output" jacks on the rear panel of the T7 to your amplifier or active speakers using appropriate RCA or XLR cables. Both outputs can be used simultaneously.
4. Ike izizi
Ensure all connections are secure. Turn on your audio source and amplifier/active speakers. Then, power on the Douk Audio T7.
Ntuziaka ọrụ
1. Selecting Input Mode
Use the input selector knob on the front panel to choose your desired input: "RCA" for RCA sources, or "BAL" for Balanced XLR sources.
2. Adjusting Equalization
Once an input is selected, use the seven frequency adjustment knobs (64Hz, 125Hz, 250Hz, 500Hz, 2KHz, 4KHz, 8KHz) to fine-tune the audio frequencies. Rotate the knobs clockwise to boost the frequency band (+6dB) and counter-clockwise to cut the frequency band (-6dB).
Experiment with different settings to achieve your preferred sound profile or to correct room acoustics and speaker response.
3. Usoro uzo
To listen to the original, unequlized audio signal, set the input selector knob to "OFF". This activates the bypass mode, allowing the audio signal to pass through the unit without any equalization.
4. Simultaneous Outputs
The T7 outputs audio simultaneously through both the RCA and Balanced XLR output ports. You can connect to multiple devices if needed.
Nlekọta
Nhicha
Wipe the unit with a soft, dry cloth. Do not use any liquid cleaners or solvents, as they may damage the finish or internal components.
Nchekwa
If the unit will not be used for an extended period, disconnect it from the power supply and store it in a cool, dry place.
Igwe ikuku
Ensure that the ventilation openings are not blocked to prevent overheating. Maintain adequate space around the unit for proper airflow.
Nchọpụta nsogbu
Enweghị mpụta ụda
- Lelee Ike: Ensure the power adapter is securely connected to the T7 and a working power outlet.
- Check Input Selection: Verify that the input selector knob on the front panel is set to the correct input (RCA or BAL), not "OFF" (bypass mode).
- Lelee njikọ: Ensure all audio cables (input and output) are securely connected to both the T7 and your source/ampndị na-ekwu okwu.
- Check Source/Ampntughari: Confirm that your audio source is playing and your amplifier/active speakers are powered on and functioning correctly.
Ụda agbagọ
- Check Gain Levels: Ensure that the equalizer knobs are not set to extreme boost levels, which can cause clipping or distortion. Try reducing the gain on specific frequency bands.
- Lelee eriri: Nyochaa eriri ọdịyo maka mmebi ma ọ bụ njikọ rụrụ arụ.
- Ogo isi mmalite: Verify the quality of the audio source. Poor quality source material can result in distorted output.
Hum ma ọ bụ mkpọtụ
- Loop ala: A hum can sometimes indicate a ground loop. Try connecting all audio equipment to the same power strip or outlet. If the issue persists, a ground loop isolator may be necessary.
- Ogo USB: Use high-quality, shielded audio cables.
- Ntinye aka: Keep the unit away from other electronic devices that may cause interference.
Nkọwapụta
| Ụdị: | T7 |
| Ndị agha Frequency: | 64Hz, 125Hz, 250Hz, 500Hz, 2KHz, 4KHz, 8KHz |
| Ọnụ ego: | -6dB to +6dB per band |
| Ntinye: | Balanced XLR (L/R), RCA (L/R) |
| Nsonaazụ: | Balanced XLR (L/R), RCA (L/R) |
| Oke mgbama-na- mkpọtụ (SNR): | > 104dB |
| Nzaghachi ugboro ugboro: | 20Hz - 20kHz |
| Mgbagha: | <0.003% |
| Ịnye ọkụ: | DC 12V |
| Akụkụ ngwaahịa (L x W x H): | 15.2 x 12.6 x 4.2 cm (5.98 x 4.96 x 1.65 inch) |
| Nha ịbụ: | 1.02 n'arọ (2.25 lbs) |
| Onye nrụpụta: | Douk Audio |
| Mba onye si: | China |
Akwụkwọ ikike na nkwado
Douk Audio products are designed for reliability and performance. For warranty information and technical support, please refer to the documentation included with your purchase or visit the official Douk Audio websaịtị. Debe nnata nzụta gị dị ka ihe akaebe nke ịzụrụ maka nkwupụta ikike.


