1. Okwu mmalite
This manual provides detailed instructions for the installation, operation, and maintenance of your Stinger Audio MT-1000.1M 1-Channel Monoblock Marine Audio Subwoofer Amplifier. Please read this manual thoroughly before attempting installation or operation to ensure proper use and to prevent damage to the unit or your audio system. Keep this manual for future reference.
2. Ngwaahịa gafereview
The Stinger Audio MT-1000.1M is a high-efficiency Class-D monoblock amplifier designed for marine environments. It delivers 1000 Watts RMS of power, optimized for subwoofer applications. Its robust, water-resistant design ensures reliable performance in challenging conditions.
Akụkụ ndị bụ isi:
- Digital Class-D Monoblock Ampntughari: High efficiency and compact form factor.
- Nhazi kọmpat na nke siri ike: Built for lasting reliability.
- Robust Unregulated Power Supplies: Designed for superior performance and efficiency.
- Advanced HEXFET Power MOSFET: Features reduced on-resistance, faster switching speeds, and enhanced reliability.
- Direct Insert Power and Speaker Terminals: Decreased resistance for higher power transfer and efficiency.
- Nhazi na-eguzogide mmiri: Na-echebe amplifier against weather elements for uninterrupted performance.
- Bass Boost Q: Adjustable bass boost from 0dB to 12dB at a selected frequency.
- Remote Bass Knob Included: Flush-mount design for effortless bass level adjustment.

3. Ozi nchekwa
Na-edebe ihe nchekwa nchekwa ndị a mgbe niile:
- Disconnect the vehicle's negative battery terminal before any installation.
- Ensure proper grounding to the vehicle chassis.
- Jiri wiwi nlele kwesịrị ekwesị maka njikọ ike, ala na okwu okwu.
- Wụnye ya amplifier in a well-ventilated area, away from direct heat sources.
- Zere ịkwanye ihe amplifier in locations where it may be submerged in water, despite its water-resistant rating.
- Gakwuru ọkachamara nwụnye ya ma ọ bụrụ na ị maghị akụkụ ọ bụla nke usoro nrụnye ahụ.
4. Kedu ihe dị na Igbe ahụ
Verify that all items are present before beginning installation:
- 1000 Watt Monoblock Amplifier (MT-1000.1M)
- Remote Level Control (Bass Knob)
- Ngwaike mgbakwasa
- Akwụkwọ ntuziaka
5. Njirimara akụrụngwa
Mara onwe gị na nke ahụ amplifier's controls and connections.

5.1 Control Panel (Input Side)

- POWER/PRT/CLIP Indicators: LEDs indicating power status, protection mode, and signal clipping.
- REMOTE Port: RJ11 connection for the included remote bass level control.
- INPUT (RCA): Audio input from your head unit or source.
- BRIDGE IN/OUT (RCA): For linking multiple ampndị na -enye ndụ.
- Ịnweta njikwa: Na-agbanwe mmetụta ntinye ka ọ dabara na mmepụta nke ngwaọrụ isi mmalite gị.
- LPF (Low-Pass Filter) Control: Adjusts the upper frequency limit for the subwoofer. Range: 40Hz - 180Hz.
- SUBSONIC Filter: Removes ultra-low frequencies below the audible range to protect the subwoofer. Range: OFF - 50Hz.
- FREQ (Bass Boost Frequency) Control: Selects the center frequency for the bass boost. Range: 30Hz - 80Hz.
- BOOST (Bass Boost Level) Control: Adjusts the level of bass boost. Range: 0dB - 12dB.
5.2 Terminal Panel (Output Side)

- GND (Ground) Terminal: Ọ na-ejikọ na ala chassis nke ụgbọala ahụ.
- REM (Remote) Terminal: Connects to the remote turn-on lead from your source unit.
- +12V (Power) Terminal: Connects to the positive terminal of the vehicle's battery via an inline fuse.
- MONO OUTPUT (Speaker Terminals): Connects to your subwoofer(s). Minimum impedance 1 Ohm.
6. Nwụnye
Proper installation is crucial for optimal performance and safety. Ensure all connections are secure and correctly polarized.
6.1 Ebe nrịgo
Choose a mounting location that is secure, provides adequate ventilation, and is protected from excessive moisture. While the amplifier is water-resistant, direct exposure to heavy water spray or submersion should be avoided.

6.2 Njikọ njikọ
- Ike (B+): Connect a 4-gauge power cable from the +12V terminal of the amplifier directly to the positive terminal of the vehicle's battery. Install an appropriate inline fuse (100A recommended) within 18 inches of the battery.
- Ala (GND): Connect a 4-gauge ground cable from the GND terminal of the amplifier to a clean, bare metal point on the vehicle's chassis. Ensure a solid, low-resistance connection.
- Ime (REM): Connect a 18-gauge remote turn-on wire from the REM terminal of the amplifier to the remote output of your head unit.
- Ntinye RCA: Connect RCA cables from the subwoofer output of your head unit to the INPUT RCA jacks on the ampna -emegharị ihe.
- Mpụta okwu: Connect your subwoofer(s) to the MONO OUTPUT terminals. Ensure the total impedance is not below 1 Ohm. Observe correct polarity (+ to + and - to -).
- Mpekere Bass dị anya: Connect the remote bass knob to the REMOTE port on the amplifier using the provided cable.
7. Ọrụ
After installation, follow these steps to configure and operate your ampna -emegharị ihe.
7.1 Initial Setup and Gain Adjustment
- Turn the GAIN control on the amplifier to its minimum (counter-clockwise) position.
- Debe olu nke isi gị ka ọ bụrụ ihe dịka 75% nke ọkwa kachasị elu ya.
- Play a dynamic piece of music with strong bass content.
- Slowly increase the GAIN control on the amplifier until you hear distortion, then back it off slightly until the sound is clear. The CLIP indicator should not illuminate continuously.
7.2 Crossover and Filter Settings
- LPF (Nyocha dị ala-Pass): Adjust the LPF control to set the upper frequency limit for your subwoofer. A common starting point is 80Hz-100Hz, but this may vary depending on your subwoofer and other speakers in your system.
- SUBSONIC Filter: Set the SUBSONIC filter to protect your subwoofer from playing frequencies below its resonant frequency. A common setting is 25Hz-30Hz, or slightly below your subwoofer's tuning frequency if it's in a ported enclosure. If you have a sealed enclosure, you may set it to OFF or a very low frequency.
7.3 Bass nkwalite
- Ugboro Ugboro (Ugboro Mgbalite Bass): Select the frequency at which you want the bass boost to be centered. This is typically between 30Hz and 80Hz, depending on the desired effect.
- BOOST (Bass Boost Level): Adjust the level of boost from 0dB to 12dB. Use this sparingly to avoid distortion and potential damage to your subwoofer.
7.4 Remote Bass Knob
The remote bass knob allows for convenient adjustment of the subwoofer output level from your listening position. It acts as a master volume for the subwoofer channel, allowing you to increase or decrease the bass intensity without affecting other ampntọala lifier.
8. Nlekọta
Regular maintenance helps ensure the longevity and performance of your ampna -emegharị ihe.
- Nhicha: Na-ehichapụkwa oge ụfọdụ ampmputa lifier nwere akwa dị nro, kpọrọ nkụ. Zere iji kemịkalụ siri ike ma ọ bụ ihe nchacha.
- Lelee njikọ: Annually inspect all power, ground, remote, and speaker connections for corrosion or looseness. Tighten as necessary.
- Igwe ikuku: Gbaa mbọ hụ na amplifier's cooling fins are free from obstructions to allow for proper heat dissipation.
9. Nchọpụta nsogbu
Ọ bụrụ na ị nwere nsogbu na ndụ gị amplifier, lee nsogbu na ngwọta ndị a na-ahụkarị.
| Nsogbu | Ihe nwere ike ime | Ngwọta |
|---|---|---|
| Enweghị Ike / Ike LED Gbanyụọ | Blown fuse, loose power/ground/remote wire, no remote signal. | Check inline fuse, verify all power connections, ensure head unit remote output is active. |
| Protection LED On | Speaker short circuit, impedance too low, overheating, DC offset. | Check speaker wiring for shorts, verify speaker impedance, ensure adequate ventilation, disconnect speakers and test. |
| Enweghị mmepụta ọdịyo | Enweghị mgbama ntinye, ntọala uru na-ezighi ezi, a kwụsịtụla waya okwu. | Check RCA connections, adjust gain, verify speaker connections. |
| Ụda agbagọ | Gain set too high, improper crossover settings, poor ground connection. | Reduce gain, adjust LPF/Subsonic filters, check ground wire for secure connection. |
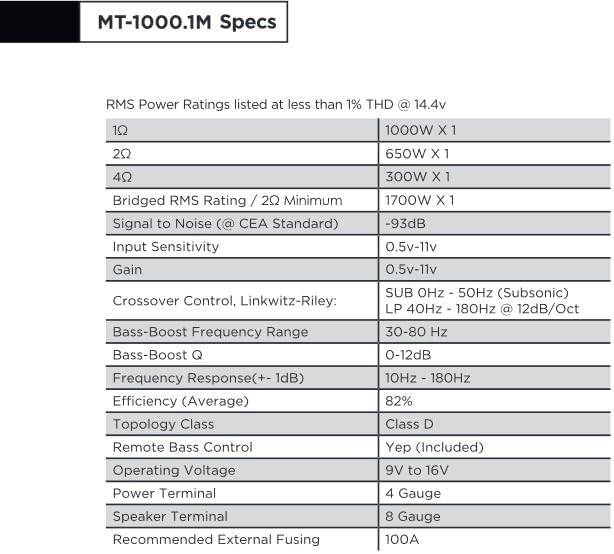
10. Nkọwapụta
Detailed technical specifications for the Stinger Audio MT-1000.1M ampna -emegharị ihe.
| Njirimara | Nkọwapụta |
|---|---|
| Ike RMS (1Ω) | 1000W x 1 |
| Ike RMS (2Ω) | 650W x 1 |
| Ike RMS (4Ω) | 300W x 1 |
| Bridged RMS Rating (2Ω Minimum) | 1700W x 1 |
| Signal to Noise (CEA Standard) | -93dB |
| Ntinye uche | 0.5V - 11V |
| Nweta | 0.5V - 11V |
| Crossover Control (Linkwitz-Riley) | SUB 0Hz - 50Hz (Subsonic), LP 40Hz - 180Hz @ 12dB/Oct |
| Oke ugboro ugboro Bass-Boost | 30Hz - 80Hz |
| Bass-Boost Q | 0 - 12dB |
| Nzaghachi ugboro ugboro (+/- 1dB) | 10Hz - 180Hz |
| Nrụ ọrụ (nkezi) | 82% |
| Klas Topology | Klas D |
| Njikwa Bass dịpụrụ adịpụ | Ee (gụnyere) |
| Nrụ ọrụ Voltage | 9V ruo 16V |
| Ibe Agbara | 4 nlele |
| Ọnụ Ọkà Okwu | 8 nlele |
| Mmanya Mpụga akwadoro | 100A |
| Ibu Ibu | 6.14 pound |
| Akụkụ ngwugwu | 14.5 x 7.8 x 3.2 sentimita asatọ |
| Ụbọchị mbụ dị | Maachị 13, 2024 |
| Onye nrụpụta | Onye nche |
11. Akwụkwọ ikike na nkwado
11.1 Ozi akwụkwọ ikike
The Stinger Audio MT-1000.1M amplifier na-abịa na a Akwụkwọ ikike afọ 1 from the date of purchase. Please retain your proof of purchase for warranty claims. The warranty covers manufacturing defects and workmanship under normal use. It does not cover damage caused by improper installation, accident, misuse, abuse, neglect, or unauthorized modification.
11.2 Nkwado ndị ahịa
For technical assistance, troubleshooting, or warranty inquiries, please contact Stinger Audio customer support. You can find more information and contact details by visiting the official STINGER brand store:


