1. Okwu mmalite
The Pronomic DX-50 USB MKII is a professional 4-channel DJ mixer designed for a wide range of applications, including discos, parties, restaurants, and presentations. Its user-friendly design ensures that both experienced and less experienced users can fully utilize its features. This manual provides detailed instructions for setting up, operating, and maintaining your mixer.
Key features include a recording function, integrated Bluetooth interface, USB player with transport controls, and multiple input channels.
2. Ntuziaka nchekwa dị mkpa
- Gụọ ntuziaka: Read all safety and operating instructions before using the product.
- Jido ntuziaka: Debe ntuziaka nchekwa na ọrụ maka ntụnye aka n'ọdịnihu.
- Ịdọ aka ná ntị ntị: Soro ịdọ aka ná ntị niile dị na ngwaahịa yana na ntuziaka ọrụ.
- Soro ntuziaka: Soro ntuziaka ọrụ na ojiji niile.
- Mmiri na mmiri: Do not use this apparatus near water (e.g., bathtub, washbowl, kitchen sink, laundry tub, wet basement, or swimming pool).
- Igwe ikuku: Akwụsịla oghere ikuku ikuku ọ bụla. Wụnye dị ka ntuziaka onye nrụpụta si dị.
- Okpomọkụ: Awụnyela n'akụkụ ebe okpomọkụ ọ bụla dị ka radiators, ndekọ okpomọkụ, stovu, ma ọ bụ ngwa ndị ọzọ (gụnyere amplifiers) nke na-emepụta okpomọkụ.
- Isi mmalite ike: Use only power sources specified by the manufacturer.
- Ike-Powerdọ Nchedo: Chebe eriri ọkụ ka ị ghara ịgagharị ma ọ bụ tuo ya, ọkachasị na plọg, ebe nchekwa dị mma, na ebe ha si na ngwa ahụ pụta.
- Nhicha: Jiri akwa kpọrọ nkụ hichaa naanị.
- Ije ozi: Anwala ịnye ngwaahịa a n'onwe gị ka imeghe ma ọ bụ iwepụ mkpuchi nwere ike ikpughe gị na voltaji dị egwutage ma ọ bụ ihe egwu ndị ọzọ. Tụtụ aka n'aka ndị ọrụ ruru eru.
3. Ihe ngwugwu
Please check that all items listed below are included in your package. If any items are missing or damaged, contact your dealer immediately.
- Pronomic DX-50 USB MKII DJ Mixer
- Power Adapter (AC 12V)
- USB Stick (32 GB, if included in your specific bundle)
- Akwụkwọ ntuziaka (akwụkwọ a)
4. Ngwaahịa gafereview
Familiarize yourself with the various controls and connections on your DX-50 USB MKII mixer.
4.1 Njikwa ihu ihu
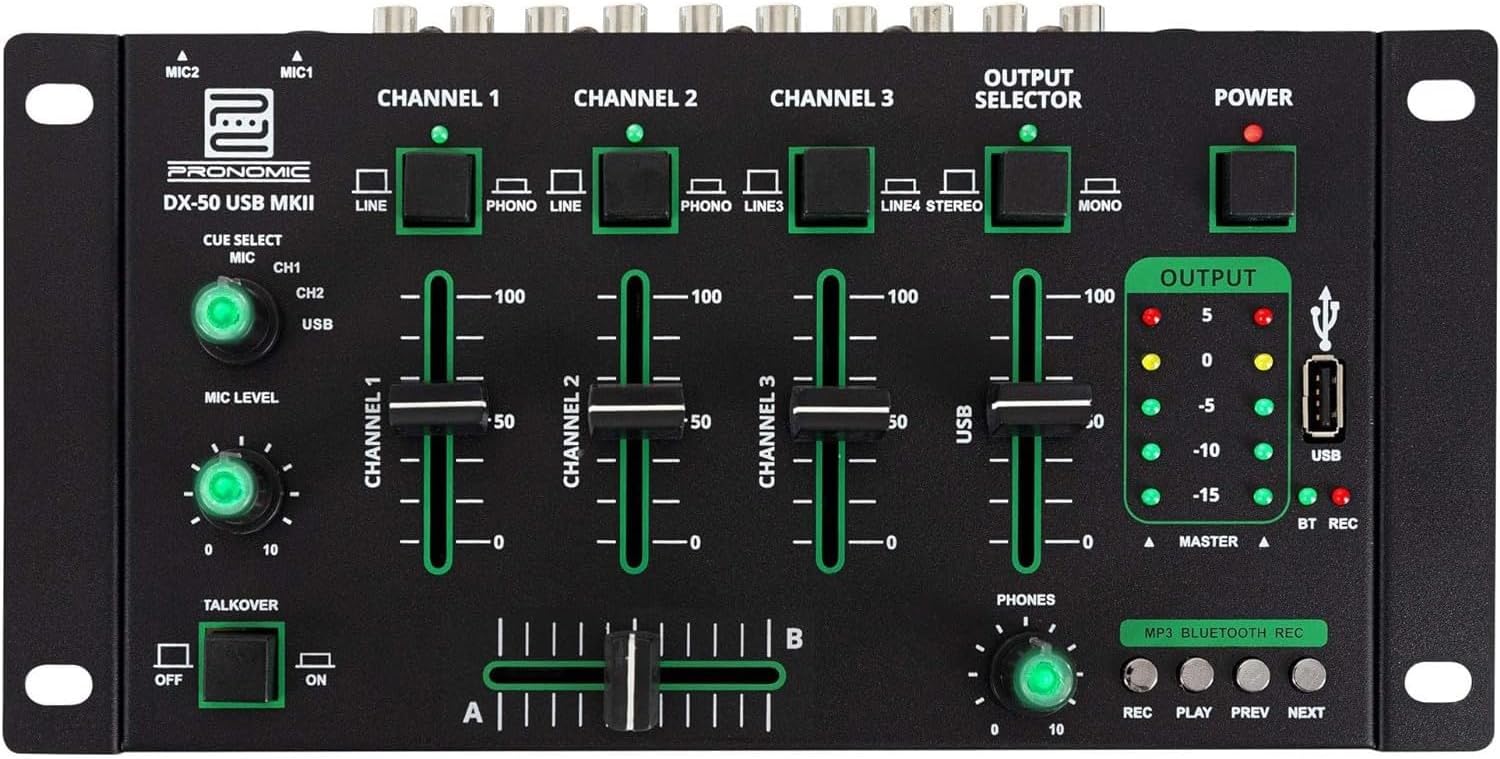
- MIC 1/2 Inputs: Connect microphones.
- Channel 1-4 Input Selectors: Switch between LINE, PHONO, or USB/Bluetooth inputs for each channel.
- Ọwa Faders: Hazie ọkwa olu maka ọwa ọ bụla.
- CUE Select Buttons: Route specific channels to the headphone output for monitoring.
- MIC Level Knob: Adjust the volume of the microphone inputs.
- Talkover Switch: Activates the talkover function, which automatically lowers music volume when speaking into the microphone.
- Output Selector: Choose between Stereo or Mono master output.
- Ike mgba ọkụ: Turns the mixer on/off.
- Mita Ọkwa Mpụta: LED indicators showing the master output level.
- Ọdụ ụgbọ mmiri USB: Connect a USB drive for MP3 playback and recording.
- MP3/Bluetooth/REC Player Controls: Buttons for Play/Pause, Previous, Next, and Record functions for the integrated player.
- Phones Level Knob: Na-edozi olu nke mmepụta ekweisi.
- Crossfader (A/B): Blends between channels assigned to A and B.
4.2 Njikọ azụ azụ

- AC 12V Power Input: Jikọọ ihe nkwụnye ọkụ enyere ebe a.
- PHONES Output: Jack 6.3mm maka ijikọ ekweisi.
- MASTER OUT L/R (RCA): Connect to your main ampigwe okwu ma ọ bụ ike okwu.
- Channel 1 & 2 Inputs (RCA Line/Phono): Connect turntables (Phono) or other line-level devices (CD players, media players). Use the front panel selector to switch.
- Channel 3 & 4 Inputs (RCA Line): Connect line-level devices.
- MIC 1 & 2 Inputs (6.3mm Jack): Connect microphones.
5. Nhazi
Follow these steps to set up your Pronomic DX-50 USB MKII mixer:
- Njikọ ike: Ensure the mixer's power switch is in the OFF position. Connect the supplied AC 12V power adapter to the "AC 12V" input on the rear panel of the mixer. Plug the adapter into a suitable power outlet.
- Master Output Connection: Connect the "MASTER OUT L/R" RCA outputs on the rear panel to the inputs of your ampigwe okwu ma ọ bụ ike okwu.
- Njikọ ngwaọrụ ntinye:
- Turntables: Connect turntables to the "CHANNEL 1" or "CHANNEL 2" RCA inputs. Set the corresponding input selector on the front panel to "PHONO".
- CD Players/Line Devices: Connect CD players, media players, or other line-level devices to "CHANNEL 1", "CHANNEL 2", "CHANNEL 3", or "CHANNEL 4" RCA inputs. Set the corresponding input selector on the front panel to "LINE".
- Igwe okwu: Connect microphones to the "MIC 1" or "MIC 2" 6.3mm jack inputs on the rear panel.
- Njikọ ekweisi: Connect your headphones to the "PHONES" 6.3mm jack on the rear panel.
- USB Drive (Optional): If using a USB drive for playback or recording, insert it into the "USB" port on the front panel.
- Ike Na: Once all connections are made, switch the mixer's power switch to the ON position. The power indicator LED will illuminate.
6. Ntuziaka ọrụ
6.1 Ngwakọta Isi
- Họrọ ntinye: For each channel, use the input selector switch (LINE/PHONO/USB/BT) to choose the desired audio source.
- Adjust Channel Volume: Use the vertical faders for each channel to adjust its individual volume level.
- Mmepụta Master: Monitor the "OUTPUT" LED meters and adjust the master volume knob (if present, otherwise rely on channel faders and amplifier volume) to achieve a suitable overall output level without clipping.
- Obo: Use the crossfader to smoothly transition between channels assigned to A and B. Channels 1 and 2 are typically assigned to the crossfader.
6.2 Igwe okwu
- Connect your microphone to one of the MIC inputs on the rear panel.
- Adjust the "MIC LEVEL" knob on the front panel to control the microphone's volume.
- Talkover Function: Activate the "TALKOVER" switch to automatically reduce the volume of the music when you speak into the microphone. This is useful for announcements.
6.3 USB Playback and Recording
- USB playback: Fanye draịva USB nwere MP3 files into the "USB" port. Select "USB" as the input source for the dedicated USB channel. Use the "PLAY/PAUSE", "PREV", and "NEXT" buttons to control playback.
- USB ndekọ: Press the "REC" button to start recording the master output to the connected USB drive. Press "REC" again to stop recording. Ensure your USB drive has sufficient free space and is formatted correctly (FAT32 is commonly supported).
6.4 Njikọ Bluetooth
- Mee ka Bluetooth rụọ ọrụ: Select "BT" as the input source for the dedicated Bluetooth channel. The mixer will enter pairing mode.
- Jikọọ ngwaọrụ: On your Bluetooth-enabled device (smartphone, tablet, etc.), search for available Bluetooth devices. Select "Pronomic DX-50 USB MKII" (or similar name) from the list to pair.
- Kpọọ ọdịyo: Once paired, you can play audio from your device through the mixer. Control playback from your device or using the mixer's transport controls (if supported by your device).
6.5 Nlekota site na iji ekweisi
- Connect headphones to the "PHONES" output.
- Use the "CUE SELECT" buttons to choose which channels you want to monitor in your headphones without affecting the main output.
- Adjust the "PHONES" level knob to set your desired headphone volume.
7. Nlekọta
- Nhicha: Disconnect the power before cleaning. Use a soft, dry cloth to wipe the surface of the mixer. Do not use liquid cleaners, aerosols, or solvents.
- Nchekwa: Chekwaa igwekota ahụ n'ebe dị jụụ, kpọrọ nkụ na-adịghị na ìhè anyanwụ kpọmkwem na oke okpomọkụ.
- Fader and Knob Care: Avoid excessive force when operating faders and knobs. Periodically check for dust or debris accumulation around moving parts.
- Njikwa USB: Ensure cables are not kinked or strained, which can lead to damage.
8. Nchọpụta nsogbu
| Nsogbu | Ihe nwere ike ime | Ngwọta |
|---|---|---|
| Enweghị ike | Power adapter not connected; Power switch off; Faulty power outlet. | Check power adapter connection; Ensure power switch is ON; Try a different power outlet. |
| No sound from main output | Master volume too low; Amplifier/speakers off or disconnected; Incorrect input selection; Channel faders down. | Increase master volume; Check amplifier/speaker connections and power; Verify correct input selected for channels; Raise channel faders. |
| Enweghị ụda sitere na ekweisi | Headphone volume too low; Headphones not connected; No CUE selected. | Increase PHONES level; Connect headphones properly; Press CUE button for desired channel. |
| Bluetooth anaghị ejikọta | Mixer not in pairing mode; Device too far; Interference. | Ensure BT input is selected; Bring device closer; Restart mixer and device. |
| Ntugharị USB anaghị arụ ọrụ | USB drive not inserted correctly; Incorrect file usoro; draịvụ USB anaghị edozi nke ọma. | Tinyegharịa draịvụ USB; Hụ na files are MP3; Format USB drive to FAT32. |
9. Nkọwapụta
| Nlereanya | Pronomic DX-50 USB MKII |
| Ọnụọgụ nke ọwa | 4 |
| Teknụzụ Njikọta | Bluetooth, USB |
| Ntinye ọdịyo | RCA (line/phono), 6.3mm microphone, Bluetooth, USB |
| Ụdị njikọ mmepụta | RCA (Master Out), 6.3mm (Phones) |
| Isi Iyi Ike | Electric Cable (AC 12V adapter) |
| Dimensions (without corner brackets and controls) | 222 x 129 x 28 mm (obosara x Omimi x Elu) |
| Total Dimensions (with corner brackets and controls) | 267 x 136 x 51 mm (obosara x Omimi x Elu) |
| Ibu | 790 g |
10. Akwụkwọ ikike na nkwado
Maka ozi gbasara akwụkwọ ikike na nkwado teknụzụ, biko lee akwụkwọ enyere gị mgbe ị zụtara ya ma ọ bụ kpọtụrụ onye na-ere ahịa gị. Debe ihe akaebe nke ịzụrụ ya maka akwụkwọ ikike ọ bụla.
For further assistance, you may also visit the official Pronomic websaịtị ma ọ bụ kpọtụrụ ngalaba ọrụ ndị ahịa ha.


