1. Okwu mmalite
Daalụ maka ịzụrụasing the Singer SN777αIII Computerized Sewing Machine. This machine is designed for ease of use and versatility, offering 100 stitch patterns, including alphanumeric characters, to support a wide range of sewing projects. Please read this manual thoroughly before operating your machine to ensure safe and efficient use.

Image: The Singer SN777αIII sewing machine is available in white, pink, and a white and pink combination, allowing users to choose a color that suits their preference or room decor.
2. Nhazi
2.1 Mwepu na ntinye
- Jiri nlezianya wepụ igwe na ngwa niile na nkwakọ ngwaahịa.
- Debe igwe ahụ n'elu ebe kwụsiri ike ma dị larịị. Hụ na e nwere oghere zuru oke gburugburu igwe ahụ maka ịrụ ọrụ dị mma.
2.2 Njikọ ike
- Hụ na ihe mgba ọkụ eletrik dị n'ọnọdụ 'GBANYỤ'.
- Jikọọ eriri ọkụ eletrik na igwe ahụ wee jikọọ ya na ebe ọkụ eletrik kwesịrị ekwesị.
2.3 Bobbin Winding
- Tinye eriri eri na ntụtụ spool.
- Follow the winding path indicated on the machine.
- Place an empty bobbin onto the bobbin winder spindle and push it to the right.
- Start winding by pressing the foot controller or start/stop button. Stop when the bobbin is full.
2.4 Ịtinye eriri elu
- Bulie ihe nkwụnye ụkwụ ụkwụ.
- Follow the numbered threading path on the machine, ensuring the thread is correctly seated in all guides and the tension discs.
- Use the automatic needle threader for easy threading of the needle eye.
2.5 Setting the Lower Thread (Bobbin)
- Mepee mkpuchi bobbin.
- Insert the wound bobbin into the bobbin case, ensuring the thread unwinds in the correct direction.
- Guide the bobbin thread through the tension spring and out the bobbin case opening.
- Close the bobbin cover. The easy bobbin setting feature allows you to start sewing without pulling up the bobbin thread manually.
2.6 Na-agbakwunye Ngwa
- Tebụl sara mbara: Attach the wide table to the machine to expand your work area, especially useful for larger projects.
- Onye njikwa ụkwụ: Connect the foot controller to the designated port on the machine for hands-free speed control.
3. Ntuziaka ọrụ
3.1 Ogwe njikwa gafereview
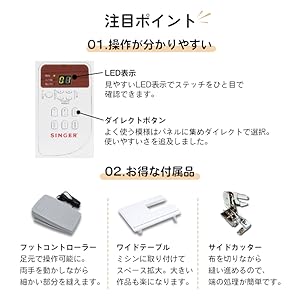
Image: The control panel features a clear LED display to show the selected stitch and direct buttons for frequently used patterns, simplifying operation.
- Ikanam Display: Shows the selected stitch pattern number and other relevant settings.
- Direct Buttons: Allows quick selection of commonly used stitch patterns.
- Stitch Selection Buttons: Use these to navigate and select from the 100 available stitch patterns.
3.2 Ịhọrọ ụkpụrụ Stitch

Image: The machine offers 100 stitch patterns, including utility stitches, decorative stitches, buttonholes, satin stitches, cross stitches, patchwork quilt stitches, and alphanumeric characters (numbers and alphabets).
- Refer to the stitch chart on the machine or in the manual.
- Use the stitch selection buttons to choose the desired pattern. The selected pattern number will appear on the LED display.
- For alphanumeric stitches, select the corresponding pattern and then use the adjustment buttons to choose specific letters or numbers.
3.3 Basic Sewing Operations

Image: This illustration highlights key operational features such as hand-focused controls for start/stop, automatic buttonhole creation, the free arm for cylindrical sewing, stepless speed adjustment, drop feed for free-motion quilting, and the presser foot lifter button for smooth sewing over varying fabric thicknesses.
- Bọtịnụ mmalite/Kwụsị: Press to start and stop sewing.
- Ndozi ọsọ ọsọ: Use the slide control for stepless speed adjustment from low to high.
- Bọtịnụ Nkwanye Aka Na-agbanwe Agbanwe: Press and hold to sew in reverse for securing stitches.
- Bọtịnụ Elu/Ala Agịga: Positions the needle up or down.
- Presser Foot Lifter Button: Automatically keeps the presser foot horizontal, making it easy to start sewing thick fabrics.
Atụmatụ 3.4 Pụrụ Iche
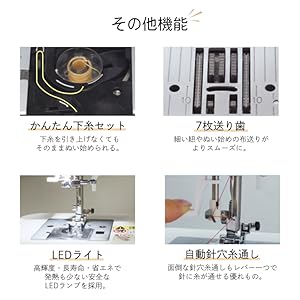
Image: This illustration details the easy bobbin setting for quick starts, the 7-point feed dog for smooth fabric feeding, the bright LED light for clear visibility, and the automatic needle threader for effortless threading.
- eriri agịga akpaaka: A lever-operated system that threads the needle automatically.
- 7-Point Feed Dog: Ensures smooth and consistent fabric feeding, especially for delicate or thick materials.
- Ọkụ LED: Provides bright, long-lasting, and energy-efficient illumination of the sewing area.
- Ogwe aka efu: Remove the accessory box to reveal the free arm, ideal for sewing cuffs, sleeves, and other cylindrical items.
- Fully Automatic Buttonhole: Simply set the button, and the machine automatically creates a perfectly sized buttonhole.
- Drop Feed: Lower the feed dogs for free-motion quilting or darning.
4. Nlekọta
4.1 Nhicha
- Always turn off and unplug the machine before cleaning.
- Regularly clean lint and dust from the bobbin case area and under the needle plate using the brush provided.
- Jiri akwa dị nro hichaa mpụta igwe. Ejila kemịkalụ siri ike.
4.2 Ndochi agịga
- Gbanyụọ igwe ma wepụ ya.
- Tọghee agịga clamp ịghasa ma wepụ agịga ochie.
- Insert a new needle with the flat side facing the back, pushing it up as far as it will go.
- Gbanwee agịga clamp ịghasa nke ọma.
5. Nchọpụta nsogbu
This section addresses common issues you might encounter. For problems not listed here, please consult the full instruction DVD or contact customer support.
| Nsogbu | Ihe nwere ike ime | Ngwọta |
|---|---|---|
| Igwe anaghị ebido | Power cord not connected; Power switch off; Foot controller not connected. | Check power connections; Turn on power switch; Ensure foot controller is plugged in. |
| Agbatị akwa | Incorrect needle; Bent needle; Incorrect threading. | Use correct needle type for fabric; Replace bent needle; Re-thread machine carefully. |
| Eriri agbaji | Incorrect tension; Poor quality thread; Improper threading; Needle bent or dull. | Adjust tension; Use good quality thread; Re-thread machine; Replace needle. |
| Ákwà anaghị enye nri | Feed dogs lowered; Presser foot pressure too low. | Raise feed dogs; Adjust presser foot pressure. |
6. Nkọwapụta

Image: The Singer SN777αIII machine's dimensions are 404mm width x 188mm depth x 298mm height, with a weight of 5.8 kg.
- Ụdị: SN777αIII
- Onye nrụpụta: Onye na-abụ abụ
- Akụkụ (Ngwaahịa): 40.4 cm (obosara) x 18.8 cm (Omimi) x 29.8 cm (Elu)
- Arọ (Ngwaahịa): 5.8 n'arọ
- Ihe: Acrylonitrile Butadiene Styrene (ABS)
- Ụdị ihe nkedo: 100 types (including numbers and alphabets)
Ngwa 6.1 gụnyere

Image: A comprehensive diagram illustrating all standard accessories, including various presser feet, bobbins, screwdrivers, a seam ripper, needle set, seam guide, spool caps, auxiliary spool pin, spool pin felt, soft cover, power cord, instruction manual, and instruction DVD.
- Ụkwụ Zigzag
- Ụkwụ Zipper
- Ụkwụ bọtịnụ oghere
- Bọtịnụ ịkwa akwa ụkwụ
- Overcasting Foot
- Ụkwụ Stitch kpuru ìsì
- Satin Stitch Ụkwụ
- Bobbins
- Triangular Screwdriver
- Obere screwdriver
- Seam Ripper with Brush
- Agịga Set
- Nduzi nduzi
- Spool Cap (Large)
- Spool Cap (Small)
- Ihe enyemaka Spool Pin
- Spool Pin Felt
- Ihe mkpuchi dị nro
- Ụdọ ọkụ
- Akwụkwọ ntuziaka
- DVD ntụziaka
- Controlkwụ njikwa
- Okpokoro sara mbara
- Akụkụ Cutter
7. Akwụkwọ ikike na nkwado
For warranty information, please refer to the warranty card included with your product or contact your retailer. For technical support or service inquiries, please refer to the contact information provided in your purchase documentation or visit the official Singer websaịtị.


