1. Okwu mmalite
The Adiding TBD-56 Solar Outdoor LED Flood Light is a high-performance, solar-powered lighting solution designed for various outdoor applications. Featuring a motion sensor, remote control, and multiple lighting modes, it provides efficient and reliable illumination for areas such as patios, yards, garages, and fences. This manual will guide you through the proper setup, operation, and maintenance of your new solar flood light.
2. Ozi nchekwa
- Ensure the product is installed securely to prevent falling.
- Do not submerge the light or solar panel in water. While water-resistant, prolonged submersion can cause damage.
- Keep the solar panel clean from dust, dirt, and debris to ensure optimal charging efficiency.
- Avoid installing the light near other strong light sources, as this may interfere with the motion sensor's functionality.
- Install the light with the vent holes facing downwards to allow for proper water drainage and prevent internal fogging. Do not install upside down or at an angle that traps water.
3. Ihe ngwugwu
Biko lelee ngwungwu ka ị hụ na ihe niile dị:
- Solar Panel (4 units)
- Motion Sensor Light (4 units)
- Remote Controller (2 units)
- Installation Accessories (4 sets)

Image: Contents of the Adiding Solar Outdoor LED Flood Light 4-pack, showing the lights, solar panels, and remote controls.
4. Akụrụngwa Ngwaahịa
- Ọkụ na-egbuke egbuke: Equipped with 202 high-quality LED beads, providing approximately 2800 lumens of brightness and 6500K daylight white light. Offers up to a 180° lighting angle for wide illumination.
- Ogwe ngbanwe anyanwụ dị elu: Efficiently converts solar energy into electricity, ensuring long working times.
- Remote Control & 3 Lighting Modes: Easily switch between lighting modes using the included remote control.
- Ihe mmetụta ngagharị nwere mmetụta: Detects motion to activate high brightness, enhancing security and convenience.
- Na-adịgide adịgide & na-eguzogide ihu igwe: IP65 waterproof rating, frost-resistant, and heat-resistant, suitable for various weather conditions.
- Nwụnye na-agbanwe agbanwe: Features a 16.5 ft detachable cable for separate mounting of the solar panel and light, or can be installed as an integrated unit.

Image: Illustration of the upgraded solar panel's 20% high conversion rate, indicating a 4-hour charging time for 400-500 detection cycles.
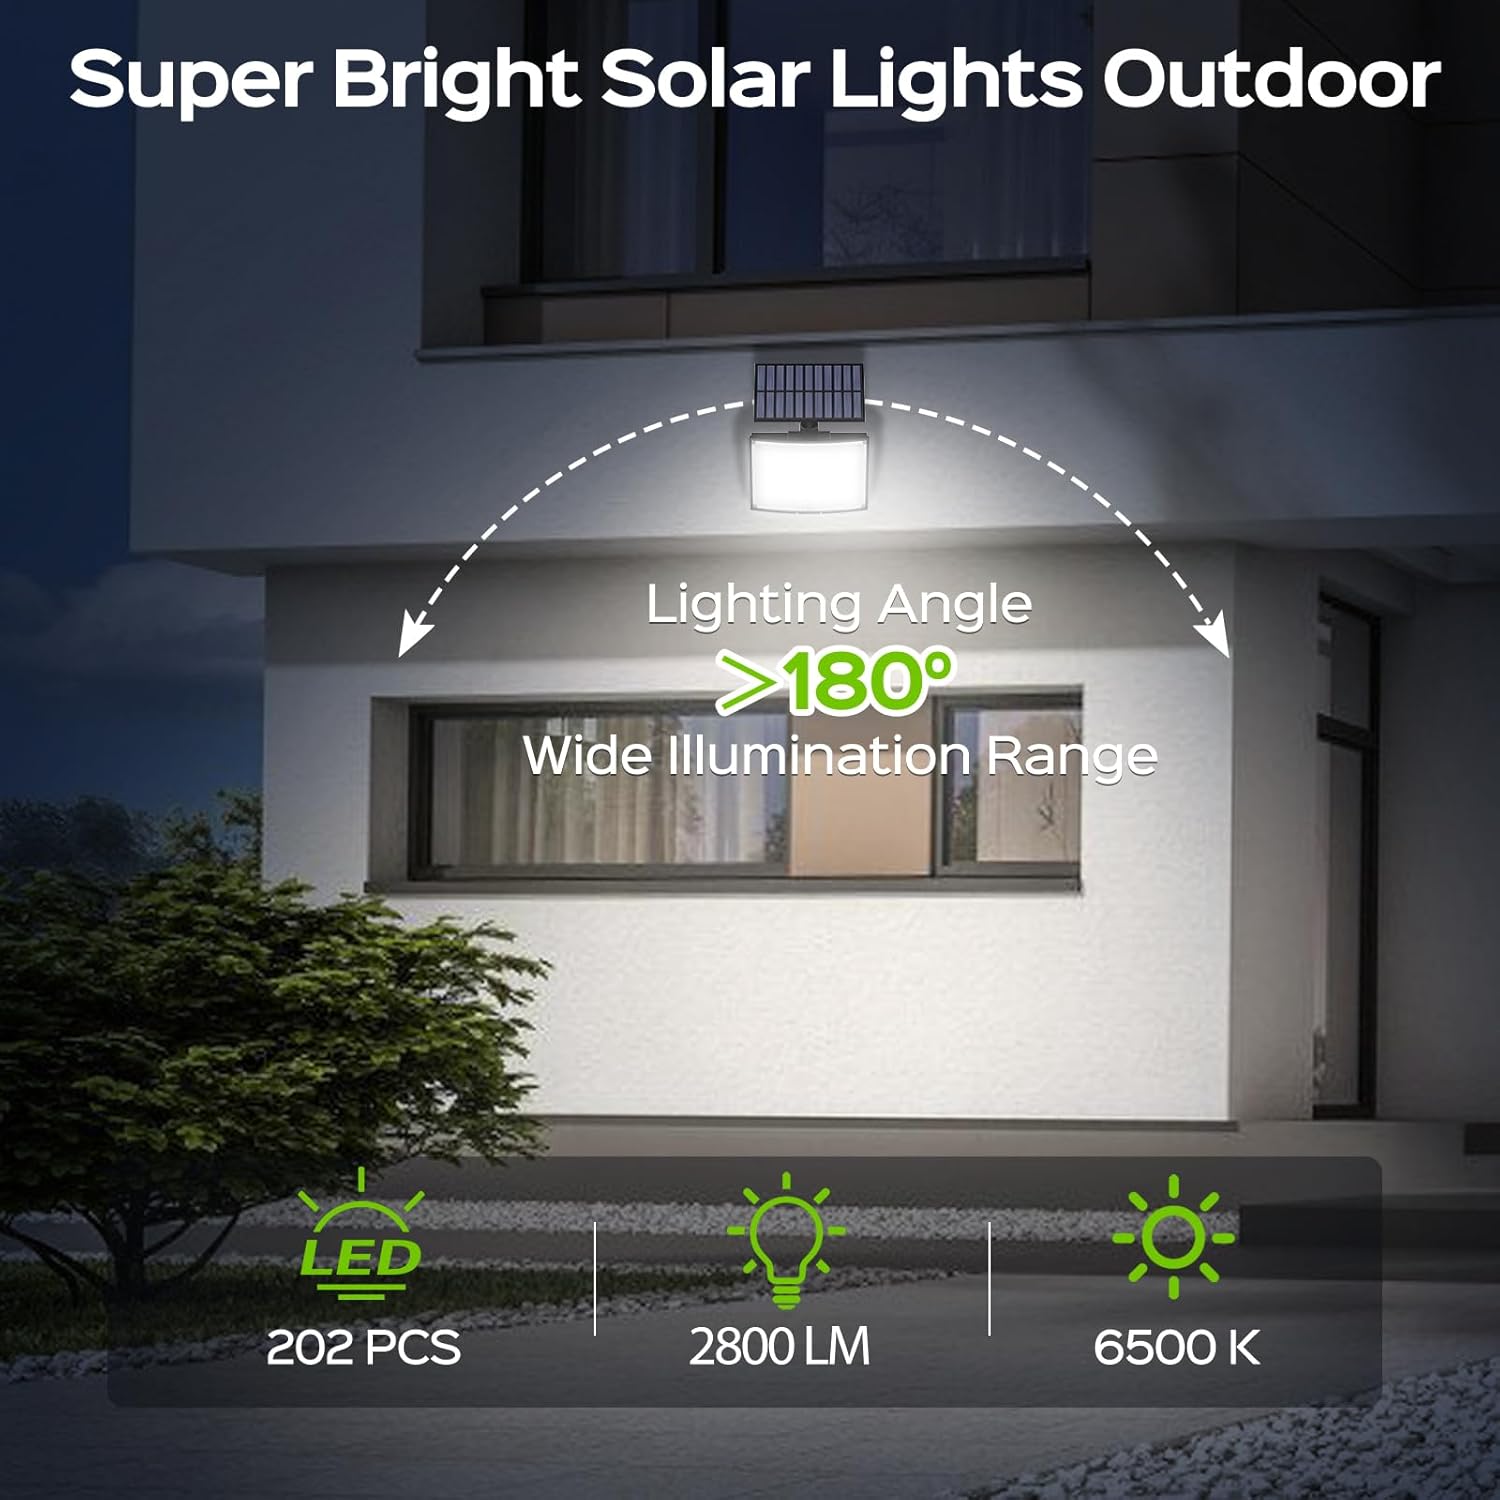
Image: Visual representation of the super bright outdoor solar lights, highlighting 202 LED beads, 2800 lumens, 6500K daylight, and a wide 180-degree lighting angle.

Image: Depiction of the upgraded motion sensor's 120-degree detection angle, illustrating its effectiveness as a car approaches a garage.
5. Ntọala & nwụnye
5.1 Ntọala mbụ
- Ebube mbụ: Upon receiving the solar light, connect the solar panel to the light unit. Place the solar panel in direct sunlight for 1-2 days to ensure a full initial charge.
- Activate Light Unit: The light is initially in an OFF state. Press the button on the back of the light body to activate it. This enables the light modes and remote control functionality.
- Gbanyụọ njikwa anya: Pull out the transparent isolation tab from the bottom of the remote controller to activate its battery.
5.2 Ụzọ ntinye
The Adiding Solar Flood Light offers two installation options:
- Separated Installation: Use the 16.5 ft cable to mount the solar panel in a location with optimal direct sunlight, and the light unit in your desired area, even if it's shaded.
- Ntinye agbakwunyere: Attach the solar panel directly to the top of the light unit for a compact, all-in-one setup. This is suitable when the light's desired location also receives ample kpọmkwem ìhè anyanwụ.

Image: A diagram illustrating the two installation types: integrated, where the solar panel is attached directly to the light, and separated, where the solar panel is connected via a cable.
5.3 Nzọụkwụ ịrị elu
- Choose a suitable installation location for the light unit and, if using separated installation, for the solar panel. Ensure the solar panel receives maximum direct sunlight throughout the day.
- Kanye akara ebe a na-egwupụta ihe maka ihe nkwado a na-etinye.
- Drill holes at the marked positions and insert the provided plastic anchors.
- Secure the mounting bracket(s) to the wall using the screws.
- Attach the light unit and/or solar panel to the secured bracket(s). Adjust the angle as needed.
- If using separated installation, connect the solar panel cable to the light unit.
5.4 ndetu ntinye dị mkpa
- Usoro: The light unit has two small vent holes at the bottom to prevent internal fogging and allow water to drain. Ensure the light is installed in an upright position, with the vent holes facing downwards. Do not install the solar light upside down or at an angle that would trap water.
- Avoid Light Interference: Install the light away from other strong light sources (e.g., streetlights) to ensure the motion sensor functions correctly at night.

Image: A diagram illustrating the correct installation direction for the solar light to allow water drainage from its vent holes, and incorrect orientations that could trap water.
5.5 Video nwụnye
Video: Official Adiding video demonstrating the installation process for the solar motion sensor outdoor flood lights, including mounting and connecting the solar panel.
6. Ntuziaka ọrụ
The Adiding Solar Flood Light is operated using the included remote control. Ensure the remote control's isolation tab has been removed before use.
6.1 Ọrụ njikwa anya
- Gbanyụọ/gbanyụọ: Na-agbanye ma ọ bụ gbanyụọ nkeji ọkụ.
- Edị 1: Activates Mode 1.
- Edị 2: Activates Mode 2.
- Edị 3: Activates Mode 3.
6.2 Ụdị ọkụ
The light features three distinct operating modes:
- Mode 1 (Motion Sensor Only): The light remains OFF until motion is detected. Upon detection, it illuminates at Ìhè dị elu for approximately 20 seconds, then turns OFF again.
- Mode 2 (Dim + Motion Sensor): The light stays on at a Ìhè dim level. When motion is detected, it switches to Ìhè dị elu for approximately 20 seconds, then returns to Ìhè dim.
- Mode 3 (Constant Dim Light): The light remains on at a Ìhè dim level throughout the night, regardless of motion detection.

Image: A visual guide to Mode 1, showing the light remaining off until motion is detected, then activating to high brightness for 20 seconds before turning off again.

Image: A visual guide to Mode 2, showing the light staying dim, then activating to high brightness for 20 seconds upon motion detection, and finally returning to dim.

Image: A visual guide to Mode 3, showing the light remaining at a low brightness throughout the entire night.
6.3 Operating Modes Video
Video: Official Adiding video demonstrating the different motion sensor lighting modes of the solar outdoor light.
7. Nlekọta
- Ichacha ogwe anyanwụ: Jiri nwayọ na-ehichapụ akụkụ anyanwụ mgbe niile, damp cloth to remove any accumulated dust, dirt, or snow. A clean panel ensures maximum sunlight absorption and charging efficiency.
- Lelee njikọ: Periodically inspect the cable connection between the solar panel and the light unit to ensure it is secure and free from damage.
- Nchacha izugbe: Clean the light unit's surface as needed to maintain optimal light output.
8. Nchọpụta nsogbu
| Nsogbu | Ihe nwere ike ime | Ngwọta |
|---|---|---|
| Ìhè anaghị agba n'abalị. | Ego anwụghị nke ọma. | Ensure solar panel is in direct sunlight for 6-8 hours daily. Clean the solar panel. |
| Light unit not activated. | Press the activation button on the back of the light unit. | |
| Njikwa anya anaghị arụ ọrụ. | Remove the transparent isolation tab from the remote. Ensure remote is pointed at the light. | |
| Ihe mmetụta ngagharị anaghị achọpụta. | Obstructions or incorrect installation height. | Clear any obstructions. Ensure installation height is within recommended range (6-10 ft). |
| Ìhè na-ada ada ma ọ bụ flickers. | Obere ụgwọ batrị. | Allow the solar panel to charge for a full 1-2 days in direct sunlight. Clean the solar panel. |
| Water accumulation inside the light. | Incorrect installation direction. | Re-install the light ensuring the vent holes are facing downwards and the unit is not upside down or at an angle that traps water. |
9. Nkọwapụta
| Njirimara | Nkọwa |
|---|---|
| Ụdị | Na-agbakwụnye |
| Nọmba nlereanya | TBD-56 |
| Icha ọkụ | 2800 Lumens (Max) |
| Okpomọkụ agba | 6500 Kelvin (Ìhè na-acha ọcha) |
| Ọnụọgụ bead LED | 202 |
| Isi Iyi Ike | Ike anyanwụ |
| Usoro njikwa | Njikwa anya |
| Akụkụ Sensọ Motion | 120° |
| Igwe ọkụ | Ruo 180 ° |
| Cable Length (Solar Panel) | 16.5 ft |
| Ọkwa Nguzogide mmiri | Ihe mgbochi mmiri IP65 |
| Ihe onwunwe | Acrylonitrile Butadiene Styrene, Polycarbonate |
| Akụkụ ngwaahịa | 6.1"L x 3.74"W x 7.68"H |
| Atụmatụ pụrụ iche | Angle Adjustable, Motion Sensor, Solar Powered, Waterproof |
10. Akwụkwọ ikike & Nkwado
Adiding offers 2 years replacement support for this solar outdoor flood light. If you encounter any issues or have questions regarding your product, please contact Adiding US customer service through your order platform. Our professional service team is available 24 hours a day to provide you with the best lighting solutions and support.


