1. Ozi nchekwa dị mkpa
Please read this manual carefully before using the Midea M9 Robot Vacuum Cleaner and retain it for future reference. Adhere to all safety warnings and instructions to prevent injury or damage.
- Enwere ike iji ngwa a ụmụaka ndị gbara afọ 8 na karịa yana ndị nwere ike anụ ahụ, mmetụta uche ma ọ bụ nke uche ma ọ bụ enweghị ahụmahụ na ihe ọmụma ma ọ bụrụ na enyerela ha nlekọta ma ọ bụ ntụziaka gbasara iji ngwa ahụ n'ụzọ dị nchebe ma ghọta ihe egwu dị na ya. .
- Ekwesịrị ilekọta ụmụaka ka ha hụ na ha ejighi ngwa eji egwu egwu egwu.
- Ụmụaka agaghị eme nhicha na nlekọta onye ọrụ na-enweghị nlekọta.
- Jiri naanị ihe nkwụnye ike mbụ nke onye nrụpụta nyere.
- Do not use the robot vacuum in wet environments or near water.
- Hụ na e tinyere ntọala chaja n'elu ala dị larịị n'akụkụ mgbidi, nwee oghere doro anya gburugburu ya.
- Remove any loose cables, small objects, or fragile items from the cleaning area before operation.
2. Ihe ngwugwu
Verify that all items are present in the package. If any components are missing or damaged, contact customer support.
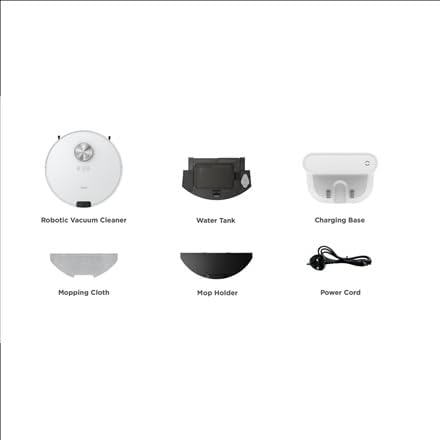
Foto: gafereview of the Midea M9 Robot Vacuum Cleaner's package contents. This image displays the main robotic vacuum cleaner unit, a water tank, a charging base, a mopping cloth, a mop holder, and a power cord.
- Robotic agụụ Cleaner
- Mmiri mmiri
- Nchaji ntọala
- Akwa Mopping
- Njide ejiri
- Ụdọ ọkụ
3. Ngwaahịa gafereview
3.1 kacha View
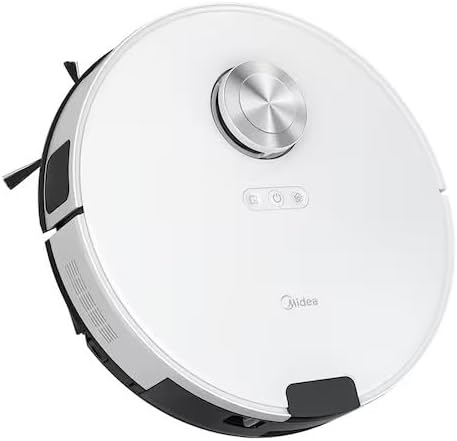
Foto: N'elu view of the Midea M9 Robot Vacuum Cleaner. This image shows the circular design of the robot, with a central LiDAR navigation sensor tower, power button, and other control indicators on its surface.
The top of the Midea M9 features the LiDAR navigation sensor, which allows the robot to map your home and navigate efficiently. It also includes control buttons for starting/pausing cleaning and returning to the charging base.
3.2 N'okpuru View

Foto: N'okpuru view of the Midea M9 Robot Vacuum Cleaner. This image displays the two side brushes, the main rolling brush, the driving wheels, and the mopping pad attachment area.
The underside of the robot houses the main rolling brush, two side brushes for edge cleaning, driving wheels, and cliff sensors to prevent falls. The mopping pad attachment area is also visible.
4. Nhazi
4.1 Nhazi Isi Nchaji
- Place the charging base against a wall on a hard, level surface.
- Ensure there is at least 0.5 meters (1.6 feet) of clear space on both sides of the charging base and 1.5 meters (4.9 feet) in front of it.
- Connect the power cord to the charging base and plug it into a power outlet.
4.2 Nchaji izizi
- Place the robot vacuum onto the charging base, ensuring the charging contacts align.
- Allow the robot to charge completely before its first use. This typically takes 4-6 hours. The indicator light on the robot will change to indicate a full charge.
4.3 Ngwa Njikọ (Nhọrọ)
- Download the Midea Smart app from your mobile device's app store.
- Follow the in-app instructions to connect your Midea M9 Robot Vacuum Cleaner to your home Wi-Fi network. This enables advanced features like remote control, scheduling, and cleaning mode selection.
5. Ntuziaka ọrụ
5.1 Starting/Stopping Cleaning
- Iji malite: Press the power button on the robot or use the Midea Smart app. The robot will begin cleaning in Auto mode.
- Ka ịkwụsịtụ: Press the power button again during cleaning.
- To Stop/Return to Base: Press and hold the power button for a few seconds, or use the 'Return to Base' function in the app.
5.2 Ụdị nhicha
The Midea M9 offers various cleaning modes:
- Nchekwa onwe na ọnọdụ: The robot intelligently navigates and cleans your entire home.
- Ụdị ntụpọ: Cleans a specific area more intensely. Place the robot in the center of the dirty area and activate Spot mode via the app.
- Ụdị ihu: The robot cleans along walls and furniture edges. Activate via the app.
5.3 Mopping Ọrụ
- Fill the water tank with clean water. Do not use detergents or cleaning solutions not approved by Midea.
- Attach the mopping cloth to the mop holder, then slide the mop holder with the cloth onto the water tank.
- Insert the assembled water tank and mop holder into the robot.
- The robot will automatically switch to mopping mode or combined vacuuming and mopping.
6. Nlekọta
Nlekọta anya mgbe niile na-eme ka arụ ọrụ kacha mma ma gbasaa ogologo ndụ nke oghere robot gị.
6.1 Dustbin and Water Tank Cleaning
- Wepu ihe mkpofu ahihia mgbe ejirichara ya.
- Rinse the dustbin and filter with water as needed, ensuring they are completely dry before reinstallation.
- Empty and clean the water tank after each mopping session to prevent mold and odors.
6.2 Brush Cleaning
- Isi ahịhịa: Remove the main brush cover and lift out the brush. Use the cleaning tool to remove hair and debris. Clean weekly.
- Nchicha akụkụ: Check for tangled hair or debris. Remove and clean as needed. Replace if worn or damaged. Clean monthly.
6.3 Sensọ nhicha
- Wipe the cliff sensors, wall sensors, and charging contacts with a clean, dry cloth monthly to ensure proper function.
7. Nchọpụta nsogbu
Ọ bụrụ na ị na-enwe nsogbu, rụtụ aka na nsogbu ndị a na-ahụkarị na ngwọta ndị a:
| Nsogbu | Ihe nwere ike ime | Ngwọta |
|---|---|---|
| Robot anaghị akwụ ụgwọ | Charging contacts are dirty; Power adapter not connected; Robot not properly aligned with base. | Clean charging contacts; Ensure power adapter is plugged in; Realign robot on charging base. |
| Robot na-arapara mgbe mgbe | Loose cables or small objects on the floor; Robot stuck on high thresholds. | Clear obstacles from cleaning path; Use virtual walls or no-go zones in the app. |
| Arụmọrụ nhicha na-adịghị mma | Mpekere mkpofu juru; Ahịhịa ndị ahụ gbagọrọ agbagọ; Ihe nzacha kpọchiri akpọchi. | Wụpụ ihe mkpofu ahụ; Hichaa ahịhịa isi na nke dị n'akụkụ; Hichaa ma ọ bụ dochie nzacha ahụ. |
| Robot enweghị ike ijikọ na Wi-Fi | Incorrect Wi-Fi password; Router too far; Only supports 2.4GHz Wi-Fi. | Verify password; Move robot closer to router; Ensure router is set to 2.4GHz. |
8. Nkọwapụta
| Njirimara | Nkọwa |
|---|---|
| Ụdị | Midia |
| Aha Nlereanya | Midea M9 |
| Akụkụ (L x W x H) | 32 x 32 x 10 cm |
| Ibu | 4 kilogram |
| Atụmatụ pụrụ iche | Smart mapping, Portable |
| Nkwanye elu | Kapeeti |
9. Akwụkwọ ikike na nkwado
Maka ozi gbasara akwụkwọ ikike na nkwado teknụzụ, biko lee kaadị akwụkwọ ikike dị na ngwaahịa gị ma ọ bụ gaa na Midea gọọmentị. websaịtị. Debe nnata nzụta gị ka ihe akaebe nke ịzụrụ.


