Ntuziaka nchekwa dị mkpa
Please read these instructions carefully before operating the unit and retain them for future reference.
- Ewepụla ngwa a na ntapu ma ọ bụ na-efesa mmiri.
- Edokwala ihe jupụtara na mmiri mmiri, dị ka vases, na ngwa.
- Gbaa mbọ hụ na ikuku ikuku dị mma. Akwụsịla oghere ikuku ikuku ọ bụla.
- Awụnyela n'akụkụ ebe okpomọkụ ọ bụla dị ka radiators, ndekọ okpomọkụ, stovu, ma ọ bụ ngwa ndị ọzọ (gụnyere amplifiers) nke na-emepụta okpomọkụ.
- Jiri naanị mgbakwunye / ngwa ndị nrụpụta akọwapụtara.
- Kwupu ngwa a n'oge oke mmiri ozuzo ma ọ bụ mgbe ejighi ya ogologo oge.
- Tụtụ aka n'aka ndị ọrụ ruru eru. Achọrọ ọrụ mgbe akụrụngwa mebiri emebi n'ụzọ ọ bụla.
Ngwaahịa gafereview
The Muse M17CB is a compact dual PLL FM/MW digital alarm clock radio designed for reliable timekeeping and audio playback. It features a clear 0.9-inch white LED display with a dimmer function and a 24-hour time format. Users can set two independent alarms, choosing to wake up to either the radio or a buzzer. The digital tuner allows for 6 preset stations (3 FM and 3 MW) for quick access to your favorite broadcasts. Additional functions include SNAP, SLEEP, and SNOOZE for enhanced user convenience.
N'ihu View

Nkọwa onyonyo: This image displays the front of the Muse M17CB alarm clock radio. It features a prominent 0.9-inch white LED display showing "12:00". Above the display are various control buttons and two rotary knobs. The buttons include P.1, P.2, P.3, DIM., O/SOURCE, and a large SNOOZE button. The left rotary knob is for VOLUME, and the right is for TUNING/SET. A small "muse" logo tag is visible on the left side.
Njikwa Panel nke dị elu

Nkọwa onyonyo: Onyonyo a na-enye a elu-ala view of the Muse M17CB alarm clock radio, highlighting the control panel. It shows two large rotary knobs for Volume and Tuning/Set, along with several push buttons: P.1, P.2, P.3 (for radio presets), DIM. (dimmer), O/SOURCE (power/source selection), and a large circular SNOOZE button. The layout is clear and intuitive.
Njikọ Ogwe azụ

Nkọwa onyonyo: This image shows the rear panel of the Muse M17CB alarm clock radio. It clearly displays the "AC~" power input socket, the "FM ANT." wire antenna, and an "AUX IN" 3.5mm jack for connecting external audio devices. A speaker grille is also visible on the right side.
Melite
Njikọ Ike
- Unpack the Muse M17CB unit and all accessories.
- Connect the AC power cord to the "AC~" input on the rear of the unit.
- Tinye nsọtụ nke ọzọ nke eriri ike ahụ n'ime oghere mgbidi nkịtị.
- The LED display will light up, indicating the unit is receiving power.
Mbido Antenna
- For optimal FM reception, fully extend the FM wire antenna located at the back of the unit.
- Adjust the position of the antenna for the best possible signal reception.
Ntuziaka ọrụ
Ịtọ oge
- Gbaa mbọ hụ na agbanyere unit ahụ.
- Pịa ma jide TUNING/SET knob for approximately 2 seconds until the hour digits flash on the display.
- Tugharia ihe TUNING/SET kụọ aka ịgbanwe elekere.
- Pịa TUNING/SET knob once to confirm the hour; the minute digits will flash.
- Tugharia ihe TUNING/SET knob to adjust the minutes.
- Pịa TUNING/SET knob again to confirm the minutes and exit time setting mode.
- E gosipụtara oge ahụ n'ụdị awa 24.
Setting the Alarm (Alarm 1 and Alarm 2)
Ngwaọrụ a nwere mkpu abụọ nọọrọ onwe ha (Mkpu 1 na Mkpu 2).
- Pịa P.1 button (for Alarm 1) or P.2 button (for Alarm 2) once. The alarm icon and hour digits will flash.
- Tugharia ihe TUNING/SET knob to adjust the alarm hour.
- Pịa TUNING/SET knob to confirm the hour; the minute digits will flash.
- Tugharia ihe TUNING/SET knob to adjust the alarm minutes.
- Pịa TUNING/SET knob to confirm the minutes. The alarm source (radio or buzzer) will flash.
- Tugharia ihe TUNING/SET knob to select either Redio or Buzzer as the alarm sound.
- Pịa TUNING/SET knob to confirm the alarm source. The alarm volume will flash (if radio is selected).
- Tugharia ihe Mpịakọta knob to set the desired alarm volume (for radio alarm).
- Pịa TUNING/SET knob to save the alarm settings. The corresponding alarm icon will appear on the display, indicating the alarm is active.
To deactivate an alarm, press the corresponding P.1 or P.2 bọtịnụ ruo mgbe akara ngosi mkpu ahụ ga-apụ n'anya na ngosipụta ahụ.
Radio Operation (FM/MW)
- Pịa O/SOURCE button to turn on the radio. Press it repeatedly to cycle between FM, MW, and AUX modes.
- Tugharia ihe TUNING/SET knob to manually tune to a desired frequency.
- To auto-scan for stations, press and hold the TUNING/SET knob for 2 seconds. The radio will scan and stop at the next available station.
Setting and Recalling Presets (P.1, P.2, P.3)
- To Store a Preset: Tune to the desired station. Press and hold one of the preset buttons (P.1, P.2, ma ọ bụ P.3) for 2 seconds until the display confirms the preset is saved.
- Icheta ihe atọrọ: Briefly press the desired preset button (P.1, P.2, ma ọ bụ P.3) to tune to the stored station.
Ọrụ dimmer
Pịa DIM. button repeatedly to adjust the brightness of the LED display to your preference (e.g., High, Medium, Low, Off).
Ọrụ snooze
Mgbe mkpu dara, pịa nnukwu URUA button to temporarily silence the alarm. The alarm will sound again after approximately 9 minutes.
Ọrụ ụra
Ọrụ ụra ahụ na-enye gị ohere ihi ụra na redio, nke ga-agbanyụ na akpaghị aka mgbe oge edobere.
- Mgbe redio na-akpọ, pịa P.3 button (often doubles as SLEEP function) repeatedly to cycle through available sleep timer durations (e.g., 90, 60, 30, 15 minutes, or OFF).
- The radio will automatically turn off after the selected duration.
SNAP Function
The specific operation of the SNAP function is not detailed in the provided product description. Please refer to the full printed manual included with your device for instructions on using the SNAP feature.
Ntinye Enyemaka (AUX IN)
Jikọọ ngwaọrụ ọdịyo mpụga (dịka ọmụmaatụ, ọkpụkpọ MP3, ama) na ỌXụ IN jack on the rear of the unit using a 3.5mm audio cable. Press the O/SOURCE button repeatedly until "AUX" appears on the display to switch to auxiliary input mode. Audio from the connected device will play through the alarm clock's speaker.
Nlekọta
- Nhicha: Jiri ákwà dị nro ma kpọọ nkụ hichaa mpụta nke ihe ahụ. Ejila ihe nhicha, wax, ma ọ bụ ihe mgbaze.
- Nchekwa: If the unit is not used for an extended period, unplug it from the power outlet and store it in a cool, dry place.
- Zere mmiri mmiri: Keep the unit away from water and high humidity.
Nchọpụta nsogbu
| Nsogbu | Ihe nwere ike ime | Ngwọta |
|---|---|---|
| Enweghị ike / Gbanyụọ ngosipụta | Ejikọghị eriri ọkụ nke ọma. | Ensure the AC power cord is securely plugged into the unit and a working wall outlet. |
| Nnabata redio adịghị mma | FM antenna not extended or positioned correctly. | Fully extend and adjust the position of the FM wire antenna for better reception. Try moving the unit to a different location. |
| Oti mkpu anaghị ada ụda | Agbaghị mkpu ma ọ bụ ahazighị ya nke ọma. | Verify that the alarm icon is displayed. Recheck alarm time and source settings. Ensure alarm volume is not set to minimum if radio alarm is selected. |
| Ngosipụta na-egbuke egbuke/na-adịghị mma nke ukwuu | Ntọala Dimmer chọrọ mgbanwe. | Pịa DIM. button repeatedly to cycle through brightness levels. |
Nkọwapụta
- Ụdị: M17CB
- Ngosipụta: 0.9-inch White LED with Dimmer
- Ụdị oge: 24 - elekere
- Tuner: Digital FM/MW PLL
- Atọrọ atọ: 6 (3 FM + 3 MW)
- Mkpu: Dual Alarm (Radio or Buzzer)
- Ọrụ: SNAP, SLEEP, SNOOZE
- Isi mmalite ike: Ike AC
- Akụkụ: 13 cm (Ogologo) x 11 cm (Obosara) x 6.5 cm (Elu)
- Agba: Turquoise
- Ihe: Resin or Plastic
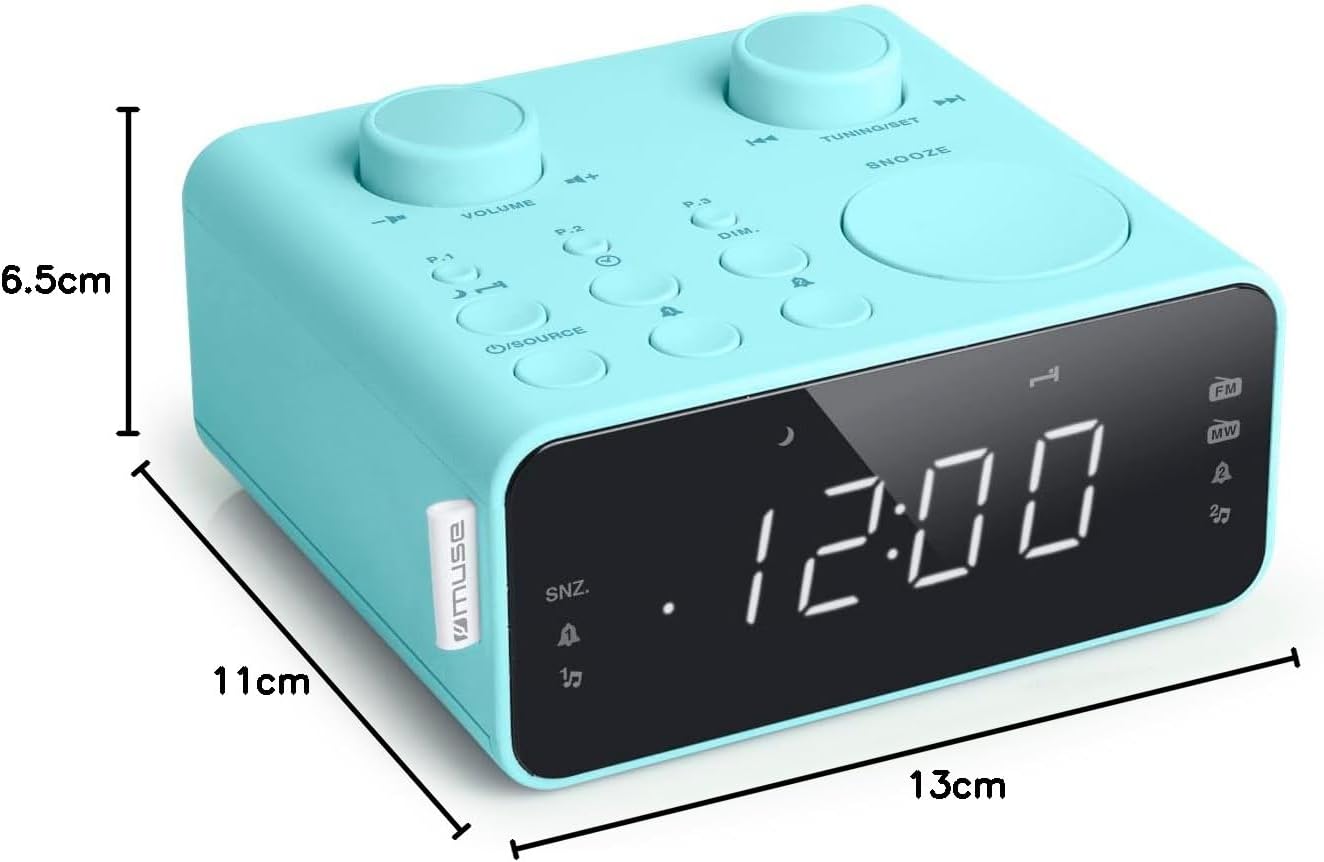
Nkọwa onyonyo: This image illustrates the dimensions of the Muse M17CB alarm clock radio. It shows the unit with measurements indicating a length of 13cm, a width of 11cm, and a height of 6.5cm.
Akwụkwọ ikike na nkwado
For warranty information and technical support, please refer to the warranty card included with your product or visit the official Muse websaịtị. Debe nnata nzụta gị ka ihe akaebe nke ịzụrụ.
The product includes a user manual (as indicated by "Pièces incluses: Manuel du propriétaire").


