Okwu mmalite
Thank you for choosing the Epson EB-L210SF projector. This manual provides essential information for the safe and efficient use of your projector. Please read it thoroughly before operating the device and keep it for future reference.
The Epson EB-L210SF is a 3LCD Full-HD projector designed for clear and vibrant image projection. It features a laser light source for long-lasting performance.
Ozi nchekwa dị mkpa
- Nchekwa laser: Do not look directly into the projector lens when the laser light source is active. Avoid direct eye exposure to the laser beam.
- Igwe ikuku: Ensure adequate ventilation around the projector. Do not block ventilation openings. Overheating can cause damage.
- Isi mmalite ike: Use only the power supply specified for this projector.
- Ijikwa: Jiri nlezianya jide ihe ngosi ahụ. Zere ịda ma ọ bụ mee ka ọ daa ma ọ bụ mee ka ọ daa n'ihe ike.
- Nhicha: Gbanyụọ eriri ọkụ eletrik tupu ị sachaa ya. Jiri ákwà dị nro ma kpọọ nkụ. Ejila ihe nhicha mmiri ma ọ bụ ihe nhicha aerosol.
Melite
1. Mwepu na ntinye
Carefully remove the projector and all accessories from the packaging. Place the projector on a stable, level surface. Ensure there is sufficient space around the projector for proper ventilation.

Foto 1: N'ihu na akụkụ view of the Epson EB-L210SF projector, showing the lens and ventilation grilles.
2. Ijikọ Ike
- Jikọọ eriri ọkụ ewepụtara na ntinye AC nke projector.
- Tinye nsọtụ nke ọzọ nke eriri ọkụ n'ime oghere eletrik gbadoro ụkwụ.
3. Ijikọ isi mmalite ntinye
The projector supports various input sources. Connect your device (computer, Blu-ray player, etc.) to the appropriate port on the projector's rear panel.

Figure 2: Rear panel of the projector, displaying various input and output ports including HDMI, Computer (VGA), Video, USB, and Audio connections.
- HDMI: Connect an HDMI cable from your device to one of the HDMI ports (HDMI 1 or HDMI 2).
- Kọmputa (VGA): Connect a VGA cable from your computer to the Computer 1 or Computer 2 port. For audio, connect a separate audio cable to Audio 1 or Audio 2.
- Vidiyo: Connect composite video and audio cables to the Video and Audio (R/L) ports.
- USB: Use the USB-A port for connecting USB storage devices or the USB-B port for display over USB.
- LAN: Connect an Ethernet cable for network control and monitoring.
4. Ike mbido na ngbanwe onyonyo
- Press the power button on the projector or remote control to turn on the device. The power indicator will illuminate.
- Hazie nke mgbanaka mgbanaka around the lens until the image is sharp and clear.
- Jiri ihe zoom lever (if available) to adjust the image size.
- If the image appears trapezoidal, use the mgbazi isi okwu feature (manual or automatic) to square the image. Refer to the Operating section for details on menu navigation.
Na-arụ ọrụ Projector
1. Ogwe njikwa gafereview
The control panel on top of the projector allows access to various functions and settings.
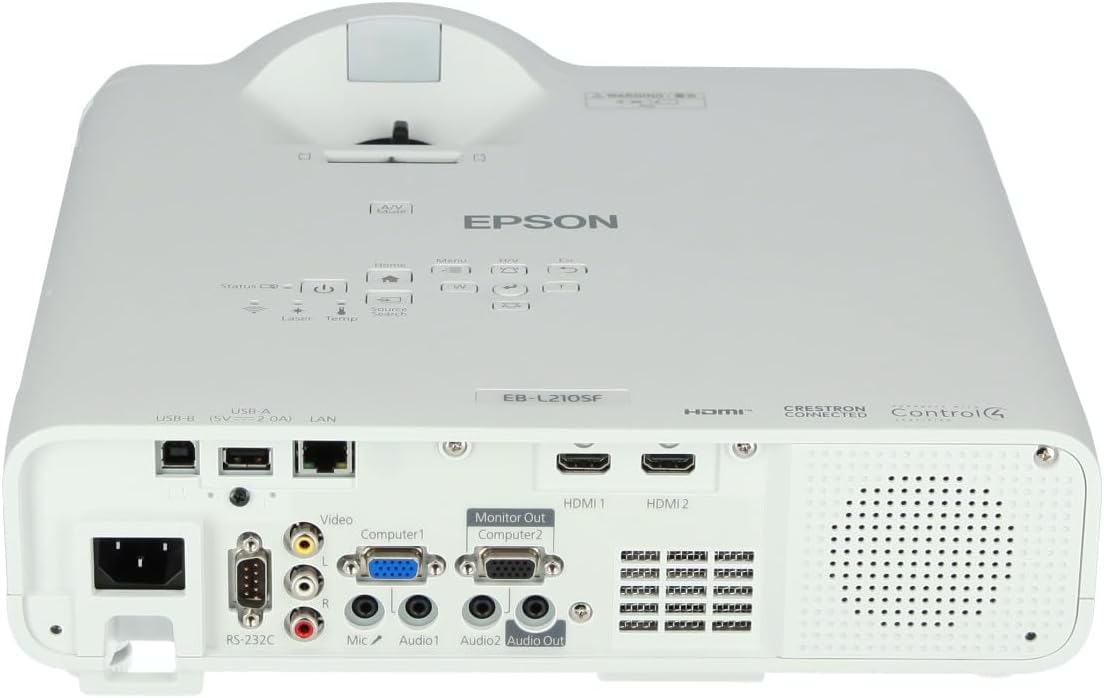
Foto 3: Top view of the projector, highlighting the control panel with buttons for power, menu, source selection, and navigation.
- Bọtịnụ ike: Gbanyụọ ma ọ bụ gbanyụọ projector.
- Ọchụchọ isi mmalite: Na-eme okirikiri site na isi mmalite ntinye dị.
- Bọtịnụ menu: Opens the on-screen display (OSD) menu.
- Navigation Buttons (Arrow keys): A na-eji ya eme ihe iji lelee nhọrọ menu.
- Tinye bọtịnụ: Na-akwado nhọrọ dị na menu.
- Esc Button: Exits the current menu or returns to the previous screen.
- Bọtịnụ ụlọ: Accesses the home screen or quick settings.
- Ogbi: Temporarily mutes audio and blanks the screen.
2. Selecting an Input Source
Pịa Search isi mmalite button on the control panel or remote control to cycle through the connected input sources (e.g., HDMI 1, HDMI 2, Computer 1, Video). The projector will automatically detect and display the active source.
3. Adjusting Image and Audio Settings
Pịa NchNhr button to access the projector's on-screen display (OSD) menu. Use the navigation buttons to browse categories such as:
- Foto: Adjust brightness, contrast, color, tint, sharpness, and color temperature.
- Akara: Configure input signal settings, aspect ratio, and overscan.
- Ntọala: General projector settings like language, display options, and power management.
- Audio: Adjust volume, mute, and audio input selection.
Họrọ otu nhọrọ wee pịa Banye to modify its value. Press Esc ịpụ na menu.
Nlekọta
1. Na-ehicha ihe ngosi
- Mputa: Wipe the projector's exterior with a soft, dry, lint-free cloth. For stubborn dirt, dampen the cloth slightly with water, then wipe dry.
- oghere: Gently wipe the lens with a lens cleaning cloth or lens paper. Avoid using abrasive materials or excessive force.
- Ihe nzacha ikuku: Regularly check and clean the air filter to prevent dust buildup, which can affect performance and cause overheating. Refer to the projector's on-screen menu for filter maintenance reminders.
2. Laser Light Source
The Epson EB-L210SF uses a laser light source, which offers a long operational life and does not require lamp replacement. No user maintenance is typically required for the laser light source itself.
Nchọpụta nsogbu
Ọ bụrụ na ị na-enwe nsogbu na projector gị, rụtụ aka na nsogbu na azịza ndị a na-ahụkarị:
| Nsogbu | Ihe kpatara/ Ngwọta nwere ike ime |
|---|---|
| Ọnweghị onyonyo atụpụtara |
|
| Onyonyo na-agba agba ma ọ bụ enweghị nchekwube |
|
| Image is distorted (trapezoidal) |
|
| Enweghị ụda |
|
| Projector is not wireless | The Epson EB-L210SF is not inherently a wireless projector. Wireless functionality typically requires an optional external wireless adapter, which is sold separately. Please consult Epson's official website or your retailer for compatible wireless adapters. |
| Overheating warning (Temp indicator) |
|
Nkọwapụta
| Njirimara | Nkọwa |
|---|---|
| Nọmba nlereanya | V11HA75080 |
| Ngosipụta mkpebi | 1920 x 1080 (HD zuru ezu) |
| Teknụzụ Njikọta | HDMI, VGA, USB, LAN |
| Akụkụ ngwaahịa | 11.81 x 11.81 x 11.81 sentimita asatọ |
| Ibu Ibu | 10.14 pound |
| Isi Iyi Ìhè | Laser |
| Onye nrụpụta | Epson |
| Eji akwadoro | nlekota oru |
| Njirimara Pụrụ Iche | Dị fechaa |
| Batrị achọrọ | 1 AAAA (for remote control, not included with projector unit) |
| Ụbọchị mbụ dị | Nọvemba 14, 2023 |
Akwụkwọ ikike na nkwado
Maka ozi akwụkwọ ikike zuru ezu, biko rụtụ aka na kaadị akwụkwọ ikike gụnyere ngwaahịa gị ma ọ bụ gaa na Epson gọọmentị websaịtị. Usoro na ọnọdụ ikike nwere ike ịdị iche site na mpaghara.
For technical support, product registration, or to download the latest drivers and software, please visit the official Epson support website or contact Epson customer service in your region. Contact information can typically be found on the Epson websaịtị.


