1. Okwu mmalite
This user manual provides comprehensive instructions for the installation, operation, and maintenance of your HDWR videoCAR-L300 Dash Cam. Please read this manual thoroughly before using the device to ensure proper functionality and to maximize its lifespan. Keep this manual for future reference.
2. Ngwaahịa gafereview
The HDWR videoCAR-L300 is a versatile dash camera designed to enhance your driving safety and record your journeys. It functions as both a front and rear recording device, integrated into a rearview mirror with a touchscreen display.
Akụkụ ndị bụ isi:
- Ndekọ vidiyo HD zuru ezu: The front camera records in Full HD (1920x1080) resolution, providing clear and detailed video footage.
- Rear Camera Functionality: The rear camera offers VGA (640x480) recording resolution and can also serve as a reverse camera for parking assistance.
- Integrated 4.7-inch Touchscreen Display: The wide mirror, approximately 30 cm, features a built-in 4.7-inch touchscreen for easy operation and increased rear visibility.
- 120-Degree Wide-Angle Lens: The front camera's lens offers a 120-degree viewing angle, capturing a broad area in front of your vehicle.
- Ọrụ akpaaka: Features include automatic camera start and stop, motion detection, and adjustable sensitivity.
- G-Sensor for Impact Detection: Automatically protects recordings from being overwritten in the event of sudden braking or a collision.
- Nkwado kaadị MicroSD: Supports microSD memory cards up to 32GB for storing recorded video and audio files.

Foto 2.1: N'ihu view of the HDWR videoCAR-L300 Dash Cam, showing the mirror display with a car image.
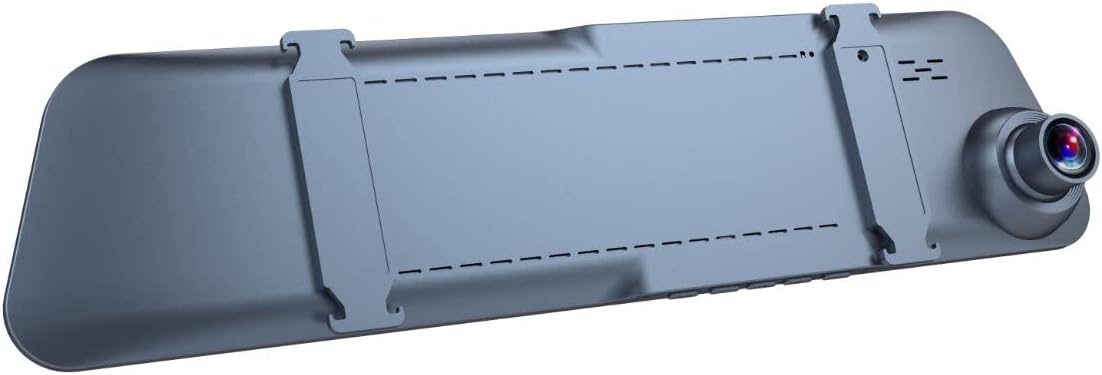
Ọgụgụ 2.2: N'azụ view of the HDWR videoCAR-L300 Dash Cam, highlighting the mounting clips for installation.
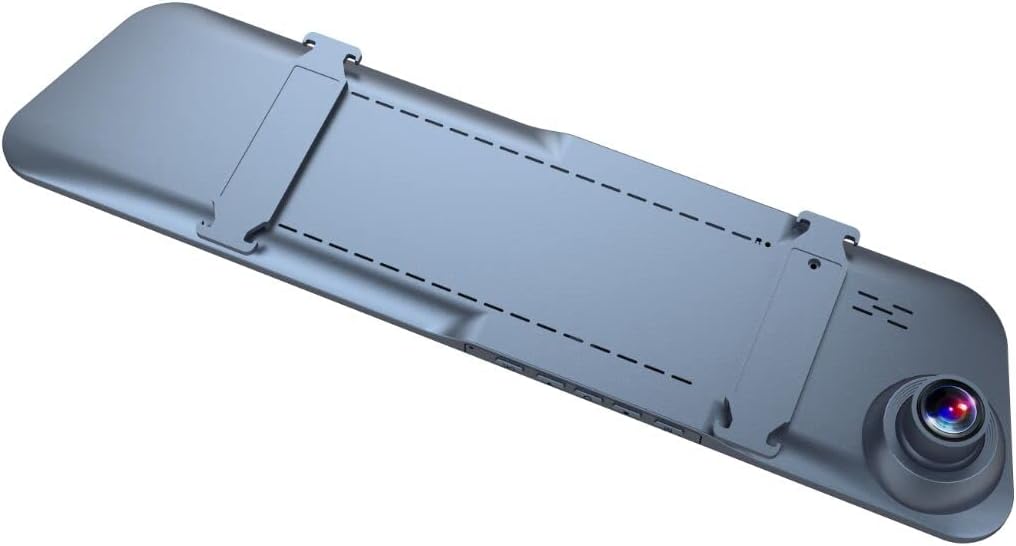
Foto nke 2.3: Azụ nwere akụkụ anọ view of the HDWR videoCAR-L300 Dash Cam, showing the camera lens and mounting clips.

Ọgụgụ 2.4: gbawara view illustrating the various perspectives of the HDWR videoCAR-L300 Dash Cam.
3. Ntọala na nwụnye
3.1 Kedu ihe dị na igbe ahụ
Before beginning installation, please ensure all components are present:
- HDWR videoCAR-L300 Dash Cam Unit
- Ịchaji eriri
- Ngwa nwụnye
- Akwụkwọ ntuziaka (akwụkwọ a)
3.2 Installation Steps (Windshield Mount)
The videoCAR-L300 is designed for windshield mounting, typically over your existing rearview mirror.
- Kwadebe Ngwaọrụ: Gently unbox the dash cam and ensure the protective film is removed from the screen and lens.
- Ịkwanye: Securely attach the dash cam to your vehicle's rearview mirror using the integrated clips. Ensure it is firmly in place and does not obstruct your view.
- Njikọ Ike: Use the provided charging cable to connect the dash cam to your vehicle's 12V power outlet (cigarette lighter socket). Route the cable neatly to avoid interference with driving.
- Install Rear Camera (Optional): If using the rear camera, connect it to the main unit and route its cable to the rear of the vehicle. Mount the rear camera in a suitable location, typically near the license plate or inside the rear window, ensuring a clear view.
- Fanye kaadị MicroSD: Insert a compatible microSD card (up to 32GB, not included) into the designated slot on the dash cam. Ensure it is inserted correctly until it clicks into place.
- Ike izizi: Start your vehicle. The dash cam should automatically power on. If not, press the power button.
- Gbanwee akụkụ: Adjust the angle of the front camera lens to ensure it captures the road ahead clearly. Use the live view on the touchscreen display for precise alignment.

Figure 3.1: The dash cam installed on the vehicle's rearview mirror, showing its integration into the car's interior.
4. Ntuziaka ọrụ
4.1 Gbanyụọ ma ọ bụ gbanyụọ
- Ọrụ akpaaka: The device is designed to automatically power on and begin recording when your vehicle's ignition is turned on, and power is supplied. It will automatically power off when the ignition is turned off.
- Ọrụ aka: To manually power on or off, press and hold the power button located on the device.
4.2 Nsoro Ihuenyo Mmetụ Aka
The 4.7-inch touchscreen display allows for intuitive navigation through menus and settings.
- Isi interface: Na-egosi ndụ view from the front and/or rear cameras.
- Ịnweta NchNhr: Tap the screen to reveal menu icons. Swipe left/right or up/down to navigate through options.
- Nhọrọ nhọrọ: Pịa akara ngosi ma ọ bụ nhọrọ iji họrọ ya.

Figure 4.1: The dash cam's screen showing a live road view, indicating active recording.
4.3 Ụdị ndekọ
- Ndekọ loop: Kamera dash na-edekọ vidiyo n'ime akụkụ (dịka ọmụmaatụ, nkeji 1, nkeji 3, ma ọ bụ nkeji 5). Mgbe kaadị ebe nchekwa juru, a na-emepe nke kacha ochie. filea na-edegharị s na-akpaghị aka.
- G-Sensọ (ndekọ ihe mberede): In the event of sudden braking or a collision, the built-in G-Sensor detects the impact and automatically locks the current video segment, preventing it from being overwritten by loop recording.
- Nchọpụta ngagharị: When enabled, the camera will automatically start recording if it detects movement in front of the vehicle while parked. This feature requires continuous power supply.
4.4 Nghaghachi
Maka review edekọ footage:
- From the main screen, tap to access the menu.
- Select the "Playback" or "Gallery" option.
- Browse through the recorded video and audio files. Akpọchiri files (from G-Sensor events) will typically be in a separate folder.
- Kpatụ a file to play it back on the screen.
4.5 Settings Adjustment
Access the settings menu to customize various parameters:
- Mkpebi vidiyo: Adjust recording quality (e.g., Full HD, VGA).
- Ogologo oge ndekọ loop: Set the length of video segments.
- Mmetụta G-Sensọ: Adjust the sensitivity of the impact detection.
- Nchọpụta ngagharị: Kwado ma ọ bụ gbanyụọ atụmatụ a.
- Ụbọchị/Oge Stamp: Ensure the correct date and time are set for accurate recording timestamps.
- Ndekọ ọdịyo: Enable or disable microphone recording.
- Nchekwa ihuenyo: Set the display to turn off after a period of inactivity to avoid distraction while driving.
5. Nlekọta
Regular maintenance ensures optimal performance and longevity of your dash cam.
- Na-ehicha oghere: Jiri ákwà dị nro, nke na-enweghị lint hichaa anya igwefoto ahụ nke ọma. Zere ihe ndị na-emebi emebi ma ọ bụ kemịkal siri ike nke nwere ike ịkpacha anya ahụ.
- Na-ehicha ihuenyo: Wipe the touchscreen display with a soft, dry cloth. For stubborn smudges, slightly dampen akwa na mmiri.
- Nlekọta kaadị MicroSD: Format the microSD card regularly (e.g., once a month) within the camera's settings to prevent data corruption and ensure smooth recording. Back up any important footage tupu nhazi.
- Okpomọkụ: Avoid exposing the device to extreme temperatures (very hot or very cold) for extended periods, as this can affect battery life and component performance.
- Nkwanye echekwabara: Periodically check that the dash cam is securely mounted to prevent vibrations from affecting video quality or causing the device to fall.
6. Nchọpụta nsogbu
If you encounter issues with your HDWR videoCAR-L300, refer to the following common problems and solutions:
| Nsogbu | Ihe nwere ike ime | Ngwọta |
|---|---|---|
| Ngwaọrụ anaghị agbanwu ọkụ. | No power supply; loose cable connection; faulty power adapter. | Check the charging cable connection to the device and the vehicle's power outlet. Ensure the vehicle's ignition is on. Try a different power outlet or cable if available. |
| Nkwụsị ndekọ ma ọ bụ friza. | Full or corrupted microSD card; slow microSD card; G-Sensor triggered too often. | Format the microSD card (back up data first). Use a high-speed (Class 10 or U1/U3) microSD card. Adjust G-Sensor sensitivity in settings. |
| Vidiyo footage adịghị acha ma ọ bụ na-edoghị anya. | Dirty lens; protective film still on lens; improper camera angle. | Clean the camera lens with a soft cloth. Remove any protective film. Adjust the camera angle to ensure a clear view nke okporo ụzọ. |
| Ihuenyo anaghị anabata. | Nsogbu ngwanrọ nwa oge. | Perform a soft reset by pressing and holding the power button until the device restarts. If unresponsive, disconnect power and reconnect. |
| Rear camera not working. | Loose connection; faulty cable or camera. | Lelee njikọ nke eriri igwefoto azụ na isi ngwaọrụ ahụ. Hụ na eriri ahụ emebighị. |
If the problem persists after trying these solutions, please contact HDWR customer support for further assistance.
7. Nkọwapụta
| Njirimara | Nkọwa |
|---|---|
| Ụdị | HDWR |
| Aha Nlereanya | videoCAR |
| Nọmba Nlereanya ihe | L300 |
| Akụkụ ngwaahịa | 3.5D x 29.7W x 7H cm; 180 grams |
| Nha ihuenyo | 4.7 sentimita asatọ |
| Video Resolution (Front) | HD zuru oke (1920x1080p) |
| Video Resolution (Rear) | VGA (640x480) |
| Viewna n'akuku | 120 ogo |
| Ụdị ebe nchekwa Flash | microSD (up to 32GB) |
| Teknụzụ Njikọta | AUX |
| Atụmatụ pụrụ iche | Motion Sensor, G-Sensor |
| Usoro njikwa | Metụ aka |
| Ụdị nkwụnye | Ugwu ikuku ikuku |
| Batrị gụnyere | Mba |
| Ngwa dakọtara | Ekwentị mkpanaaka |
8. Akwụkwọ ikike na nkwado
For warranty information and technical support, please refer to the official HDWR website or contact their customer service directly. Details regarding warranty periods and service procedures are typically provided with your purchase documentation or on the manufacturer's websaịtị.
Maka enyemaka ọzọ, biko gaa na: www.hdwr.eu


