1. Okwu mmalite
This manual provides detailed instructions for the installation, operation, and maintenance of your Gravity Audio 1200W 12" Premium Car Subwoofer Kit. This comprehensive package includes a Gravity 12-inch subwoofer, an Audiobank 3000W Class D amplifier, an Audiotek single 12-inch vented subwoofer enclosure, and a complete amplifier installation kit. Please read this manual thoroughly before attempting installation or operation to ensure proper use and maximum performance.

Nyocha 1.1: N'eluview of the Gravity Audio 1200W 12" Premium Car Subwoofer Kit components.
2. Ozi nchekwa
Na-edebe nchekwa nchekwa ndị a mgbe niile n'oge ntinye na arụ ọrụ:
- Akwadoro nwụnye ọkachamara: If you are unsure about any aspect of installation, consult a qualified car audio technician.
- Kwupu batrị: Always disconnect the vehicle's negative battery terminal before starting any electrical work to prevent short circuits and electrical shock.
- Wiwi kwesịrị ekwesị: Use appropriate gauge wiring as specified in this manual and ensure all connections are secure and insulated to prevent shorts.
- Igwe ikuku: Gbaa mbọ hụ na amplifier is mounted in a location with adequate airflow to prevent overheating.
- Zenarị ihe mgbochi: Do not mount components in locations that obstruct airbags, driver visibility, or vehicle controls.
- Nchedo Ntị: Prolonged exposure to high volume levels can cause permanent hearing damage. Use caution when adjusting volume.
3. Ihe ngwugwu
Chọpụta na ihe niile dị na ngwugwu gị:
- Gravity 12" 1200W Peak Power Subwoofer (GR-12PW)
- Audiobank 3000W Class D Monoblock Amplifier (P3001)
- Audiotek Single 12 Inch Vented Subwoofer Enclosure (CA-12SP)
- Zuru oke Amplifier Installation Kit (Power Cable, Ground Cable, Remote Turn-On Wire, RCA Interconnects, Speaker Wire, Fuse Holder, Fuse, Terminals, Zip Ties)

Figure 3.1: Contents of the amplifier installation kit, including various cables, fuse, and terminals.
4. Ntọala na nwụnye
Follow these steps for proper installation of your car audio system. Ensure the vehicle's battery is disconnected before proceeding.
4.1 Subwoofer Installation into Enclosure
- Carefully place the Gravity 12" subwoofer into the opening of the Audiotek vented enclosure. Ensure the mounting holes align.
- Secure the subwoofer using appropriate screws (not included, typically self-tapping wood screws) through the mounting holes into the enclosure. Do not overtighten.
- Connect speaker wire from the subwoofer's terminals to the enclosure's internal terminals. Observe polarity: positive (+) to positive, negative (-) to negative.

Foto 4.1: N'ihu view of the Gravity 12-inch subwoofer, showing the cone and surround.

Foto 4.2: N'ihu view of the Audiotek single 12-inch vented subwoofer enclosure.
4.2 Amplifier Ịkwalite
Choose a secure, well-ventilated location for the Audiobank amplifier, such as the trunk or under a seat. Ensure it is away from moisture and direct sunlight.
- Mark the mounting holes on the chosen surface.
- Drill pilot holes if necessary, taking care not to damage any vehicle components.
- Chekwaa amplifier using appropriate screws.

Foto 4.3: Top view of the Audiobank 3000W Class D Monoblock Ampna -emegharị ihe.
4.3 Njikọ njikọ
Tụtụ aka na amplifier's rear panel for terminal locations. Use the provided ampngwa nrụnye liifier.
- Power Cable (+12V): Run the thick red power cable from the vehicle's positive battery terminal to the amplifier's +12V terminal. Install the fuse holder within 18 inches of the battery and insert the fuse.
- Ground Cable (GND): Connect the thick black ground cable from the ampMee ka ọdụ GND nke lifier gaa n'elu ígwè dị ọcha, nke a na-eseghị agba n'elu chassis nke ụgbọala ahụ. Hụ na njikọ siri ike, nke na-anaghị eguzogide ihe ọ bụla.
- Waya Mgbakwụnye N'ime Ime Obodo (REM): Connect the blue remote wire from your head unit's remote output to the ampỌdụ REM nke lifier. Nke a na-atụgharị amplifier on/off with your head unit.
- RCA Interconnects: Connect the RCA cables from your head unit's subwoofer or full-range pre-outs to the ampNjikọ ntinye RCA nke lifier.
- Mpụta okwu: Connect the speaker wire from the enclosure's external terminals to the amplifier's speaker output terminals. Ensure correct polarity.

Figure 4.4: Rear panel of the Audiobank amplifier showing power, ground, remote, and speaker output terminals.

Figure 4.5: Speaker terminal on the Audiotek subwoofer enclosure for connecting to the ampna -emegharị ihe.
5. Ntuziaka ọrụ
Once all connections are made and verified, reconnect the vehicle's negative battery terminal.
5.1 Initial Power-Up and Basic Settings
- Gbanye ihe mgbanye ọkụ na isi ụgbọala gị. amplifier's power indicator should illuminate.
- Malite na amplifier's GAIN control set to minimum (fully counter-clockwise).
- Set the head unit's volume to about 75% of its maximum.
- Jiri nwayọọ nwayọọ na-abawanye amplifier's GAIN control until you hear distortion, then back it off slightly. This sets the maximum clean output.
5.2 Ampnjikwa ọkụ
The Audiobank P3001 amplifier features several controls for fine-tuning your subwoofer's performance:
- Nweta: Adjusts the input sensitivity to match the output of your head unit. (See 5.1)
- LPF (Nyocha ngafe dị ala): This control sets the upper frequency limit for the subwoofer. Typically set between 80Hz and 120Hz. Frequencies above this setting will be filtered out.
- AKWỤKWỌ BASS: Provides an increase in bass output at a specific frequency. Use sparingly to avoid distortion and potential damage.
- OGE: Allows you to adjust the phase of the subwoofer output (0 or 180 degrees) to ensure it blends seamlessly with your main speakers. Experiment with both settings to find the best sound.
6. Nlekọta
Your Gravity Audio Subwoofer Kit requires minimal maintenance to ensure long-term performance.
- Nhicha: Periodically wipe down the amplifier and subwoofer enclosure with a soft, dry cloth. Avoid using harsh chemicals or abrasive cleaners.
- Nyocha njikọ: Annually, inspect all wiring connections for tightness and corrosion. Re-tighten any loose connections.
- Igwe ikuku: Gbaa mbọ hụ na amplifier's cooling fins remain free of dust and debris to maintain proper heat dissipation.
7. Nchọpụta nsogbu
If you experience issues with your subwoofer kit, consult the following table before seeking professional assistance:
| Nsogbu | Ihe nwere ike ime | Ngwọta |
|---|---|---|
| Enweghị ụda sitere na Subwoofer |
|
|
| Ụda agbagọ |
|
|
| Amplifier ekpo oke ọkụ |
|
|
8. Nkọwapụta
Gravity 12" Subwoofer (GR-12PW)
- Ụdị ọkà okwu: Subwoofer
- Dayameta Subwoofer: 12 sentimita asatọ
- Voice Coil Configuration: Abụọ 4 Ohm
- Ọnụ ọgụgụ kasị elu Power: 1200 Watts nke ọ bụla
- Ike RMS: 600 Watts nke ọ bụla
- Nzaghachi ugboro ugboro: 30 - 2.5kHz
- Mmetụta: 90 dB
- Ihe cone: Competition Grade Pressed Paper Cone
- Gburugburu: High Roll Foam Surround
- Sistemu jụrụ oyi: Advanced Air Flow Cooling System
Audiobank 3000W Class D Amplifier (P3001)
- Ụdị: Klas D Monoblock Ampna -emegharị ihe
- Ọnụ ọgụgụ kasị elu Power: 3000 Watts (Total Package)
- Njikwa: Gain, LPF, Bass Boost, Phase
Audiotek Single 12 Inch Vented Enclosure (CA-12SP)
- Nhazi: Vented (Ported)
- Ihe: High Quality Gray Carpet
- Akụkụ: Approximately 18"W x 16"D x 14"H (External)
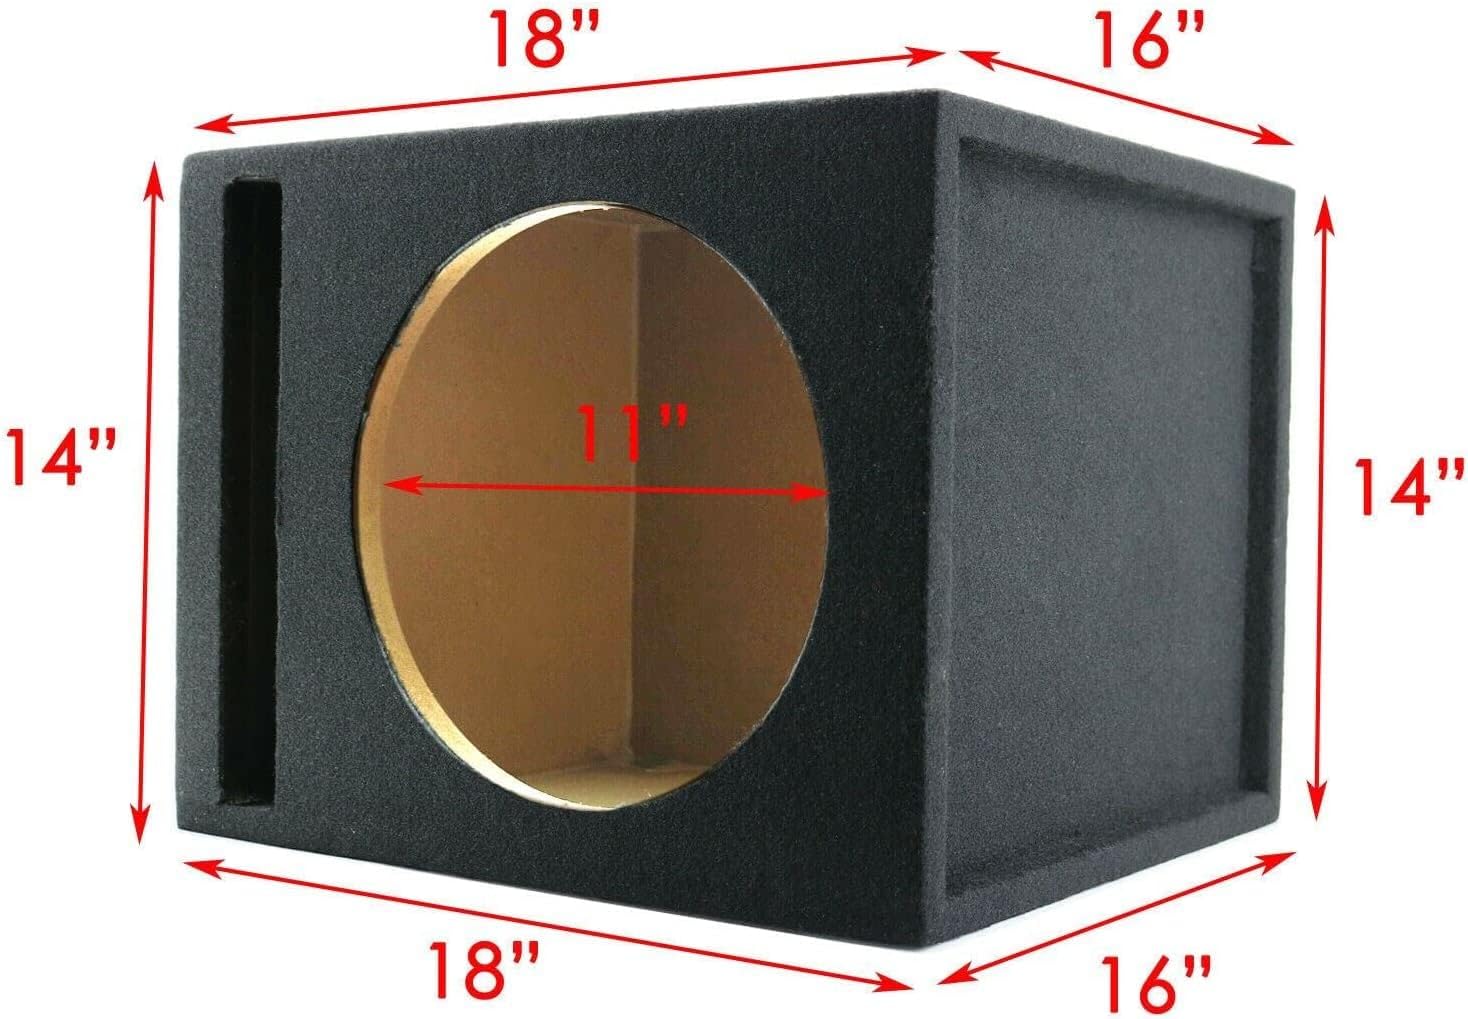
Figure 8.1: Dimensions of the Audiotek single 12-inch vented subwoofer enclosure.
9. Akwụkwọ ikike & Nkwado
This product comes with a Limited Warranty. For specific details regarding warranty coverage, duration, and terms, please refer to the warranty card included with your purchase or contact Gravity Audio customer support directly.
Nkwado ndị ahịa
For technical assistance, troubleshooting not covered in this manual, or warranty claims, please contact your retailer or Gravity Audio customer service. Have your product model number (GR-12PW + P3001 + CA-12SP + Kit) and purchase date available when contacting support.