1. Okwu mmalite
This manual provides essential information for the LILYGO T3S3 ESP32-S3 LoRa Development Board. This board integrates an ESP32-S3 microcontroller, a LoRa wireless module (SX1280 2.4G), and a 0.96 inch OLED display, making it suitable for various wireless communication and IoT projects, including Meshtastic applications. It supports Wi-Fi and Bluetooth 5.0 connectivity.

Foto 1: N'ihu view of the LILYGO T3S3 ESP32-S3 LoRa Development Board, showing the integrated 0.96 inch OLED display.

Ọgụgụ 2: Azụ view of the LILYGO T3S3 ESP32-S3 LoRa Development Board, highlighting the LoRa module and other components.
2. Ngwa ngwaahịa
The LILYGO T3S3 ESP32-S3 LoRa Development Board package typically includes the following items:
- 1 x LILYGO T3S3 ESP32-S3 LoRa Development Board
- 1 x Antenna (for LoRa communication)
- 1 x eriri ọkụ
- 2 x Pin Headers

Figure 3: Contents of the LILYGO T3S3 ESP32-S3 LoRa Development Board package, showing the board, antenna, power cable, and pin headers.
3. Nhazi ntuziaka
Follow these steps to set up your LILYGO T3S3 development board:
- Tinye Antenna: Carefully screw the provided LoRa antenna onto the SMA connector on the board. Ensure it is finger-tight to avoid damage.
- Njikọ ike: Connect the board to a power source using the USB Type-C port. Alternatively, use the provided power cable for a 3.7V LiPo battery connection. The board supports USB/3.7V LiPo battery power supply.
- Initial Firmware: The board may come with pre-installed firmware (e.g., Meshtastic). To install or update firmware, refer to the official LILYGO Wiki or GitHub repository for detailed instructions and tools. A common method involves using the ESP-IDF or Arduino IDE.
- TF Card Insertion (Optional): If your application requires external storage, insert a compatible TF card into the designated slot on the board.
- Pin Headers (Optional): Attach the included pin headers if you plan to integrate the board into a breadboard or custom circuit. Refer to the pinout diagram for correct connections.
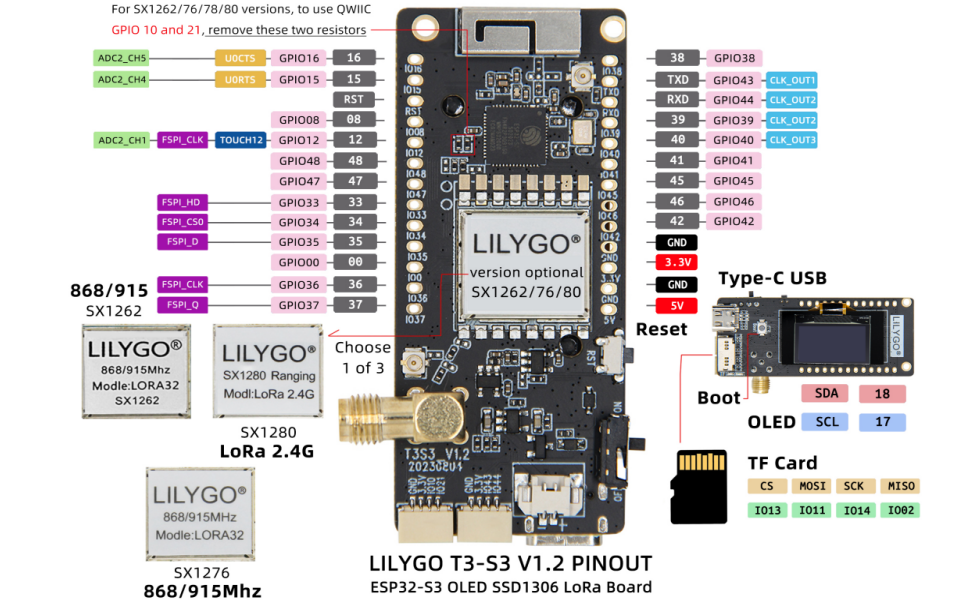
Figure 4: Detailed pinout diagram for the LILYGO T3S3 ESP32-S3 LoRa Development Board, showing GPIO assignments and component locations.
4. Ntuziaka ọrụ
Once the board is set up and firmware is loaded, you can begin operation:
- Ike Na: Connect the board to a power source. The OLED display should illuminate, showing information based on the loaded firmware (e.g., network status, messages for Meshtastic).
- Ngosipụta OLED: The 0.96 inch SSD1306 OLED display provides visual feedback. Its resolution is 128x64, and it uses an I2C interface (SDA-IO18, SCL-IO17).
- Nkwukọrịta ikuku: Utilize the integrated Wi-Fi and Bluetooth 5.0 for local network connectivity or device pairing. The LoRa module (SX1280 2.4G) enables long-range, low-power communication.
- Reset and Boot Buttons: The board features a Reset button to restart the microcontroller and a Boot button, typically used for entering bootloader mode during firmware flashing.
- Software Interaction: Interact with the board through its serial interface (via USB) or wirelessly, depending on the firmware's capabilities. For Meshtastic, a mobile application or web interface is commonly used.
5. Nlekọta
Proper maintenance ensures the longevity and reliable operation of your development board:
- Debe nkụ: Protect the board from moisture and humidity.
- Jiri nwayọọ dị ọcha: Use a soft, dry brush or compressed air to remove dust. Avoid liquid cleaners.
- Mmelite femụwe: Regularly check the official LILYGO GitHub repository (github.com/Xinyuan-LilyGO/LilyGo-LoRa-Series) for firmware updates and security patches.
- Nlekọta Antenna: Ensure the antenna is securely connected but do not overtighten. Avoid bending or damaging the antenna.
6. Nchọpụta nsogbu
If you encounter issues with your LILYGO T3S3 board, consider the following:
- Bọọdụ Anaghị Agbanye Ike:
- Verify the USB cable is properly connected to a working power source.
- If using a LiPo battery, ensure it is charged and correctly connected to the battery switch.
- OLED Display Blank:
- Lelee ọkọnọ ike.
- Ensure firmware is correctly loaded and configured to initialize the OLED.
- No Wireless Connectivity (Wi-Fi/Bluetooth/LoRa):
- Confirm the antenna is attached correctly for LoRa.
- Verify that the firmware includes the necessary drivers and configurations for the wireless modules.
- Lelee maka nnyonye anya mpaghara.
- Firmware Upload Issues:
- Ensure correct drivers for the USB-to-serial chip are installed on your computer.
- Pịa ma jide buut button while pressing and releasing nke Tọgharia button, then release buut to enter flashing mode.
- Consult the LILYGO Wiki (wiki.lilygo.cc) or GitHub for specific flashing instructions for your operating system and development environment.
7. Nkọwapụta
Detailed technical specifications for the LILYGO T3S3 ESP32-S3 LoRa Development Board (SX1280 2.4G Without PA):
| Njirimara | Nkọwapụta |
|---|---|
| Nhazi | ESP32-S3FH4R2 (Dual-core Xtensa LX7) |
| Ebe nchekwa Flash | 4MB |
| PSRAM | 2MB |
| Usoro ikuku ikuku | Wi-Fi (802.11 b/g/n), Bluetooth 5.0 (LE) |
| LoRa Transceiver | SX1280 (2.4 GHz) |
| LoRa TX Power | + 13dBm |
| OLED ngosi | 0.96 inch SSD1306, 128x64 pixels, I2C (SDA-IO18, SCL-IO17) |
| Onboard Functions | Reset Button, Boot Button, TF Card Support |
| Ịnye ọkụ | USB Type-C, 3.7V LiPo battery (with battery switch) |
| Sistemụ nrụọrụ | FreeRTOS (typical) |
| Akụkụ (LxWxH) | 3.45 x 2.6 x 1.06 sentimita (ihe dịka 87.6 x 66 x 26.9 mm) |
Figure 5: Comprehensive technical specifications for the LILYGO T3S3 series, highlighting the SX1280 2.4G module details.

Figure 6: Physical dimensions of the LILYGO T3S3 ESP32-S3 LoRa Development Board.
8. Nkwado na akwụkwọ ikike
For any questions or suggestions regarding the LILYGO T3S3 ESP32-S3 LoRa Development Board, please contact LILYGO customer service. Detailed technical support and community resources can be found on the official LILYGO Wiki and GitHub pages:
- Official Wiki: wiki.lilygo.cc
- GitHub Repository: github.com/Xinyuan-LilyGO/LilyGo-LoRa-Series
Specific warranty information is not provided in the product details. Please refer to your point of purchase or contact LILYGO directly for warranty terms and conditions.


