1. Ozi nchekwa
Read all instructions carefully before beginning installation. If you are unfamiliar with electrical wiring, consult a qualified electrician. This product is ETL Listed, ensuring compliance with safety standards.
- Hụ na agbanyụrụ ọkụ eletrik na ihe na-agbaji sekit tupu etinye ma ọ bụ rụzie ya.
- Waya niile ga-adịrịrị na koodu eletriki nke obodo na nke mpaghara.
- Ihe nrụnye ahụ ga-enwerịrị ike ịkwado ibu nke fan (ihe dịka 7.83 n'arọ).
- Do not operate the fan with damaged blades.
- Zere idobe ihe n'ụzọ agụba fan.
2. Ihe ngwugwu na akụrụngwa
Nyochaa na akụrụngwa niile dị tupu ịga n'ihu na ntinye.

Foto 2.1: Gbawara view showing key components like the fast installation terminal, sloped ceiling mounting bracket, acrylic lampshade, and integrated LED light module.
Typical Components:
- Mgbakọ Ụlọ moto
- Fan Blades (5 reversible blades)
- Downrod na Canopy
- Arịọnụ mgbodo
- Integrated LED Light Kit
- Acrylic Lampndo
- Njikwa dịpụrụ adịpụ na nnata
- Ngwungwu ngwaike (skru, washers, akụ waya)
3. Nwụnye na Ntọala
3.1 Nhọrọ nrịgo
This fan supports both standard downrod mounting and angled (sloped) ceiling mounting up to 15 degrees.
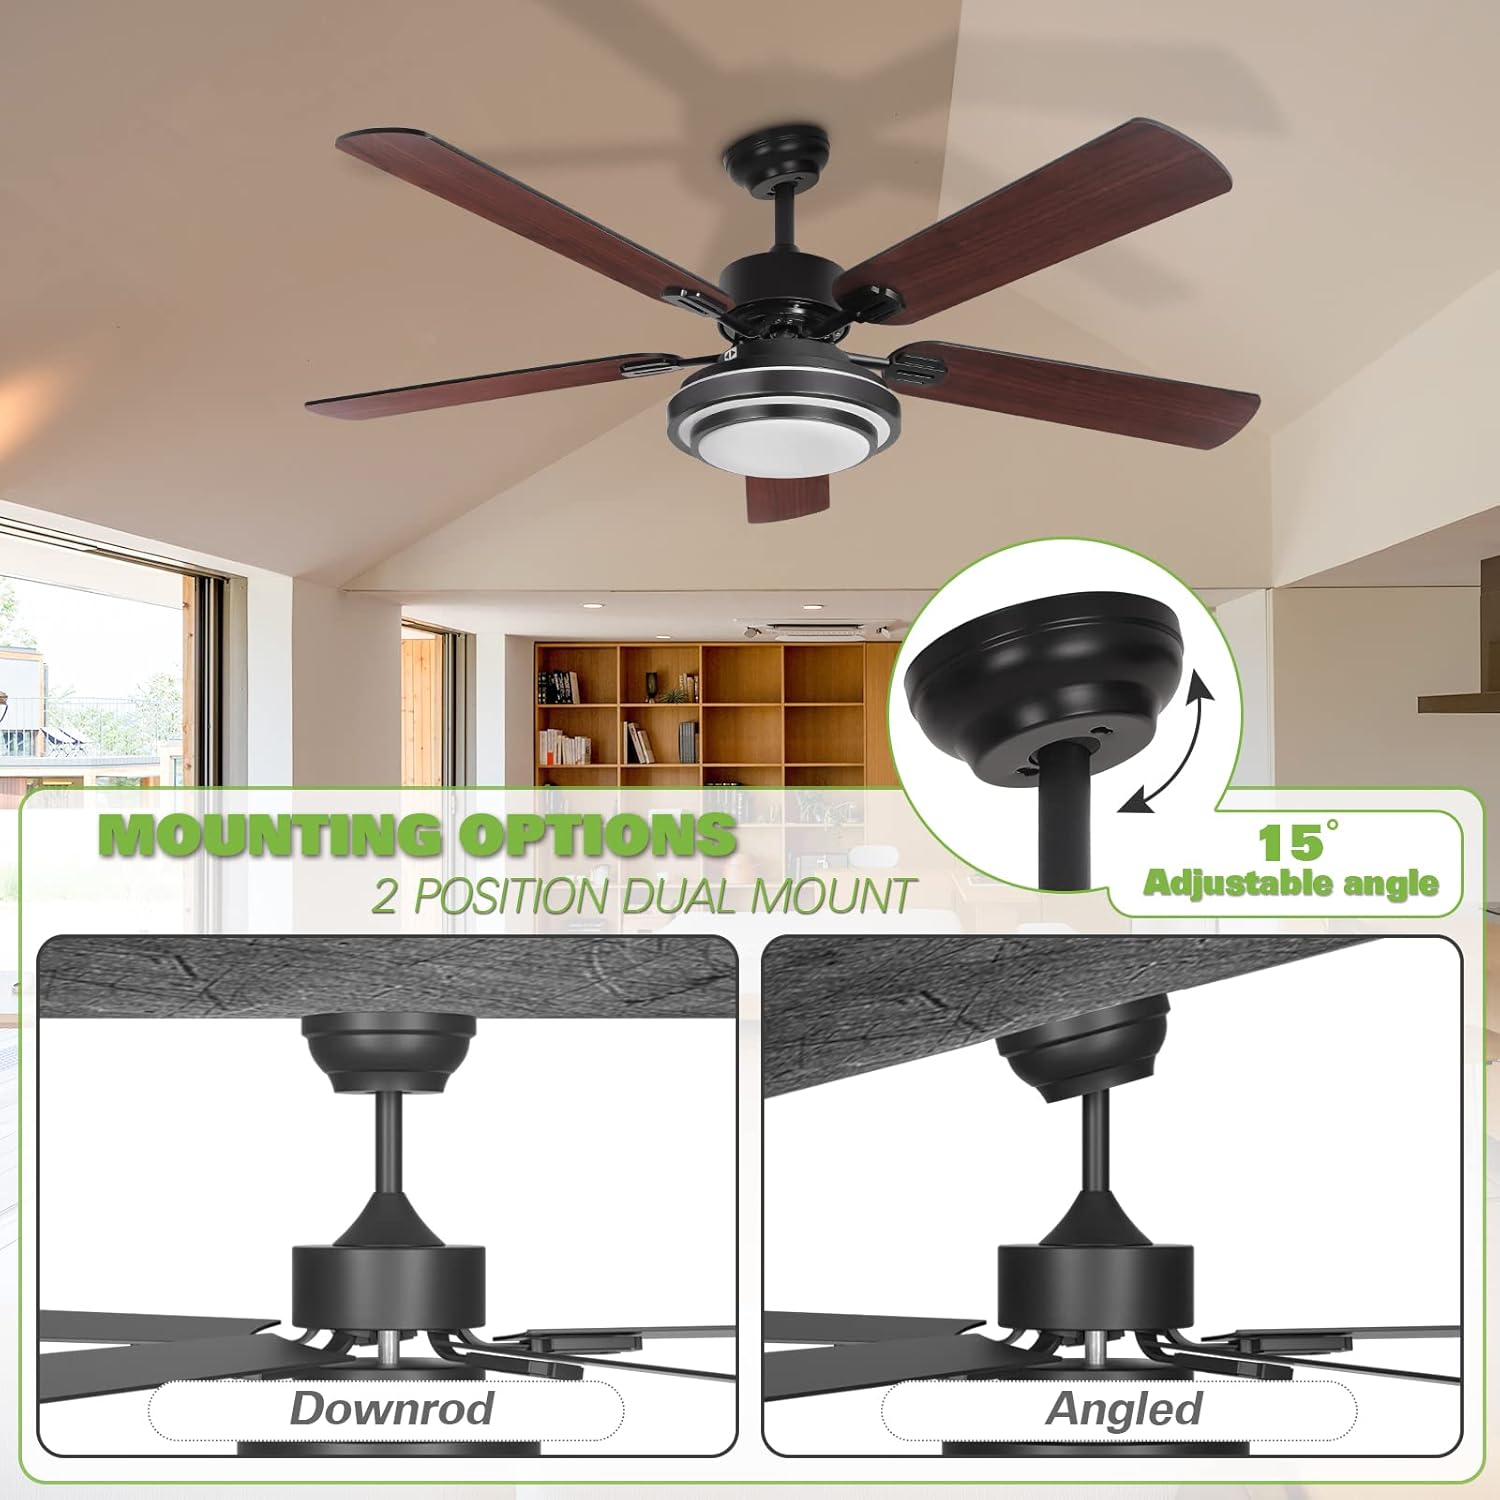
Foto 3.1: Illustration of downrod and angled mounting configurations. The fan can accommodate sloped ceilings up to 15 degrees.
- Mpempe mgbago echekwabara: Attach the mounting bracket to the ceiling junction box. Ensure the bracket is securely fastened and can support the fan's weight.
- Kpọkọta Downrod: Insert the downrod through the canopy and connect it to the motor housing.
- Hang Fan: Jiri nlezianya welie mgbakọ fan ahụ ma kwụgide ya n'elu ihe nkwado ahụ.
3.2 Igwe ọkụ eletrik
Connect the fan's electrical wires to the household wiring using the provided fast installation terminals and wire nuts. Ensure all connections are secure.
- Connect the ground wire (green or bare copper) from the fan to the ground wire from the outlet box.
- Connect the neutral wire (white) from the fan to the neutral wire from the outlet box.
- Connect the live wire (black) from the fan to the live wire from the outlet box.
- Install the remote receiver into the canopy.
3.3 Nwụnye agụba
The fan includes 5 reversible blades, with one side in dark wood color and the other in black. Choose your preferred finish before installation.

Foto 3.2: Reversible fan blades, offering a choice between dark wood and black finishes.
- Attach each blade to the blade arm using the provided screws.
- Secure the blade arms to the motor housing.
3.4 Light Kit Assembly
Connect the integrated LED light kit to the fan's wiring and secure the acrylic lampndo.
- Connect the LED light kit wires to the corresponding wires from the fan.
- Mount the LED light kit to the bottom of the fan motor housing.
- Tinye acrylic lampshade by twisting or securing it into place.
4. Ntuziaka ọrụ
The Hykolity ceiling fan is operated using the included remote control.
4.1 Ọrụ njikwa anya

Foto 4.1: Remote control functionality for light dimming and color temperature adjustment (3000K, 4000K, 5000K).
- Gbanyụọ/ Gbanyụọ: Pịa bọtịnụ fan ka ịgbanwuo ma ọ bụ gbanyụọ fan.
- Ọsọ onye ofufe: Use the speed buttons (1, 2, 3) to adjust the fan's rotation speed.
- Mgbanwu/ Gbanyụọ: Pịa bọtịnụ ọkụ iji gbanye ma ọ bụ gbanyụọ ọkụ LED agbakwunyere.
- Ntucha ọkụ: Use the dimming buttons (+/-) to adjust the brightness of the LED light.
- Ndozi okpomoku agba: The LED light offers three color temperatures: Warm White (3000K), Natural Light (4000K), and Daylight (5000K). Cycle through these options using the dedicated button on the remote or by quickly toggling the light switch.
4.2 Ọrụ Moto A Na-agbanwe Agbanwe
The fan features a reversible motor for year-round comfort. A slide switch on the fan's motor housing controls the direction of airflow.

Foto 4.2: Reversible motor switch for seasonal airflow adjustment.
- Summer Mode (Left Position): Set the switch to the LEFT position for downward airflow, creating a cooling effect.
- Winter Mode (Right Position): Set the switch to the RIGHT position for upward airflow, circulating warm air trapped near the ceiling.
- Ihe dị mkpa: Ensure the fan is OFF before changing the direction of the motor. The fan will not operate if the reverse switch is in the middle position.
5. Nlekọta
Nlekọta anya mgbe niile na-eme ka arụmọrụ kacha mma na ogologo ndụ nke onye na-akwado uko ụlọ gị.
- Nhicha: Jiri nwayọọ na-ehicha agụba fan na ụlọ moto, damp akwa . Ejila ihe nchacha abrasive ma ọ bụ ihe mgbaze.
- Ntụle agụba: Ọ bụrụ na fan ahụ na-ama jijiji, lelee na skru agụba niile siri ike yana na agụba ndị ahụ dabara adaba. Ngwa nhazi dị ma ọ dị mkpa.
- Njikọ eletrik: Annually inspect all electrical connections for tightness. Ensure power is off at the circuit breaker before inspection.
- Ngwa ọkụ: The integrated LED light is designed for long life and typically does not require replacement. If issues occur, contact support.
6. Nchọpụta nsogbu
Lee tebụl na-esonụ maka nsogbu ndị a na-enwekarị na ngwọta ha.
| Nsogbu | Ihe nwere ike ime | Ngwọta |
|---|---|---|
| Onye ofufe anaghị ebido | No power to the fan; Loose wire connections; Remote control battery low; Reverse switch in middle position. | Check circuit breaker; Verify all wire connections are secure; Replace remote battery; Ensure reverse switch is fully engaged left or right. |
| Ìhè anaghị arụ ọrụ | Loose wire connection to light kit; LED driver failure; Remote control battery low. | Check light kit wiring; Contact support for LED driver replacement; Replace remote battery. |
| Fans na-ama jijiji | Kposara agụba tọgbọrọ chakoo; Mpekere na-enweghị nha nha; Ihe nkwado mgbago rụrụ arụ. | Tighten all blade screws; Use a blade balancing kit; Ensure mounting bracket is securely fastened. |
| Njikwa anya anaghị arụ ọrụ | Battery depleted; Remote not paired with receiver. | Replace battery; Refer to remote pairing instructions (usually involves pressing a button within a few seconds of turning on power). |
| Oke mkpọtụ | Kwụsị skru; Mgbochi ụlọ moto; Ugbo na-akụ ihe mgbochi. | Check and tighten all screws; Ensure no parts are rubbing; Clear any obstructions from blade path. |
7. Nkọwapụta
Detailed technical specifications for the Hykolity 52 Inch Ceiling Fan.

Foto 7.1: Key dimensions of the 52-inch ceiling fan.
| Njirimara | Nkọwa |
|---|---|
| Ụdị | Hykolite |
| Nlereanya | Onye na-akwado elu ụlọ 52 inch |
| Dayameta | 52 sentimita asatọ |
| Height (Ceiling to Fan Bottom) | 15.7 inches (optional) |
| Isi Iyi Ìhè | Integrated 24-watt LED |
| Okpomọkụ agba | 3000K (Warm White), 4000K (Natural Light), 5000K (Daylight) |
| Motor Noise Level | Ihe na-erughị 35 dB |
| Ọnụọgụ agụba | 5 (Reversible: Dark Wood / Black) |
| Ụdị nkwụnye | Dual-Mount (Downrod, Angled up to 15°) |
| Ụdị njikwa | Njikwa anya |
| Ike/Wattage | 24 watts (for light) |
| Ibu Ibu | 7.83 n'arọ |
| Ihe onwunwe | Polycarbonate (blades), Metal (housing) |
| ETL edepụtara | Ee |
8. Akwụkwọ ikike na nkwado
Hykolity provides the following warranty for this product:
- moto: Akwụkwọ ikike ndụ.
- Light Accessories: 3 afọ akwụkwọ ikike.
For any product problems or warranty claims, please contact the Hykolity after-sales support team. Keep your purchase receipt as proof of purchase.
Contact information is typically provided on the product packaging or official websaịtị.


