1. Okwu mmalite
This manual provides comprehensive instructions for the installation, operation, and maintenance of your SALCAR T9W WiFi Heating Thermostat. Please read this manual thoroughly before using the device to ensure proper function and safety. This thermostat system consists of a main thermostat unit and a receiver, designed to provide efficient and smart control over your heating system.
2. Ngwaahịa gafereview
2.1 Akụkụ
- Thermostat Unit: Features a VA color screen for displaying temperature, humidity, and settings.
- onye nnata: Connects to your heating system and communicates wirelessly with the thermostat unit.
- Ụdị-C USB: For USB power supply to the thermostat unit.
- Screw Pack: For mounting the receiver and optional wall-mounting of the thermostat.
- Akwụkwọ ntuziaka onye ọrụ: Akwụkwọ a.
Note: 2 x 1.5V AA batteries are required for battery power supply and are not included.
2.2 Atụmatụ
- Njikọ WiFi: Connects to your home network for remote control via the Smart Life app.
- RF Wireless Technology: Stable wireless communication between the thermostat and receiver.
- VA Color Screen: Clear display of current room temperature, set temperature, humidity, and local weather (when connected to WiFi).
- Njikwa anya: Manage your heating from anywhere using the "Smart Life" app on your smartphone.
- Njikwa olu: Dakọtara na Amazon Alexa na Google Assistant maka ọrụ na-enweghị aka.
- Programmable Schedules: Set daily or weekly heating schedules to optimize energy consumption.
- Ọtụtụ Nhọrọ Ike: The thermostat unit can be powered via USB (Type-C) or 2x AA batteries.
- Nwụnye na-agbanwe agbanwe: Thermostat can be placed on a tabletop or wall-mounted.

Image 2.1: The SALCAR T9W thermostat unit with its VA color screen and the accompanying receiver unit.
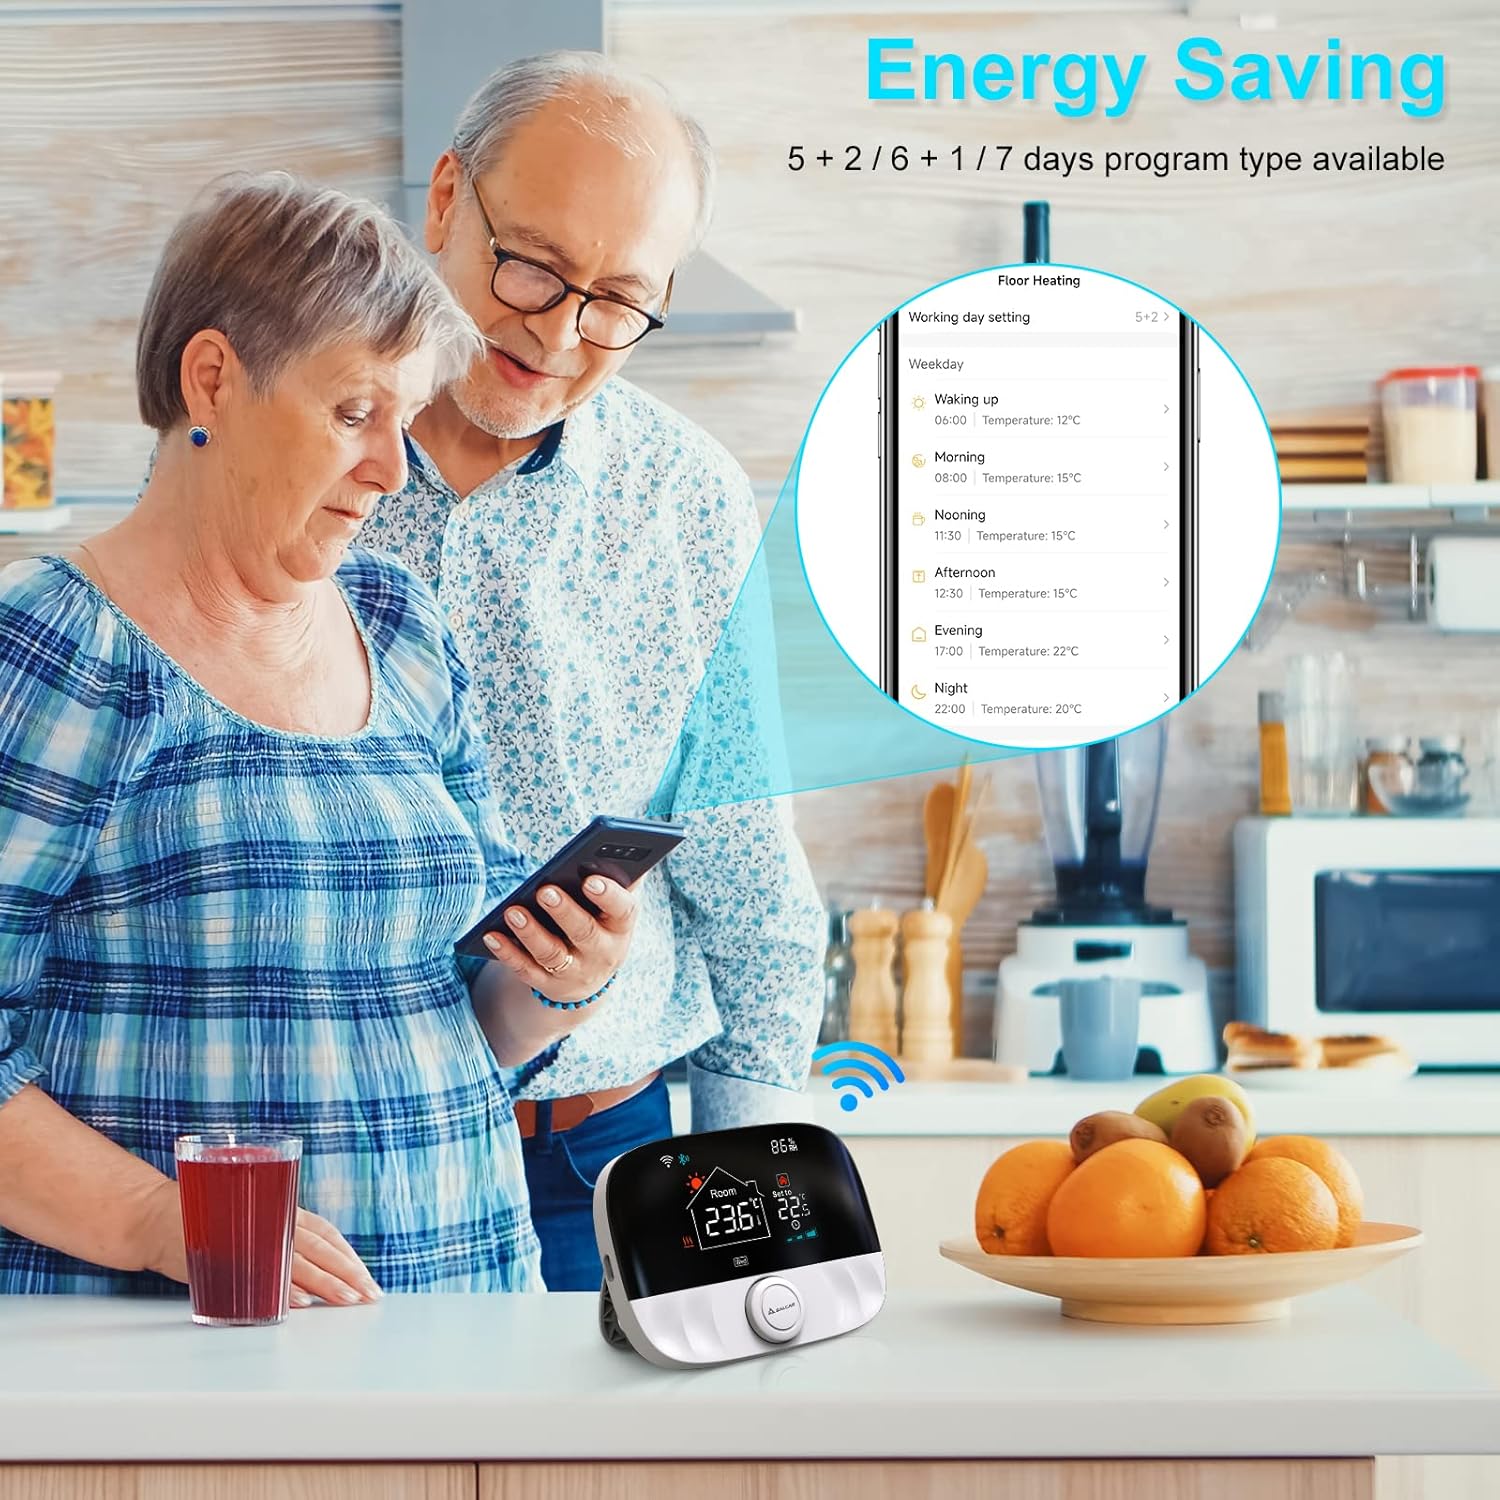
Image 2.2: Contents of the SALCAR T9W package, including the thermostat, receiver, USB cable, screws, and manual.
3. Nhazi
3.1 Ntinye nke nnata
The receiver unit should be installed near your heating appliance (e.g., boiler, radiator). Ensure it is placed in a location that allows for stable RF communication with the thermostat unit and has access to a power source for connection to your heating system.
- Gbanyụọ: Before any wiring, ensure the main power supply to your heating system is turned off at the circuit breaker.
- Ịkwanye: Secure the receiver to a wall using the provided screws.
- Wiring: Connect the receiver to your heating system according to the wiring diagram provided in the separate wiring guide (if applicable) or consult a qualified electrician. The receiver typically requires a 230V power connection and control wires to the heating appliance.
- Ike Na: Once wired, restore power to your heating system. The receiver's indicator lights will show its status.
3.2 Thermostat Unit Placement and Power Supply
The thermostat unit can be placed on a tabletop or wall-mounted for convenience.
- Nkwanye: Choose a central location in the room where accurate temperature readings can be taken, away from direct sunlight, drafts, or heat sources.
- Ịnye ọkụ:
- Ike USB: Connect the provided Type-C cable to the thermostat unit and a USB power adapter (not included). This is recommended for continuous power and optimal WiFi performance.
- Ike batrị: Insert 2 x 1.5V AA alkaline batteries into the battery compartment on the back of the thermostat unit. Ensure correct polarity. Battery life may vary depending on usage and settings.

Image 3.1: The SALCAR T9W thermostat showing both USB (Type-C) and AA battery power supply options.
3.3 Connectivity (RF and WiFi Pairing)
The thermostat and receiver communicate via RF. The thermostat also connects to your home WiFi for smart features.
- RF Pairing (Thermostat and Receiver):
- Ensure both the thermostat and receiver are powered on.
- Refer to the specific instructions in your detailed manual for initiating RF pairing mode on both devices. Typically, this involves pressing a button on the receiver and then a sequence on the thermostat.
- A successful pairing will be indicated by a change in the receiver's LED status or a message on the thermostat screen.
- WiFi Pairing (Thermostat to App):
- Budata ngwa "Smart Life" n'ụlọ ahịa ngwa ekwentị gị.
- Debanye aha ma ọ bụ banye na akaụntụ Smart Life gị.
- In the app, tap '+' to add a new device. Select the thermostat category.
- Follow the in-app instructions to put the thermostat into WiFi pairing mode (usually by pressing and holding a button until a WiFi icon flashes).
- Connect your phone to a 2.4GHz WiFi network (5GHz networks are not supported).
- Enter your WiFi password in the app to complete the connection.
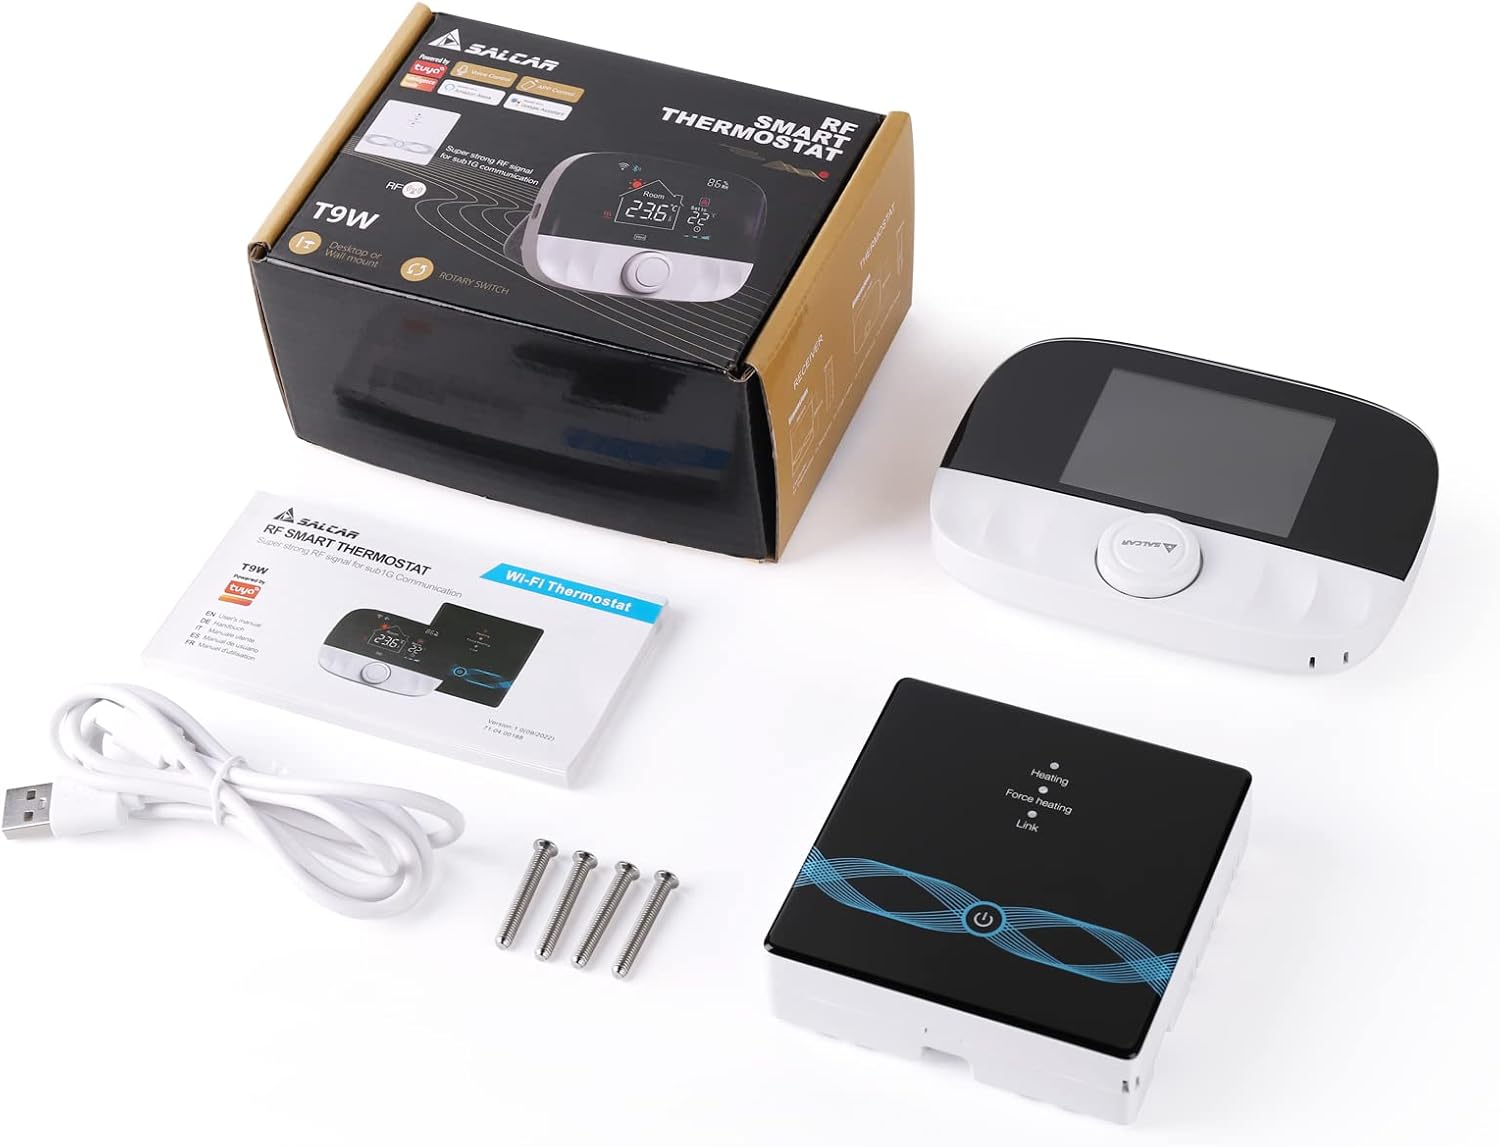
Image 3.2: Diagram illustrating the connectivity between the smartphone, WiFi router, smart speaker, RF thermostat, and RF receiver.
4. Ọrụ
4.1 Njikwa ntọala
The thermostat unit features a rotary knob and buttons for direct control.
- Rotary akpu: Turn to adjust the target temperature. Press to confirm selections or enter menus.
- Ngosipụta: Shows current room temperature, set temperature, time, day, WiFi status, RF status, and humidity.
- Nhọrọ ụdị: Switch between manual mode, automatic (programmed) mode, and temporary mode.
4.2 Ngwa njikwa anya
The "Smart Life" app provides comprehensive control and monitoring features.
- Ndozi okpomọkụ: Change the set temperature remotely.
- Ụdị mgbanwe: Toggle between manual, auto, and temporary modes.
- Ịhazi oge: Create and modify heating schedules for different days and times.
- Ntọala ngwaọrụ: Access advanced settings like temperature calibration, child lock, and anti-freeze function.
- Nleba anya: View current room temperature, humidity, and heating status.

Image 4.1: A smartphone displaying the Smart Life app interface for remote control of the SALCAR T9W thermostat.
4.3 Njikwa olu
Integrate your thermostat with Amazon Alexa or Google Assistant for convenient voice commands.
- Akaụntụ Njikọ: In the Alexa or Google Home app, link your Smart Life account.
- Chọpụta Ngwaọrụ: Allow the voice assistant to discover your SALCAR T9W thermostat.
- Iwu olu: Jiri iwu dịka:
"Alexa, setịpụ [Aha Thermostat] na ogo 22."
"Ndewo Google, kedu okpomọkụ dị n'ime ụlọ obibi?"
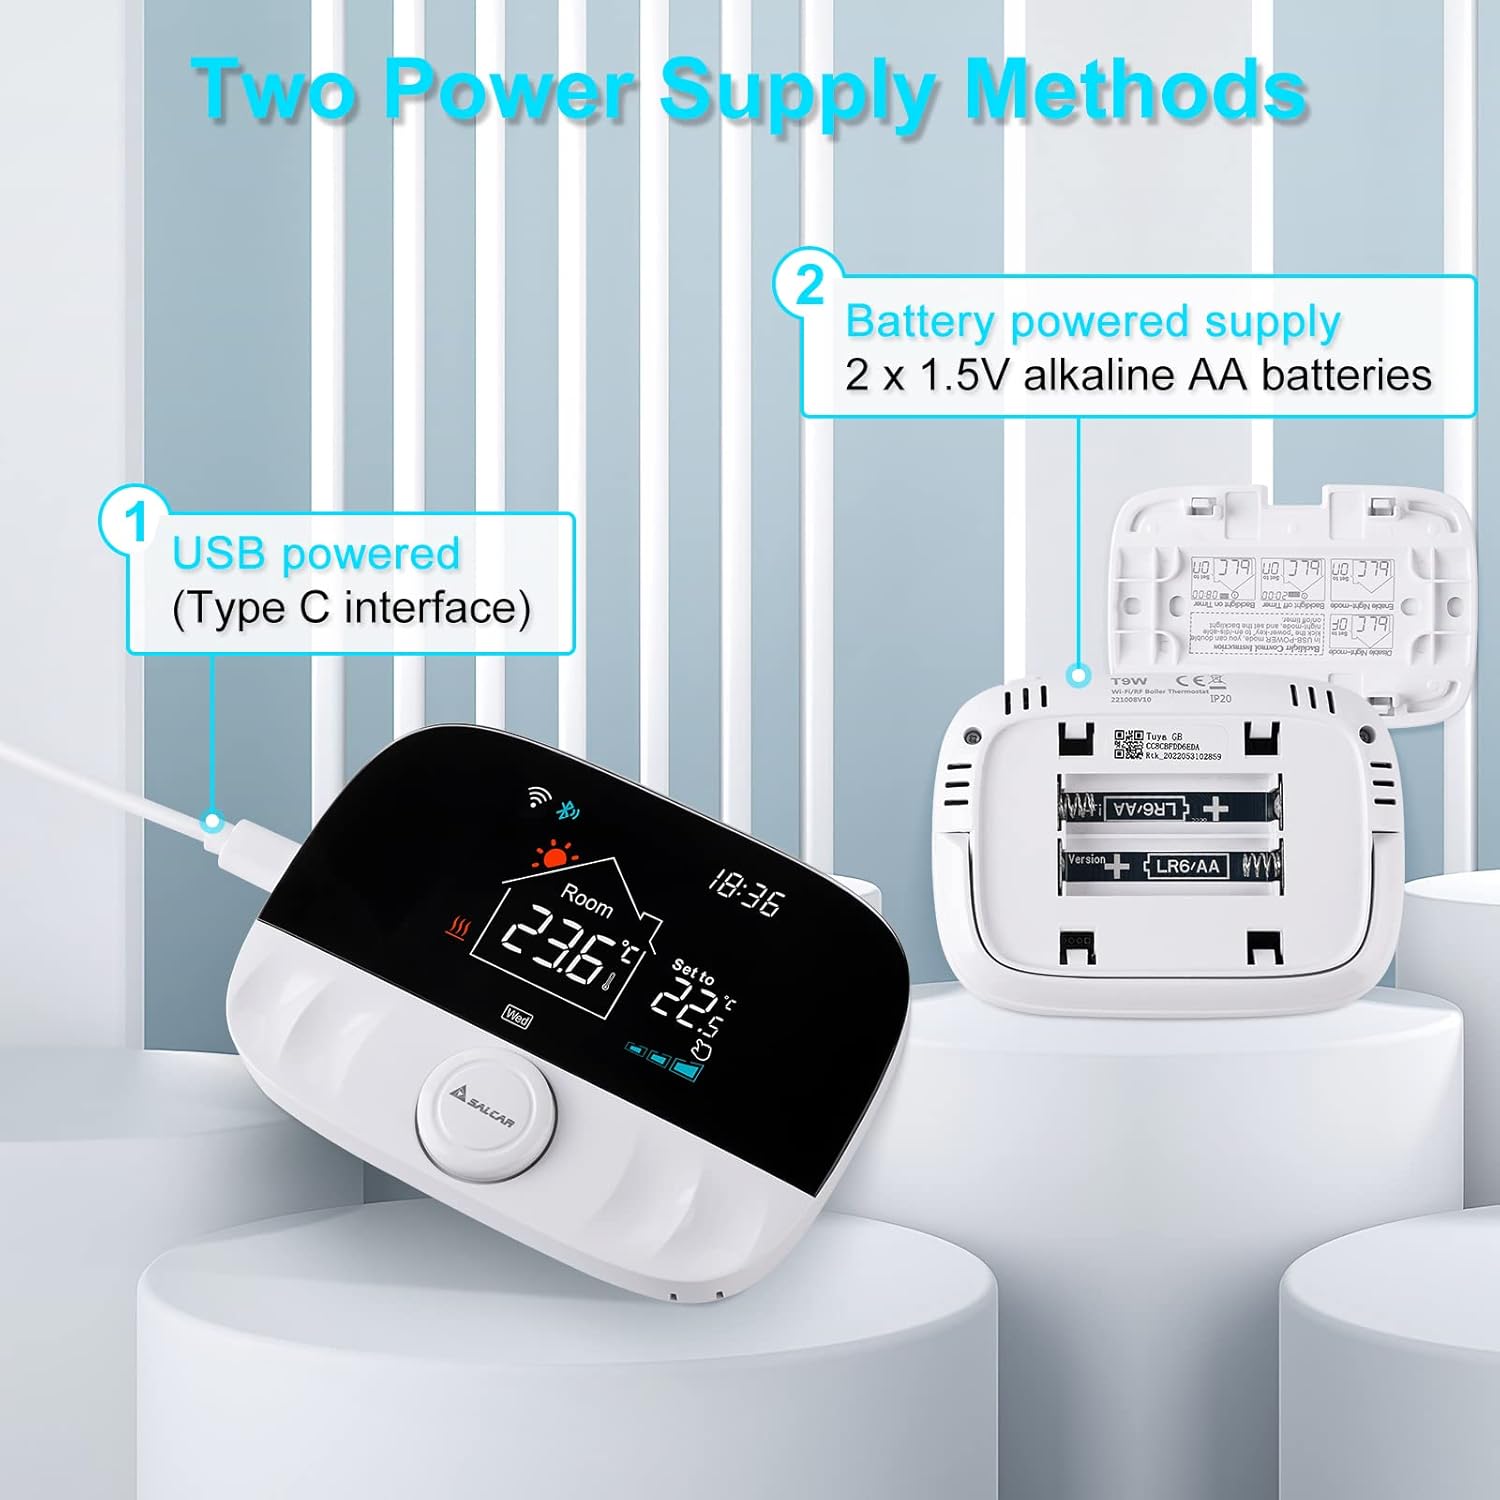
Image 4.2: Demonstrating voice control functionality of the SALCAR T9W thermostat with Amazon Alexa and Google Assistant devices.
4.4 Programming Schedules (Energy Saving)
The thermostat supports programmable schedules to optimize heating and save energy.
- Schedule Types: Typically supports 5+2 day (weekday/weekend) or 6+1 day programming, and 7-day individual programming.
- Setting Periods: Define multiple time periods per day with specific target temperatures (e.g., morning, daytime, evening, night).
- Nhazi ngwa: Schedules are best configured and managed through the "Smart Life" app for ease of use.

Foto 4.3: Example of the energy-saving programming interface within the Smart Life app, showing daily temperature schedules.
5. Nlekọta
- Nhicha: Wipe the thermostat screen and body with a soft, dry cloth. Do not use abrasive cleaners or solvents.
- Ngbanwe batrị: If using battery power, replace AA batteries when the low battery indicator appears on the screen. Ensure to use new alkaline batteries.
- Mmelite femụwe: Periodically check the Smart Life app for any available firmware updates for your thermostat to ensure optimal performance and new features.
6. Nchọpụta nsogbu
| Nsogbu | Ihe nwere ike ime | Ngwọta |
|---|---|---|
| Thermostat not connecting to WiFi. | Incorrect WiFi password; 5GHz network used; thermostat not in pairing mode; router too far. | Ensure correct 2.4GHz WiFi password. Put thermostat in pairing mode. Move closer to router. |
| Receiver not responding to thermostat. | RF pairing lost; receiver not powered; distance too great. | Re-pair thermostat and receiver. Check receiver power. Reduce distance between units. |
| Ọgụgụ okpomọkụ ezighi ezi. | Thermostat placed near heat source/draft; calibration needed. | Relocate thermostat. Use the app to calibrate temperature if necessary. |
| Njikwa olu anaghị arụ ọrụ. | Smart Life account not linked; device not discovered; incorrect commands. | Link Smart Life account in Alexa/Google Home app. Discover devices. Use correct voice commands. |
| Ihuenyo thermostat ghe oghe. | No power; batteries depleted. | Check USB power connection or replace AA batteries. |
7. Nkọwapụta
- Akara: SALCAR
- Nọmba nlereanya: RV7
- Aha ngwaahịa: T9W WiFi Heating Thermostat
- Agba: Silver / Black
- Akụkụ (Ngwugwu): 13.7 x 10.2 x 6.9 cm
- Arọ (Ngwaahịa): 370 g
- Voltage: 15 Volts (Thermostat), 230V (Receiver)
- Teknụzụ Njikọta: WiFi (2.4GHz), RF (433MHz)
- Njikwa Type: Amazon Alexa, onye enyemaka Google
- Ụdị njikwa okpomọkụ: Dijitalụ
- Power Source (Thermostat): USB (Type-C) or 2 x 1.5V AA Batteries
- Atụmatụ pụrụ iche: WiFi Connection, Amazon Alexa & Google Assistant Compatibility, Remote Control via App, Multiple Heating Zone Control
8. Akwụkwọ ikike na nkwado
For warranty information and technical support, please refer to the documentation included with your purchase or contact SALCAR customer service directly. Keep your purchase receipt as proof of purchase for warranty claims.
For further assistance, visit the official SALCAR websaịtị ma ọ bụ kpọtụrụ ọwa nkwado ha.


