Okwu mmalite
This manual provides detailed instructions for the setup, operation, and maintenance of your Amazon Basics Projection Alarm Clock. Please read this manual thoroughly before using the product to ensure proper function and to prevent damage.

Image: The Amazon Basics Projection Alarm Clock, showing its digital display and projection lens.
Ntuziaka nchekwa
- Ewepụla akụkụ ahụ na oke okpomọkụ, ìhè anyanwụ kpọmkwem, uzuzu ma ọ bụ iru mmiri.
- Hụ na ihe nkwụnye ọkụ eletrik ahụ dakọtara na ọkụ eletrik mpaghara gị.
- Debe ihe ahụ ka ọ ghara ịbanye na mmiri ma ọ bụ mmiri ndị ọzọ.
- Agbalịla ịgbasa ma ọ bụ gbanwee ngwaọrụ ahụ. Nke a ga-eme ka akwụkwọ ikike ahụ ghara ịdị irè.
- Clean the unit only with a soft, dry cloth. Do not use liquid cleaners.
- Tụfuo batrị nke ọma dịka iwu mpaghara siri dị.
Ihe ngwugwu
- Amazon Basics Projection Alarm Clock
- Ada Ada AC
- Akwụkwọ ntuziaka onye ọrụ
Njirimara ngwaahịa
- Projection of time onto a wall or ceiling.
- FM Radio with automatic/manual scan and up to 15 preset stations.
- USB port for charging mobile phones or tablets.
- 7-inch high-definition LED display with adjustable brightness.
- Dual alarms for separate wake-up times.
- Snooze function with adjustable duration (2 to 60 minutes).
- Sleep timer for automatic radio shut-off (5 to 90 minutes).
- DST button for Daylight Saving Time adjustment.
- Battery backup (requires 2 AAA batteries, not included) to maintain time settings during power outages.

Foto: Ofeview of key features including sleep timer, radio presets, and snooze function.
Njikwa na Ngosipụta
Familiarize yourself with the buttons and ports on your alarm clock for optimal use.

Foto: Akụkụ view illustrating the location of controls, USB charging port, and projection lens.
- Bọtịnụ Ntọala Oge: Ejiri iji tọọ oge dị ugbu a.
- Alarm 1/2 Buttons: Used to set and activate Alarm 1 and Alarm 2.
- Snooze/Dimmer Button: Activates snooze during an alarm; adjusts display brightness when not alarming.
- Radio/Sleep Button: Turns FM radio on/off; sets sleep timer.
- Volume/Tune Dial: Adjusts radio volume and tunes FM frequencies.
- Projection On/Off/Flip Button: Controls the projection feature and flips the projected time.
- Projection Focus Wheel: Adjusts the clarity of the projected time.
- Projection Angle Adjuster: Changes the angle of the projected time.
- USB Nchaji Port: Maka ịchaji ngwaọrụ mpụga.
- DST Button: Na-agbanwe Oge Nchekwa Ehihie.
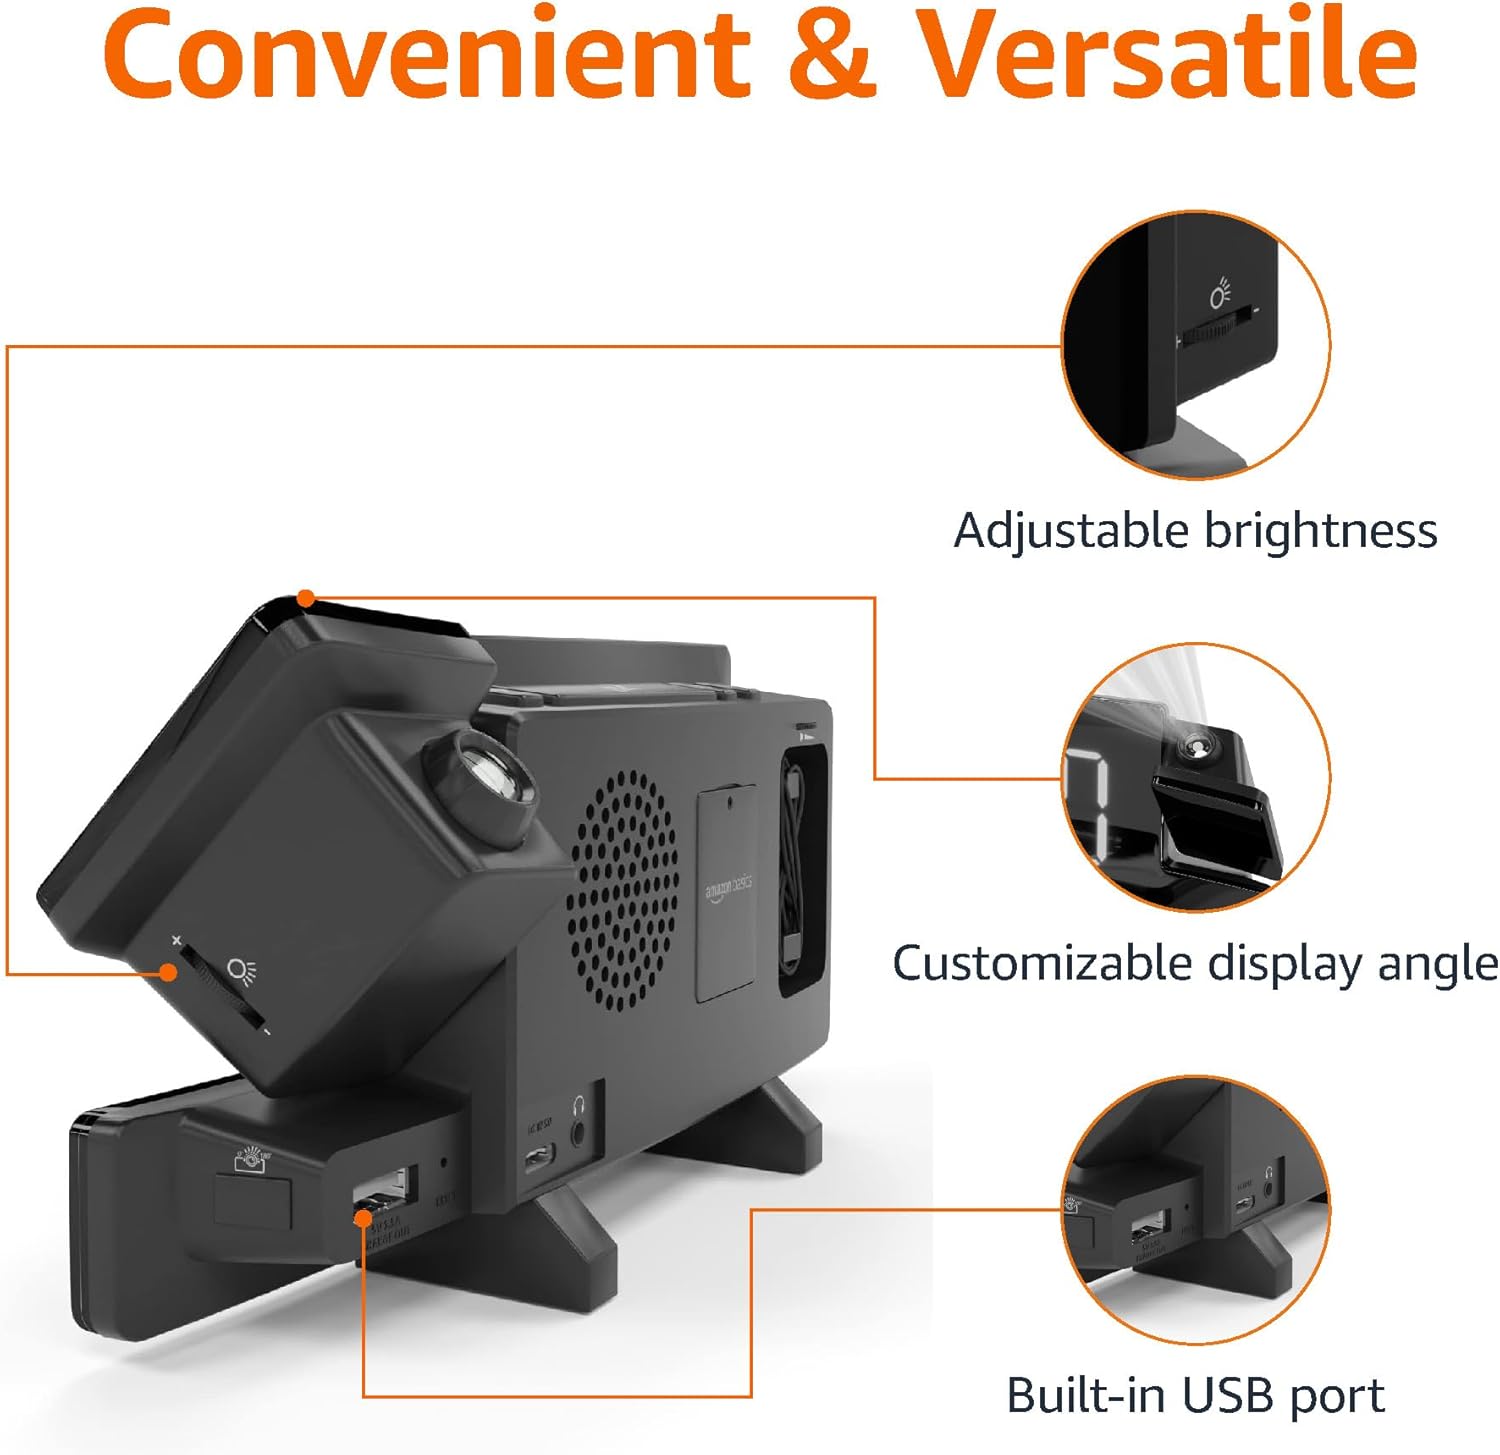
Image: Diagram highlighting the adjustable brightness, customizable projection angle, and USB charging port.
Melite
1. Njikọ ike
Connect the AC power adapter to the DC IN port on the back of the alarm clock and plug it into a standard wall outlet. The display will light up.
2. Nwụnye ndabere batrị
For battery backup, open the battery compartment on the bottom of the unit. Insert 2 AAA batteries (not included), ensuring correct polarity (+/-). Close the compartment. The battery backup maintains time settings during power outages but does not power the display or alarm functions.
3. Ntọala Oge Mmalite
- Pịa ma jide Nhazi oge bọtịnụ. Ọnụọgụ elekere ga-enwu.
- Jiri ihe Volume/Tune Dial iji dozie elekere. Pịa Nhazi oge ọzọ iji gosi.
- The minute digits will flash. Use the Volume/Tune Dial imeghari nkeji. Pịa Nhazi oge ọzọ iji gosi.
- The time format (12H/24H) will flash. Use the Volume/Tune Dial to select your preferred format. Press Nhazi oge to confirm and exit time setting mode.
4. Oge nchekwa ụbọchị (DST)
Pịa DST button to toggle Daylight Saving Time on or off. The DST indicator will appear or disappear on the display.
Ntuziaka ọrụ
1. Setting Alarms (Alarm 1 and Alarm 2)
- Pịa ma jide Mkpu 1 or Mkpu 2 bọtịnụ. Ọnụọgụ elekere mkpu ga-enwu.
- Jiri ihe Volume/Tune Dial to adjust the alarm hour. Press the respective Oti mkpu bọtịnụ ọzọ iji gosi.
- The alarm minute digits will flash. Use the Volume/Tune Dial to adjust the alarm minutes. Press the respective Oti mkpu bọtịnụ ọzọ iji gosi.
- The alarm source (FM radio or buzzer) will flash. Use the Volume/Tune Dial to select your preference. Press the respective Oti mkpu button to confirm and activate the alarm. An alarm icon will appear on the display.
- To deactivate an alarm, press the respective Oti mkpu button once. The alarm icon will disappear.
2. Using Snooze
Mgbe oti mkpu na-ada, pịa Tie mkpu/nkpu button to temporarily silence the alarm. The alarm will sound again after the set snooze duration. The default snooze duration is 9 minutes. To adjust the snooze duration, press and hold the Tie mkpu/nkpu bọtịnụ, wee jiri ya Volume/Tune Dial to select a duration between 2 and 60 minutes. Press Tie mkpu/nkpu ọzọ iji gosi.
3. Ọrụ redio FM
- Gbanwuo/ Gbanyụọ: Pịa Radio/Sleep button to turn the FM radio on or off.
- Ọdụ Tune: Jiri ihe Volume/Tune Dial to manually tune to a desired FM frequency.
- Nyocha akpaaka: Pịa ma jide Radio/Sleep button to automatically scan and save available FM stations as presets.
- Họrọ atọrọ atọ: Once stations are saved, short press the Radio/Sleep button to cycle through the preset stations.
- Gbanwee olu: Tugharia ihe Volume/Tune Dial to adjust the radio volume.
4. Ngụ oge ụra
While the FM radio is playing, press the Radio/Sleep button repeatedly to set the sleep timer. Options typically range from 5 to 90 minutes. The radio will automatically turn off after the selected duration.
5. Atụmatụ amụma

Image: The alarm clock projecting the time onto a bedroom ceiling.
- Tinye/ gbanyụọ: Pịa Projection On/Off/Flip button to turn the time projection on or off.
- Gbanwee akụkụ: Manually adjust the projection arm to direct the time onto your desired surface (wall or ceiling).
- Gbado anya: Tugharia ihe Projection Focus Wheel to achieve a clear image.
- Flip Display: Pịa Projection On/Off/Flip button repeatedly to rotate the projected time 180 degrees, ensuring correct orientation.

Image: The alarm clock on a nightstand, projecting the time onto a wall, demonstrating its use in a bedroom setting.
6. Nchaji USB
Connect your mobile phone or tablet's USB charging cable to the Ọdụ ụgbọ mmiri USB on the back of the alarm clock. The device will begin charging. This port is for charging only and does not support data transfer.
7. Ngosipụta mmezi ihie
Pịa Tie mkpu/nkpu button (when no alarm is sounding) to cycle through different brightness levels for the main LED display.
Nlekọta
1. Nhicha
Wipe the unit with a soft, dry, lint-free cloth. Do not use abrasive cleaners, waxes, or solvents as they may damage the surface.
2. Ngbanwe batrị
If the battery backup is not functioning correctly (e.g., time resets after a power outage), replace the 2 AAA batteries in the battery compartment, ensuring correct polarity.
Nchọpụta nsogbu
| Nsogbu | Ihe nwere ike ime | Ngwọta |
|---|---|---|
| Ngosipụta bụ oghere. | Enweghị njikọ ike. | Ensure the AC adapter is securely plugged into the unit and a working wall outlet. |
| Oti mkpu anaghị ada ụda. | A naghị agba mkpu ma ọ bụ olu ya dị oke ala. | Check if the alarm icon is visible on the display. Re-set the alarm if necessary. Increase radio volume if FM is selected as alarm source. |
| Oge a tụrụ anya ya na-adịghị mma. | Projection focus is not adjusted. | Tugharia ihe Projection Focus Wheel ruo mgbe ihe oyiyi doro anya. |
| Projected time is not visible. | Projection is off or room is too bright. | Pịa Projection On/Off/Flip button to activate. The projection is best viewed in a dark room. |
| Nnabata redio adịghị mma. | Ọnọdụ antenna ma ọ bụ nnyonye anya. | Adjust the position of the FM antenna wire. Move the unit away from other electronic devices that may cause interference. |
| Ịchaji USB anaghị arụ ọrụ. | Cable issue or device incompatibility. | Ensure the USB cable is functional and properly connected. Try a different cable or device. |
Nkọwapụta
- Ụdị: MET8831-US
- Ntinye ike: Ihe nkwụnye AC (gụnyere)
- Ndabere batrị: Batrị 2 x AAA (anaghị etinye ya)
- Ngosipụta: 7-inch LED
- Oge Radio: FM
- USB mmepụta: 5V, 1A (for charging)
- Akụkụ (L x W x H): 7.1 x 1.6 x 3.7 sentimita (18.03 x 4.06 x 9.4 cm)
- Arọ: Ihe dị ka 0.59 lbs (267.62 g)

Image: Product dimensions for the Amazon Basics Projection Alarm Clock.
Ozi akwụkwọ ikike
This product is covered by the Amazon Basics warranty. For detailed information regarding warranty terms and conditions, please refer to the official Amazon Basics websaịtị ma ọ bụ kpọtụrụ nkwado ndị ahịa.
Nkwado ndị ahịa
For further assistance, troubleshooting, or product inquiries, please contact Amazon Basics customer support through the Amazon website or your purchase platform. Have your product model number (MET8831-US) and purchase details ready.


