Okwu mmalite
This manual provides instructions for the proper use and maintenance of your Alecto AK-20 Alarm Clock with Thermometer. Please read these instructions carefully before operating the device and retain them for future reference. The AK-20 is designed to display time, date, day, and indoor temperature, featuring multiple alarms, a snooze function, and radio-controlled time synchronization.
Ozi nchekwa
- Ewepụla ngwaọrụ ahụ na oke okpomọkụ, ìhè anyanwụ kpọmkwem, ma ọ bụ oke iru mmiri.
- Zere idobe ngwaọrụ ma ọ bụ tinye ya na mmetụta siri ike.
- Anwala ịkwasa ma ọ bụ rụkwaa unit ahụ n'onwe gị. Kpọtụrụ ndị ọrụ ruru eru ọrụ niile.
- Tụfuo batrị eji arụ ọrụ dịka iwu obodo siri dị.
Ihe ngwugwu
Hụ na ihe niile dị ma dị mma mgbe ị na-ewepụ ha:
- Alecto AK-20 Alarm Clock
- User Manual (NL/EN/DE/FR)
Ngwaahịa gafereview
The Alecto AK-20 features a clear digital display and intuitive controls for easy operation.

Foto 1: N'ihu view of the Alecto AK-20 Alarm Clock, showing the large digital display with time, date, day, and temperature, along with control buttons at the bottom.

Ọgụgụ 2: N'akuku view of the Alecto AK-20, highlighting the main display and the alarm ON/OFF switches on the right side.
Controls and Display Elements:
- Nnukwu ngosi dijitalụ: Shows time (AM/PM indicator), date, day of the week, and indoor temperature.
- Bọtịnụ TỊRỊ OGE: Used to enter time setting mode.
- - / + bọtịnụ: Used to adjust values (decrease/increase).
- Bọtịnụ SET Mkpu: Used to enter alarm setting mode.
- ALARM 1-4 ON/OFF Switches: Located on the side for individual alarm activation.
- Bọtịnụ SOOZE / ÌHÈ: Located on top, activates backlight and snooze function.
- AUTO LIGHT Switch: Located on the back, controls automatic backlight.
- Bọtịnụ Tọgharia: Located on the back, for factory reset.

Ọgụgụ 3: Akụkụ aka nri view of the alarm clock, showing the physical ON/OFF switches for Alarm 3 and Alarm 4.

Ọgụgụ 4: Azụ view of the alarm clock, showing the battery compartment, RESET button, and AUTO LIGHT switch.
Melite
1. Ntinye batrị
- Locate the battery compartment on the back of the alarm clock (refer to Figure 4).
- Mepee mkpuchi nke batrị batrị.
- Insert two AA batteries, ensuring correct polarity (+ and -).
- Mechie mkpuchi nke batrị batrị nke ọma.
The display will light up, and the clock will begin searching for the DCF radio signal for automatic time synchronization.
2. Initial Time and Date Synchronization (DCF)
The AK-20 is a radio-controlled clock. Upon battery installation, it will automatically attempt to synchronize with the DCF signal. This process may take several minutes. A signal icon on the display indicates successful reception.
- Debe elekere n'akụkụ windo maka nnabata mgbaama ka mma.
- Avoid placing it near electronic devices that may cause interference.
3. Manual Time and Date Setting (Optional)
If DCF synchronization is not desired or unsuccessful, you can set the time and date manually:
- Pịa ma jide Oge setịpụrụ button until the hour digits start flashing.
- Jiri ihe - or + bọtịnụ iji dozie elekere.
- Pịa Oge setịpụrụ again to confirm the hour and move to minutes.
- Repeat the process for minutes, year, month, and day.
- Pịa Oge setịpụrụ one last time to exit the setting mode.
4. Nhọrọ Asụsụ
The device supports multiple languages for day display. To change the language:
- Mgbe ị nọ n'ọnọdụ ngosipụta oge nkịtị, pịa pịa - bọtịnụ ugboro ugboro.
- The day of the week will cycle through available languages (Dutch, French, German, English, Spanish, Italian, Danish, Russian).
- Stop when your desired language is displayed.
Ntuziaka ọrụ
1. Isetịpụ Mkpu
The AK-20 allows setting up to four independent alarms.
- Pịa ma jide AKWARKWỌ NDAR ỌRAR button until the alarm time (e.g., ALARM-1) starts flashing.
- Jiri ihe - or + buttons to adjust the desired alarm hour.
- Pịa AKWARKWỌ NDAR ỌRAR again to confirm the hour and move to minutes.
- Jiri ihe - or + buttons to adjust the desired alarm minutes.
- Pịa AKWARKWỌ NDAR ỌRAR to confirm and move to the next alarm (ALARM-2, ALARM-3, ALARM-4).
- Repeat steps 2-4 for each alarm you wish to set.
- After setting all desired alarms, press AKWARKWỌ NDAR ỌRAR ịpụ na ọnọdụ ntọala mkpu.
2. Activating/Deactivating Alarms
Each alarm has a dedicated ON/OFF switch on the side of the unit (refer to Figure 3).
- Slide the corresponding switch to ON to activate an alarm. An alarm icon will appear on the display.
- Malite ngbanwe ahụ gaa na Gbanyụọ to deactivate an alarm. The alarm icon will disappear.
3. Ọrụ snooze
Mgbe oti mkpu na-ada, pịa SOOZE / ÌHÈ button on top of the clock. The alarm will temporarily stop and sound again after a few minutes (typically 5-10 minutes, depending on the model's default setting).
4. Ọrụ ọkụ azụ
The display features a backlight for visibility in low-light conditions.
- Manual Backlight: Pịa nkenke SOOZE / ÌHÈ button to activate the backlight for a few seconds.
- Ìhè azụ akpaaka: On the back of the unit, slide the Ìhè akpaaka gbanwee gaa ON. The backlight will automatically illuminate in dark environments. Slide to Gbanyụọ to disable this feature.
5. Ngosipụta okpomọkụ
The integrated thermometer displays the indoor temperature.
- To switch between Celsius (°C) and Fahrenheit (°F), press the + button while in normal time display mode.
Nlekọta
- Jiri akwa dị nro hichaa ngwaọrụ ahụ. Ejila ihe nchacha abrasive ma ọ bụ ihe mgbaze.
- Ọ bụrụ na a gaghị eji ngwaọrụ ahụ ruo ogologo oge, wepụ batrị ndị ahụ iji gbochie mmiri ịpụpụta.
Nchọpụta nsogbu
| Nsogbu | Ihe nwere ike ime | Ngwọta |
|---|---|---|
| Ngosipụta bụ oghere ma ọ bụ nchara nchara. | Batrị dị ala ma ọ bụ tinye ya na ezighi ezi. | Dochie batrị na batrị AA ọhụrụ, na-ahụ na polarity ziri ezi. |
| Oge ezighi ezi. | DCF signal not received or manual time not set. | Ensure the clock is in an area with good signal reception. Manually set the time if necessary. |
| Oti mkpu anaghị ada ụda. | A naghị arụ ọrụ mkpu ma ọ bụ ahazighị ya nke ọma. | Check the alarm ON/OFF switch on the side. Verify alarm time settings. |
| Ìhè azụ anaghị arụ ọrụ. | AUTO LIGHT switch is OFF or batteries are low. | Check the AUTO LIGHT switch on the back. Replace batteries if needed. |
Ọ bụrụ na nsogbu ahụ dịgidere mgbe ị nwara azịza ndị a, biko kpọtụrụ nkwado ndị ahịa.
Nkọwapụta
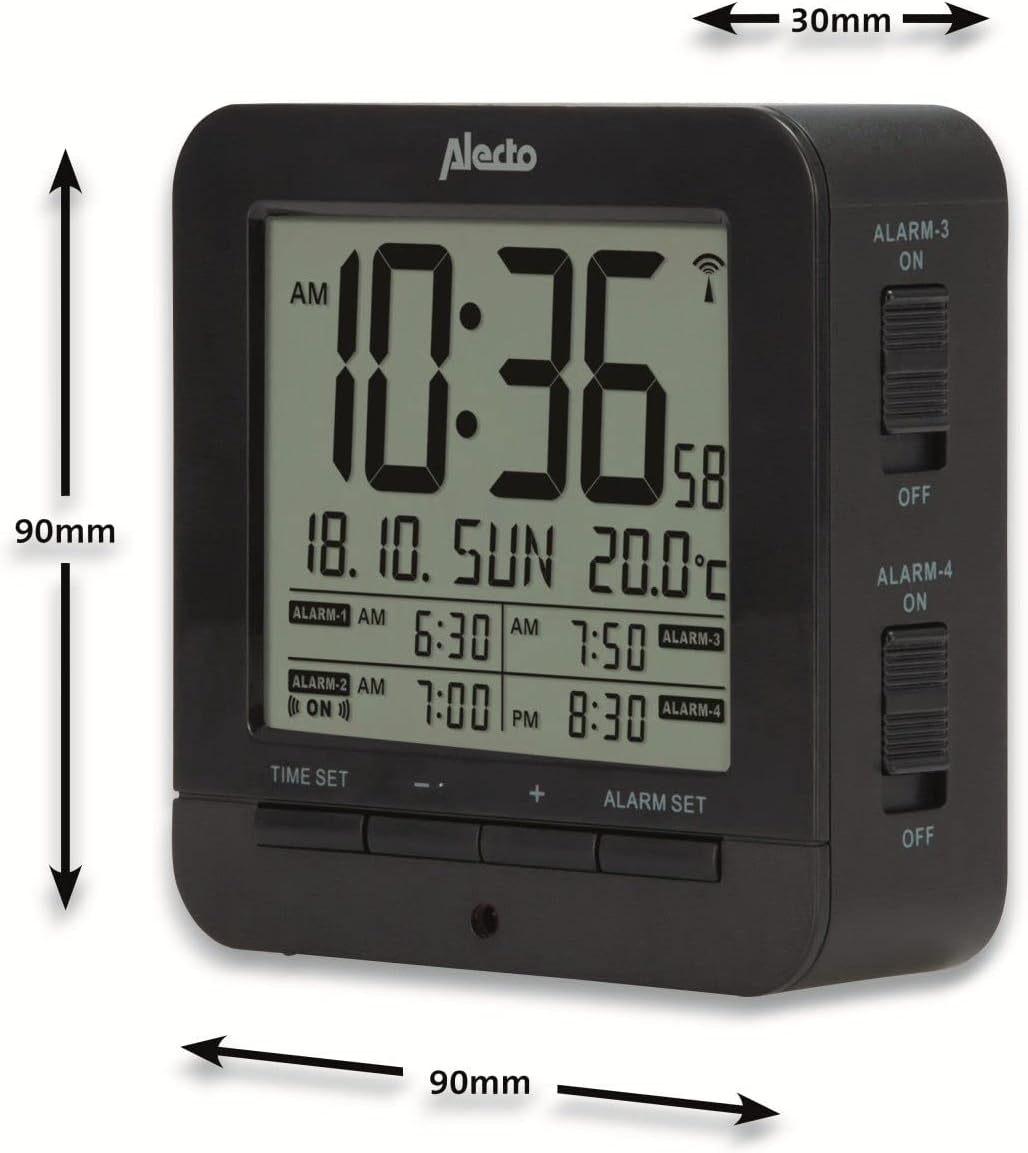
Figure 5: Alecto AK-20 Alarm Clock showing its approximate dimensions: 90mm height, 90mm width, and 30mm depth.
| Njirimara | Nkọwa |
|---|---|
| Nọmba nlereanya | AK-20 (A003319) |
| Ụdị | Alexo |
| Agba | Nwa |
| Ihe onwunwe | Acrylonitrile Butadiene Styrene (ABS) |
| Akụkụ (H x W x D) | 9 x 9 x 3 cm (ihe dị ka 3.54 x 3.54 x 1.18 sentimita) |
| Akụkụ ihuenyo | 6.4 x 5.4 cm (approx. 2.52 x 2.13 inches) |
| Ibu | 231g (ihe dị ka 0.51 lbs) |
| Isi Iyi Ike | Batrị 2 x AA (anaghị etinye ya) |
| Ụdị ngosi | Dijitalụ |
| Atụmatụ pụrụ iche | Temperature Display, 4 Alarms, Snooze Function, Backlight, DCF Radio Control |
| Nkeji okpomọkụ | °C / °F selectable |
| Asụsụ akwadoro | Dutch, French, German, English, Spanish, Italian, Danish, Russian |
Akwụkwọ ikike na nkwado
Alecto products are manufactured to high quality standards. For information regarding warranty terms and conditions, please refer to the documentation provided with your purchase or visit the official Alecto website. For technical support or service inquiries, please contact your retailer or the Alecto customer service department.


