1. Okwu mmalite
Daalụ maka ịzụrụasing the NYXI Wireless Controller. This controller is designed to enhance your gaming experience on Nintendo Switch, Switch Lite, and Switch OLED consoles. It features advanced functionalities such as customizable LED lighting, programmable back buttons, adjustable vibration, a 6-axis gyro sensor, and a TURBO function.
Please read this manual carefully before use to ensure proper operation and to fully utilize all features of your new controller.

Foto 1.1: N'ihu view nke NYXI Wireless Controller, na-egosiasing its ergonomic design and illuminated joysticks.
2. Ihe ngwugwu
Chọpụta na ihe niile dị na ngwugwu:
- NYXI Wireless Controller x 1
- Ụdị-C eriri USB x 1
- Akwụkwọ ntuziaka x1

Image 2.1: The NYXI Wireless Controller and its retail packaging.
3. Akụrụngwa Ngwaahịa
- Ọkụ LED mara mma: Features 9 LED colors (Red, Orange, Green, Cyan, Blue, Purple, Pink, Rainbow) and 3 lighting modes to customize your gaming atmosphere.
- Customizable Back Buttons: Equipped with 4 programmable back buttons (M1, M2, M3, M4) that can be assigned to various functions, simplifying complex in-game actions.
- Adjustable Vibration & 6-Axis Gyro: Offers 4 levels of vibration intensity for immersive feedback and a 6-axis gyro sensor for precise motion control.
- Ọrụ TURBO: Includes a TURBO button for continuous firing, with 3 adjustable speed settings (5, 12, or 20 shots per second), reducing hand fatigue during prolonged gameplay.
- Ogologo ndụ batrị: Built-in 600mAh battery provides approximately 10 hours of gameplay on a 2-hour charge. Supports both wireless and wired connections.
- Ọrụ edemede: Pressing the Home button can wake up the Nintendo Switch console from sleep mode.
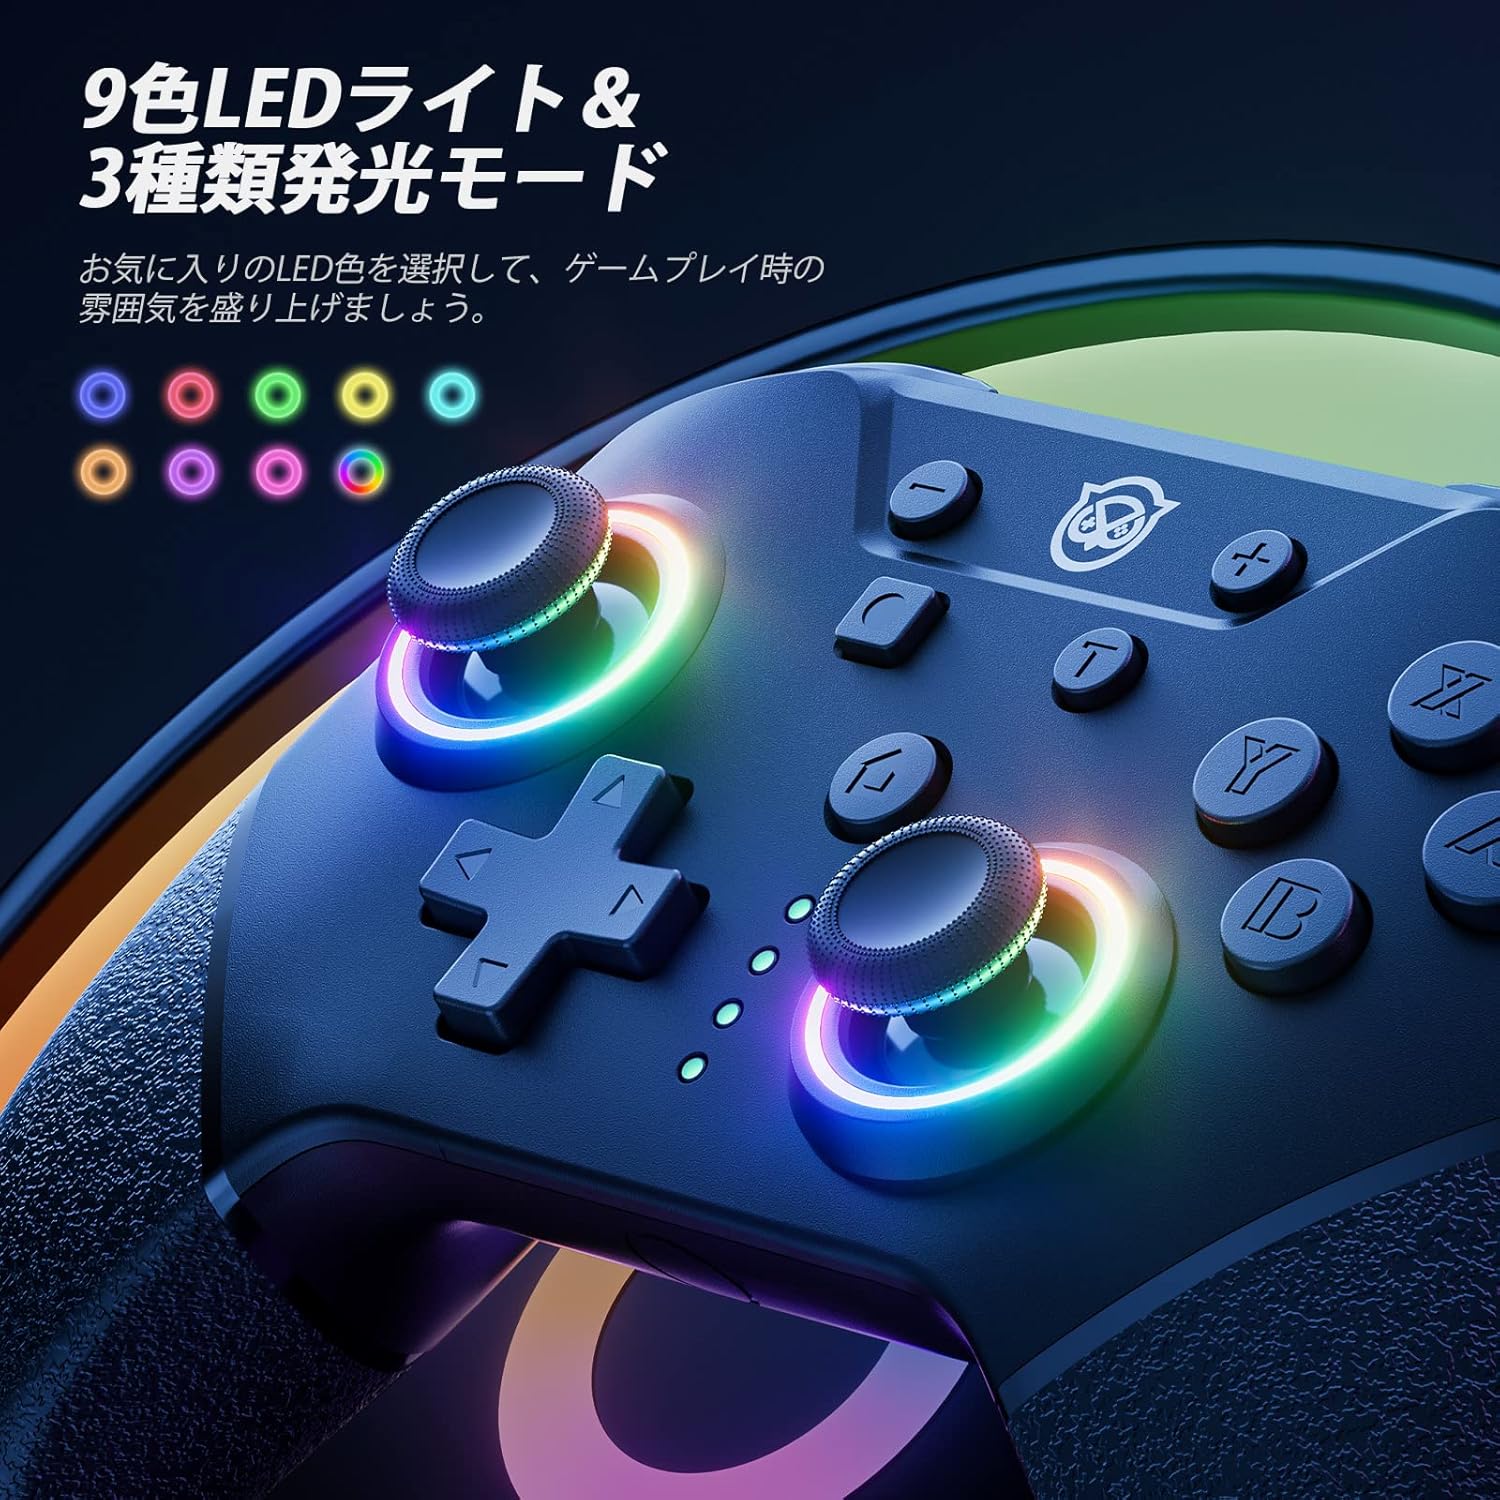
Image 3.1: The controller's joysticks displaying various LED colors and lighting effects.

Image 3.2: The rear of the controller, showing the strategically placed and customizable M1, M2, M3, and M4 buttons.
4. Ntọala na Njikọ
4.1 Wireless Pairing with Nintendo Switch
- On your Nintendo Switch console, go to the HOME Menu.
- Select "Controllers" > "Change Grip/Order".
- Press and hold the Sync button on the back of the NYXI controller for 3-5 seconds until the LED indicators start flashing rapidly.
- Once the controller is successfully paired, the player LED(s) on the controller will light up solid.
4.2 Njikọ wired
To use the controller in wired mode, connect the Type-C charging cable from the controller to a USB port on the Nintendo Switch dock. Ensure that "Pro Controller Wired Communication" is enabled in the Switch System Settings.
4.3 Waking Up the Console
When the Switch console is in sleep mode, you can press the Home button on the NYXI controller to wake it up, provided the controller is already paired wirelessly.
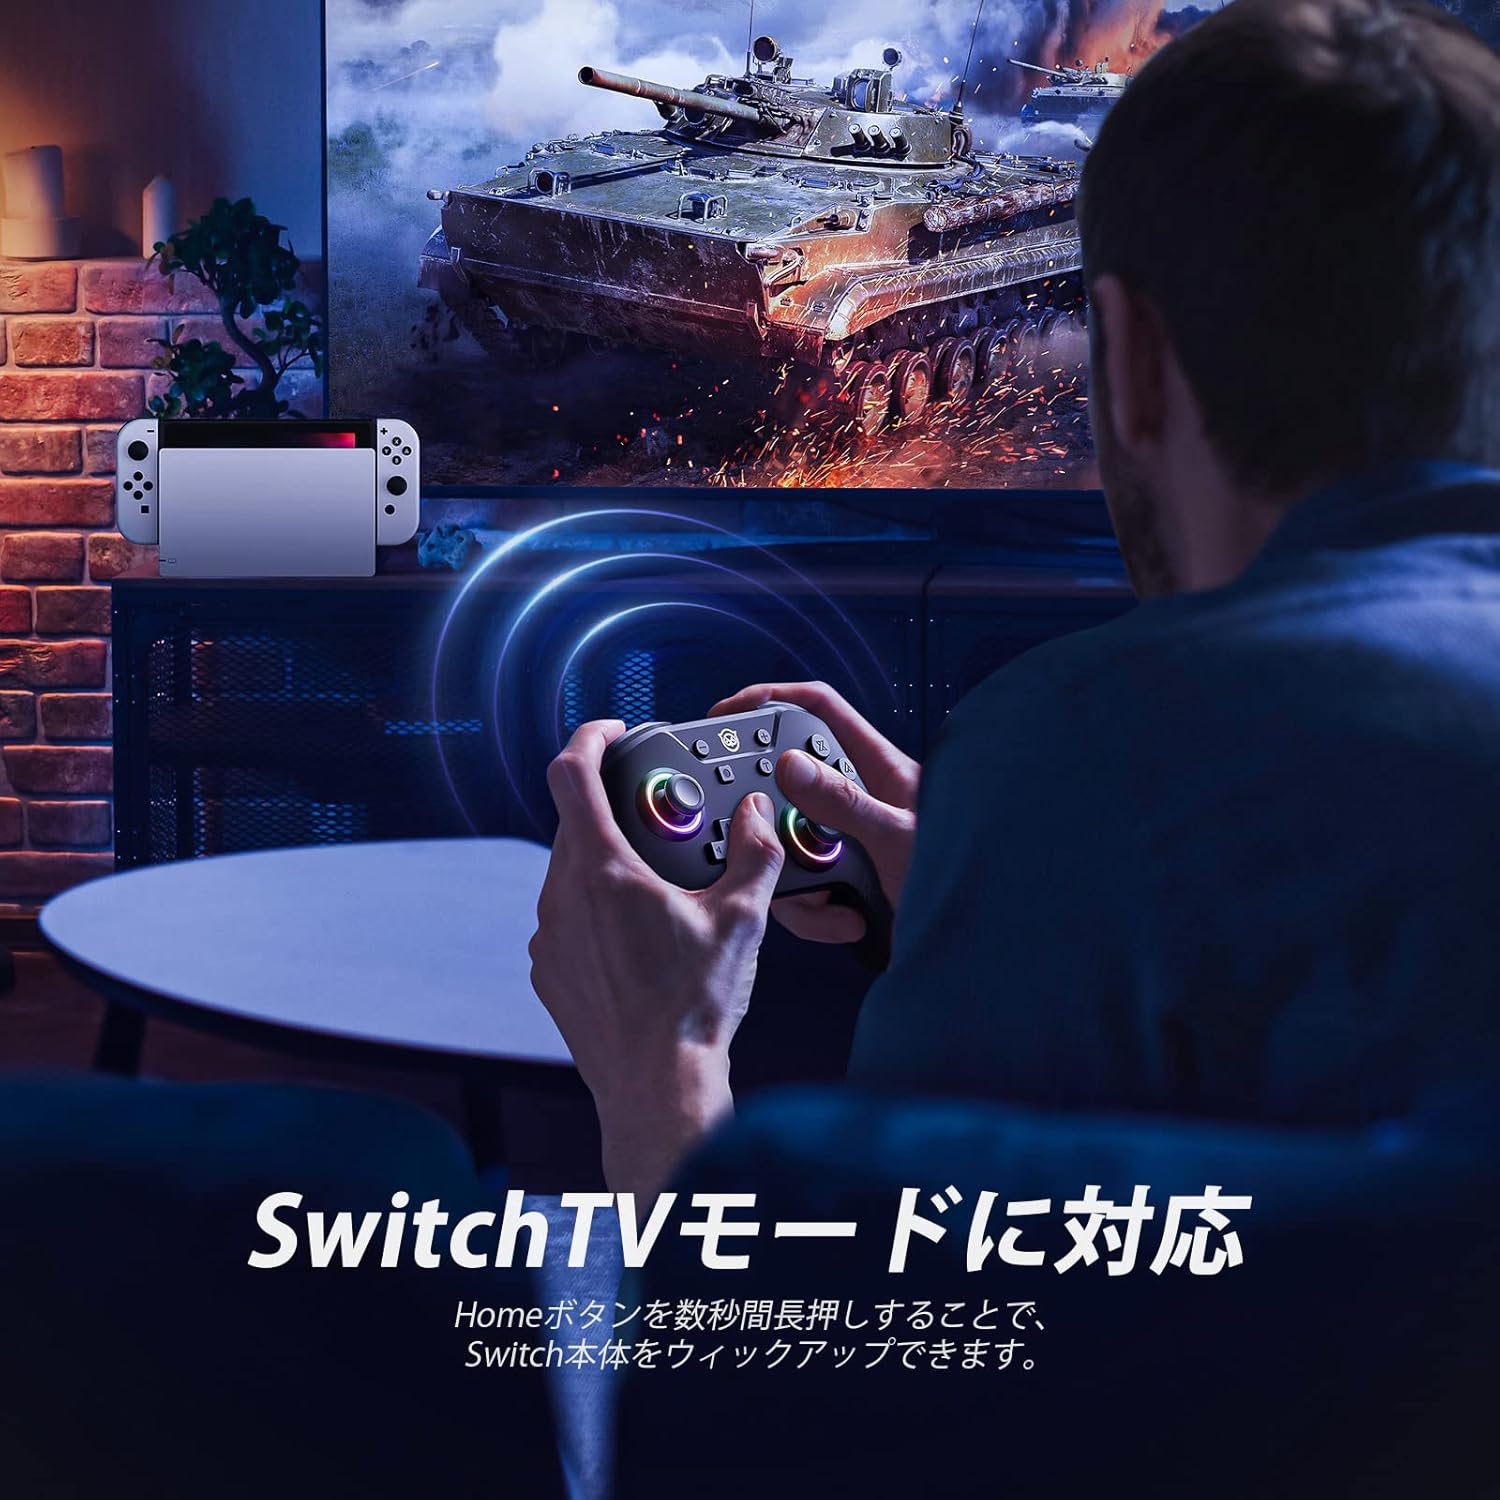
Image 4.1: The controller in use with a Nintendo Switch console connected to a television.
5. Ntuziaka ọrụ
Ụdị ọkụ ọkụ 5.1 LED
The controller features 9 LED colors and 3 lighting modes. Use the dedicated LED button (often located near the Home button) to cycle through colors and modes. The available modes typically include:
- Standard Mode (solid color)
- Breathing Mode (fading in and out)
- Rainbow Mode (cycling through colors)
5.2 Customizing Back Buttons (M1-M4)
The 4 back buttons (M1, M2, M3, M4) can be programmed to replicate other button inputs or sequences. Refer to the detailed instructions in the included manual for specific programming steps. This feature allows for single button assignments or macro sequences.
5.3 Mgbanwe ịma jijiji
The controller offers 4 levels of vibration intensity: 0% (off), 30%, 70%, and 100%. To adjust, press and hold the Vibration button (or a designated combination, refer to the manual) and use the D-pad or joystick to select your preferred intensity.
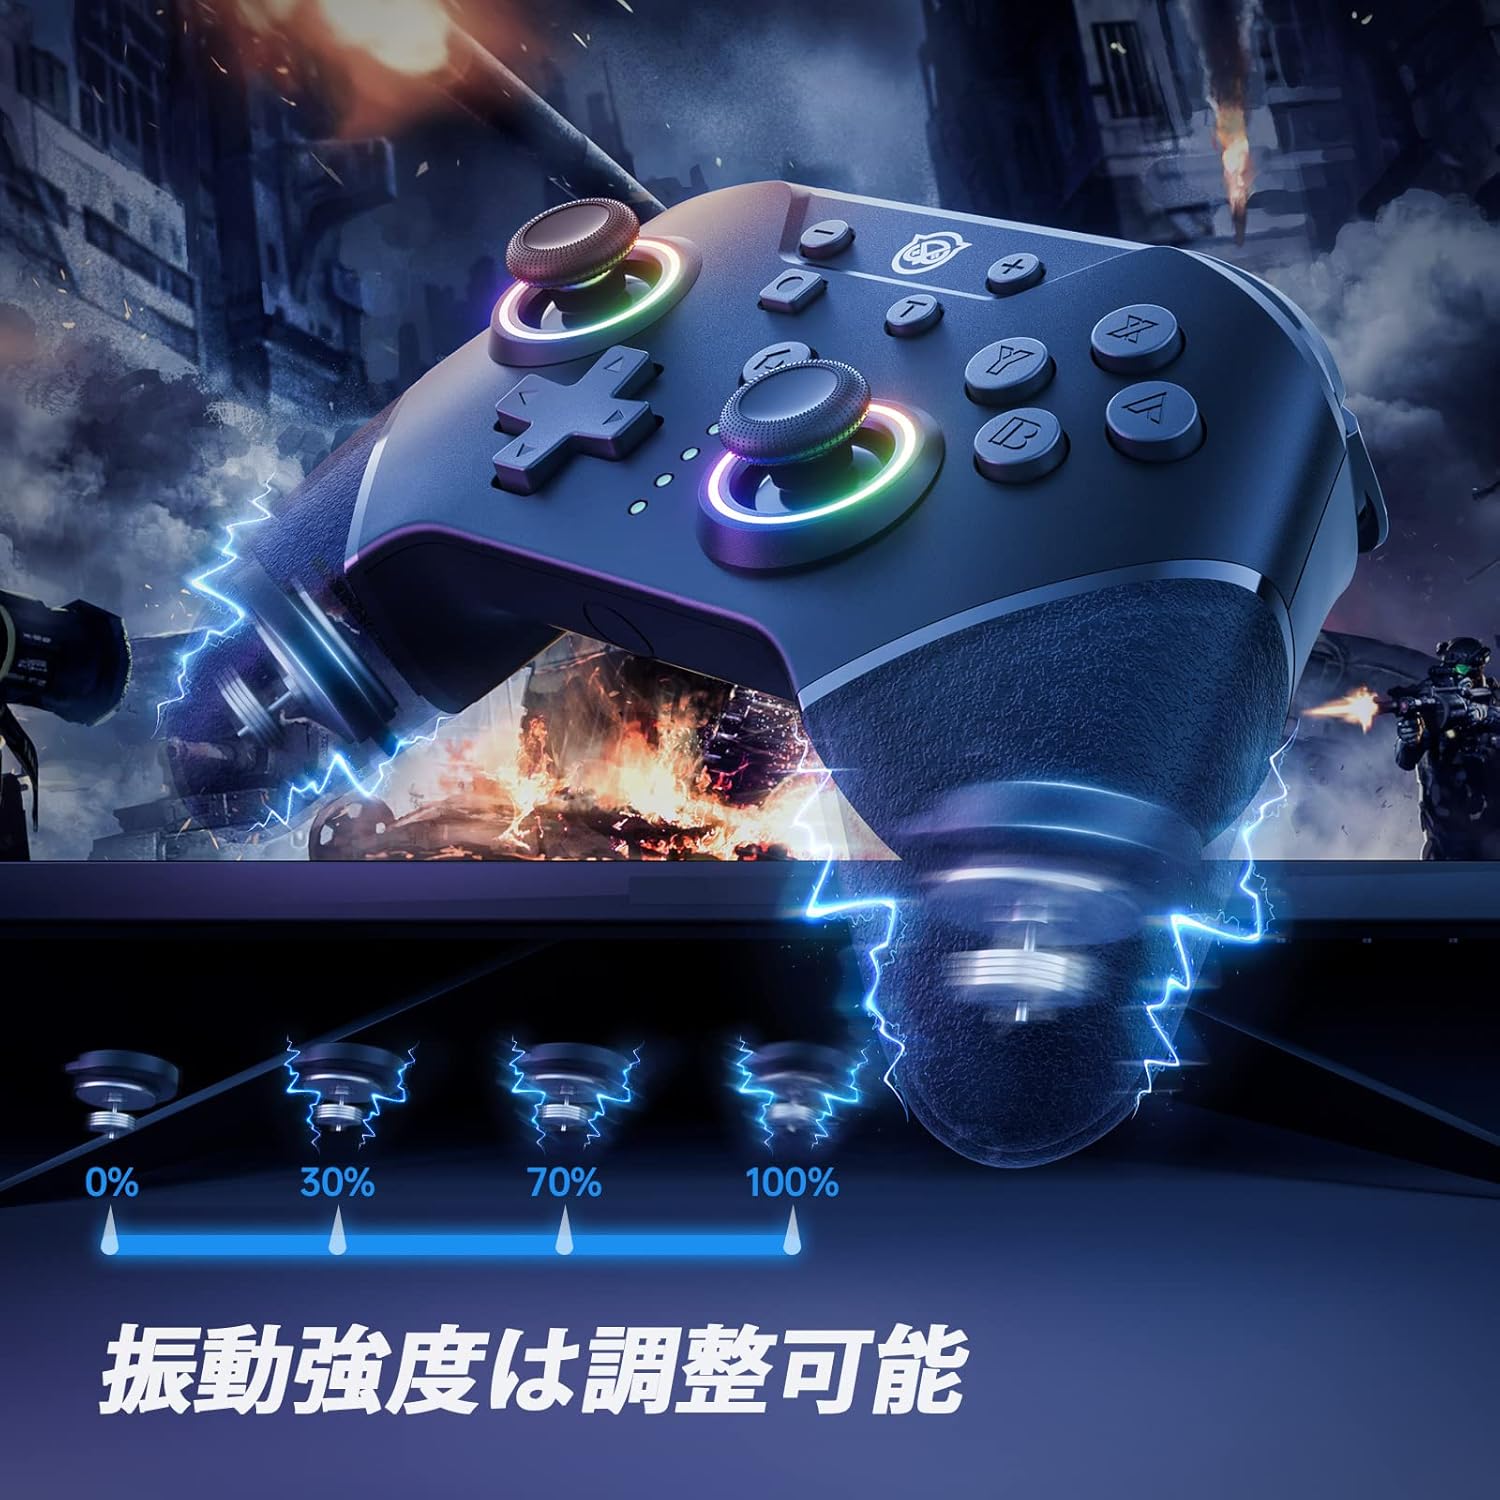
Image 5.1: Visual representation of the four adjustable vibration intensity levels.
5.4 TURBO ọrụ
The TURBO function allows for rapid, continuous input of a selected button. It has 3 adjustable speeds: 5, 12, and 20 shots per second.
- To activate TURBO: Press and hold the TURBO button, then press the button you wish to set for continuous fire (e.g., A, B, X, Y, L, R, ZL, ZR).
- Ka ịgbanwee ọsọ TURBO: While holding the TURBO button, move the Right Analog Stick Up or Down to cycle through the 3 speed settings.
- To deactivate TURBO: Repeat the activation step (hold TURBO, then press the assigned button) or hold the TURBO button for 5 seconds.

Image 5.2: The controller illustrating the TURBO function and its three speed levels.
5.5 Ịchaji njikwa
Connect the provided Type-C charging cable to the controller's charging port and the other end to a USB power source (e.g., Switch dock, USB wall adapter, computer USB port). The LED indicators will show charging status and turn off when fully charged. A full charge takes approximately 2 hours and provides about 10 hours of gameplay.
6. KeyLinker App Customization
The NYXI controller supports customization via the dedicated "KeyLinker" mobile application. This app allows for advanced configuration of various controller settings, including:
- Button remapping
- Adjusting joystick dead zones
- Fine-tuning vibration intensity
- Configuring TURBO function settings
- Programming back buttons (M1-M4)
- Advanced LED light adjustments (e.g., RGB values)
Download the "KeyLinker" app from your mobile device's app store and follow the in-app instructions to connect and customize your controller.
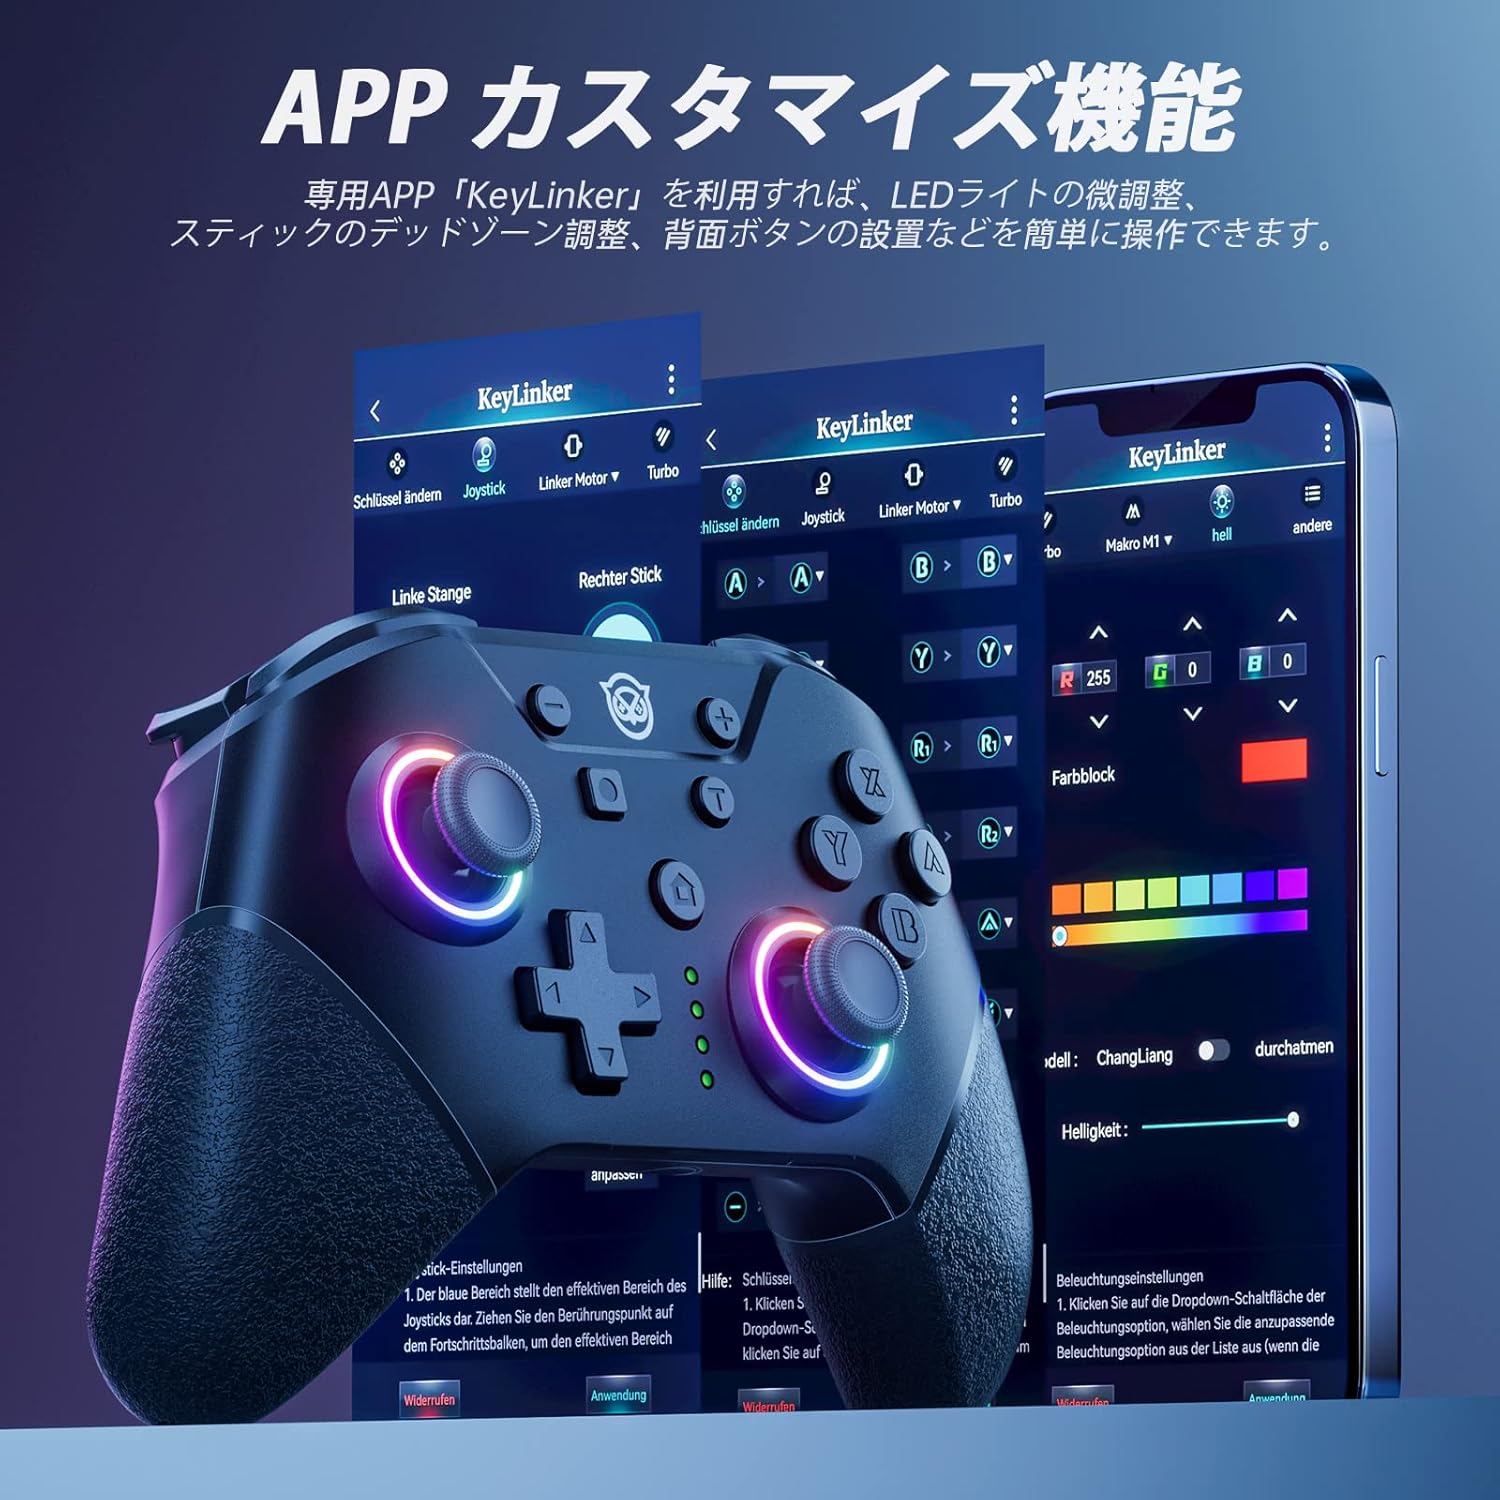
Image 6.1: The KeyLinker mobile application interface, showing various customization options for the controller.
7. Nlekọta
- Debe ihe njikwa ahụ ka ọ kpọọ nkụ ma zere oke okpomọkụ.
- Jiri ákwà dị nro ma kpọọ nkụ hichaa ihe njikwa ahụ. Ejila kemịkalụ siri ike ma ọ bụ ihe ndị na-emebi ihe.
- Zere ịtụfu ihe njikwa ahụ ma ọ bụ mee ka ọ nwee mmetụta siri ike.
- Store the controller in a safe place when not in use to prevent damage.
8. Nchọpụta nsogbu
8.1 Controller Not Connecting/Pairing
- Gbaa mbọ hụ na ebubo onye njikwa ahụ.
- Verify that the Switch console is updated to the latest system version.
- Try re-pairing the controller by following the steps in Section 4.1.
- If multiple controllers are paired, try disconnecting others or resetting the Switch's Bluetooth connections.
- Ensure the controller is within range of the Switch console.
8.2 Joystick Drift or Unresponsive Buttons
- Calibrate the joysticks and buttons through the Nintendo Switch System Settings: HOME Menu > System Settings > Controllers and Sensors > Calibrate Control Sticks / Calibrate Buttons.
- Clean around the joysticks and buttons to remove any dust or debris.
- If using the KeyLinker App, check for any dead zone settings that might be causing issues.
- Consider resetting the controller to factory settings (refer to the full manual for specific button combinations).
8.3 Settings Reset After Power Off
Some settings, particularly macros or LED configurations, might reset if the controller is completely powered off or if the KeyLinker app connection is unstable. Ensure settings are saved correctly within the app and that the controller maintains a charge.
9. Nkọwapụta
| Njirimara | Nkọwa |
|---|---|
| Ụdị | NYXI |
| Nọmba nlereanya | SP5248LED-BK |
| Ndakọrịta | Nintendo Switch, Switch Lite, Switch OLED |
| Njikọta | Wireless (Bluetooth), Wired (USB Type-C) |
| Ike batrị | 600mAh |
| Oge Nchaji | Ihe ruru. awa 2 |
| Oge ọrụ | Ihe ruru. awa 10 |
| Mmaji | 4-ọkwa mgbanwe |
| Sensọ ngagharị | 6-axis Gyro Sensor |
| Ọkụ ọkụ LED | Agba iri na isii, ụdị anọ |
| Bọtịnụ enwere ike ime | 4 back buttons (M1-M4) |
| Ọrụ TURBO | 3 mgbanwe ọsọ |
| Akụkụ | 15.7 x 13.6 x 7.3 cm |
| Ibu | 228 g |
10. Akwụkwọ ikike na nkwado
Ngwaahịa a na-abịa na a 1-afọ akwụkwọ ikike from the date of purchase. In the unlikely event of a product defect, please contact the seller directly for assistance. We offer new product exchanges for defective units.
For further support or inquiries, please refer to the contact information provided with your purchase or visit the official NYXI websaịtị.


