Okwu mmalite
This manual provides detailed instructions for the setup, operation, and maintenance of your PAKITE Wireless HDMI Transmitter and Receiver Kit, Model 850. This system is designed to transmit 1080P Full HD video and audio wirelessly over long distances, featuring IR remote control extension and an HDMI loop-out function. Please read this manual thoroughly before use to ensure proper installation and optimal performance.

Image: The PAKITE Wireless HDMI Transmitter and Receiver Kit, showing both units and their antennas.
Atụmatụ igodo
- Nzipu Ogologo Anya: Transmits HD video and audio up to 200 meters (657 feet) in open spaces and up to 50 meters (165 feet) through walls, ensuring reliable signal delivery.
- Teknụzụ ikuku ikuku 2.4GHz: Utilizes 2.4GHz Wi-Fi for strong signal penetration, enhancing stability over long distances.
- Full HD 1080P Progressive Scan: Supports 1080P and 720P progressive scan formats for clear, flicker-free images. Note: Interlaced formats (1080i, 720i) are not supported.
- Ọnwụ anwụ dị ala: Experience near real-time viewing with latency as low as 0.1 seconds, ideal for high-action content and gaming.
- Ọrụ nkwụnye na Play: Simple connection without complex setup.
- HDMI Loop-out Function: The transmitter features an HDMI output port, allowing simultaneous display on a local monitor or other receiver.
- IR Remote Control Extension: Control your source device from the receiver's location using the included IR extension kit, supporting various IR frequencies.
- Multi-Receiver Support: One transmitter can connect to up to four receivers simultaneously, enabling multi-room streaming or screen extension.
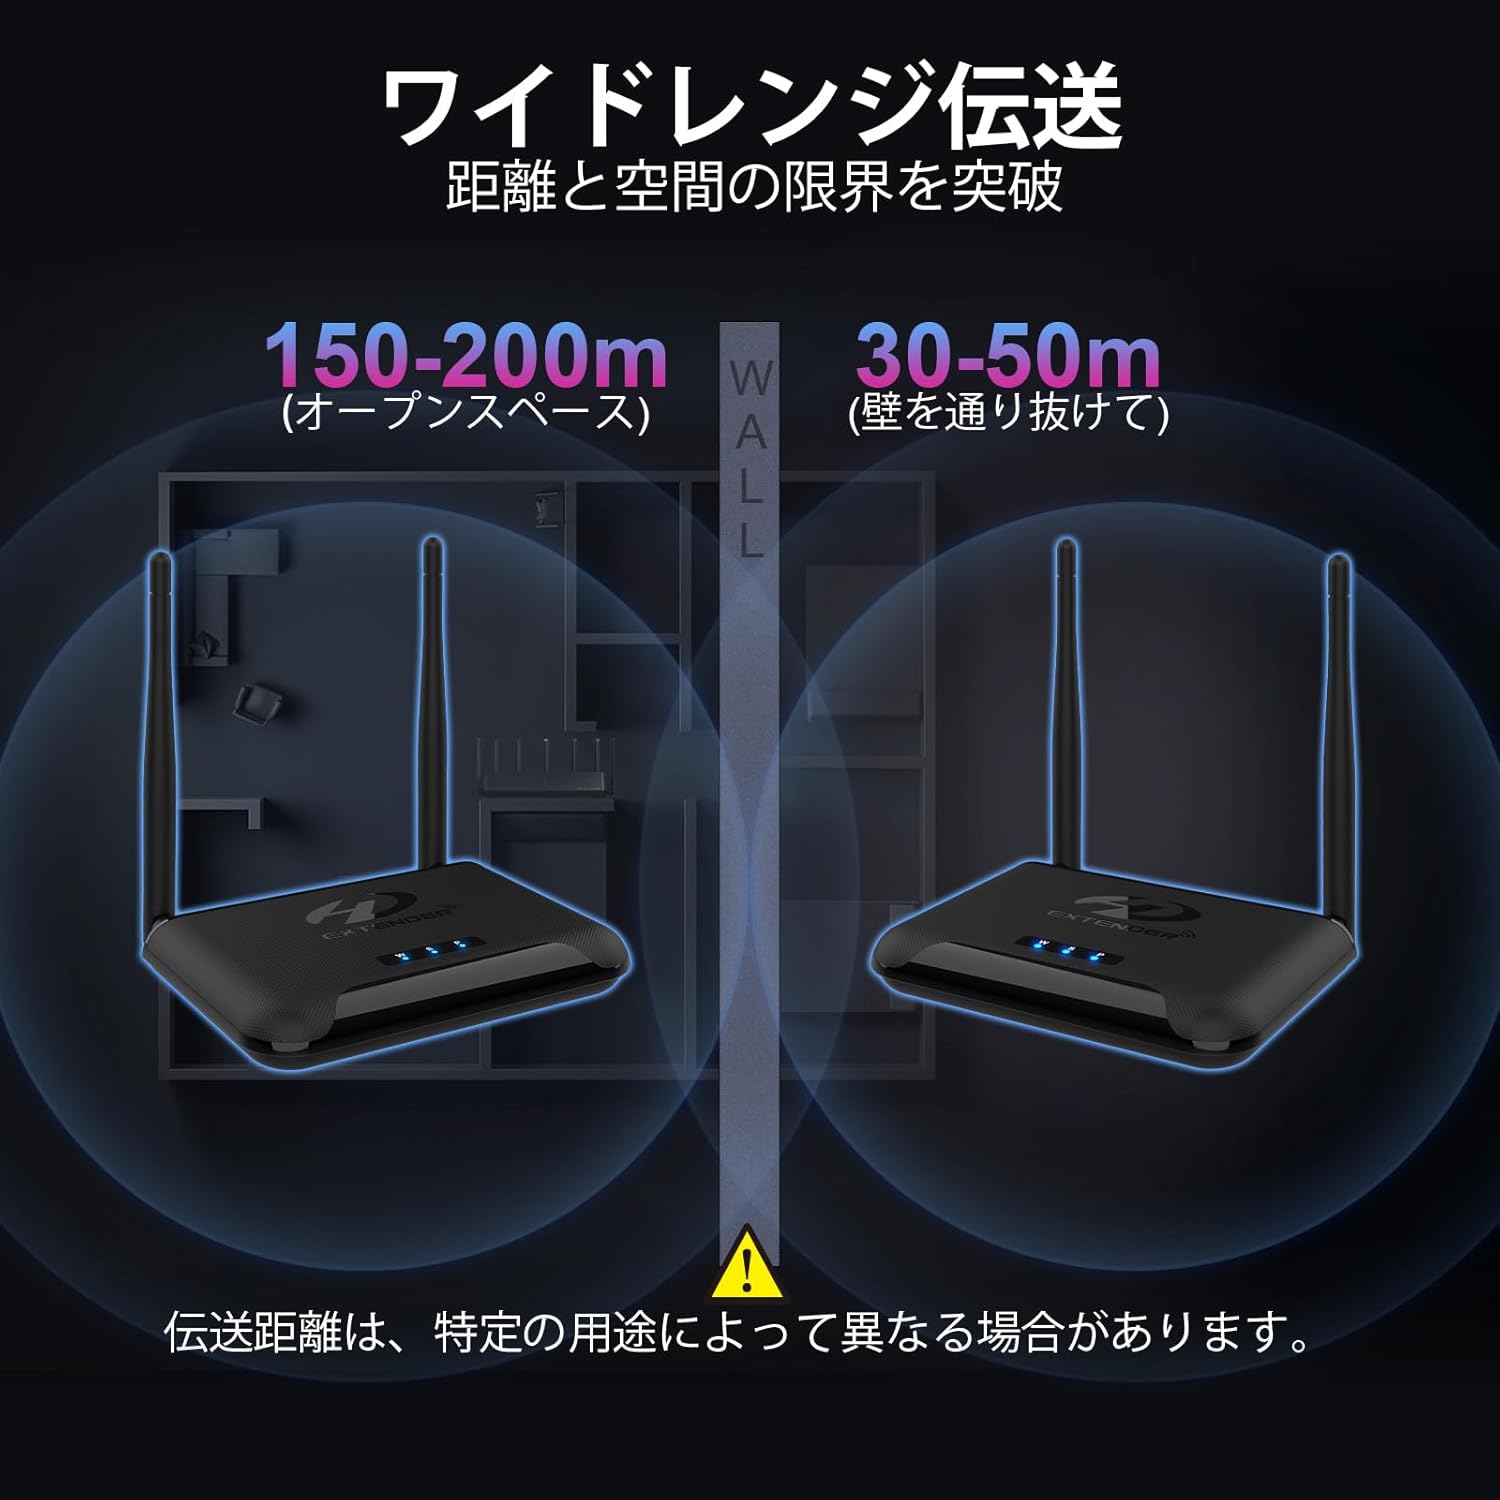
Image: Diagram illustrating the wide range transmission capability, showing signal passing through walls and in open spaces.

Image: A screen displaying "0.1S" indicating the ultra-low latency of the system.
Ntuziaka nhazi
- Njikọ ike: Connect the power adapters to both the Transmitter (TX) and Receiver (RX units). Press the power switch button on each unit to turn them on.
- HDMI Source Connection (TX): Connect your HDMI source device (e.g., laptop, cable box, game console) to the HDMI IN port on the Transmitter (TX) unit using an HDMI cable.
- HDMI Display Connection (RX): Connect your display device (e.g., TV, projector) to the HDMI OUT port on the Receiver (RX) unit using an HDMI cable.
- HDMI Loop-out Connection (Optional TX): If you wish to display the source content on a local monitor near the transmitter, connect that monitor to the HDMI OUT port on the Transmitter (TX) unit.
- Usoro njikọ: After powering on both units, they will automatically attempt to pair. Wait approximately 18-26 seconds for the connection to establish. The 'W' (Wireless) indicator light on both units will flash during pairing and become solid when connected.
- IR Extension Cable Connection:
- Connect the light blue IR Transmitter cable (with a single black circle plug) to the IR-OUT port on the Transmitter (TX) unit. Position the IR emitter head near the IR sensor of your source device.
- Connect the dark blue IR Receiver cable (with two black circle plugs) to the IR-IN port on the Receiver (RX) unit. Position the IR receiver head in a location where it can receive signals from your remote control.
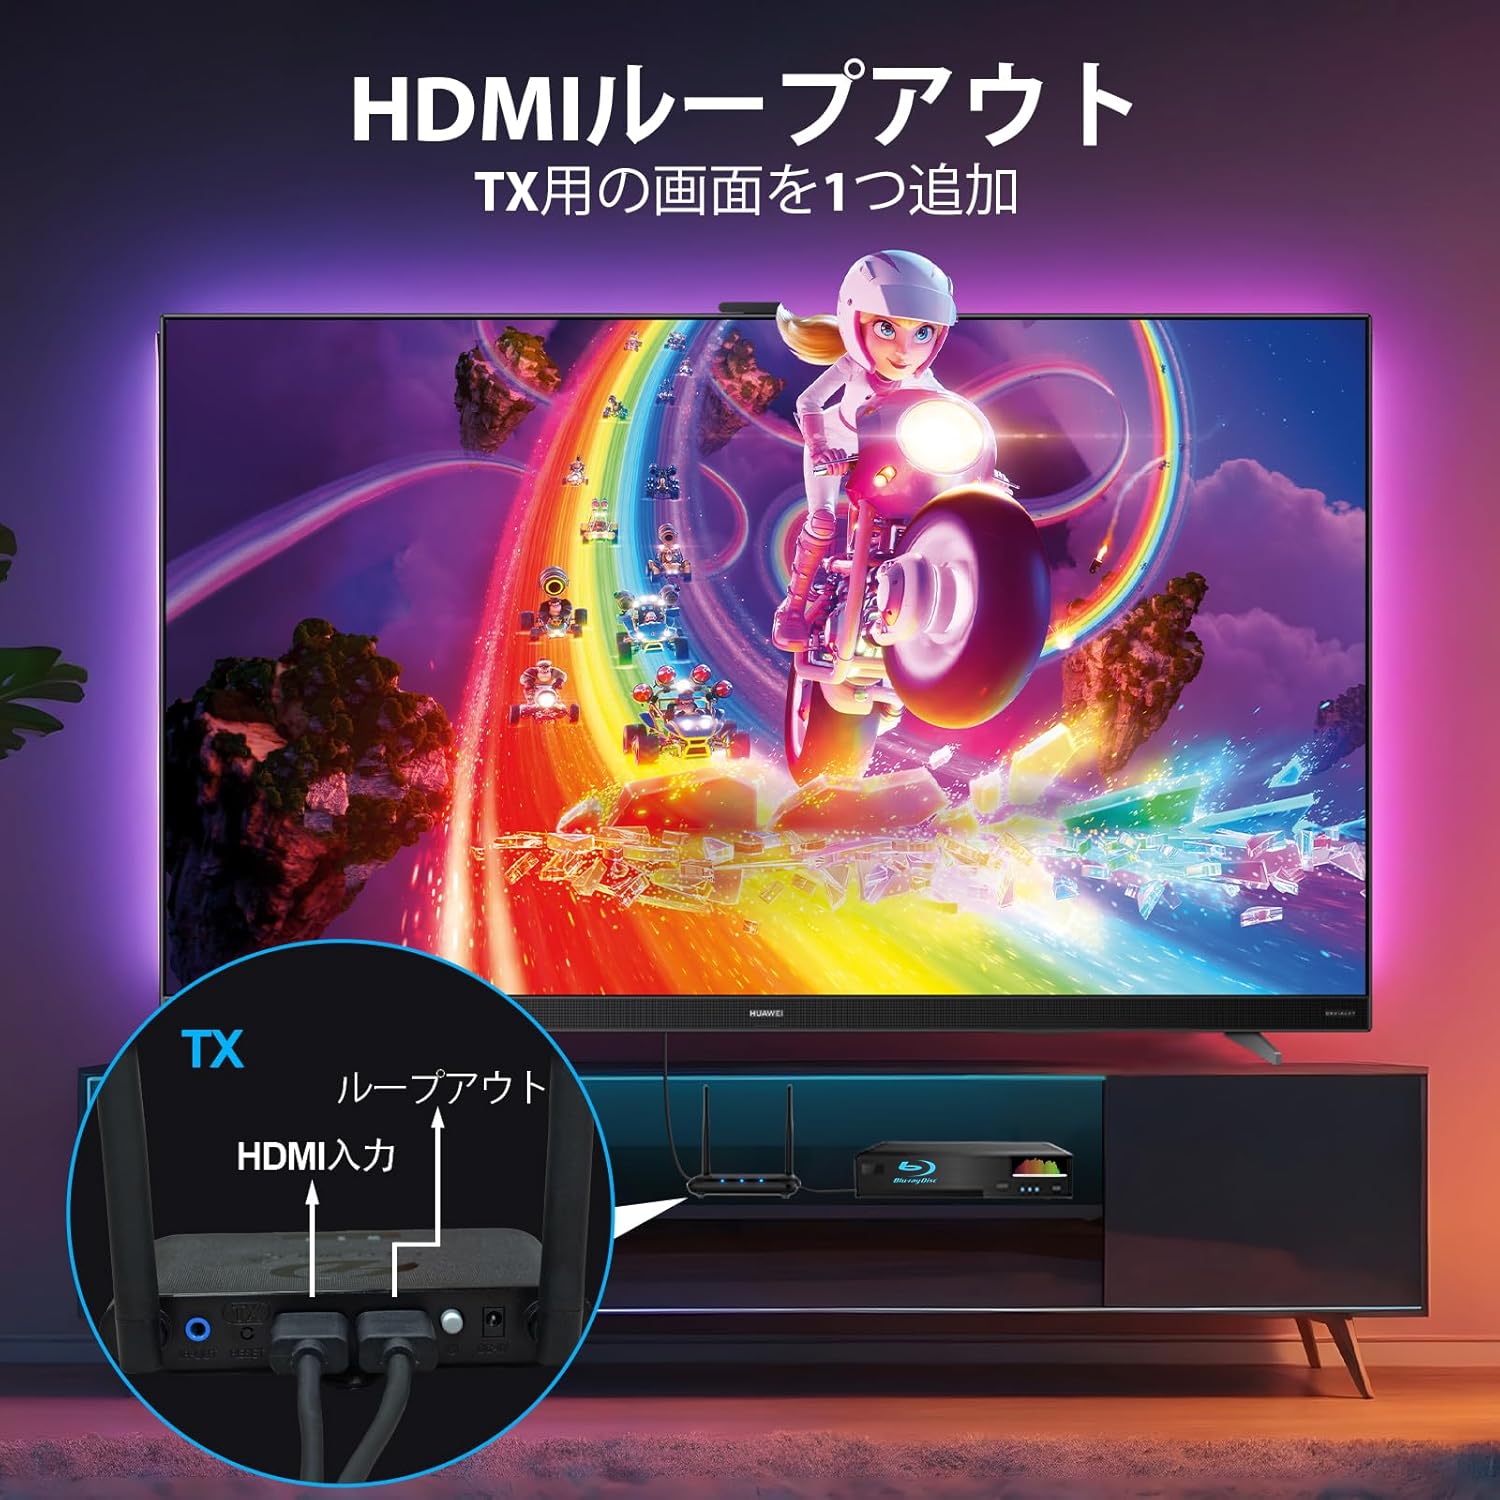
Image: Diagram showing the HDMI loop-out connection on the transmitter (TX) unit, allowing a local display.
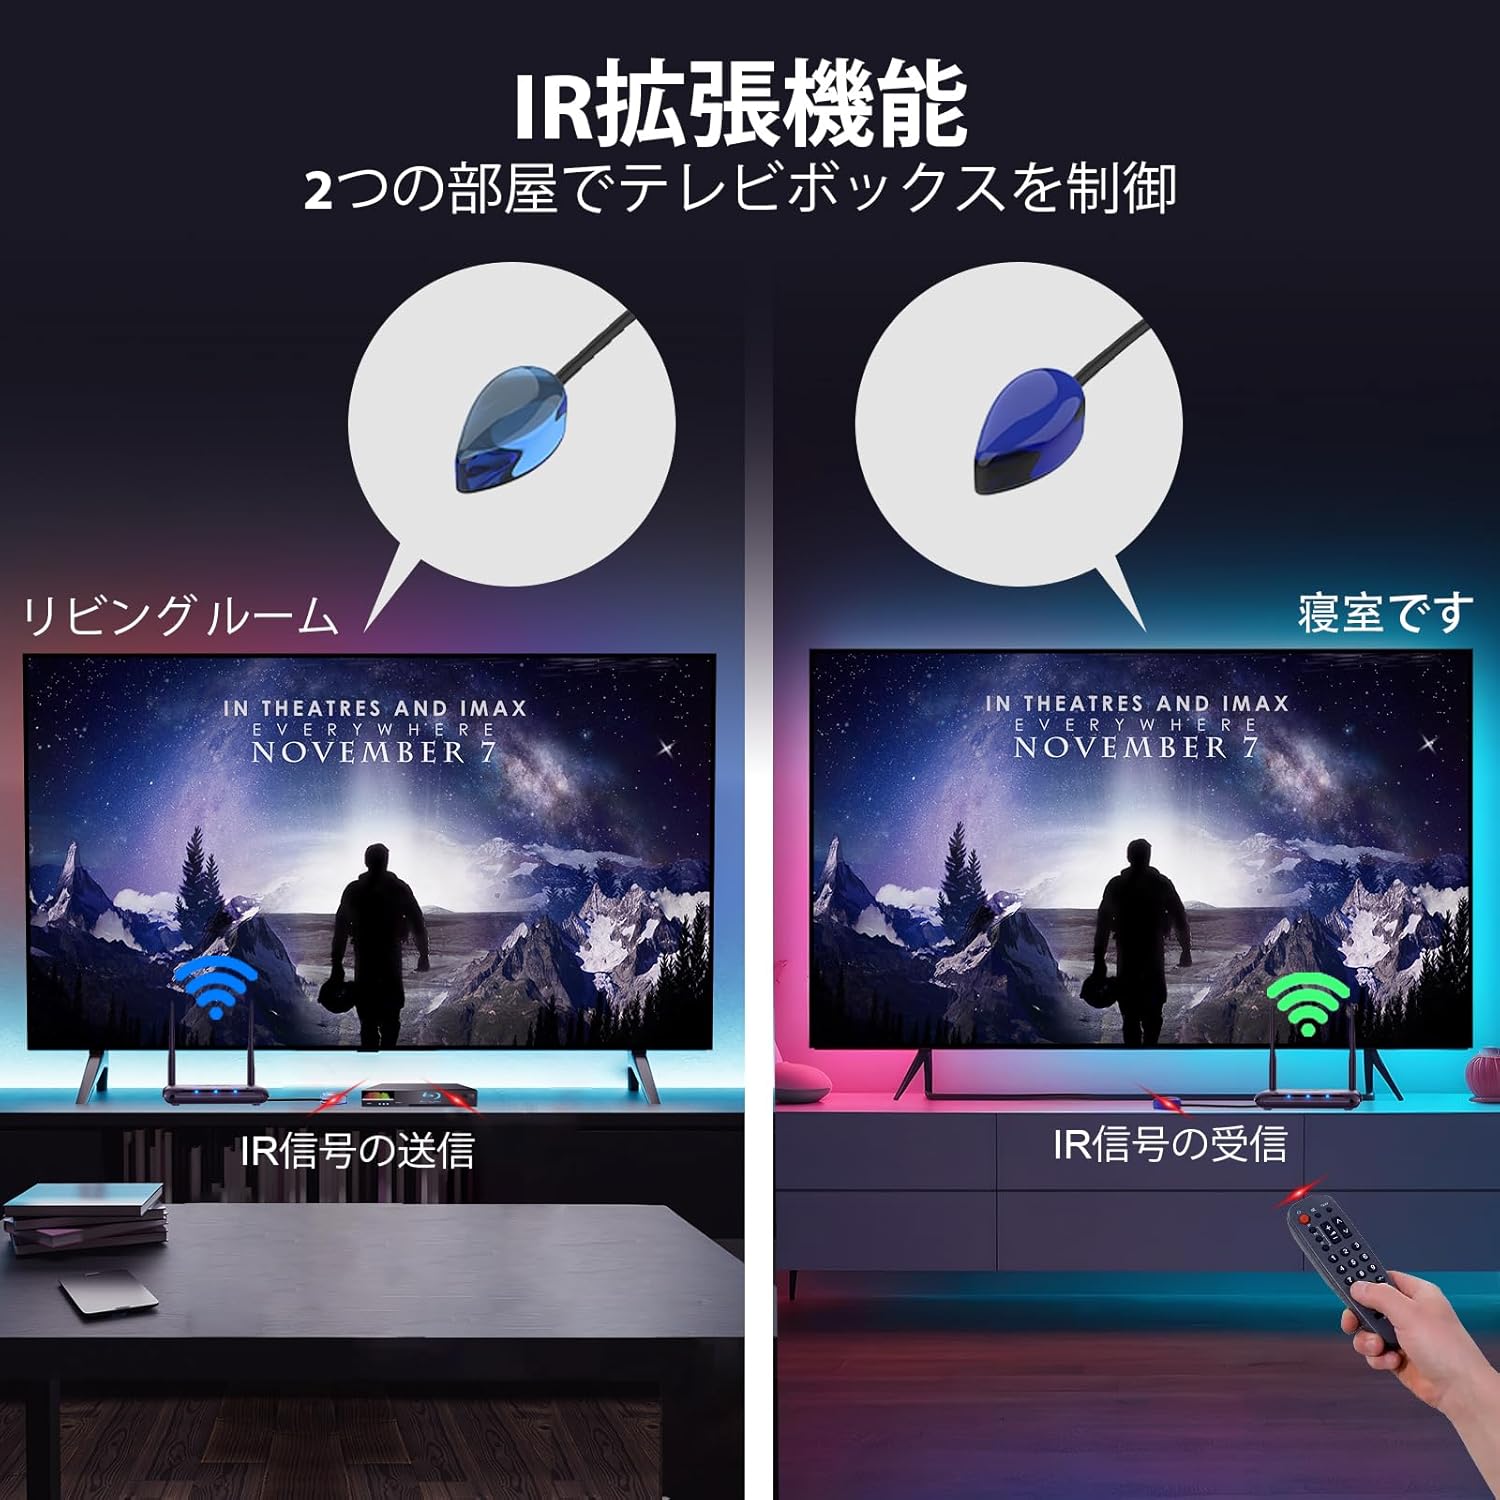
Image: Diagram illustrating the setup of the IR extension cables for controlling a source device from a remote location.
Ntuziaka ọrụ
Isi ọrụ
Once the Transmitter (TX) and Receiver (RX) units are powered on and successfully paired, the video and audio from your HDMI source connected to the TX unit will be wirelessly transmitted to the display connected to the RX unit. If you have connected a local monitor to the TX's HDMI OUT port, the content will also be displayed there simultaneously.
Using the IR Remote Control Extension
To control your source device (e.g., DVD player, cable box) from the location of your remote display:
- Ensure the IR Transmitter cable is connected to the TX unit and its emitter head is correctly positioned over your source device's IR sensor.
- Ensure the IR Receiver cable is connected to the RX unit and its receiver head is positioned to receive signals from your remote control.
- Point your original remote control at the IR Receiver head connected to the RX unit. The signal will be transmitted wirelessly back to the TX unit and then to your source device, allowing you to control it remotely.
- If the remote control does not respond, press the IR button on the Receiver (RX) unit to cycle through different IR frequencies (30kHz, 38kHz, 47kHz, 56kHz) until it matches your device's remote control frequency.
Multi-Receiver Setup (1 TX to 4 RXs)
This system supports connecting one Transmitter (TX) to up to four Receiver (RX) units simultaneously. This allows you to mirror or extend your display to multiple screens in different locations.
- Acquire additional PAKITE Model 850 Receiver (RX) units.
- Connect each additional RX unit to its respective display and power it on, following the "Setup Instructions" above.
- The TX unit will automatically detect and pair with the additional RX units. The video and audio will then be transmitted to all connected displays.

Image: Diagram showing a single transmitter wirelessly sending video to four separate display screens.
Ngosipụta ọnọdụ
The Transmitter (TX) and Receiver (RX) units are equipped with LED indicators to show their operational status:
- P (Power) Indicator: This light illuminates solid when the product is powered on.
- S (Video) Indicator: This light illuminates solid when an HDMI signal is being input or output.
- W (Wireless) Indicator: This light flashes when the product is communicating normally. A solid light indicates a stable wireless connection.
Nlekọta
- Keep the device in a dry environment, away from direct sunlight, high temperatures, and humidity.
- Zere idobe ma ọ bụ idobe ngwaọrụ ahụ na mmetụta siri ike.
- Jiri akwa dị nro hichaa ngwaọrụ ahụ. Ejila ihe nhicha mmiri ma ọ bụ ikuku ikuku.
- Hụ na ikuku na-efegharị nke ọma gburugburu ngwaọrụ ndị ahụ iji gbochie oke okpomọkụ.
Nchọpụta nsogbu
| Nsogbu | Ihe nwere ike ime | Ngwọta |
|---|---|---|
| No image or unstable image on the receiver display. |
|
|
| IR remote control not working. |
|
|
Nkọwapụta
- Akara: PAKITE
- Nọmba nlereanya: BIN-850
- Teknụzụ Njikọta: HDMI, Wi-Fi (2.4GHz)
- Ụdị njikọ: Ọkọlọtọ HDMI
- Mkpebi: 1080p Full HD, 720p Progressive Scan
- Oke ikuku: Up to 200m (657ft) in open space, 50m (165ft) through walls
- Latency: Ultra-low, approximately 0.1 seconds
- Njikwa anya IR: Supports 30kHz, 38kHz, 47kHz, 56kHz frequencies
- Multi-Receiver Support: 1 Transmitter to up to 4 Receivers
- Akụkụ ngwaahịa: 12 x 10 x 2 cm
- Arọ ngwaahịa: 550 g
- Agba: Nwa
- Ngwa dakọtara: Projectors, TVs, PCs, smartphones, tablets, game consoles, cable TV boxes, cameras, etc.
Akwụkwọ ikike na nkwado
PAKITE offers a 365-day free exchange service for non-human-caused damage. For any questions, technical assistance, or warranty claims, please contact PAKITE customer support through your purchase platform or the official PAKITE websaịtị.
Maka enyemaka ọzọ, biko gaa na PAKITE Brand Store.


