Okwu mmalite
This manual provides detailed instructions for the installation, operation, and maintenance of your WGP Teleheer T6 Plus Motorcycle Bluetooth Headset. Please read this manual thoroughly before using the device to ensure proper function and safety. The T6 Plus is designed for motorcycle riders, offering full-duplex Bluetooth real-time intercom communication, hands-free calling, music playback, and voice assistant integration.
Atụmatụ igodo
- Full Duplex Bluetooth Real-time Intercom: Stable signal transmission up to 1500 meters (93 MPH) with ceramic antenna.
- Hands-free & Multi-function Keys: Bluetooth 5.1 connectivity, supports call handling (answer/refuse/redial), music playback. Automatic switch to phone mode for incoming calls. Large button design for easy operation with gloves.
- IP65 Waterproof & Dustproof Design: Withstands various weather conditions, operational down to -15°F.
- HD Speakers & Ultra High Quality Sound: High-definition sound quality, especially for bass, with effective wind noise reduction.
- All-in-One Type-C Port: Integrated audio, data transfer, and charging.
- Ogologo ndụ batrị: 850 mAh battery providing 30 hours of continuous use and 500 hours standby.
Ihe ngwugwu
Biko chọpụta na ihe niile dị na ngwugwu gị:
- WGP Teleheer T6 Plus Bluetooth Headset Unit (2 units for 2-pack)
- Ndị na-ekwu okwu okpu agha
- Microphone (boom mic for open-face helmets, soft mic for full-face helmets)
- Mounting Clip (clamp and adhesive options)
- USB Type-C Nchaji USB
- Akwụkwọ ntuziaka onye ọrụ

Image: A detailed diagram illustrating the components of the WGP Teleheer T6 Plus headset, including the main unit with its Type-C port, indicator light, and control buttons (OFF/ON, Volume+, Volume-, Telephone, Connect). It also shows the securing clip, microphone, and trumpet (speakers), providing a clear visual guide to the parts included and their connections.
Ntọala na nwụnye
1. Ịchaji ngwaọrụ
Before first use, fully charge the T6 Plus headset. Connect the provided USB Type-C cable to the headset's Type-C port and the other end to a USB power adapter (not included). The indicator light will show charging status and turn off when fully charged.
- Oge nchaji: Ihe dịka awa 2-3.
- Indicator light: Red during charging, off when fully charged.
2. Installing the Headset in Your Helmet
The T6 Plus can be installed using either the clamp mount or the adhesive mount.
- Họrọ Ebe Nkwanye: Select a flat area on the left side of your helmet where the headset unit can be easily accessed.
- Install Speakers: Attach the speakers inside the helmet's ear pockets using the adhesive pads. Ensure they are positioned directly over your ears for optimal sound quality.
- Install Microphone:
- For full-face helmets: Use the soft wire microphone and position it inside the chin bar, close to your mouth.
- For open-face or modular helmets: Use the boom microphone and position it in front of your mouth.
- Mount the Main Unit:
- Clamp Ugwu: Gbanye clamp between the helmet shell and the inner padding. Secure it tightly.
- Ugwu nrapado: Clean the chosen surface on the helmet. Peel off the protective film from the adhesive mount and firmly press it onto the helmet for at least 30 seconds. Allow 24 hours for the adhesive to cure before use.
- Jikọọ eriri: Plug the speaker/microphone cable into the Type-C port on the main headset unit.

Image: A WGP Teleheer T6 Plus headset unit mounted on the side of a motorcycle helmet. This image demonstrates the typical installation position of the headset on a helmet, showing its compact design and how it integrates with the helmet's exterior. The control buttons are visible, indicating ease of access for the rider.
Ntuziaka ọrụ
1. Gbanyụọ / gbanyụọ
- Ike Na: Pịa ma jide bọtịnụ ike for 3 seconds until the indicator light flashes.
- Gbanyụọ: Pịa ma jide bọtịnụ ike for 3 seconds until the indicator light turns off.
2. Bluetooth Pairing with Mobile Phone
- Ensure the T6 Plus is powered off.
- Pịa ma jide bọtịnụ ike for approximately 5-7 seconds until the indicator light flashes red and blue alternately, indicating pairing mode.
- On your mobile phone, enable Bluetooth and search for "Teleheer T6 Plus".
- Select "Teleheer T6 Plus" from the list of available devices to connect. Once connected, the indicator light will flash blue slowly.
3. Intercom Pairing (Two Units)
To establish intercom communication between two T6 Plus units:
- Ensure both T6 Plus units are powered off.
- On Unit 1, press and hold the bọtịnụ ike for 5-7 seconds until the indicator light flashes red and blue alternately.
- On Unit 2, press and hold the bọtịnụ ike for 5-7 seconds until the indicator light flashes red and blue alternately.
- Pịa nkenke bọtịnụ ike on either Unit 1 or Unit 2 (one short press). The units will search for each other.
- Once connected, the indicator lights on both units will flash blue slowly, and you will hear a confirmation tone.
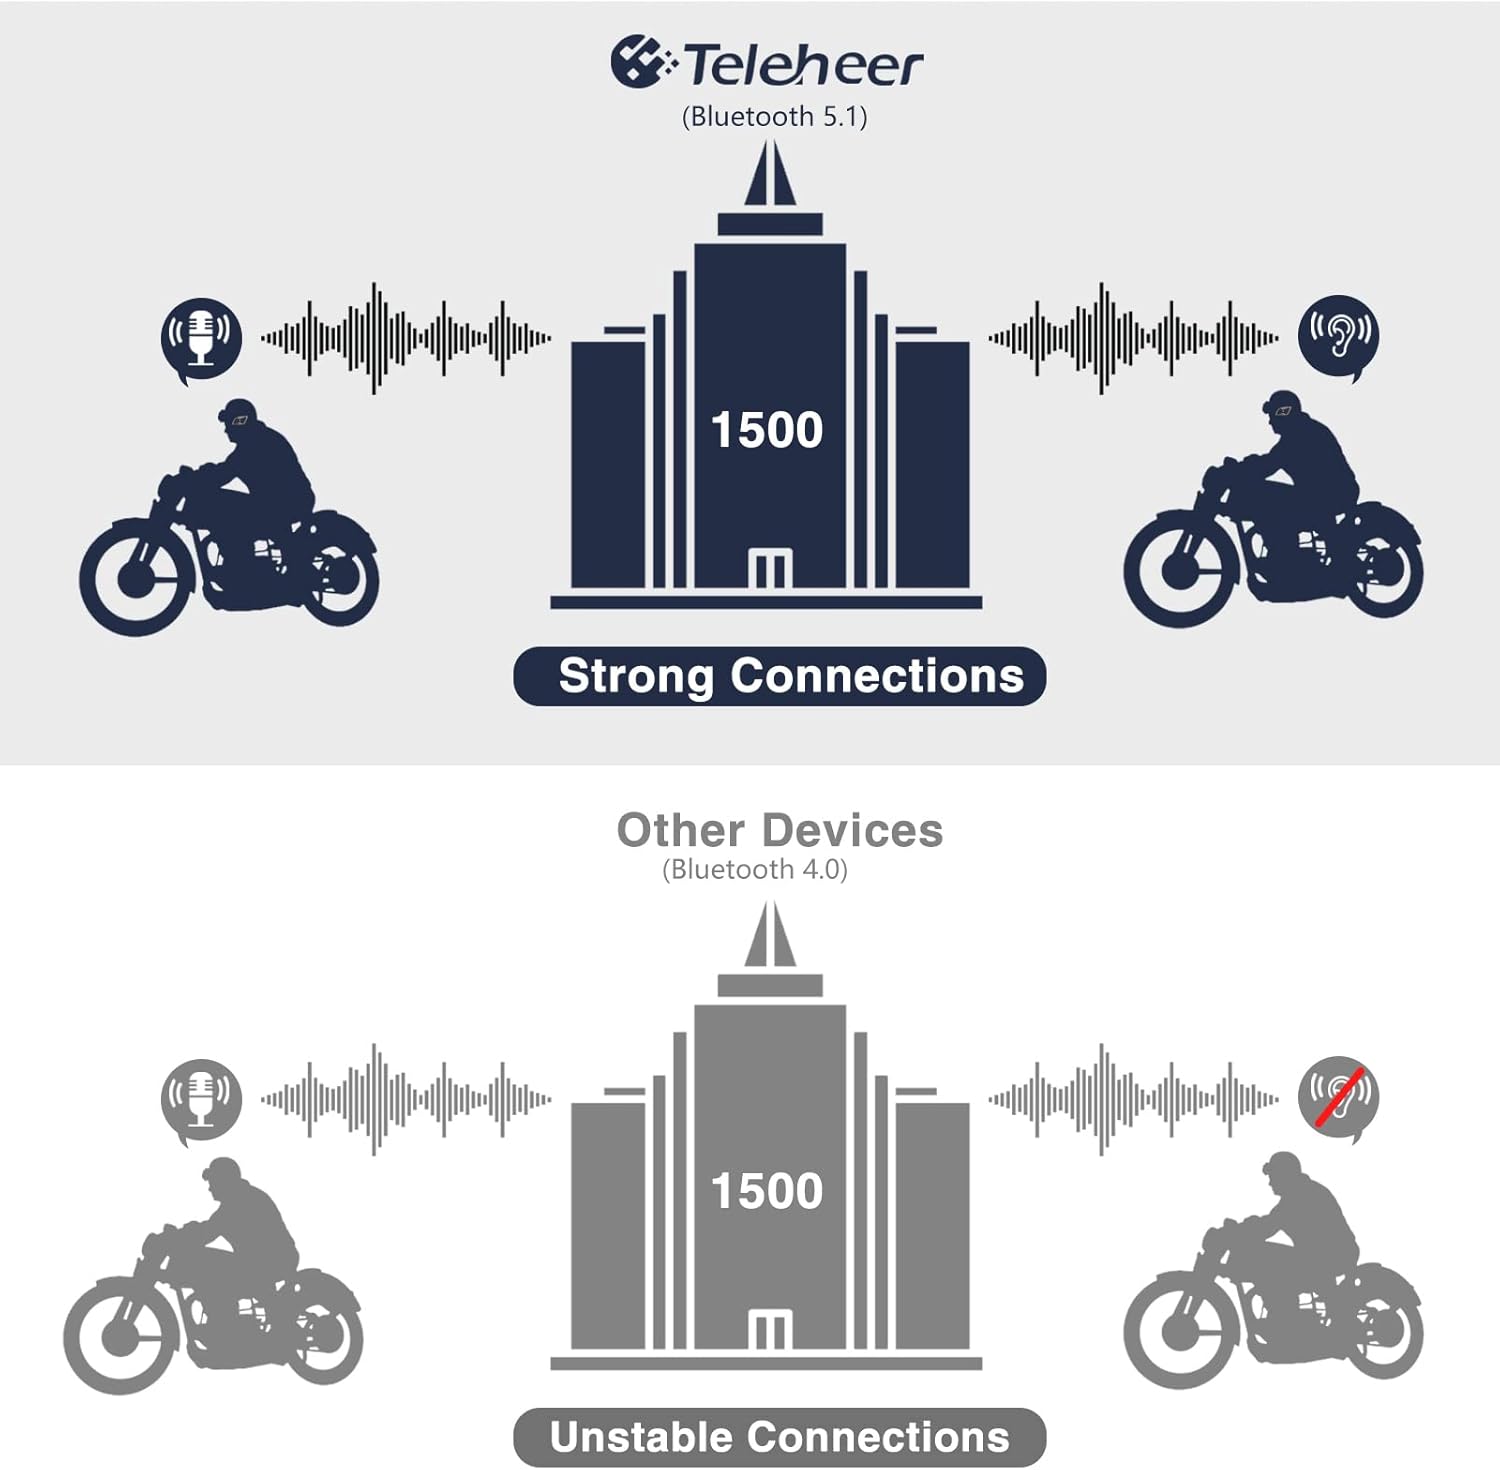
Image: A graphic illustrating the effective intercom range of the Teleheer T6 Plus (Bluetooth 5.1) compared to older Bluetooth 4.0 devices. The T6 Plus shows stable connections over 1500m, while older devices show unstable connections over shorter distances. This highlights the improved signal stability and range due to Bluetooth 5.1 and the ceramic antenna.
4. Phone Call Functions
- Oku azaa: Mkpirisi pịa Bọtịnụ ekwentị.
- Oku ngwụcha: Mkpirisi pịa Bọtịnụ ekwentị.
- Jụ oku: Pịa ma jide Bọtịnụ ekwentị maka 2 sekọnd.
- Nọmba Ikpeazụ emegharịgharịrị: Pịa ugboro abụọ Bọtịnụ ekwentị.
5. Nghaghachi egwu
- Gwuo/kwụsịtụ: Mkpirisi pịa Bọtịnụ ekwentị.
- Track na-esote: Mkpirisi pịa Igodo olu.
- Gara aga Track: Mkpirisi pịa Olu Down Button.
- Ndozi olu: Pịa ma jide Bọtịnụ olu elu/ala ịbawanye ma ọ bụ ibelata olu.
6. Voice Assistant (Siri/Google Assistant)
- Mee ka onye enyemaka olu rụọ ọrụ: Pịa ugboro abụọ bọtịnụ ike.

Image: A graphic depicting the voice assistant feature of the Teleheer T6 Plus, showing a helmeted rider interacting with their phone via voice commands like "Hey Siri" or "Ok Google". This illustrates the hands-free convenience for navigation, calls, and other smartphone functions while riding.
Nlekọta na nlekọta
- Nhicha: Jiri ihe dị nro, d hichaa ngwaọrụ ekweisi ahụamp akwa . Ejila kemịkalụ siri ike ma ọ bụ ihe mkpocha abrasive.
- Nguzogide mmiri: The device is IP65 waterproof. While it can withstand water jets, avoid submerging it in water for extended periods. Ensure the Type-C port cover is securely closed when not charging.
- Nchekwa: Debe ngwaọrụ ahụ n'ebe dị jụụ ma kpọọ nkụ mgbe a naghị eji ya. Zere oke okpomọkụ.
- Nlekọta batrị: To prolong battery life, avoid fully discharging the battery frequently. Charge the device regularly, even if not in use for long periods.

Image: A WGP Teleheer T6 Plus headset unit partially submerged in water with splashes, demonstrating its IP65 waterproof rating. The image emphasizes the device's ability to withstand water exposure, making it suitable for various weather conditions during riding.
Nchọpụta nsogbu
| Nsogbu | Ihe nwere ike ime | Ngwọta |
|---|---|---|
| Ngwaọrụ anaghị agbanwu ọkụ. | Batrị dị ala. | Chajie ngwaọrụ ahụ nke ọma. |
| Enweghị ike ijikọ na ekwentị. | Device not in pairing mode; Bluetooth off on phone; too many paired devices. | Ensure device is in pairing mode (red/blue flashing). Turn on phone's Bluetooth. Delete old Bluetooth connections on phone. |
| Intercom connection unstable or short range. | Obstructions; out of range; interference. | Ensure clear line of sight. Stay within 1500m range. Avoid strong electromagnetic interference. |
| Enweghị ụda sitere na ndị ọkà okwu. | Speakers not connected properly; volume too low. | Check speaker connection to Type-C port. Increase volume. |
| Microphone not picking up voice. | Microphone not connected properly; microphone position. | Check microphone connection. Ensure microphone is close to your mouth. |
| Wind noise during calls/intercom. | High speed; improper microphone placement. | Ensure microphone is positioned correctly to minimize wind exposure. The device has DSP noise suppression, but extreme conditions may affect performance. |
Nkọwapụta
| Njirimara | Nkọwa |
|---|---|
| Aha Nlereanya | Teleheer T6 Plus |
| Ụdị Bluetooth | Bluetooth 5.1 |
| Intercom Range | Up to 1500 meters (93 MPH) |
| Ike batrị | 850 mAh |
| Oge eji na-aga n'ihu | awa 30 |
| Oge Njikere | awa 500 |
| Nchaji ọdụ ụgbọ mmiri | Ụdị-C |
| Mmiri Nguzogide | IP65 (Jet-proof) |
| Okpomọkụ na-arụ ọrụ | Down to -15°F |
| Ihe Antenna | Ceramic |
| Usoro njikwa | Touch / Physical Buttons |
| Ibu Ibu | 14.4 ounces (ihe dị ka gram 408) |
| Akụkụ (Ngwugwu) | 8.54 x 3.9 x 2.95 sentimita asatọ |
Akwụkwọ ikike na nkwado
For warranty information and technical support, please refer to the official WGP websaịtị ma ọ bụ kpọtụrụ ndị ahịa ha ozugbo. Debe nnata nzụta gị dị ka ihe akaebe nke ịzụrụ maka nkwupụta ikike.
Maka enyemaka ọzọ, ị nwere ike ịga na ngwaahịa ibe na Amazon or contact the seller directly through the Amazon platform.


