1. Okwu mmalite
Thank you for choosing the AZDOME M01 Pro Dual Dash Cam. This device is designed to provide reliable video recording of your journeys, enhancing driving safety and providing evidence in case of incidents. It features a front camera for road ahead recording and a rear camera for simultaneous rear view coverage. This manual provides detailed instructions for installation, operation, and maintenance of your dash cam.
2. Ihe ngwugwu
Biko lelee ngwungwu maka ihe ndị a:
- AZDOME M01 Pro Dash Cam (Main Unit)
- Rear Camera (6m/20ft cable)
- 32GB SD kaadị
- Dual USB Car Charger (5V/2.4A)
- Power Cable (3.5m/12ft)
- 360° Suction Mount
- 360° 3M Spare Sticky Mount
- Mirror Mount Holder (Optional, if included in your bundle)

Image: Contents of the AZDOME M01 Pro Dash Cam package.
3. Ngwaahịa gafereview
3.1 Main Unit (Front Dash Cam)
The main unit features a 3-inch 2.5D curved IPS screen, a 150° wide-angle lens with F2.0 large aperture, and various control buttons for navigation and settings. It supports 1080P Full HD recording.

Image: AZDOME M01 Pro Dash Cam main unit with key features.
3.2 Igwefoto azụ
The compact rear camera provides VGA resolution recording and is designed to be mounted at the rear of your vehicle for comprehensive coverage.
3.3 Nhọrọ nrịgo
The dash cam comes with a 360° suction mount for windshield attachment and a 360° 3M sticky mount for alternative placements. A mirror mount holder is also included for integration with your vehicle's rearview mirror.

Image: Mirror mount holder for the dash cam.
4. Nhazi
4.1 Ịtinye kaadị SD
- Hụ na agbanyụrụ dashcam ahụ.
- Locate the SD card slot on the side of the dash cam.
- Insert the provided 32GB SD card with the gold contacts facing the back of the camera until it clicks into place.
- Iji wepụ ya, jiri nwayọ pịa kaadị ahụ ruo mgbe ọ ga-apụta.
Mara: It is recommended to format the SD card within the dash cam's settings before first use and periodically thereafter to ensure optimal performance.
4.2 Ịrịgo Dash Cam
Choose between the suction mount or the mirror mount holder.
Using the Suction Mount:
- Hichaa ebe windo ihu gị dị ebe ịchọrọ itinye igwefoto.
- Attach the suction mount to the dash cam.
- Pịa iko mmiri ahụ nke ọma n'akụkụ windo windo ahụ wee tụgharịa ihe nkwụnye ahụ iji jide ya.
- Gbanwee akụkụ igwefoto ka ọ dị mkpa.
Using the Mirror Mount Holder:
- Attach the mirror mount holder to the dash cam.
- Na nzuzo clamp the mirror mount holder onto your vehicle's rearview mirror stem.
- Mechie skru niile iji hụ na nkwụsi ike.
- Adjust the camera angle for an optimal view.
4.3 Ijikọ ike
- Plug the small end of the power cable into the dash cam's power port.
- Plug the other end of the power cable into the dual USB car charger.
- Insert the car charger into your vehicle's 12V power outlet (cigarette lighter socket).
- Route the cable neatly along the windshield trim to avoid obstructing your view.
4.4 Ịwụnye igwefoto azụ
- Jikọọ eriri igwefoto azụ na ọdụ ụgbọ mmiri akọwapụtara na ngalaba dashcam isi.
- Route the rear camera cable from the front unit to the rear of your vehicle, typically along the headliner and side panels.
- Mount the rear camera on the rear windshield using its adhesive pad, ensuring a clear view.
- Adjust the angle of the rear camera for optimal coverage.
5. Ntuziaka ọrụ
5.1 Gbanyụọ ma ọ bụ gbanyụọ
- Akpaaka: The dash cam will power on and begin recording automatically when your vehicle's ignition is turned on (and power is supplied to the 12V outlet).
- Akwụkwọ ntuziaka: Press and hold the Power button to manually turn the device on or off.
5.2 Ndekọ ndabere
Once powered on, the dash cam will automatically start continuous loop recording. The front camera records in 1080P FHD, and the rear camera records in VGA resolution simultaneously.

Image: High-resolution 1080P FHD recording display.
5.3 Ndekọ loop
The dash cam records video in segments (e.g., 1, 3, or 5 minutes). When the SD card is full, the oldest unlocked video files will be overwritten by new recordings. This ensures continuous recording without manual intervention.
5.4 G-Sensọ (Ndekọ Mberede)
The built-in G-sensor detects sudden impacts or collisions. When triggered, it automatically locks the current video segment, preventing it from being overwritten by loop recording. The sensitivity of the G-sensor can be adjusted in the settings menu.
5.5 Ọnọdụ ebe a na-adọba ụgbọala
With Parking Mode enabled, the dash cam will automatically start recording if it detects a collision or vibration while your vehicle is parked. This feature requires a continuous power supply (e.g., a hardwire kit, sold separately) to function when the vehicle is off.
5.6 Nchekwa ihuenyo
To avoid distraction while driving, you can set the screen to turn off automatically after a set period (e.g., 1, 3, or 5 minutes) while recording continues in the background. The screen can be reactivated by pressing any button.
5.7 ADAS (Advanced Driver-Assistance Systems)
The ADAS feature provides alerts for potential road hazards, such as Lane Departure Warning (LDW) or Forward Collision Warning (FCW). Refer to the dash cam's settings to enable and configure these features.
5.8 Fatigue Driving Alert
This feature reminds drivers to take a break after a preset duration of continuous driving, promoting safer driving habits.
5.9 Dual Recording and Reverse View
The AZDOME M01 Pro records simultaneously from both the front and rear cameras. When the vehicle is in reverse gear (if properly wired), the screen can display the rear camera feed with parking guidelines, assisting with parking maneuvers.
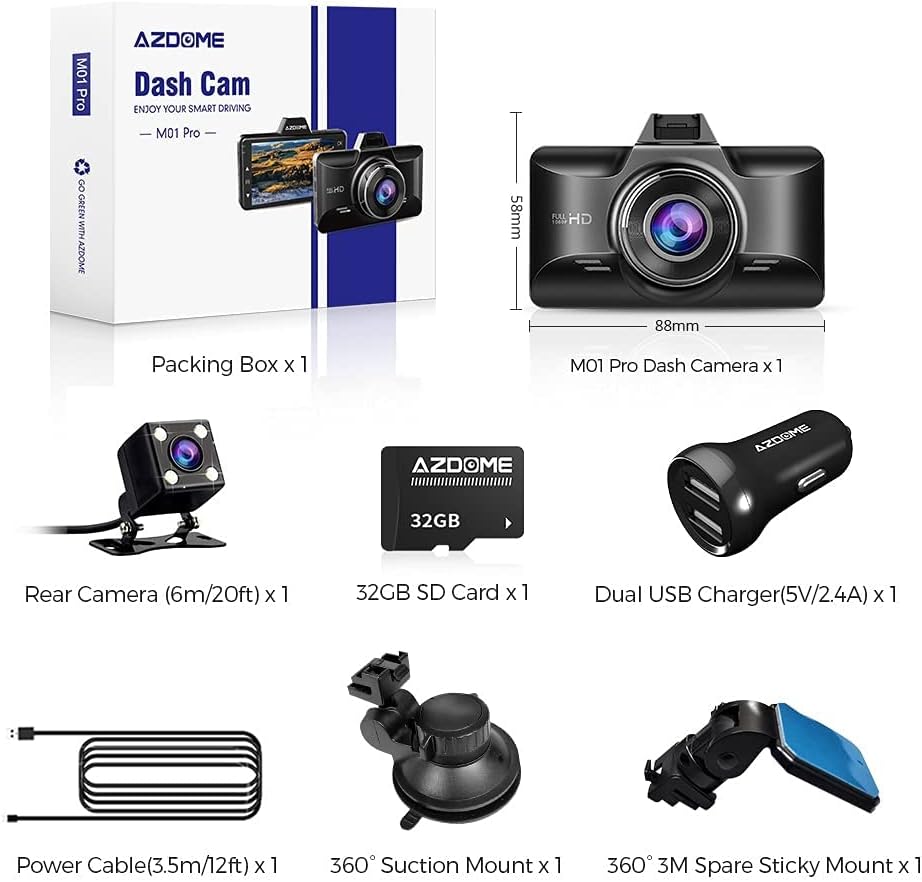
Image: Dual recording display with reverse view parking assistance.
5.10 Nghaghachi
Iji view recorded videos, stop recording (if active) and enter the playback mode via the menu. You can browse through video files and play them directly on the dash cam screen or transfer the SD card to a computer for viewing.
6. Nlekọta
- Nhicha: Use a soft, dry cloth to clean the camera lenses and screen. Avoid using abrasive cleaners.
- Nhazi kaadị SD: Format the SD card regularly (e.g., once a month) within the dash cam's settings to maintain optimal recording performance and prevent data corruption.
- Okpomọkụ: Avoid exposing the dash cam to extreme temperatures for extended periods.
7. Nchọpụta nsogbu
| Nsogbu | Ngwọta |
|---|---|
| Igwefoto dash anaghị agbanye. | Check if the power cable is securely connected to both the dash cam and the car charger. Ensure the car charger is properly inserted into the 12V outlet and the vehicle's ignition is on. Test the 12V outlet with another device. |
| Dash cam stops recording. | Ensure the SD card is inserted correctly and has sufficient free space. Format the SD card. Check if loop recording is enabled. If the G-sensor is too sensitive, it might lock too many files, filling the card. Adjust G-sensor sensitivity. |
| Vidiyo footage is blurry. | Clean the camera lenses with a soft cloth. Ensure the protective film has been removed from the lenses. Check if the windshield area is clean. |
| SD card error message. | Format the SD card within the dash cam settings. If the issue persists, try a different high-speed (Class 10 or U3) SD card from a reputable brand. |
| Igwefoto azụ anaghị egosi. | Lelee njikọ nke eriri igwefoto azụ na isi ngwaọrụ ahụ. Hụ na eriri ahụ emebighị. |
8. Nkọwapụta
| Njirimara | Nkọwa |
|---|---|
| Aha Nlereanya | M01 Pro |
| Ụdị | AZDOME |
| Mkpebi ịse vidiyo | Front: 1080p FHD; Rear: VGA |
| Nha ihuenyo | 3 Inches (2.5D Curved IPS) |
| Atụmatụ pụrụ iche | 360 Degree (Mount), Loop Recording, G-Sensor, Parking Mode, Screen Saver, ADAS, Fatigue Driving Alert, Super Night Vision |
| Teknụzụ Njikọta | USB |
| Ụdị nkwụnye | Suction Mount, Mirror Mount |
| Ụdị ebe nchekwa Flash | SD (Supports up to 64GB, 32GB included) |
9. Akwụkwọ ikike na nkwado
AZDOME products are designed for reliability and performance. For warranty information, technical support, or any inquiries regarding your AZDOME M01 Pro Dash Cam, please refer to the contact information provided on the official AZDOME websaịtị ma ọ bụ akwụkwọ ịzụrụ ihe gị. Biko debe ihe akaebe nke ịzụrụ ihe gị maka nkwupụta nkwa.
Nkwado n'ịntanetị: www.azdome.com/support


