1. Okwu mmalite
Thank you for choosing the EMKE 300W Heating Element. This product is designed to provide efficient and controlled heating for your bathroom radiators and towel warmers. This manual contains important information regarding the safe installation, operation, and maintenance of your heating element. Please read it thoroughly before use and retain it for future reference.
2. Ntuziaka nchekwa
Iji hụ na ọrụ nchekwa na gbochie mmebi, biko debe ihe nchekwa nchekwa ndị a:
- Nchekwa Eletriki: Ensure the power supply matches the specifications (220-240V 50Hz). Always disconnect power before installation or maintenance. Installation should be performed by a qualified electrician if you are unsure.
- Nchekwa mmiri: The heating element has an IP44 protection rating, meaning it is protected against solid objects larger than 1mm and splashing water from any direction. However, it should not be submerged in water.
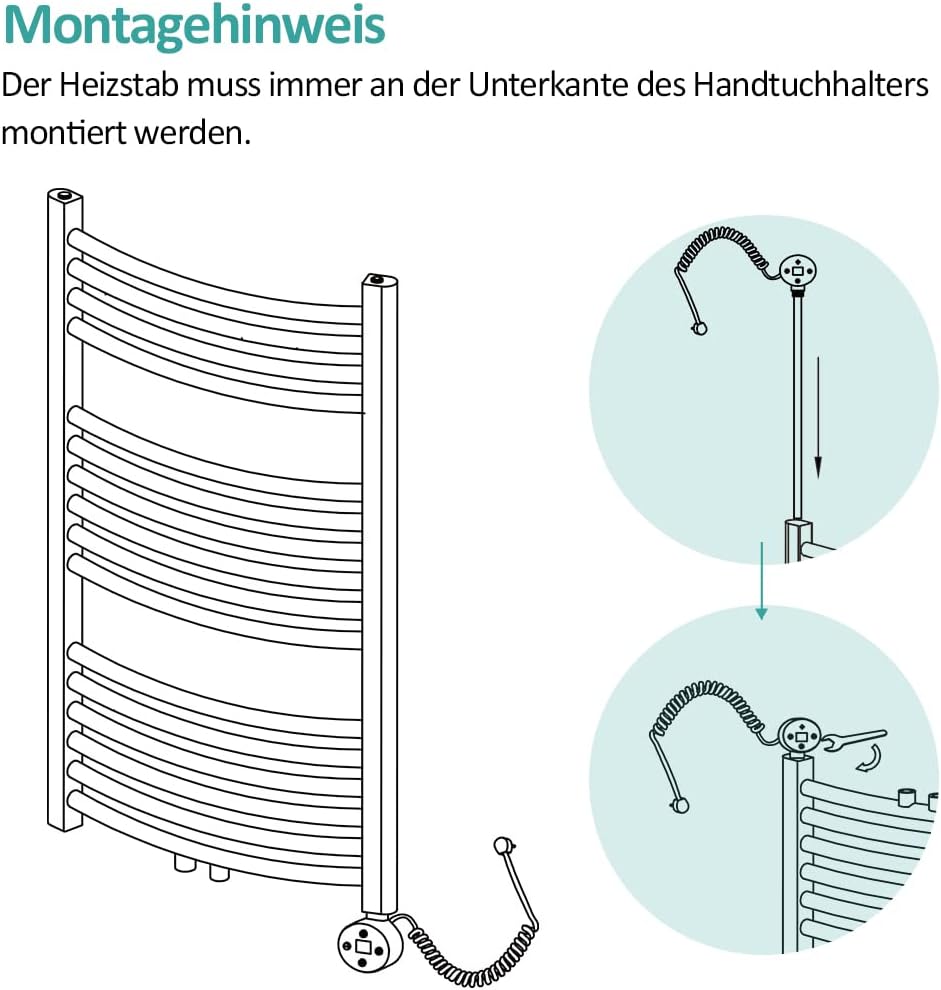
- Nwụnye nke ọma: The heating element must be installed vertically at the bottom of the radiator/towel warmer. Ensure the G1/2 connection thread is securely sealed to prevent leaks.
- Okpomọkụ: The surface of the heating element and radiator can become hot during operation. Avoid direct contact to prevent burns.
- Ụmụaka na anụ ụlọ: Keep children and pets away from the operating heating element.
- Ezubere iji: Use this product only for its intended purpose as a heating element for bathroom radiators and towel warmers.
3. Akụrụngwa Ngwaahịa
- Mpụta ike: 300W, suitable for radiators with a power requirement below 600W.
- Ihe: Constructed from high-quality 304 stainless steel for rapid heating, rust resistance, and corrosion resistance.
- Thermostat agbakwunyere: Allows for easy control of heating time and temperature.
- Oke okpomoku nwere ike imeghari: 30°C ruo 70°C.
- Ọrụ ngụ oge: Includes 2-hour and 4-hour timer settings.
- Ogo nchekwa: IP44 for splash water protection.
- Nhazi eriri: Spiral cable for neat and flexible connection.
4. Nkọwapụta
| Njirimara | Nkọwapụta |
|---|---|
| Nọmba nlereanya | THE230W-ADR |
| Ike | 300 W |
| Voltage | 220-240 V 50 Hz |
| Heating Bar Size | 392 x Φ 12 mm |
| Ogologo eriri USB | 700-1400 mm |
| Agba | Ọcha |
| Ihe onwunwe | 304 igwe anaghị agba nchara |
| Degree Nchekwa | IP44 |
| Ọkwa nchekwa | Klas I |
| Eriri Njikọ | G1/2 |
| Oke. Nrụgide arụ ọrụ | 10 mmanya |
| Akụkụ ngwaahịa (L x W x H) | 38 x 6 x 4 cm |
| Ibu Ibu | 480 g |
5. Ntọala na nwụnye
Before installation, ensure the radiator system is drained and depressurized. The heating element is designed for vertical installation at the bottom of your towel warmer or electric radiator.
- Select the Correct Heating Element: Ensure the 300W heating element is appropriate for your radiator. It is suitable for radiators with a power output below 600W. Refer to the table below for guidance on matching heating element power to radiator heat output.
- Kwadebe Radiator: Locate the G1/2 connection port at the bottom of your radiator. Ensure it is clean and free of debris.
- Insert the Heating Element: Carefully screw the heating element into the G1/2 connection port. Use appropriate tools to tighten it securely, ensuring a watertight seal. Do not overtighten.
- Ndokwa: The heating element must always be mounted at the lowest point of the towel rail/radiator to ensure proper heat distribution and prevent overheating.
- Njikọ eletrik: Once the heating element is physically installed, connect the power plug to a suitable 220-240V 50Hz electrical outlet. Ensure the outlet is properly grounded and protected by a residual current device (RCD).


6. Ntuziaka ọrụ
The EMKE heating element features an intuitive control panel with an LCD display for easy temperature and timer adjustments.


- Gbanyụọ/ Gbanyụọ: Pịa bọtịnụ ike (⏻) to turn the heating element on or off. The LCD display will illuminate when active.
- Na-agbanwe okpomọkụ: When the heating element is on, press the Temperature/Time Increase (+) or Belata (-) buttons to set your desired temperature between 30°C and 70°C. The set temperature will be displayed on the LCD.
- Isetịpụ oge: Pịa Mode Change button (↶) to cycle through the timer options (2H, 4H, or continuous heating). The selected timer duration will be shown on the LCD. The heating element will operate for the set duration and then turn off automatically.
- Ịkpọ ọkụ na-aga n'ihu: If no timer is selected, the heating element will operate continuously at the set temperature until manually turned off.

7. Nlekọta
Regular maintenance ensures the longevity and efficient operation of your EMKE heating element.
- Nhicha: Before cleaning, always unplug the heating element from the power outlet. Use a soft, damp cloth to wipe the surface of the heating element and control panel. Do not use abrasive cleaners, solvents, or harsh chemicals, as these can damage the finish or electronic components.
- Nyocha: Periodically check the power cable for any signs of damage (fraying, cuts). Inspect the connection point to the radiator for any leaks or corrosion. If any damage is found, discontinue use and contact customer support.
- Nchekwa: If the heating element will not be used for an extended period, unplug it and ensure it is clean and dry before storing.
8. Nchọpụta nsogbu
If you encounter issues with your EMKE heating element, refer to the following common problems and solutions:
| Nsogbu | Ihe nwere ike ime | Ngwọta |
|---|---|---|
| Heating element does not turn on. | Enweghị ọkụ. Ọpụpụ na-ezighi ezi. | Check if the plug is securely inserted. Jiri ngwaọrụ ọzọ nwalee ọpụpụ ahụ. Lelee ihe nbibi sekit. |
| Heating element is on but not heating. | Okpomọkụ atọrọ oke ala. Air in the radiator system. Ihe na-ekpo ọkụ adịghị arụ ọrụ. | Dịkwuo okpomọkụ atọrọ. Bleed the radiator to remove air. Kpọtụrụ onye na-akwado ndị ahịa ma ọ bụrụ na nsogbu ahụ ka dị. |
| Ọrụ ngụ oge anaghị arụ ọrụ dịka a tụrụ anya ya. | Ntọala ngụ oge ezighi ezi. | Ensure the correct timer duration (2H or 4H) is selected using the Mode Change button. |
| Water leakage at the connection point. | Njikọ rụrụ arụ. Akara mebiri emebi. | Ensure the heating element is securely tightened. Check the G1/2 seal and replace if damaged. Consult a professional if necessary. |
If these solutions do not resolve the issue, please contact EMKE customer support for further assistance.
9. Akwụkwọ ikike na nkwado
EMKE products are manufactured to high-quality standards. For information regarding warranty coverage and terms, please refer to the documentation provided with your purchase or visit the official EMKE websaịtị.
For technical support, troubleshooting assistance, or spare parts inquiries, please contact EMKE customer service. Have your model number (THE230W-ADR) and purchase details ready when contacting support.
EMKE Customer Service: Please refer to your purchase receipt or the EMKE official websaịtị maka ozi kọntaktị kpọmkwem na mpaghara gị.


