1. Okwu mmalite
The CYCPLUS Cadence/Speed Sensor is a versatile device designed to track your cycling performance. It supports both ANT+ and Bluetooth 4.0 protocols, allowing seamless connection with various cycling computers and smartphone applications. This sensor can function as either a speed sensor or a cadence sensor, providing accurate data for your training and rides.
This manual provides detailed instructions for setting up, operating, and maintaining your CYCPLUS Cadence/Speed Sensor to ensure optimal performance and longevity.

Image 1: Two CYCPLUS Cadence/Speed Sensors, showcasing kọmpat imewe.
2. Ihe ngwugwu
Biko chọpụta na agụnyere ihe niile edepụtara n'okpuru na ngwugwu gị:
- CYCPLUS Cadence/Speed Sensor Unit
- Rubber Spacers (2 pieces)
- Rubber Rings (2 pieces)
- Batrị cell bọtịnụ CR2032 (arụnyere ya mbụ)
- Ntuziaka onye ọrụ

Image 2: Package contents including the sensor, rubber spacers, rubber rings, and user guide.
3. Ntọala na nwụnye
3.1. Ịkwalite batrị
The sensor comes with a pre-installed CR2032 battery. Before first use, you need to remove the insulation sheet to activate the battery.
- Gently press the cover and rotate the lever to align with the center line.
- Remove the cover and the insulation sheet from the battery compartment.
- Place the battery back with the positive (+) side facing up.
- Align the cover with the center line, gently press, and rotate the lever to secure it.
Video 1: This video demonstrates the process of removing the insulation sheet and installing the battery for the CYCPLUS Cadence/Speed Sensor.
3.2. Nhọrọ mode
The sensor can operate in two modes: Speed Mode and Cadence Mode. To switch between modes, gently press the cover and rotate the sensor body until the indicator aligns with the desired mode (SPEED or CADENCE). The LED light will flash to indicate the current mode:
- Ìhè na-acha anụnụ anụnụ: Ụdị ọsọ
- Ọkụ ndụ ndụ: Ụdị Cadence

Image 3: The sensor displaying its mode selection and Bluetooth pairing process.
3.3. Installation - Speed Mode
When using the sensor as a speed sensor, attach it to the wheel hub.
- Ensure the sensor is in Speed Mode (blue light flashes).
- Select the appropriate rubber spacer (thicker one for larger hubs) and rubber ring.
- Place the sensor on the front or rear wheel hub.
- Secure the sensor firmly with the rubber ring around the hub and sensor.

Image 4: The CYCPLUS sensor installed on a bicycle wheel hub for speed tracking.
3.4. Installation - Cadence Mode
When using the sensor as a cadence sensor, attach it to the crank arm.
- Ensure the sensor is in Cadence Mode (green light flashes).
- Select the appropriate rubber spacer (thinner one for crank arms) and rubber ring.
- Place the sensor on the inside of the left crank arm.
- Secure the sensor firmly with the rubber ring around the crank arm and sensor.

Image 5: The CYCPLUS sensor installed on a bicycle crank arm for cadence tracking.
4. Connectivity and Pairing
The CYCPLUS sensor supports both ANT+ and Bluetooth 4.0 for broad compatibility.
4.1. Pairing with Cycling Computers (ANT+ & Bluetooth)
To pair the sensor with your cycling computer:
- Ensure the sensor is in the correct mode (Speed or Cadence) and active (rotate the wheel or crank to wake it up).
- On your cycling computer, navigate to the sensor pairing menu.
- Select to add a new speed or cadence sensor.
- The cycling computer should detect the CYCPLUS sensor. Select it to pair.
- Once paired, the data will be displayed on your cycling computer.

Image 6: The sensor demonstrating ANT+ compatibility with a cycling computer, displaying speed and cadence data.
4.2. Pairing with Smartphone Applications (Bluetooth)
To pair the sensor with a cycling app on your smartphone:
- Ensure Bluetooth and location services are enabled on your smartphone.
- Ihe dị mkpa: Do not pair the sensor directly through your phone's Bluetooth settings. Instead, open your preferred cycling application (e.g., Zwift, Wahoo Fitness, Strava).
- Within the app, navigate to the sensor pairing or device connection section.
- The app will search for available sensors. Select the CYCPLUS sensor (it may appear as 'Speed' or 'Cadence' followed by a number) to connect.
- Once connected, the app will display your speed or cadence data.
5. Ụdị arụ ọrụ
The CYCPLUS sensor offers two distinct operating modes:
- Ụdị Ọsọ: When the sensor is attached to the wheel hub and the blue LED flashes, it measures and transmits speed data.
- Cadence Mode: When the sensor is attached to the crank arm and the green LED flashes, it measures and transmits cadence data.
Always ensure the sensor is in the correct mode for the data you wish to track. The mode can be switched by rotating the sensor body as described in Section 3.2.

Image 7: The sensor can be used for indoor training setups, providing data to compatible devices or apps.
6. Nlekọta
6.1. Ngbanwe batrị
The sensor uses a standard CR2032 button cell battery. The battery life is approximately 600 hours in cadence mode and 400 hours in speed mode. To replace the battery, follow the steps for battery activation (Section 3.1) to open the compartment, replace the old battery with a new CR2032, and then securely close the cover.

Image 8: The sensor's battery compartment, showing the CR2032 battery and its estimated operational hours.
6.2. Cleaning and Water Resistance
The CYCPLUS sensor has an IP67 waterproof rating, meaning it is protected from dust and can withstand immersion in water up to 1 meter for 30 minutes. This makes it suitable for use in various weather conditions.
To clean the sensor, wipe it with a soft, damp ákwà. Zere iji kemịkalụ siri ike ma ọ bụ ihe ndị na-emebi ihe nke nwere ike imebi casing ma ọ bụ ihe ndị dị n'ime.
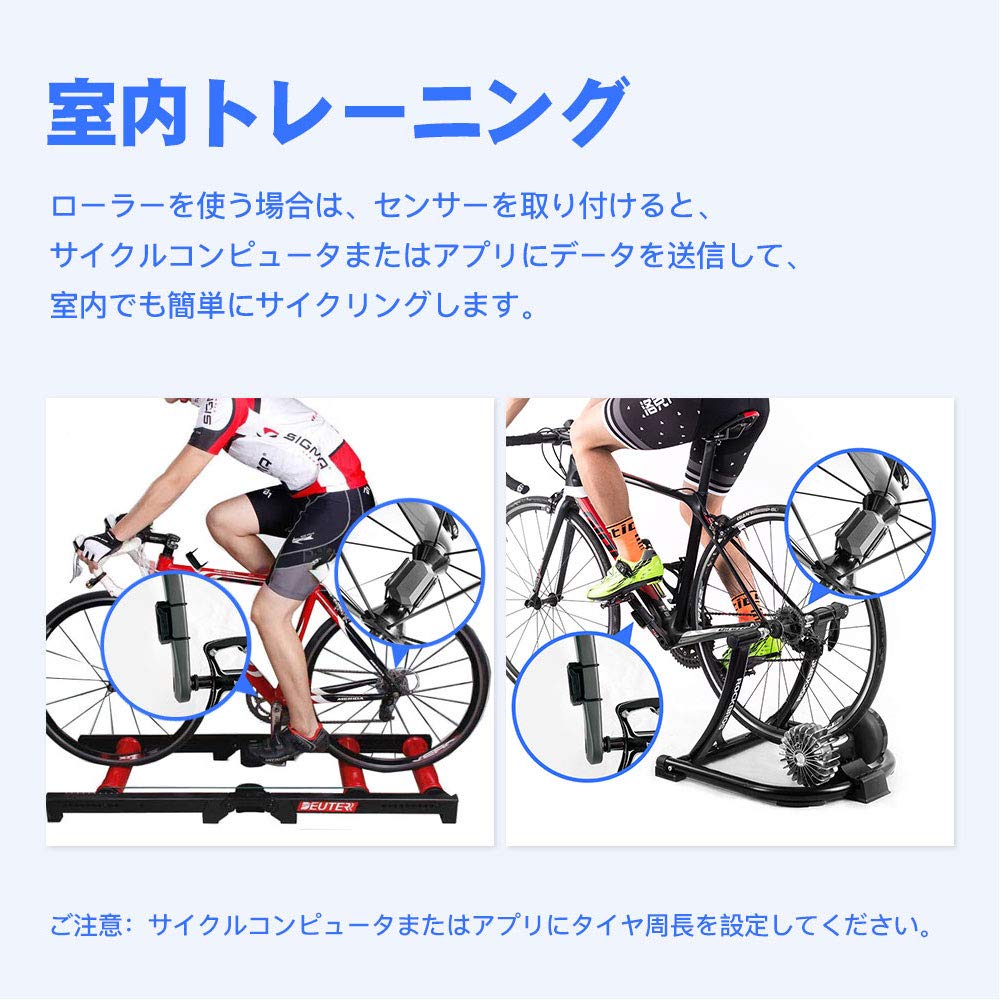
Image 9: The sensor being exposed to water, highlighting its IP67 waterproof and dustproof capabilities.
7. Nchọpụta nsogbu
7.1. No Data Displayed
- Lelee batrị: Hụ na etinyere batrị ahụ nke ọma ma nwee ike ịchaji zuru oke. Dochie ya ma ọ bụrụ na ọ dị mkpa.
- Mee ihe mmetụta: Rotate the wheel (for speed) or crank (for cadence) to wake up the sensor. The LED should flash.
- Lelee Ụdị: Verify the sensor is in the correct mode (blue for speed, green for cadence).
- Jikọọgharịa Ngwaọrụ: Try unpairing and re-pairing the sensor with your cycling computer or app.
- nso: Ensure the sensor is within range of your receiving device.
7.2. Incorrect or Intermittent Data
- Ọnọdụ sensọ: Ensure the sensor is securely mounted and not moving during your ride. For cadence, ensure it's on the inside of the crank arm. For speed, ensure it's on the hub.
- Ntinye aka: Strong electromagnetic fields or other wireless devices nearby can cause interference. Try moving away from such sources.
- Wheel Size (Speed Mode): For accurate speed readings, ensure the correct wheel circumference is set in your cycling computer or app.
- Femụwe Update: Check the CYCPLUS website or app for any available firmware updates for the sensor.
7.3. Pairing Failure
- Ntọala Bluetooth: If using a smartphone app, ensure you are pairing within the app itself, not directly through the phone's Bluetooth settings.
- Ngwa ndị ọzọ: Disconnect the sensor from any other devices it might be currently paired with.
- Malitegharịa: Restart your cycling computer or smartphone.
8. Nkọwapụta
| Njirimara | Nkọwapụta |
|---|---|
| Ibu ngwaahịa | 9.2 g |
| Nha ngwugwu | 13.4 x 9.7 x 3 cm |
| Ụdị | Speed Sensor (Dual Mode: Speed/Cadence) |
| Ụdị nkwụnye | Easy Installation (Wireless) |
| Ụdị batrị | Igwe bọtịnụ CR2032 |
| Njikọta | ANT+, Bluetooth 4.0 |
| Ngosi nke enweghị mmiri | IP67 |
| Cadence Mode Operating Time | awa 600 |
| Speed Mode Operating Time | awa 400 |
9. Akwụkwọ ikike na nkwado
CYCPLUS provides a 12-month quality assurance service for this product. If you have any questions or concerns, please contact us through your purchase platform. For Amazon purchases, navigate to "Account Service" → "Order History" → "Sold by: CYCPLUS" → "Ask a question." We aim to respond within 24 hours and provide prompt assistance for returns, refunds, or exchanges as quickly as possible.


