1. Okwu mmalite
Thank you for choosing the Napoleon COS1902473 22-inch Charcoal Kettle Barbecue Grill. This manual provides essential information for the safe assembly, operation, maintenance, and troubleshooting of your new grill. Please read these instructions thoroughly before using the grill for the first time and retain them for future reference.

Figure 1: Napoleon COS1902473 Charcoal Kettle Grill. This image displays the complete grill assembly, highlighting its spherical kettle design, lid with temperature gauge, and wheeled stand.
2. Ozi nchekwa dị mkpa
Failure to follow these safety instructions could result in fire, explosion, or burn hazards, which could cause property damage, personal injury, or death.
- Eji naanị n'èzí: This grill is designed for outdoor use only. Do not operate indoors or in enclosed areas.
- mkpochapụ: Maintain a minimum distance of 3 feet (1 meter) from combustible materials (e.g., wooden decks, fences, trees, bushes).
- Elu nke kwụsiri ike: Always place the grill on a hard, level, non-combustible surface.
- Ụmụaka na anụ ụlọ: Debe ụmụaka na anụ ụlọ n'ebe a na-esi nri mgbe niile, ọkachasị n'oge a na-arụ ọrụ.
- Ebe na-ekpo ọkụ: The grill becomes very hot during use. Use heat-resistant gloves or mitts when handling hot components.
- Mmanụ ụgbọala: Use only charcoal briquettes or lump charcoal as fuel. Do not use gasoline, kerosene, or alcohol to light or relight charcoal.
- Mkpofu ntụ: Allow charcoal to cool completely before disposing of ash. Never dispose of hot ashes in combustible containers.
- Igwe ikuku: Ensure adequate airflow for charcoal combustion. Do not block air vents.
- Ahapụla n'atụghị anya: Ahapụla ihe ọkụ ọkụ ọkụ na-echeghị ya.
3. Parts List and Assembly Overview
Before beginning assembly, ensure all parts are present and undamaged. Refer to the assembly diagram (if provided in packaging) for detailed component identification.
- Kettle Bowl (Main body)
- Lid with ACCU-PROBE Temperature Gauge and Cool Touch Handle
- Chrome Plated Steel Cooking Grid
- Hinged Cooking Grids (for easy charcoal access)
- Stainless Steel Heat Diffuser
- Stainless Steel Air Vents (top and bottom)
- Removable Heavy Steel Ash Catcher
- Built-in Lid Hanger
- Rugged Weather-Proof Wheels
- Legs and Bottom Shelf
Mgbakọ gafereview:
Assembly typically involves attaching the legs to the kettle bowl, securing the bottom shelf, mounting the wheels, installing the ash catcher, and placing the cooking grids. Tools required are usually a screwdriver and wrench (not included).
4. Ntọala na ojiji mbụ
4.1 Nhicha mbụ
Before first use, wash the cooking grid with warm, soapy water. Rinse thoroughly and dry. This removes any manufacturing residues.
4.2 Seasoning the Grill (Optional but Recommended)
To enhance non-stick properties and protect the cooking grid, lightly coat it with high-heat cooking oil (e.g., vegetable oil) and heat the grill for 15-20 minutes at medium heat. Allow to cool before cooking.
5. Ntuziaka ọrụ
5.1 Lighting the Charcoal
- Open all air vents (top and bottom) to ensure maximum airflow.
- Place charcoal briquettes or lump charcoal on the charcoal grate at the bottom of the kettle. Arrange them in a pyramid shape.
- Use a charcoal chimney starter or solid fire starters to ignite the charcoal. Do not use lighter fluid.
- Once the charcoal is covered in a light gray ash (approximately 15-20 minutes), spread the charcoal evenly or arrange for direct/indirect cooking.
- Place the cooking grid back onto the grill.
5.2 Njikwa okpomọkụ
The grill's temperature is primarily controlled by adjusting the air vents:
- Increase Heat: Open the top and bottom air vents wider to allow more oxygen flow to the charcoal.
- Decrease Heat: Close the top and bottom air vents partially to restrict oxygen flow.
- The ACCU-PROBE Temperature Gauge on the lid provides an accurate reading of the internal grill temperature.
5.3 Isi nri
Place food on the chrome-plated steel cooking grid. Use the hinged sections of the cooking grid to add more charcoal or wood chips during cooking without removing the entire grate.

Figure 2: Grill with Lid Open. This image shows the interior of the kettle grill, featuring the chrome-plated steel cooking grid and the charcoal grate below. The hinged design of the cooking grid is visible.
6. Nlekọta na nlekọta
6.1 ihicha mgbe ojiji ọ bụla
- Cooking Grid: After cooking, while the grill is still warm, use a grill brush to scrape off any food residue from the cooking grid.
- Mkpofu ntụ: Once the grill and charcoal are completely cool, remove the removable heavy steel ash catcher and dispose of the ashes safely. Ensure no hot embers remain.
- Ime: Periodically brush out any accumulated ash or debris from the kettle bowl.
6.2 Nhicha izugbe
- Jiri mgbasa ozi hichapụ elu elu mpụtaamp akwa na ncha dị nro. Zere ndị na-ehicha ihe na-ekpo ọkụ.
- Clean the ACCU-PROBE Temperature Gauge with a soft cloth.
- Hụ na oghere ikuku niile dị ọcha nke na-enweghị ihe mgbochi ọ bụla.
6.3 Nchekwa
Store the grill in a dry, protected area when not in use. Using a grill cover is recommended to protect it from weather elements and extend its lifespan.
7. Nchọpụta nsogbu
| Nsogbu | Ihe nwere ike ime | Ngwọta |
|---|---|---|
| Charcoal not lighting or staying lit | Insufficient airflow; damp charcoal; improper lighting method. | Ensure all air vents are fully open. Use dry charcoal. Use a charcoal chimney starter. |
| Okpomọkụ dị oke ala | Air vents closed too much; not enough charcoal; charcoal not fully lit. | Open air vents wider. Add more charcoal. Allow charcoal to ash over completely before cooking. |
| Okpomọkụ dị oke elu | Air vents open too wide; too much charcoal. | Partially close air vents. Reduce the amount of charcoal for future cooks. |
| Food sticking to cooking grid | Grid not seasoned; grid not clean; insufficient oil on food/grid. | Season the grid. Clean the grid thoroughly before use. Lightly oil the grid or food before placing on grill. |
8. Nkọwapụta
| Njirimara | Nkọwa |
|---|---|
| Aha Nlereanya | COS1902473 |
| Ụdị | Char-Broil (Manufactured by Napoleon) |
| Akụkụ ngwaahịa (D x W x H) | 22.05" x 22.44" x 6.5" (Note: The 6.5" height likely refers to kettle depth or package height, not overall assembled height.) |
| Ụdị mmanụ ụgbọala | Unyi |
| Ihe onwunwe | Stainless Steel (Special Feature, Handle, Frame) |
| Isi nri Grid | Chrome Plated Steel, Hinged |
| Ash Catcher | Removable Heavy Steel |
| Nlele okpomọkụ | ACCU-PROBE |
| Mgbakọ chọrọ | Ee |
| Ibu Ibu | 48.8 pound |
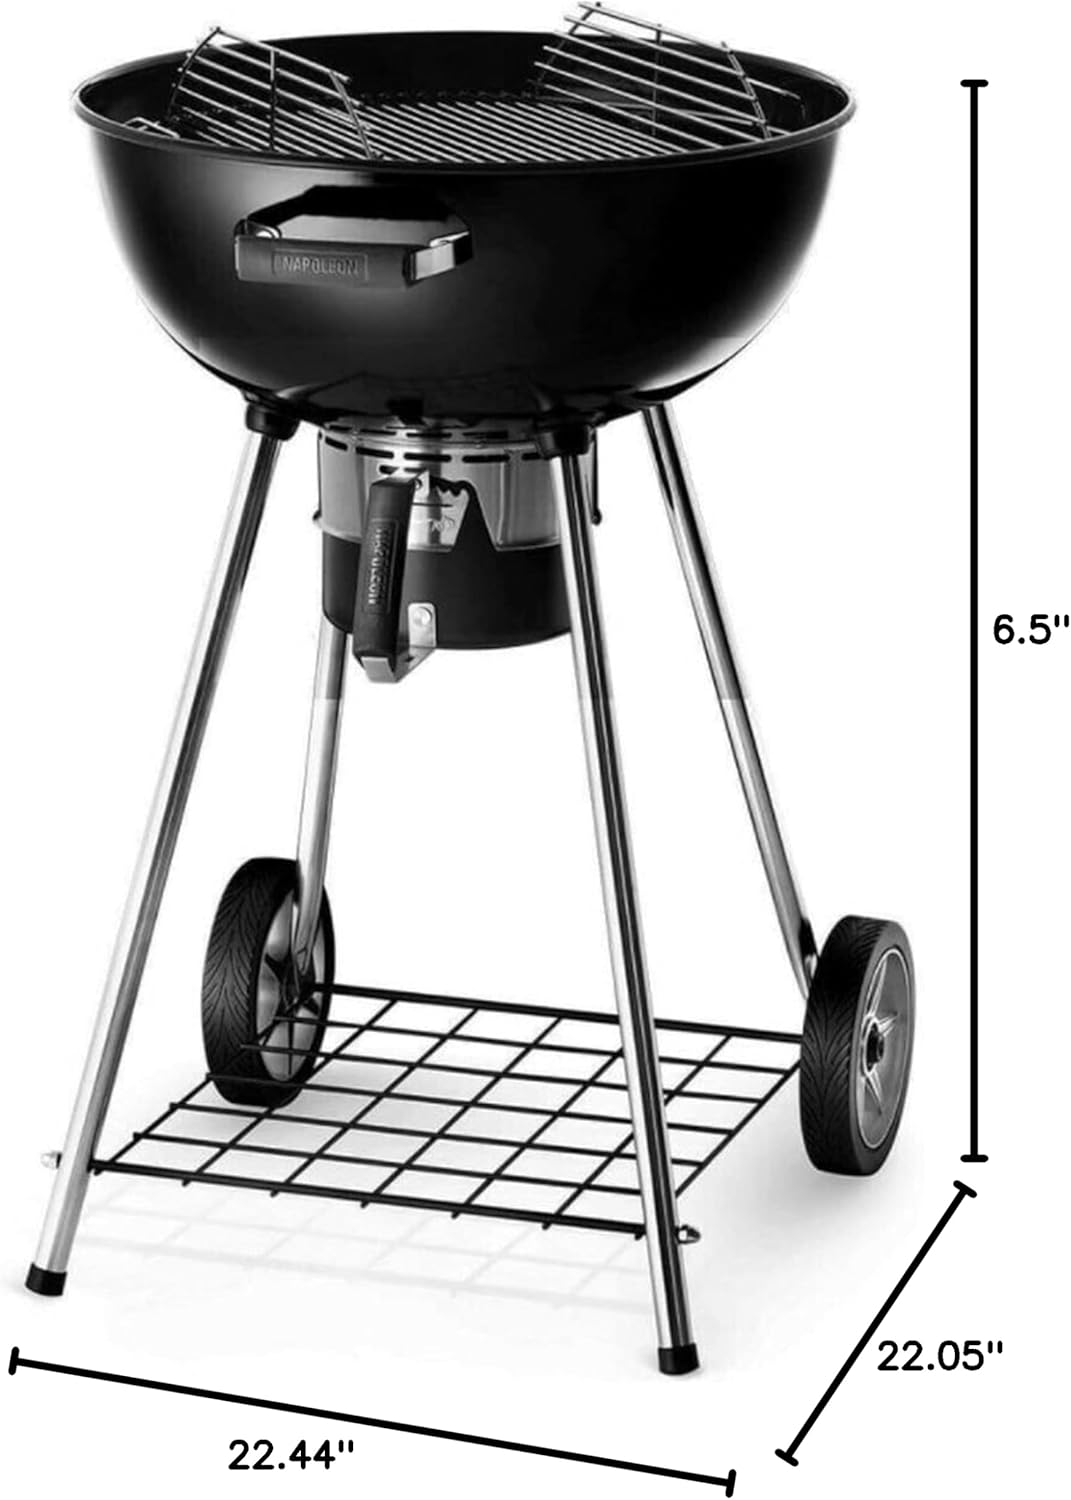
Figure 3: Product Dimensions. This image illustrates the key dimensions of the grill, including its width and depth. Note that the listed height of 6.5" likely refers to the kettle depth, not the overall assembled height.
9. Akwụkwọ ikike na nkwado
This product comes with a manufacturer's warranty. Please refer to the warranty card included in your product packaging for specific terms, conditions, and duration. For technical support, replacement parts, or warranty claims, please contact the manufacturer directly.
Onye nrụpụta: Napoleon
For further assistance, visit the official Char-Broil website or contact their customer service department. (Note: While the product title mentions Napoleon, the brand is listed as Char-Broil in specifications. Please refer to your product packaging for the most accurate support contact information.)


