1. Okwu mmalite
This manual provides comprehensive instructions for the installation, operation, and maintenance of your CALEX Smart Mini Indoor IP Camera. Please read this manual thoroughly before using the product to ensure proper functionality and safety.
The CALEX Smart Mini Indoor IP Camera is a Wi-Fi surveillance camera offering 1080P Full HD resolution, night vision capabilities, two-way audio communication, and flexible storage options via MicroSD card or cloud.
2. Ihe ngwugwu
Chọpụta na ihe niile dị na ngwugwu:
- 1 x CALEX Smart Mini Indoor IP Camera
- 1 x Power Adapter (AC 220-240 V, 50/60 Hz input; DC 5 V output)
- 1 x eriri USB
- Akwụkwọ ntuziaka onye ọrụ 1 x (akwụkwọ a)
- Mounting accessories (if applicable, not explicitly listed but common for cameras)

Figure 2.1: CALEX Smart Mini Indoor IP Camera and its retail packaging. The packaging highlights 1080P Full HD, Wi-Fi 2.4 GHz, and compatibility with the Calex Smart app.
3. Ngwaahịa gafereview
Familiarize yourself with the components of your CALEX Smart Mini Indoor IP Camera.
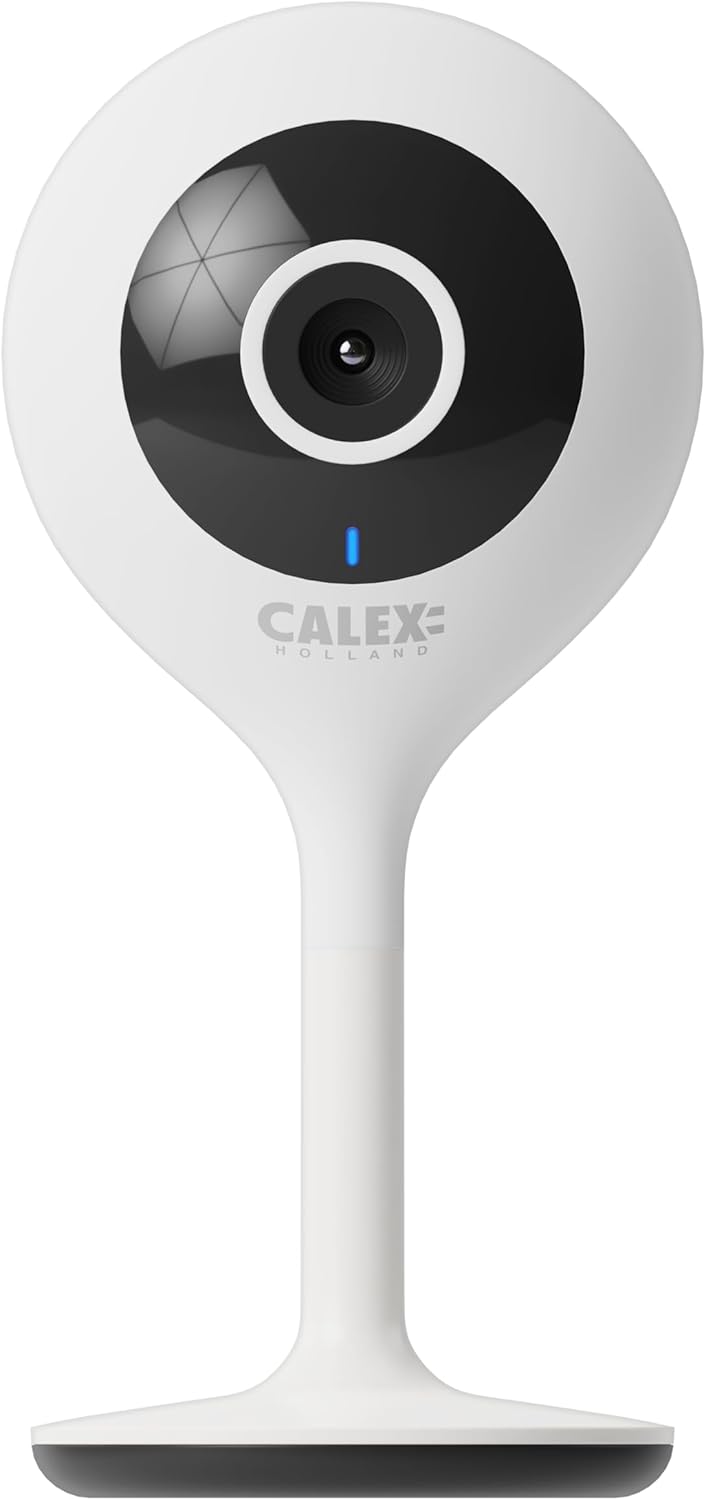
Foto 3.1: N'ihu view of the CALEX Smart Mini Indoor IP Camera. It features a central lens, an indicator light, and the CALEX HOLLAND logo.

Ọgụgụ 3.2: N'azụ view of the CALEX Smart Mini Indoor IP Camera. This view shows the speaker grille, a reset button, and the MicroSD card slot. The USB power input is located at the base.
Akụkụ ndị bụ isi:
- Mkpebi 1080P HD zuru ezu: Na-enye foo vidiyo doro anya na zuru ezutage.
- Ọhụụ abalị: Equipped with infrared LEDs for clear monitoring in low-light or dark conditions.
- Audio Ụzọ Abụọ: Igwe okwu arụnyere na igwe okwu maka nzikọrịta ozi.
- Njikọ Wi-Fi: Connects to your home Wi-Fi network (2.4 GHz only).
- Nchekwa mpaghara: Supports MicroSD card for continuous recording or event-triggered recording.
- Nchekwa igwe ojii: Optional cloud storage service for secure off-site recording.
- Nchọpụta ngagharị: Alerts and records upon detecting movement.
- Njikwa ngwa mkpanaaka: Jikwaa na view live feed via the Calex Smart app.
- Ndakọrịta ihe enyemaka olu: Works with Amazon Alexa and Google Home.
4. Ntọala na nwụnye
4.1 Tupu ịmalite
- Hụ na netwọk Wi-Fi gị dị 2.4 GHz. Igwefoto anaghị akwado Wi-Fi 5 GHz.
- Debe aha netwọk Wi-Fi gị (SSID) na paswọọdụ dị njikere.
- Download the "Calex Smart" app from your mobile device's app store.
- Place the camera within range of your Wi-Fi router.

Figure 4.1: QR codes for downloading the Calex Smart app. Scan the appropriate QR code for your device (iOS or Android) to download the application.
Download the Calex Smart app here: Ụlọ ahịa ngwa iOS | Ụlọ ahịa Google Play
4.2 Nzọụkwụ mbido mbụ
- Ike Na: Connect the camera to a power outlet using the provided USB cable and power adapter. The camera's indicator light will begin to flash, indicating it is ready for pairing.
- Open Calex Smart App: Launch the Calex Smart app on your smartphone. If you are a new user, register an account. If you already have an account, log in.
- Tinye ngwaọrụ: Tap the "+" icon in the top right corner of the app to add a new device. Select "Security & Video Surveillance" and then "Smart Camera".
- Kwenye ọnọdụ egosi: Follow the in-app instructions. Confirm that the indicator light on your camera is flashing rapidly.
- Tinye nkọwa Wi-Fi: Tinye aha na paswọọdụ netwọk Wi-Fi 2.4 GHz gị mgbe a gwara gị.
- Nyochaa koodu QR: The app will generate a QR code. Hold your phone with the QR code approximately 15-20 cm (6-8 inches) in front of the camera lens. The camera will emit a sound when it successfully scans the QR code.
- Njikọ: Tap "I heard a prompt" in the app. The camera will then attempt to connect to your Wi-Fi network. Once connected, the indicator light will turn solid blue.
- Ngwaọrụ aha: Once connected, you can name your camera (e.g., "Living Room Camera", "Nursery Camera").


Ọgụgụ 4.2: Ọpụamples of the Calex Smart app interface. The left image shows a live camera feed with options for screenshot, speaking, and recording. The right image shows a settings screen within the app.
5. Ịrụ ọrụ igwefoto gị
5.1 Ndụ View
Open the Calex Smart app and select your camera from the device list to access the live video feed. You can view the feed in portrait or landscape mode.

Figure 5.1: A user viewing the live feed from the CALEX Smart Mini Indoor IP Camera on their smartphone.
5.2 Audio ụzọ abụọ
Mgbe na ndụ view, kpatụ akara igwe okwu iji kwuo okwu site na igwe okwu. Kpatụ akara okwu ka ị gee ọdịyo sitere na igwe okwu igwefoto.
5.3 Ndekọ na ịkpọghachi
- Ndekọ akwụkwọ ntuziaka: Tap the "Record" button in the live view interface to start or stop manual recording. Recordings are saved to your phone's gallery.
- nseta ihuenyo: Tap the "Screenshot" button to capture a still image from the live feed.
- MicroSD Card Recording: Insert a MicroSD card (up to 128GB, not included) into the camera's slot for continuous or event-triggered recording. Ensure the card is formatted within the app settings.
- Nchekwa igwe ojii: Subscribe to the cloud storage service via the app for secure, off-site storage of event recordings.
- Nkpọghachi: Nweta ndekọ footage from the "Playback" section within the camera's settings in the app.

Figure 5.2: The Calex Smart app interface displaying options for cloud storage and video playback. This allows users to review ihe ndị e dekọrọ.
5.4 Nchọpụta na Ịdọ Aka Ná Ntị
Configure motion detection sensitivity and alert settings in the app. You will receive push notifications on your smartphone when motion is detected.
5.5 Njikwa olu (Alexa/Google Home)
To integrate your camera with Amazon Alexa or Google Home, follow the instructions in the respective voice assistant app to enable the "Calex Smart" skill/action. You can then use voice commands to view the camera feed on compatible smart displays.

Figure 5.3: A couple using voice commands with an Amazon Echo device, demonstrating the camera's compatibility with smart home ecosystems like Alexa and Google Home.
6. Nlekọta
- Nhicha: Use a soft, dry cloth to clean the camera lens and body. Do not use liquid cleaners or aerosols.
- Mmelite femụwe: Periodically check the Calex Smart app for available firmware updates for your camera. Keeping the firmware updated ensures optimal performance and security.
- Ịtọgharịa igwefoto: If you experience connectivity issues or need to reconfigure the camera, locate the reset button on the back of the device (refer to Figure 3.2). Use a pin or a straightened paperclip to press and hold the reset button for approximately 5-10 seconds until the indicator light flashes rapidly. This will restore the camera to factory settings.
7. Nchọpụta nsogbu
| Nsogbu | Ihe nwere ike ime | Ngwọta |
|---|---|---|
| Igwefoto anaghị ejikọ na Wi-Fi. | Incorrect Wi-Fi password; 5 GHz Wi-Fi network; camera too far from router; Wi-Fi signal interference. |
|
| Enweghị vidiyo dị ndụ. | Camera offline; poor internet connection; app issue. |
|
| Amataghị kaadị MicroSD. | Card not inserted correctly; card corrupted; unsupported card size/format. |
|
| Audio ụzọ abụọ anaghị arụ ọrụ. | Microphone/speaker muted in app; low volume; app permissions. |
|
8. Nkọwapụta
| Njirimara | Nkọwa |
|---|---|
| Aha Nlereanya | Nchekwa Smart |
| Nọmba nlereanya | 5501000300 |
| Mkpebi | 1080p zuru oke |
| Njikọta | Wi-Fi (naanị 2.4 GHz) |
| Ntinye ike | AC 220-240 Volts, 50/60 Hz |
| Mbupute ike (ihe nkwụnye) | DC 5 volts |
| Oriri ike | 5 Watt |
| Akụkụ (L x W x H) | 3.2 x 5.3 x 11 cm (1.26 x 2.09 x 4.33 inch) |
| Ibu | 167 grams (0.37 lbs) |
| Ihe onwunwe | Plastic |
| Agba | Ọcha |
| Nhọrọ nchekwa | MicroSD (up to 128GB), Cloud Storage |
| Atụmatụ pụrụ iche | Night Vision, Two-Way Audio, Motion Detection, Compatible with Alexa/Google Home |
| Ojiji gburugburu | Ime ụlọ |
9. Akwụkwọ ikike na nkwado
CALEX products are designed and manufactured to the highest quality standards. For warranty information and technical support, please refer to the official CALEX websaịtị ma ọ bụ kpọtụrụ ndị ahịa ha ozugbo.
Onye nrụpụta: CALEX
Maka enyemaka ọzọ, gaa na CALEX Official Websaịtị.
10. Ozi nchekwa
- Do not expose the camera to water or moisture. This product is designed for indoor use only.
- Anwala ịkwasa ma ọ bụ rụkwaa igwefoto n'onwe gị. Kpọtụrụ ndị ọrụ ruru eru ọrụ niile.
- Use only the provided power adapter and cable to prevent damage or fire.
- Debe igwefoto ahụ ka ọ ghara ịta ìhè anyanwụ kpọmkwem, ebe okpomọkụ na-esi apụta, na ebe magnet siri ike.
- Ensure the camera is placed on a stable surface to prevent it from falling.