1. Okwu mmalite
Daalụ maka ịzụrụasing the PRIMO PR501SV Cordless 3-in-1 Stick Vacuum Cleaner. This manual provides essential information for the safe and efficient use, maintenance, and troubleshooting of your appliance. Please read it thoroughly before first use and keep it for future reference.
2. Ntuziaka nchekwa
Iji belata ihe egwu nke ọkụ, ujo eletrik, ma ọ bụ mmerụ ahụ, na-agbaso usoro nchekwa nchekwa mgbe niile mgbe ị na-eji ngwa eletriki.
- Gụọ ntuziaka niile tupu i jiri ngwa.
- Ejila n'èzí ma ọ bụ n'elu mmiri.
- Ekwela ka eji mee ihe egwuregwu ụmụaka. Nlebara anya dị mkpa mgbe ụmụaka na-eji ma ọ bụ nso.
- Jiri naanị dị ka akọwara n'akwụkwọ ntuziaka a. Jiri naanị mgbakwunye atụnyere ndị nrụpụta.
- Ejila eriri ma ọ bụ plọg mebiri emebi. Ọ bụrụ na ngwa anaghị arụ ọrụ ka o kwesịrị, atụbagoro, mebie, hapụ ya n'èzí, ma ọ bụ tụba ya na mmiri, weghachite ya na ebe ọrụ.
- Anaghachila ma ọ bụ were ụdọ buru, jiri eriri dị ka aka, mechie ọnụ ụzọ na eriri, ma ọ bụ dọpụta eriri n'akụkụ ọnụ ma ọ bụ nkuku dị nkọ. Ejila ngwa n'elu eriri. Debe eriri n'ebe dị ọkụ.
- Akwụpụla eriri site na ịdọrọ eriri. Iji kwụpụ, jide plọg, ọ bụghị eriri.
- Ejila aka mmiri were jide plọg ma ọ bụ ngwa.
- Etinyela ihe ọ bụla n'ime oghere. Ejila oghere ọ bụla akpọchiri; na-ezere uzuzu, lint, ntutu na ihe ọ bụla nwere ike ibelata ikuku.
- Debe ntutu isi, uwe na-adịghị mma, mkpịsị aka na akụkụ ahụ niile pụọ na oghere na akụkụ ndị na-akpụ akpụ.
- Ewelitela ihe ọ bụla na-ere ọkụ ma ọ bụ ise siga, dị ka sịga, ọkụ, ma ọ bụ ntụ na-ekpo ọkụ.
- Ejila eburu mmiri ọkụ na-ere ọkụ ma ọ bụ ọkụ ọkụ, dị ka mmanụ ụgbọala, ma ọ bụ jiri n'ebe ha nwere ike ịnọ.
- Ebutela ihe na-egbu egbu (dịka ọmụmaatụ, chlorine bleach, ammonia cleaner, drain cleaner).
- Ejikwala iko uzuzu na/ma ọ bụ nzacha n'ebe.
- Gbanyụọ njikwa niile tupu ịtọpụ ya.
- Jiri nlezianya mee ihe mgbe ị na-ehicha ihe na steepụ.
- Ejila ya eburu ihe siri ike ma ọ bụ dị nkọ dịka iko, mbọ, skru, mkpụrụ ego, wdg.
- Gbochie ịmalite n'amaghị ama. Gbaa mbọ hụ na ngbanwe ahụ nọ n'ọnọdụ agbanyụrụ tupu jikọọ na ngwugwu batrị, bulie ma ọ bụ iburu ngwa ahụ.
- Fanye naanị na chaja nke onye nrụpụta kwuru. Chaja dabara maka otu ụdị ngwugwu batrị nwere ike ịmepụta ihe egwu ọkụ mgbe ejiri ya na ngwugwu batrị ọzọ.
- N'okpuru ọnọdụ mkparị, enwere ike ịpụpụ mmiri mmiri na batrị; zere kọntaktị. Ọ bụrụ na kọntaktị emee na mberede, sachaa na mmiri. Ọ bụrụ na mmiri mmiri na-akpakọrịta anya, chọọkwa enyemaka ahụike. Mmiri a na-achụpụ na batrị nwere ike ịkpata iwe ma ọ bụ ọkụ.
3. Ihe ngwugwu
Carefully unpack your PRIMO PR501SV and ensure all components are present and in good condition. Refer to the image below for identification.

Onyonyo 3.1: Akụrụngwa gụnyere
This image displays the main components of the PRIMO PR501SV vacuum cleaner: the motor unit with integrated dust reservoir, the long lightweight metallic tube, the motorized floor brush, a crevice tool for narrow spaces, a dusting brush for delicate surfaces, the power adapter for charging, and a wall mount for convenient storage.
- Motor Unit with Dust Reservoir (0.6 L capacity)
- Lightweight Metallic Tube
- Nchacha ala
- Ngwá Ọrụ Crevice
- Ahịhịa uzuzu
- Ihe nkwụnye ọkụ
- Wall Mount with Screws
4. Ngwaahịa gafereview
The PRIMO PR501SV is a versatile 3-in-1 cordless vacuum cleaner designed for various cleaning tasks. It can be configured as a stick vacuum, a handheld vacuum, or a crumb collector.

Figure 4.1: 3-in-1 Configurations
This image illustrates the three primary modes of the PR501SV: as a complete stick vacuum for floor cleaning, as a handheld unit equipped with the crevice tool for tight spots, and as a handheld unit with the dusting brush for upholstery or delicate surfaces. The wall mount is also visible, indicating a storage solution.
5. Ntọala na Mgbakọ
Soro usoro ndị a iji chịkọta vacuum Cleaner gị:
- Assemble the Stick Vacuum: Insert the metallic tube into the main motor unit until it clicks into place. Then, attach the motorized floor brush to the other end of the metallic tube, ensuring it is securely fastened.
- Handheld Configuration: To use as a handheld vacuum, detach the metallic tube and motorized floor brush from the motor unit. Attach either the crevice tool or the dusting brush directly to the motor unit's suction opening.
- Nwụnye mgbidi: Choose a suitable location near a power outlet. Use the provided screws to securely attach the wall mount to the wall. Ensure it is at a height that allows the vacuum to hang freely.

Figure 5.1: Wall Mount Storage
This image shows a user placing the assembled stick vacuum onto the wall mount, demonstrating how the appliance can be conveniently stored and charged when not in use.
6. Ịchaji batrị
The PRIMO PR501SV is powered by an 18.5V Lithium-ion battery. Before first use, fully charge the battery.
- Connect the power adapter to the charging port on the motor unit.
- Wunye nkwụnye ahụ na ntanetị.
- The battery indicator lights will illuminate during charging. A full charge typically takes 4-5 hours.
- Once fully charged, the indicator lights will show a full battery level. Disconnect the charger.

Figure 6.1: Battery Indicator and Runtime
This close-up image displays the battery charge indicator on the vacuum cleaner. It shows two modes: 'MAX-R' (Max Power) offering approximately 20 minutes of runtime, and 'ECO-G' (Eco Mode) providing around 40 minutes of runtime, indicating the battery's endurance based on the selected power setting.
7. Ntuziaka ọrụ
Your vacuum cleaner offers two speed settings and multiple configurations for versatile cleaning.
7.1. Power On/Off and Speed Settings
- Press the power button once to turn on the vacuum in ECO mode.
- Press the power button a second time to switch to MAX power mode.
- Pịa bọtịnụ ike ugboro atọ ka gbanyụọ oghere ahụ.
7.2. Stick Vacuum Mode
Use this mode for cleaning floors, carpets, and larger areas.
- Ensure the metallic tube and motorized floor brush are securely attached to the motor unit.
- Select the desired power mode (ECO or MAX).
- Guide the vacuum over the surface to be cleaned. The motorized brush helps agitate dirt for effective cleaning.

Figure 7.1: Agile and Flexible Cleaning
This image highlights the vacuum's maneuverability, showing it easily reaching under furniture like a sofa. The design allows for a 180-degree swivel, making it agile and flexible for cleaning hard-to-reach areas.
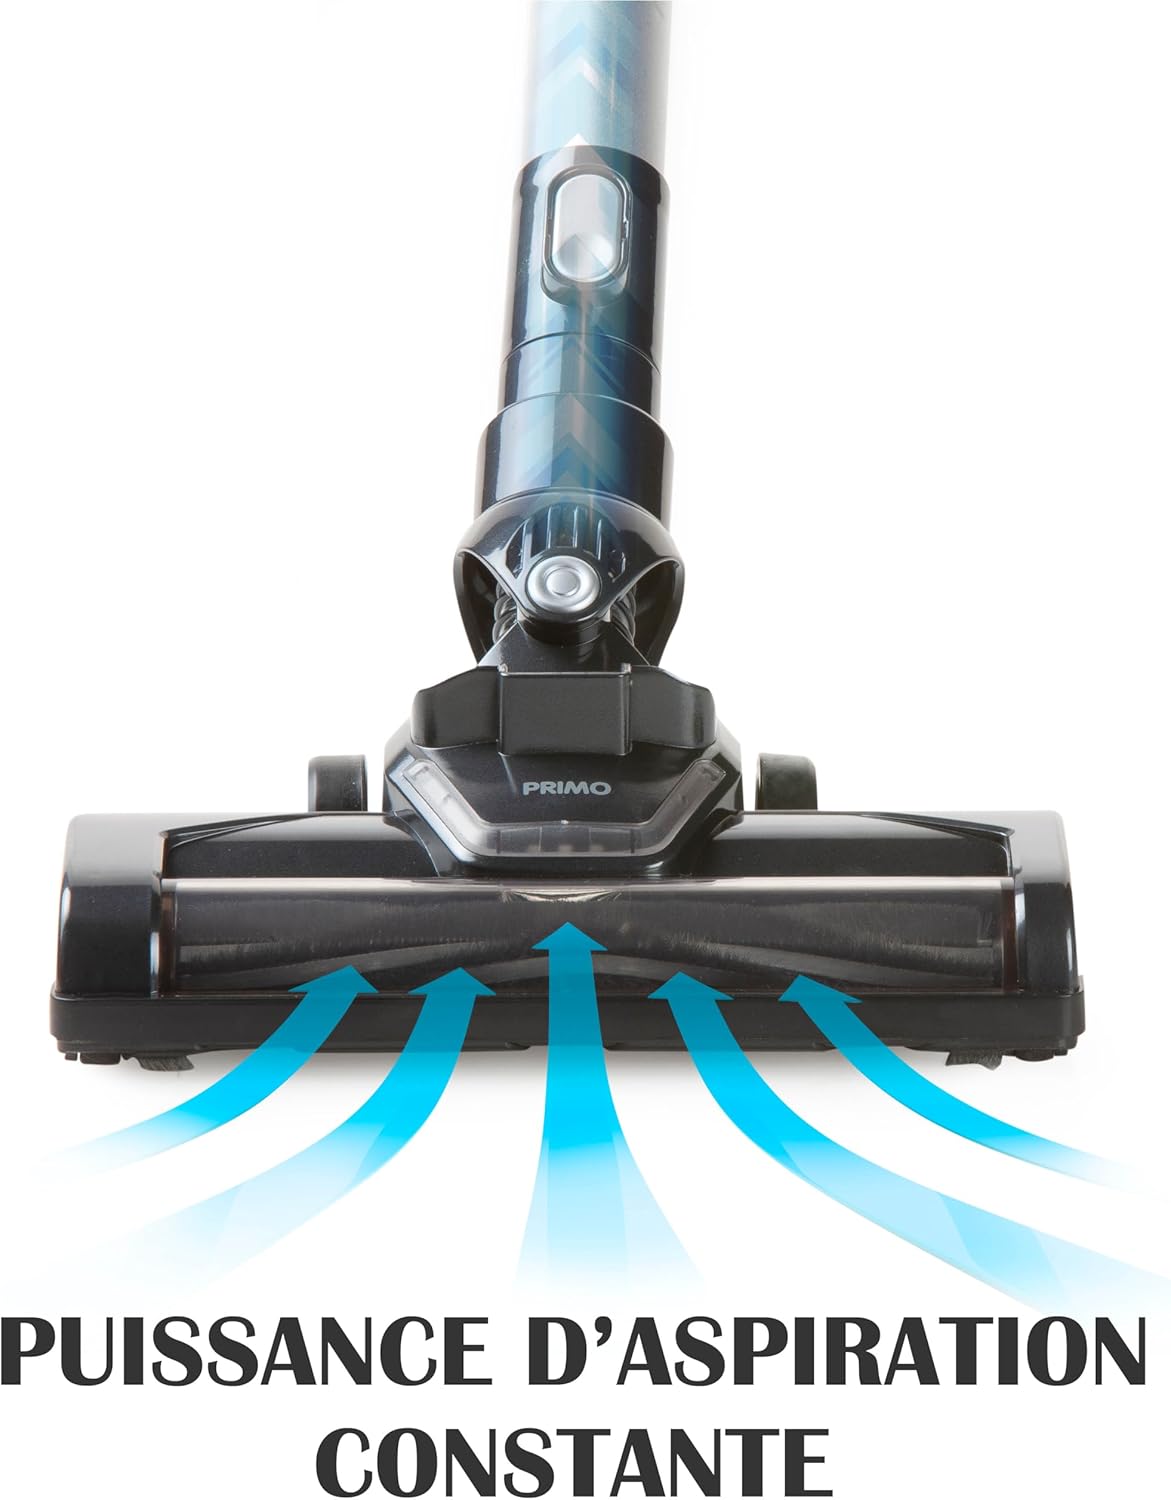
Figure 7.2: Constant Suction Power
This graphic illustrates the consistent and powerful suction generated by the vacuum's floor brush. Blue arrows depict the airflow, demonstrating how dirt and debris are effectively drawn into the vacuum head for thorough cleaning.
7.3. Handheld Vacuum Mode
Ideal for cleaning upholstery, car interiors, stairs, and small spills.
- Detach the metallic tube and motorized floor brush from the motor unit.
- Attach the crevice tool for narrow gaps or the dusting brush for surfaces like curtains or keyboards.
- Turn on the vacuum and clean the desired area.

Figure 7.3: Handheld Cleaning on Upholstery
This image shows the PRIMO PR501SV being used as a handheld vacuum to clean a sofa. It highlights the convenience and effectiveness of this mode for cleaning furniture and other elevated surfaces.
8. Nlekọta
Nlekọta anya mgbe niile na-eme ka arụ ọrụ kacha mma ma gbasaa ogologo ndụ nke ihe nhicha agụụ gị.
8.1. Ịwụpụ ihe dị n'ime oghere uzuzu
Empty the 0.6 L dust reservoir regularly, especially when it reaches the 'MAX' line.
- Hụ na agbanyụrụ igwe nhicha ahụ.
- Press the release button on the dust reservoir to detach it from the motor unit.
- Hold the dust reservoir over a trash bin and open the bottom flap to empty the contents.
- Close the flap and reattach the dust reservoir to the motor unit until it clicks securely.

Figure 8.1: Easy Dust Reservoir Emptying
This image illustrates the simple process of detaching the 0.6-liter dust reservoir from the main unit for emptying. The design allows for quick and hygienic disposal of collected debris.
8.2. Cleaning the HEPA Filter
The HEPA 13 filter retains 99.95% of dust particles. Clean it regularly to maintain suction power.
- Remove the dust reservoir as described above.
- Carefully remove the HEPA filter from inside the dust reservoir.
- Pịa nzacha ahụ nwayọ n'elu ihe mkpofu iji wepụ uzuzu na-adịghị mma.
- If heavily soiled, rinse the filter under running water. Ensure it is completely dry before reinserting. Do not use detergents or hot water.
- Reinsert the dry HEPA filter into the dust reservoir and reattach the reservoir to the motor unit.
8.3. Cleaning the Motorized Floor Brush
Hair and debris can get tangled in the brush roll, affecting performance.
- Ensure the vacuum is turned off and disconnected from the metallic tube.
- Locate the release mechanism on the side of the motorized brush head.
- Remove the brush roll from the housing.
- Use scissors or a brush to remove any tangled hair or debris from the brush roll.
- Reinsert the clean brush roll and secure it in place.
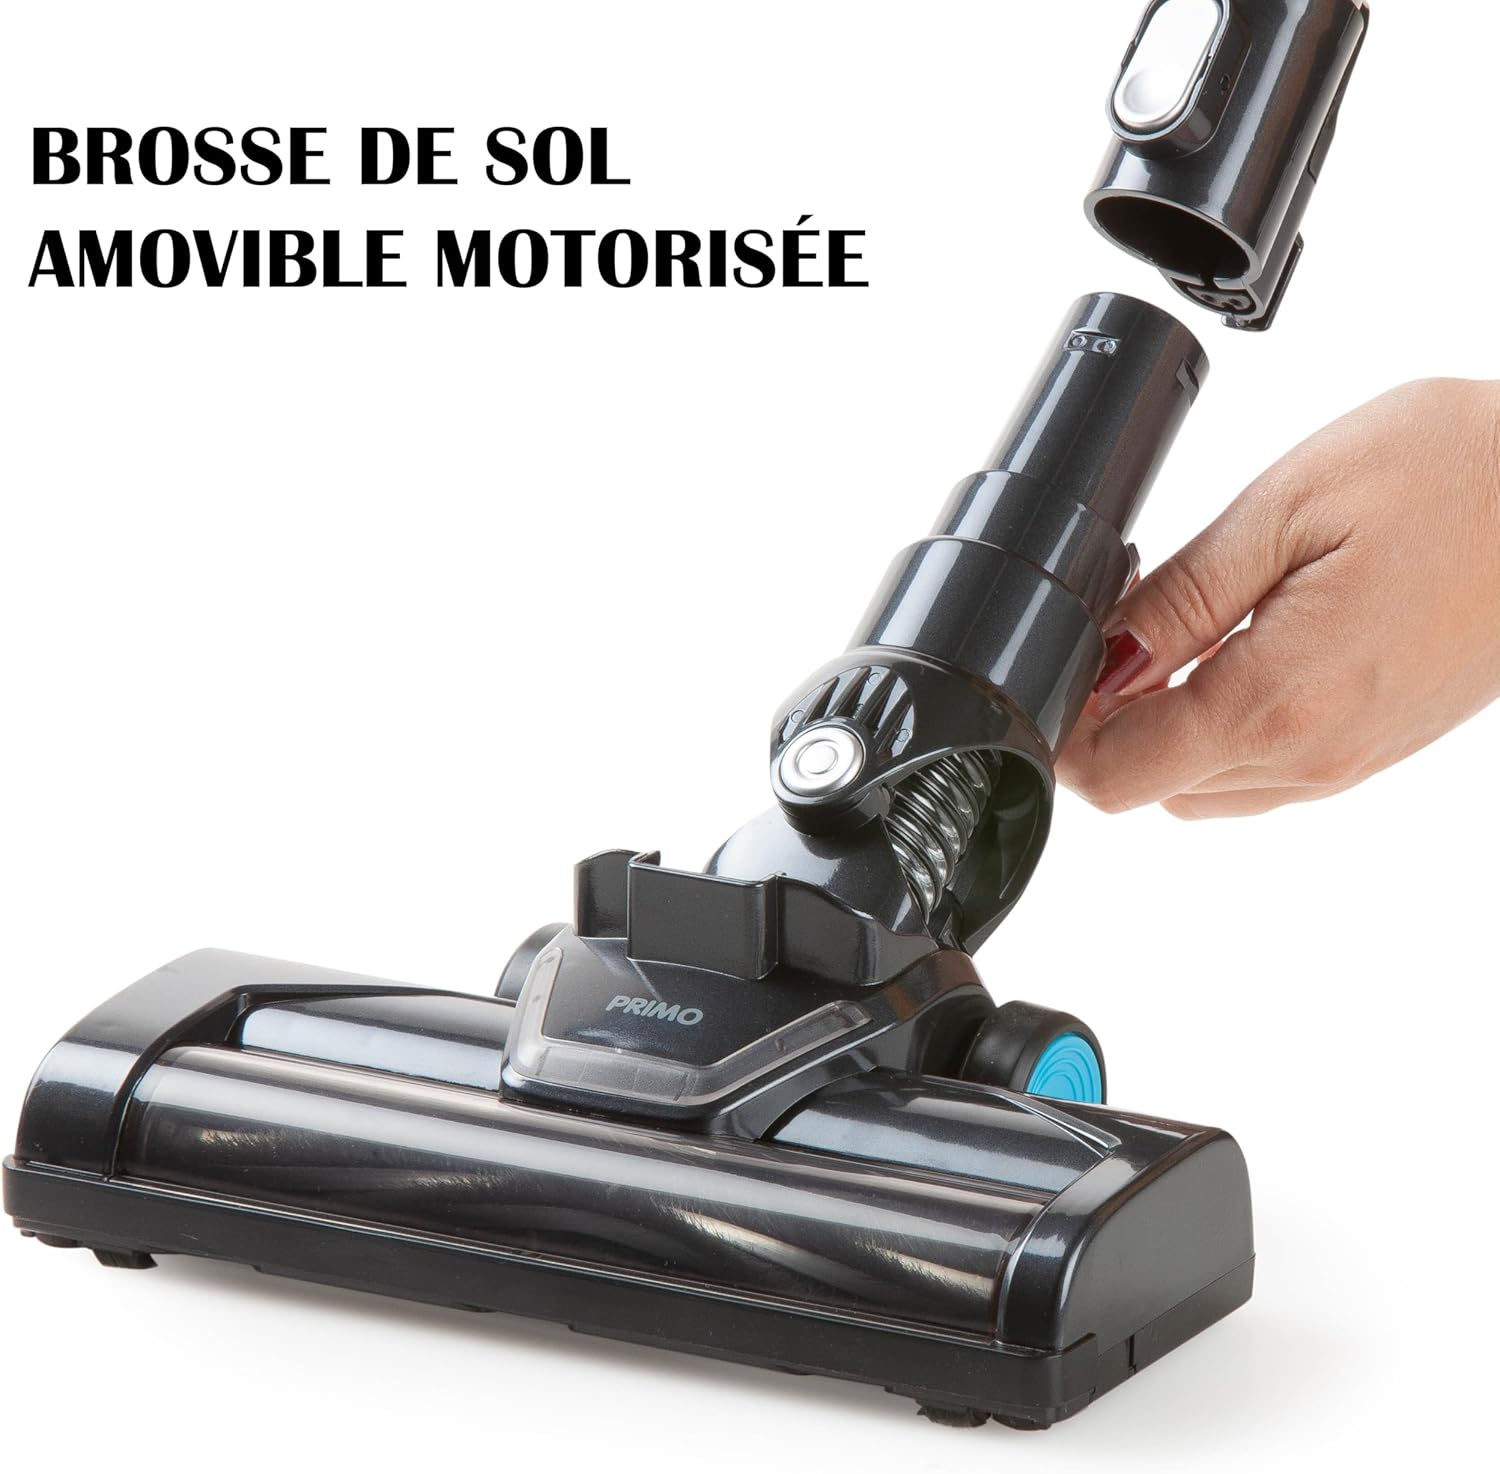
Figure 8.2: Removable Motorized Floor Brush
This image shows the motorized floor brush being detached from the vacuum's main body. This feature allows for easy access to the brush roll for cleaning tangled hair and debris, ensuring consistent performance.
9. Nchọpụta nsogbu
If you encounter issues with your PRIMO PR501SV, refer to the following common problems and solutions:
| Nsogbu | Ihe nwere ike ime | Ngwọta |
|---|---|---|
| Vacuum anaghị agbanye | Agbanyụrụ batrị Apịghị bọtịnụ ike nke ọma | Chajie batrị zuru oke Pịa bọtịnụ ike ike |
| Ike mmiri dị ala | Dust reservoir is full Akpọchiela nzacha Mpịakọta ahịhịa agbagọọla agbagọ Nozzle/tube is blocked | Empty the dust reservoir Hichaa ihe nzacha HEPA Clean the motorized brush roll Check and clear any blockages in the nozzle or tube |
| Motorized brush not rotating | Mpịakọta ahịhịa agbagọọla agbagọ Connection to main unit is loose | Hichaa mpịakọta ahịhịa Ensure the brush head is securely attached to the tube or motor unit |
| Oge ịgba ọsọ batrị dị mkpụmkpụ | Anaghị chajịa batrị Using MAX power mode continuously Mmebi batrị | Ensure battery is fully charged (4-5 hours) Use ECO mode for longer runtime Contact customer support if battery life significantly decreases over time |
Ọ bụrụ na nsogbu ahụ dịgidere mgbe ịnwale azịza ndị a, biko kpọtụrụ nkwado ndị ahịa.
10. Nkọwapụta
| Njirimara | Nkọwapụta |
|---|---|
| Nọmba nlereanya | PR501SV |
| Ụdị | PRIMO |
| Ụdị | Cordless 3-in-1 Stick Vacuum Cleaner |
| Batrị | 18.5V lithium-ion |
| Oge Nchaji | 4-5 awa |
| Runtime (ECO mode) | Ihe ruru. Nkeji 40 |
| Runtime (MAX power) | Ihe ruru. Nkeji 20 |
| Ike Nchekwa Uzuzu | 0.6 lita |
| Ụdị nzacha | HEPA 13 |
| Ọnụọgụ nke Ọsọ ọsọ | 2 |
| Ọkwa mkpọtụ | 75 dB |
| Ibu | 2 kilogram |
| Akụkụ (L x W x H) | 16 x 23 x 113 cm |
| Elu akwadoro | Ala siri ike |
| Ngwa gụnyere | Motor unit, metallic tube, motorized floor brush, crevice tool, dusting brush, power adapter, wall mount |
11. Akwụkwọ ikike na nkwado
For warranty information and customer support, please refer to the warranty card included with your purchase or visit the official PRIMO websaịtị. Debe ihe akaebe nke ịzụrụ ihe maka akwụkwọ ikike ọ bụla.


