1. Okwu mmalite
Thank you for choosing the FLYLINKTECH CK100 Portable Power Station. This manual provides essential information for the safe and efficient operation, maintenance, and troubleshooting of your device. Please read this manual thoroughly before use and retain it for future reference.
The CK100 is a versatile 300W portable power station with a 75000mAh (277.5Wh) lithium battery, designed to provide reliable power for various applications including camping, home backup, CPAP machines, and emergency situations. It features multiple output ports including AC, DC, and USB, along with an integrated LED flashlight.
2. Ngwaahịa gafereview na Atụmatụ
The FLYLINKTECH CK100 is engineered for portability and reliability, offering a range of features to meet your power needs.
2.1 Atụmatụ
- Batrị ike dị elu: 75000mAh / 277.5Wh lithium battery for extended power supply.
- Ọdụ ụgbọ mmiri mmepụta ọtụtụ: 2 AC outlets (110V, 300W pure sine wave, 350W peak), 1 DC output, and 4 USB ports (including 1 Quick Charge port).
- Igwe ọkụ ọkụ agbakọtara ọnụ: Multi-mode LED light for illumination in various situations.
- Kọmpat & Enwere ike ibugharị: Lightweight design (5.07 lbs / 2.3 kg) with a comfortable handle for easy transport.
- Atụmatụ nchekwa dị elu: Wuru n'ime voltage stabilizer, pure sine wave output, overcharge, undervoltage, ihe na-emebiga ihe ókè, na nchebe sekit dị mkpụmkpụ.
- Nchaji niile: Supports charging via wall charger, car charger, and solar panel (solar panel not included).
2.2 njirimara akụrụngwa

This image displays the overall design of the power station, highlighting its compact form factor and integrated handle for easy portability. The central display provides real-time information on battery status and output modes.
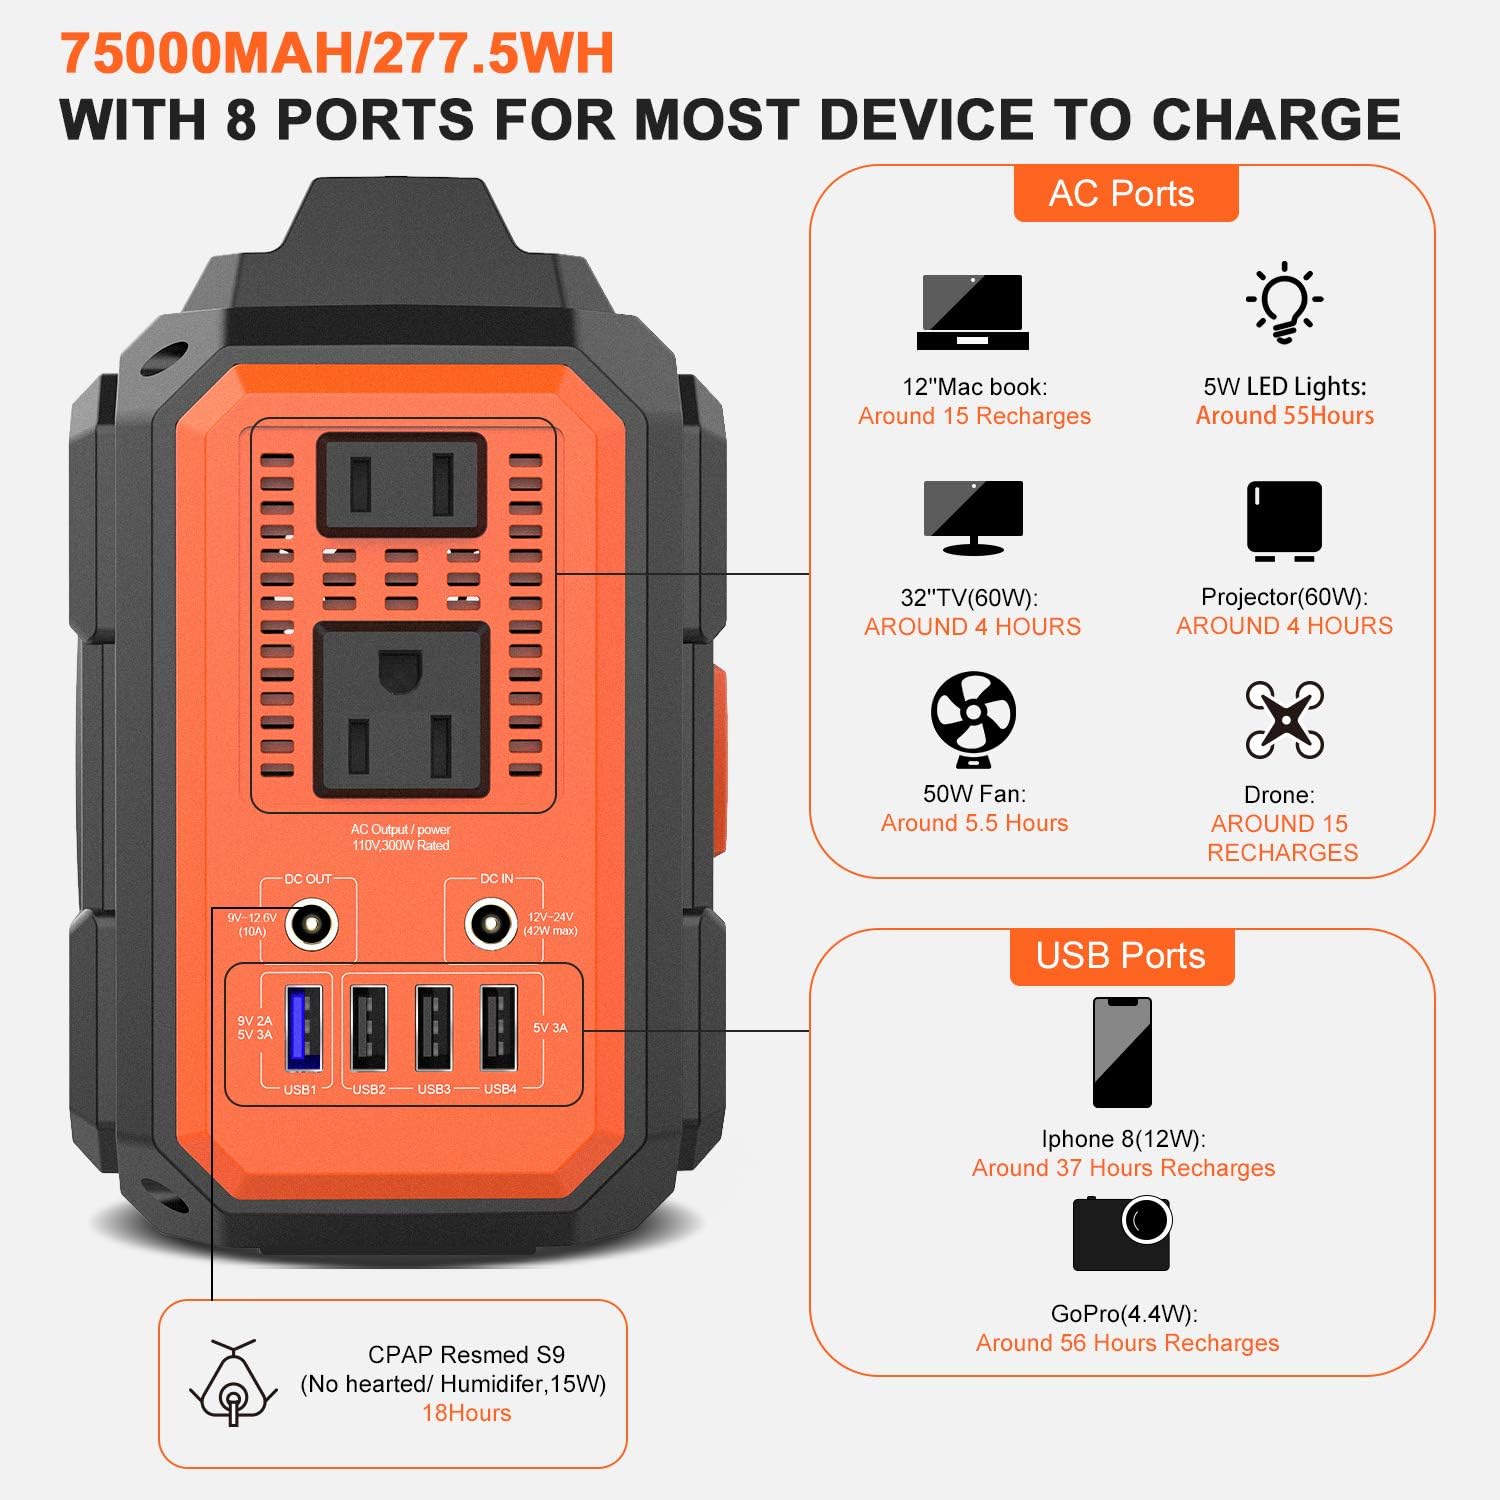
The side panel features two standard AC power outlets, a DC output port, and four USB output ports (including one blue USB1 port for quick charging). A DC input port is also visible for charging the unit.

This image shows the large circular LED light panel located on the back of the power station, which provides illumination for various outdoor or emergency scenarios.
3. Ntọlite na Nchaji mbụ
Before using your FLYLINKTECH CK100 Portable Power Station for the first time, it is recommended to fully charge the unit.
3.1 Unboxing na nyocha
Carefully remove all components from the packaging. Verify that all items listed in the "What's in the Box" section are present and undamaged. If any items are missing or damaged, please contact customer support.

The box includes the CK100 Power Station, a User Manual, 1 MC4 Cable, 1 Cigarette Lighter adapter, 1 Car Charger Cable, and 1 Home Charger.
3.2 Ụgwọ mbụ
For optimal performance, fully charge the power station using the provided AC wall charger before first use. Connect the AC charger to the DC IN port on the side of the unit and plug it into a standard wall outlet. The display will indicate charging status.
This video provides a visual guide on how to unbox the power station, identify its components, and initiate the first charge using the AC wall adapter. It shows the display indicating the charging progress.
4. Ntuziaka ọrụ
4.1 Gbanyụọ/ gbanyụọ
Pịa ma jide bọtịnụ ike (⏻) on the front panel for 3 seconds to turn the unit ON or OFF. The display will illuminate when the unit is active.
4.2 Using AC Outlets
To activate the AC outlets, first ensure the power station is ON. Then, press the "AC" button on the front panel. The AC indicator on the display will light up. Plug your 110V AC devices into the outlets. Remember that the total output should not exceed 300W (350W peak).
4.3 Using USB Ports
The USB ports are automatically active when the power station is ON. Simply plug your USB-powered devices into any of the four USB ports. USB1 (blue) supports Quick Charge (9V/2A, 5V/3A) for faster charging of compatible devices, while USB2, USB3, and USB4 provide 5V/3.1A output.
4.4 Using DC Output
The DC output port (9V-12.6V, 10A) is active when the power station is ON. Connect your 12V DC devices to this port. Ensure your device's voltage and current requirements are compatible with the output specifications.
4.5 LED Flashlight arụ ọrụ
The LED flashlight is located on the back of the unit. To turn it ON, locate the small switch on the light panel and slide it to the ON position. The light has multiple modes (e.g., steady, SOS, strobe) which can typically be cycled by pressing the switch repeatedly or holding it down, depending on the model variant.
This video illustrates how to activate and cycle through the different modes of the integrated LED flashlight, showcasing its brightness and utility in low-light conditions.
5. Ụzọ Nchaji
The CK100 offers flexible charging options to ensure you always have power when you need it.
5.1 Wall Charger (AC Adapter)
Use the included AC wall charger to charge the power station from a standard household outlet. A full charge typically takes about 7 hours.
5.2 Car chaja
The power station can be charged using the included car charger cable. Plug it into your vehicle's 12V cigarette lighter socket. A full charge via car charger takes approximately 10 hours. It is recommended to charge while the vehicle engine is running to avoid draining the car battery.
5.3 Solar Panel Charging (Optional)
The CK100 is compatible with solar charging panels (not included). Connect a compatible solar panel (12V-24V, 42W max) to the DC IN port using the provided MC4 cable. Charging time varies depending on weather conditions and solar panel efficiency, typically around 10 hours in optimal sunlight.

This image clearly illustrates the three primary methods for recharging the power station: using the car charger, the standard wall outlet charger, and an optional solar panel for eco-friendly charging.
6. Atụmatụ nchekwa na nchekwa
The FLYLINKTECH CK100 is equipped with a Smart Battery Management System (BMS) to ensure safe and reliable operation.
- Nchekwa oke ụgwọ: Prevents the battery from being overcharged, extending its lifespan.
- N'okpurutage Nchedo: Automatically shuts off output if battery voltage na-ada ada nke ukwuu, na-echebe batrị ahụ pụọ na mpụta miri emi.
- Nchekwa na-adị ugbu a: Safeguards against excessive current draw from output ports.
- Nchekwa sekit dị mkpụmkpụ: Automatically cuts off power in case of a short circuit to prevent damage.
- Nchekwa oke okpomọkụ: Monitors internal temperature and shuts down if it exceeds safe operating limits.
- Mpụta Sine Wave dị ọcha: Provides stable and clean power, suitable for sensitive electronics like CPAP machines.

This diagram visually represents the multiple layers of protection built into the power station, ensuring user safety and device longevity. These include protections against over-discharge, overcurrent, short circuits, and extreme temperatures.
7. Nka na ụzụ nkọwa
| Njirimara | Nkọwapụta |
|---|---|
| Ụdị | FLYLINKTECH |
| Aha Nlereanya | CK100 |
| Ụdị batrị | Lithium polymer |
| Ike | 75000mAh / 277.5Wh |
| Mmepụta AC | 110V, 300W (350W Peak), 60Hz Pure Sine Wave |
| USB mmepụta | USB1: 9V/2A, 5V/3A (Quick Charge); USB2/3/4: 5V/3.1A |
| Mmepụta DC | 9V-12.6V (10A) |
| DC Input (Charging) | 12V-24V (42W Max) |
| Akụkụ (L x W x H) | 8.7" x 4.7" x 6.3" (22 x 12 x 16 cm) |
| Ibu | 5.07 lbs (2.3 n'arọ) |
| Ngwa gụnyere | Charging Cable (AC Adapter, Car Charger, MC4 Cable) |
8. Mmezi na Nchekwa
- Debe ebe a na-ere ọkụ eletrik n'ebe dị jụụ ma kpọọ nkụ, ebe anwụ na-anaghị anwụ kpọmkwem na oke okpomọkụ dị oke njọ.
- Zere idobe ma ọ bụ idobe unit ahụ na mmetụta siri ike.
- Clean the exterior with a soft, dry cloth. Do not use abrasive cleaners or immerse the unit in water.
- For long-term storage, charge the unit to 50-80% every 3-6 months to maintain battery health.
- Hụ na ọdụ ụgbọ mmiri niile enweghị uzuzu na ihe mkpofu.
9. Nchọpụta nsogbu
9.1 Unit Not Turning On
- Ensure the power button is pressed and held for 3 seconds.
- Check battery level. If critically low, connect to a charger.
- Verify the charger is properly connected and receiving power if attempting to turn on while charging.
9.2 AC Output Not Working
- Ensure the "AC" button is pressed and the AC indicator is lit on the display.
- Check if the connected device's power consumption exceeds 300W. Reduce load if necessary.
- Verify the battery level is sufficient for AC output.
- If an error symbol appears, disconnect the device, restart the power station, and try again with a lower load.
9.3 Nchaji nwayọ
- Ensure you are using the original charger provided.
- For solar charging, ensure the solar panel is in direct sunlight and free from obstructions. Adjust angle for optimal exposure.
- Check ambient temperature. Extreme temperatures can affect charging efficiency.
10. Akwụkwọ ikike na nkwado
FLYLINKTECH provides a Akwụkwọ ikike nke ọnwa 24 for this product to ensure your satisfaction and peace of mind. This warranty covers manufacturing defects and issues arising from normal use.
For any questions, technical support, or warranty claims, please contact FLYLINKTECH customer service through the following channels:
- Email: nkwado@flylinktech.hk
- Websaịtị: www.flylinktech.hk
Please have your purchase receipt and product model number (CK100) ready when contacting support.


