1. Okwu mmalite
Thank you for choosing the HBN Digital Programmable Timer Socket. This device is designed to automate the switching of electrical appliances, helping you save energy and enhance convenience. It features an LCD display, 8 configurable ON/OFF programs, and a random function for security. Please read this manual carefully before use to ensure proper operation and safety.
2. Ntuziaka nchekwa
- This timer socket is designed for indoor use only. Do not expose it to moisture, water, or extreme temperatures.
- Ensure the connected appliance's power consumption does not exceed the timer's maximum load capacity (16A / 3680W). Overloading can cause damage or fire.
- Emela ka ngwaọrụ ahụ gbawaa ma ọ bụ gbalịa ịrụzi ya. Nye ndị ọrụ ruru eru ọrụ niile.
- Debe ebe ụmụaka na-apụghị iru.
- Always insert the plug fully into the socket.
- Unplug the timer from the wall socket before cleaning. Clean only with a dry, soft cloth.
3. Ngwaahịa gafereview
Familiarize yourself with the components of your HBN Digital Programmable Timer Socket.

Foto 3.1: N'ihu view of the timer socket, showing the LCD display, control buttons, and power outlet.

Ọgụgụ 3.2: Azụ view of the timer socket, displaying the model number BND-50/SG3-VC and electrical ratings.
bọtịnụ njikwa:

Ọgụgụ 3.3: Zuru ezu view of the control buttons and LCD display.
- Elekere: Used to set the current time and exit programming mode.
- ProG: Enters and cycles through the 8 ON/OFF programming settings.
- R (Random): Activates or deactivates the random switching function.
- Tọgharia: Clears all settings and resets the timer to factory defaults.
- izu: Selects the day(s) of the week for time and program settings.
- Awa: Adjusts the hour for time and program settings.
- MIN: Adjusts the minute for time and program settings.
- Gbanwuo/Anya/ Gbanyụọ: Manually switches the timer to ON, AUTO (programmed mode), or OFF.
Ngosipụta LCD:
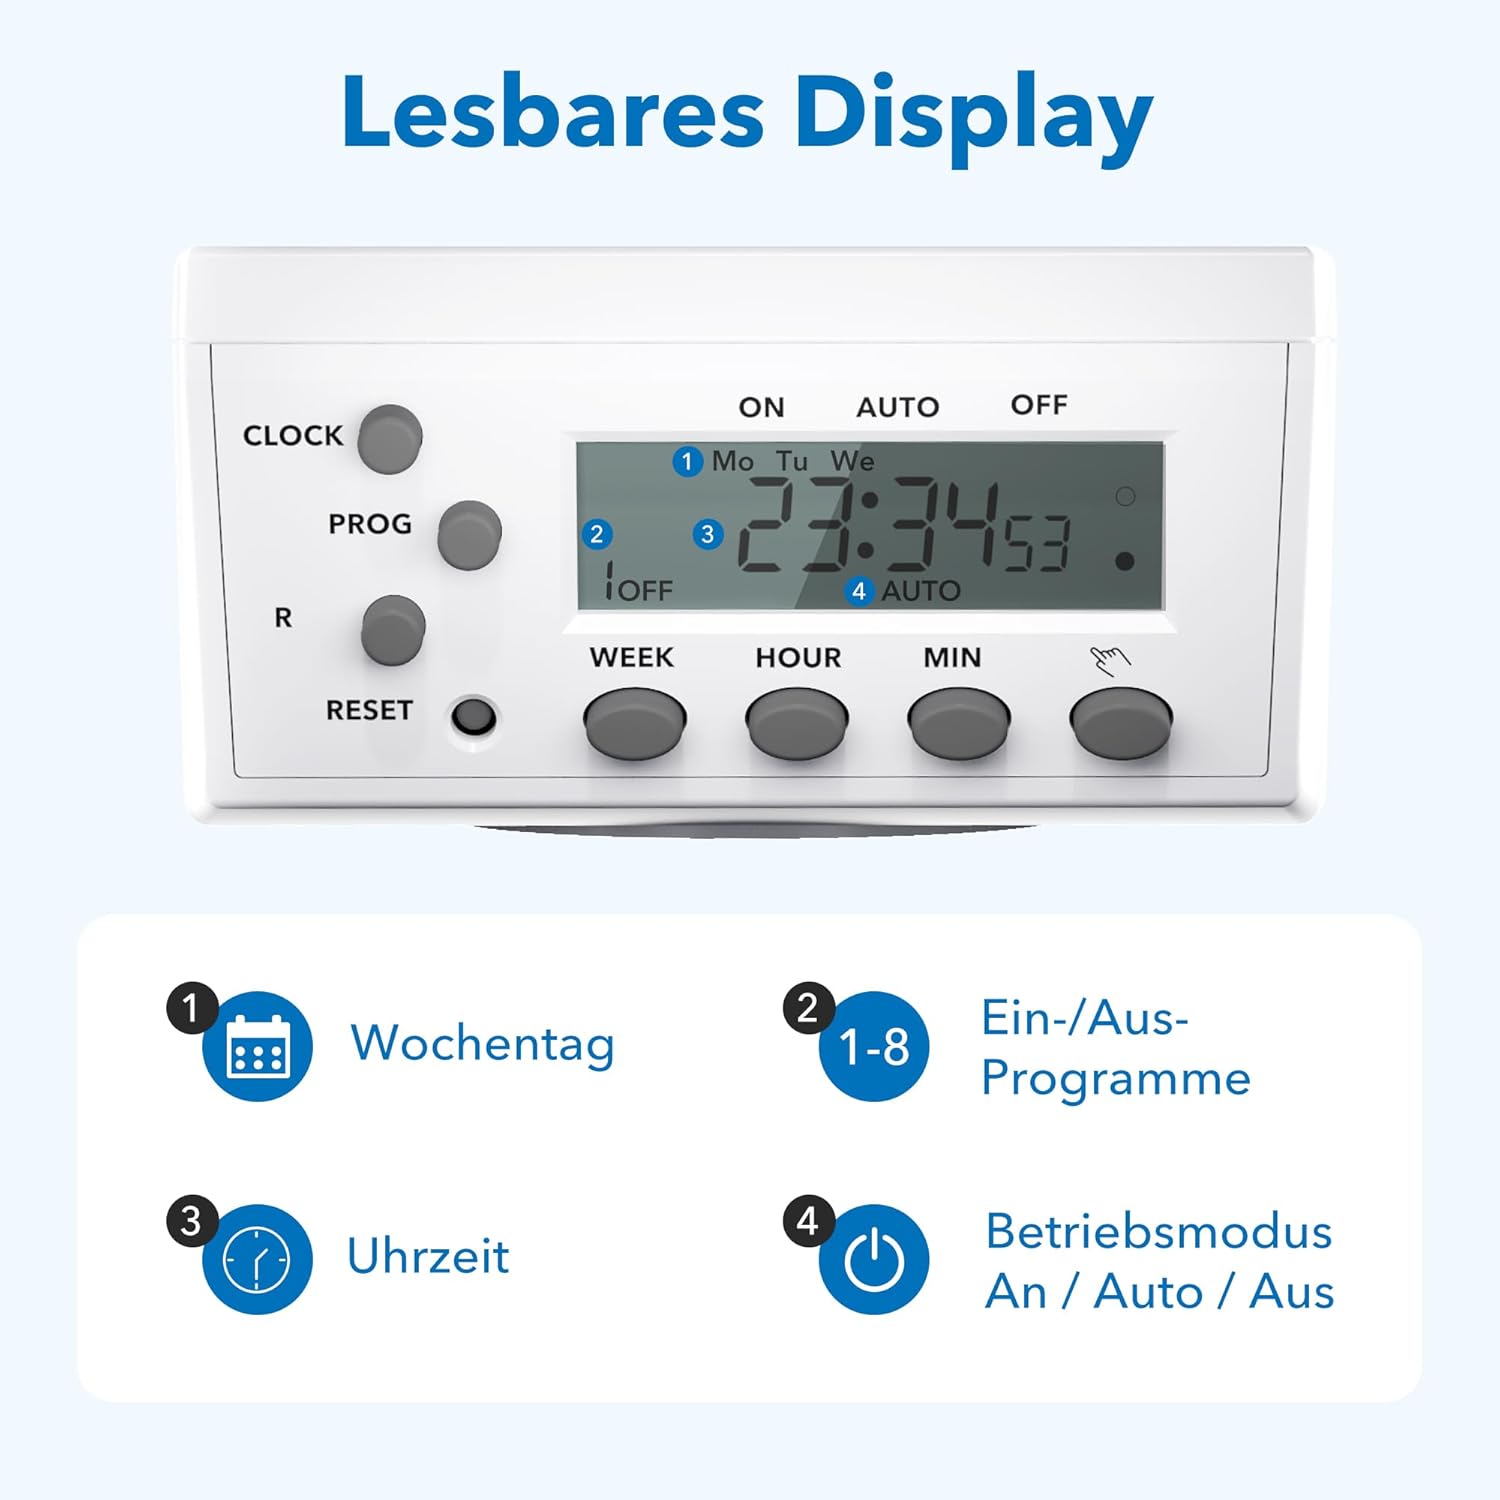
Figure 3.4: The LCD display shows current time, day, program status, and operating mode.
The LCD display provides clear information on the current time, day of the week, active program number, and the current operating mode (ON, AUTO, OFF).
4. Nhazi
4.1 Initial Charging and Reset
- Plug the timer socket into a live wall outlet for at least 15-30 minutes to charge its internal battery. This battery retains settings during power outages.
- After charging, use a pointed object (like a pen tip) to press the Tụgharịa button. This clears all previous settings and ensures a fresh start. The display will show '0:00'.
4.2 Ịtọ oge ugbu a
- Pịa ma jide EGE bọtịnụ.
- Mgbe ijide EGE, pịa I izu button repeatedly to select the current day of the week (Mo, Tu, We, Th, Fr, Sa, Su).
- Mgbe ijide EGE, pịa Awa button repeatedly to set the current hour.
- Mgbe ijide EGE, pịa MIN pịa bọtịnụ ugboro ugboro iji tọọ nkeji dị ugbu a.
- Hapụ ya EGE button. The current time is now set.
5. Ntuziaka ọrụ
5.1 Programming ON/OFF Times
Ihe nhazi oge ahụ na-enye ohere maka mmemme ON/OFF ruru 8 dị iche iche. Mmemme ọ bụla nwere oge ON na oge ON.
- Pịa ỌRỤ button once. The display will show '1 ON'.
- Pịa I izu to select the desired day(s) for this program. Options include individual days, weekdays, weekends, or all days.
- Pịa Awa iji tọọ awa ON achọrọ.
- Pịa MIN iji tọọ nkeji ON achọrọ.
- Pịa ỌRỤ again. The display will show '1 OFF'.
- Repeat steps 2-4 to set the desired OFF time for program 1.
- Pịa ỌRỤ again to move to '2 ON' and repeat the process for subsequent programs (up to 8).
- Mgbe ịtọchara mmemme niile achọrọ, pịa EGE button to exit programming mode and return to the current time display.
5.2 Manual Override (ON/AUTO/OFF)
Pịa Gbanwuo/Anya/ Gbanyụọ bọtịnụ ka ị na-agagharị site na ụdị ọrụ:
- NA: The connected appliance is continuously ON, overriding all programs.
- UTgbọala: Ihe na-egosi oge ọrụ ahụ na-arụ ọrụ dịka oge ON/OFF si dị. Nke a bụ ụdị ọrụ a na-ejikarị eme ihe maka njikwa akpaaka.
- Gbanyụọ: The connected appliance is continuously OFF, overriding all programs.
5.3 Random Function
The random function provides a security feature by switching the connected appliance ON and OFF at irregular intervals (2 to 30 minutes delay) around the programmed times. This can simulate presence when you are away.
- Iji mee ka ọ rụọ ọrụ, pịa R button. An 'R' indicator will appear on the display.
- To deactivate, press the R button again. The 'R' indicator will disappear.

Ọgụgụ 5.1: Ọpụamples of versatile applications for the timer socket.
6. Nlekọta
- Ensure the timer is unplugged from the power outlet before cleaning.
- Wipe the exterior with a soft, dry cloth. Do not use liquid cleaners or abrasive materials.
- Chekwaa ngụ oge n'ebe dị jụụ, kpọrọ nkụ mgbe anaghị eji ya.
7. Nchọpụta nsogbu
- Ngosipụta bụ oghere: Ensure the timer is plugged into a live outlet. If it has been unplugged for an extended period, the internal battery may be depleted. Plug it in for 15-30 minutes to recharge.
- Appliance does not switch ON/OFF as programmed:
- Check if the timer is in AUTO mode. If it's in ON or OFF mode, programs are overridden.
- Verify that the programmed ON/OFF times and days are correct.
- Gbaa mbọ hụ na edobere oge ugbu a nke ọma.
- Confirm the appliance itself is working and properly connected to the timer.
- Programs are lost after a power outage: The internal battery may not be fully charged or is at the end of its life. Ensure the timer is regularly plugged in to maintain battery charge.
- Timer is unresponsive: Pịa Tụgharịa button with a pointed object to clear all settings and restart the device. Then, reprogram the time and desired schedules.
8. Nkọwapụta

Figure 8.1: Technical data and dimensions of the timer socket.
| Nkọwapụta | Uru |
|---|---|
| Nọmba nlereanya | BND-50/SG3-VC |
| Ogo Voltage | 230 V |
| Enyere aha ugbu a | 16 A |
| Ibu kacha | 3680 W |
| Minimum Switching Time | Nkeji 1 |
| Ọnụọgụ nke Mmemme | Mmemme ịgbanwuo/gbanyụọ 8 |
| Akụkụ ngwaahịa | 7.5 x 7.5 x 8 cm |
| Ibu Ibu | 150 grams |
| Ihe onwunwe | Kunststoff (Plastic) |
| Agba | Ọcha |
| Onye nrụpụta | Ergo I&E CO.,LTD |
9. Akwụkwọ ikike na nkwado
HBN products are manufactured to high-quality standards. For warranty information or technical support, please refer to the documentation provided with your purchase or contact your retailer. Keep your proof of purchase for warranty claims.


