1. Okwu mmalite
The TOTU HDMI Switch (Model TT-HS001B) is designed to connect up to four HDMI source devices to a single display, such as a TV or monitor. This device allows for seamless switching between multiple HDMI inputs, supporting high-resolution video and audio formats. It is ideal for users with multiple HDMI-enabled devices and limited HDMI ports on their display.
2. Ihe ngwugwu
Biko chọpụta na agụnyere ihe niile edepụtara n'okpuru na ngwugwu gị:
- 1 x TOTU HDMI Switch (Model TT-HS001B)
- 1 x IR Remote Controller
- 1 x 5V nkwụnye ọkụ
- Akwụkwọ ntuziaka onye ọrụ 1 x (akwụkwọ a)

Image: The TOTU HDMI Switch package contents, showing the main switch unit, the remote control, the power adapter, and the user manual.
3. Ngwaahịa gafereview
The TOTU HDMI Switch features a compact design with clearly labeled ports and controls for ease of use.

Image: The TOTU HDMI Switch unit, remote control, and power adapter. The switch unit displays its front panel with input indicators and control buttons, and its rear panel with HDMI input/output ports.
Akụkụ ihu panel:
- Mgbanwe bọtịnụ: Used to manually cycle through the HDMI input sources.
- Input Indicators (1, 2, 3, 4): LED lights indicating the currently active HDMI input.
- IR Remote Receiver: Receives signals from the included infrared remote control.
- Bọtịnụ ike: Gbanyụọ ma ọ bụ gbanyụọ ngwaọrụ.
- Ihe ngosi ike: LED light indicating the power status of the device.
Akụkụ azụ azụ:
- DC 5V ọdụ ụgbọ mmiri: Connects to the provided 5V power adapter.
- Ọdụ ụgbọ mmiri HDMI: Connects to your display (TV, monitor, projector).
- HDMI Input Ports (1, 2, 3, 4): Connects to your HDMI source devices (e.g., gaming consoles, Blu-ray players, streaming devices).
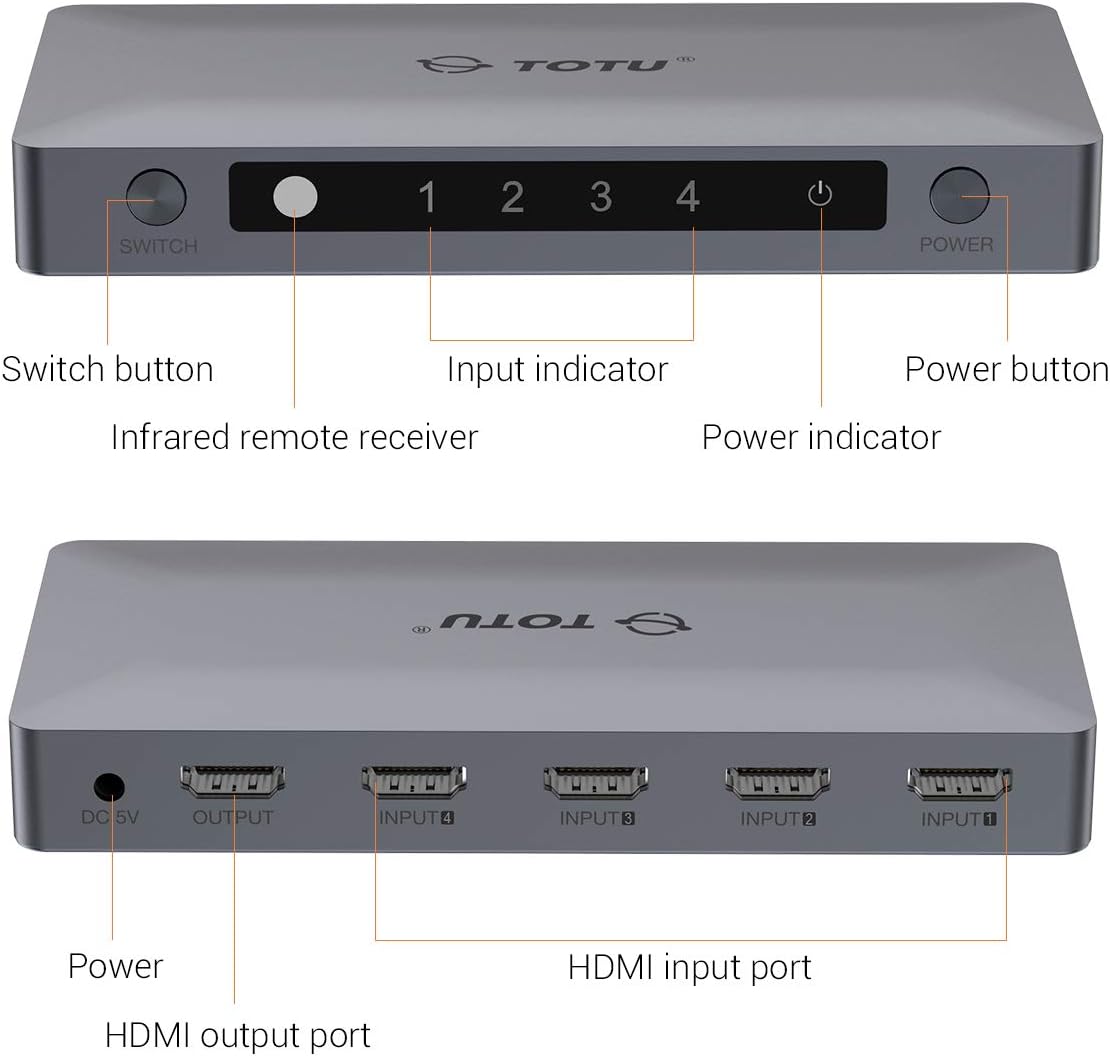
Image: A detailed diagram illustrating the front and rear panels of the TOTU HDMI Switch, with each button and port clearly labeled for identification.
4. Nhazi ntuziaka
Follow these steps to set up your TOTU HDMI Switch:
- Jikọọ Ngwaọrụ Isi Iyi HDMI: Connect up to four HDMI source devices (e.g., PS4, Xbox, Blu-ray player, Apple TV) to the HDMI Input ports (INPUT 1-4) on the rear panel of the TOTU HDMI Switch using HDMI cables.
- Jikọọ na Ngosipụta: Connect one end of an HDMI cable to the HDMI Output port on the rear panel of the TOTU HDMI Switch and the other end to an HDMI input port on your display (TV, monitor).
- Njikọ Ike: Plug the provided 5V power adapter into the DC 5V Power Port on the rear panel of the TOTU HDMI Switch, then plug the adapter into a power outlet. The power indicator LED on the front panel should illuminate.
- Ike Na Ngwaọrụ: Gbanye ihe ngosi gị na ngwaọrụ isi iyi HDMI niile ejikọrọ.

Image: A visual guide demonstrating how to connect various HDMI source devices (Laptop/PC, Apple TV Box, PS4/PS3, DVD Player) to the input ports of the TOTU HDMI Switch, which then connects to a single display via its output port.

Image: A comparison illustrating the convenience of using the HDMI switch to manage multiple devices connected to a single TV, eliminating the need for frequent manual cable changes.
5. Ntuziaka ọrụ
The TOTU HDMI Switch offers multiple methods for switching between input sources:
Ngbanwe akwụkwọ ntuziaka:
Pịa Gbanwee bọtịnụ on the front panel of the device to cycle through the connected HDMI input sources (Input 1, Input 2, Input 3, Input 4). The corresponding input indicator LED will light up to show the active source.
Mgbanwe njikwa anya:
Use the included IR remote control to select your desired input source directly. Press the numbered buttons (1, 2, 3, 4) on the remote to switch to the corresponding HDMI input. The remote also includes 'V' and '^' buttons for cycling through inputs.

Image: A diagram illustrating the use of the IR remote control to switch between different displays or input sources connected to the HDMI switch, providing convenient control from a distance.
Mgbanwe na-akpaghị aka:
The switch supports automatic switching to the current active port when only one input device is active. If multiple devices are active, you will need to switch manually using the button on the device or the remote control.
6. Nchọpụta nsogbu
If you encounter issues with your TOTU HDMI Switch, please refer to the following common solutions:
- Enweghị Foto/Akara:
- Hụ na e jikọtara eriri HDMI niile nke ọma na ngwaọrụ isi mmalite, swiichi, na ngosipụta ahụ.
- Verify that the power adapter is correctly connected and the power indicator LED on the switch is on.
- Try connecting the HDMI source device directly to the display to confirm the source device and cable are functioning correctly.
- Cycle through the input sources on the switch manually or with the remote to ensure the correct input is selected.
- Malitegharịa ngwaọrụ niile ejikọrọ (isi iyi, mgba ọkụ, ngosi).
- Poor Picture Quality/Flickering:
- Ensure you are using high-quality HDMI 2.0 cables, especially for 4K 60Hz content.
- Check if the resolution and refresh rate settings on your source device are compatible with your display and the HDMI switch.
- Gbalịa eriri HDMI dị iche.
- Njikwa anya anaghị arụ ọrụ:
- Ensure there are no obstructions between the remote control and the IR remote receiver on the switch.
- Check and replace the battery in the remote control if necessary.
- Ensure you are within the effective range of the remote control.
7. Nkọwapụta
| Njirimara | Nkọwapụta |
|---|---|
| Ụdị ngwaahịa | TT-HS001B |
| Ụdị HDMI | HDMI 2.0 (backward compatible with V1.4, V1.3, V1.2, V1.0) |
| Mkpebi Max | 4K@60Hz (3840 x 2160) |
| Omimi agba | Ruo 36-bit Deep Agba |
| Nkwado HDCP | HDCP 2.2 Pass-Through |
| 3D Nkwado | Ee |
| HDMI Channel Bandwidth | Ruo 18 Gbps |
| Ntinye ọdụ ụgbọ mmiri | 4 x HDMI |
| Ọdụ ụgbọ mmiri mmepụta | 1 x HDMI |
| Usoro njikwa | Manual Button, IR Remote Control, Auto-Switching |
| Ịnye ọkụ | DC 5V |
| Akụkụ ngwaahịa | 5.91 x 2.76 x 0.79 sentimita asatọ |
| Ibu Ibu | 4.6 ounces |
| Agba | Ọlaọcha |

Image: A television screen displaying high-resolution 4K 60Hz content, connected to a laptop through the TOTU HDMI Switch, demonstrating its capability to support advanced video formats.

Image: A television screen showing 3D content, indicating the HDMI switch's compatibility with 3D viewing experiences. Note: All connected units must support 3D for this feature to function.
8. Nlekọta
To ensure optimal performance and longevity of your TOTU HDMI Switch, follow these maintenance guidelines:
- Keep the device in a cool, dry place away from direct sunlight, heat sources, and moisture.
- Avoid placing heavy objects on top of the switch.
- Jiri akwa dị nro hichaa ngwaọrụ ahụ. Ejila ihe nhicha mmiri ma ọ bụ ikuku ikuku.
- Gbaa mbọ hụ na ikuku ikuku dị na gburugburu ngwaọrụ iji gbochie ikpo oke ọkụ.
9. Akwụkwọ ikike na nkwado
TOTU provides efficient customer service. If you have any questions or require assistance with your product, please contact us. We aim to provide the fastest and most efficient service within 24 hours.
For support, please refer to the contact information provided with your product or visit the official TOTU websaịtị.


