1. Ngwaahịa gafereview
The Intermatic ET2725C is a versatile electronic timer designed for precise control of electrical loads. It features an easy-to-use interface for scheduling, offering to-the-minute programming capabilities for a wide range of applications. This model supports 50 holiday blocks with independent scheduling and up to 96 ON/OFF events, accommodating complex scheduling requirements. A key feature is its 100-hour backup power, provided by a supercapacitor, eliminating the need for batteries.
Akụkụ ndị bụ isi:
- 100-hour supercapacitor backup, eliminating battery requirements.
- Up to 96 programmable set points or events.
- Up to 50 holiday blocks with independent scheduling capabilities.
- Ntinye akpaaka voltage selection from 120 to 277 Vac, 60 Hz.
- Additional mode of operation that converts ON/OFF buttons into 2-hour overrides.
2. Kedu ihe dị na Igbe ahụ
Mgbe imepe ngwugwu ahụ, chọpụta na akụrụngwa niile dị na enweghị mmebi.
- Intermatic Electronic Timer (Model ET2725C)
- Akwụkwọ ntuziaka (akwụkwọ a)
3. Ozi nchekwa
ỊDỌ AKA NA NTỊ: Ihe ize ndụ nke ọkụ ma ọ bụ ọkụ eletrik
- Always disconnect power at the circuit breaker(s) or disconnect switch(es) before installing or servicing this equipment.
- More than one circuit breaker or disconnect switch may be required to de-energize the equipment completely before servicing.
- Installation and/or wiring must be performed in accordance with all national and local electrical code requirements.
- Use COPPER conductors ONLY for wiring connections.
- Do NOT remove the internal insulator.
For wiring, lift the terminal cover, remove the screw, and swing it aside. Replace the screw and plastic insulator covering the terminal before powering on the device.
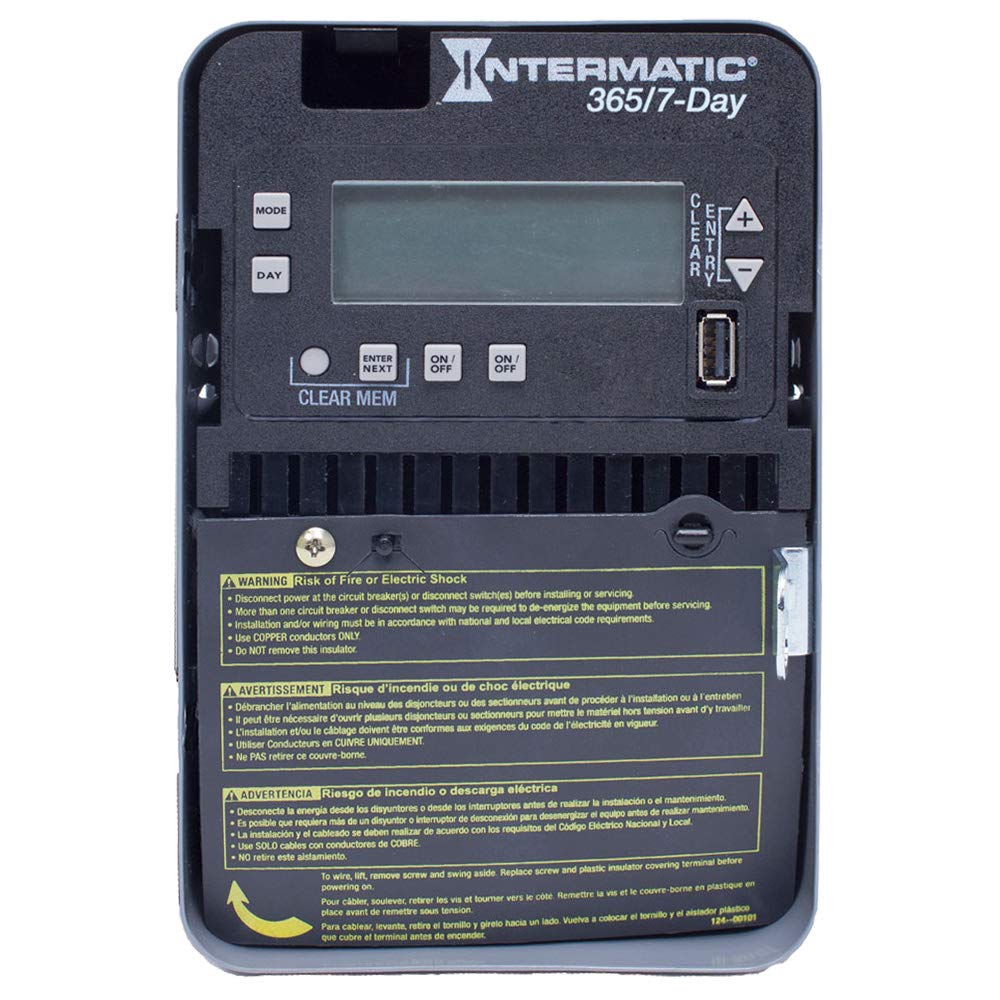
Figure 1: Front panel of the Intermatic ET2725C Electronic Timer, showing the display, control buttons (MODE, DAY, ENTER/NEXT, ON/OFF, CLEAR/ENTRY, +, -), and multi-language safety warnings at the bottom.
4. Nwụnye na Wiring
Proper installation is crucial for the safe and reliable operation of the ET2725C timer. Ensure all safety precautions are followed.
4.1 Na-arịgo
Mount the timer securely in a suitable enclosure or location, ensuring it is protected from environmental elements and accessible for programming and maintenance. Refer to local electrical codes for specific mounting requirements.
4.2 Ntuziaka waya
- Kwụpụ ike: Before beginning any wiring, ensure that power to the circuit is completely disconnected at the main circuit breaker or disconnect switch. Verify with a voltagọ bụ onye nyocha.
- Access Terminals: To access the wiring terminals, lift the terminal cover, remove the retaining screw, and swing the cover aside.
- Jikọọ Wiring: Connect the appropriate copper conductors to the timer terminals as per the wiring diagram provided with the unit and local electrical codes. The timer supports 120 to 277 Vac, 60 Hz.
- Njikọ echekwara Gbaa mbọ hụ na njikọ waya niile siri ike na nchekwa.
- Replace Insulator: Before restoring power, replace the plastic insulator covering the terminals and secure the terminal cover with its screw. This is critical for safety.
- Weghachi ike: Once all wiring is complete and verified, restore power to the circuit.
5. Operation and Programming
The ET2725C timer features a user-friendly interface for setting time, date, and programming events. The display and buttons (MODE, DAY, ENTER/NEXT, ON/OFF, CLEAR/ENTRY, +, -) are used for navigation and input.
5.1 Initial Setup (Setting Time and Date)
- Upon initial power-up or after a prolonged power outage (beyond 100 hours), the display may show default settings or require time/date input.
- Pịa MODE bọtịnụ iji tinye menu ntọala.
- Jiri ihe + or - buttons to adjust the current time (hour and minute).
- Pịa ỤBỌCHỊ tọọ ụbọchị nke izu a.
- Pịa BAnye/Osote to confirm settings and move to the next parameter.
- Continue adjusting year, month, and day as prompted until the current date and time are correctly set.
5.2 Programming ON/OFF Events
The timer allows for up to 96 ON/OFF events. Each event can be programmed for specific times and days.
- Pịa MODE repeatedly until "PROG" or "EVENT" mode is displayed.
- Jiri BAnye/Osote to select an event number (e.g., P1 ON).
- Jiri + or - to set the desired ON time for the event.
- Pịa ỤBỌCHỊ to select the days of the week for this event (e.g., Mon-Fri, Daily, Weekends, or individual days).
- Pịa BAnye/Osote to move to the OFF time for the same event (e.g., P1 OFF).
- Repeat steps 3-4 for the OFF time.
- Gaa n'ihu na BAnye/Osote to program additional events or exit programming mode.
5.3 Holiday Programming
The ET2725C supports up to 50 holiday blocks, allowing for temporary schedule overrides for specific dates.
- Access the holiday programming mode (refer to the on-screen prompts or specific button combinations).
- Select a holiday block.
- Tọọ ụbọchị mmalite na njedebe maka oge ezumike.
- Define the desired ON/OFF state or program a specific schedule for the holiday period.
- Confirm and save the holiday block.
5.4 Ntugharị akwụkwọ ntuziaka
The ON/OFF buttons can be used for manual overrides. In a specific mode, these buttons can provide a 2-hour override function, temporarily changing the load state without affecting the programmed schedule.
- Pịa Gbanye/ Gbanyụọ button to manually switch the load ON or OFF.
- In override mode, a single press may activate a 2-hour override. Consult the display for confirmation.
5.5 Clearing Memory
To clear all programmed events and reset the timer to factory defaults (excluding current time/date), use the CLEAR MEM function. This typically involves pressing and holding the CLEAR MEM button for a few seconds until the display confirms the reset.
6. Nlekọta
The Intermatic ET2725C timer is designed for long-term, reliable operation with minimal maintenance.
- Nhicha: Jiri ákwà dị nro ma kpọọ nkụ hichaa mpụta ihe n'ime oge ahụ mgbe ụfọdụ. Ejila ihe nhicha ma ọ bụ ihe mgbaze.
- Njikọ: Annually, or as required by local codes, inspect wiring connections to ensure they remain tight and free from corrosion. Always disconnect power before inspecting connections.
- Nnukwu ike: The internal supercapacitor provides backup power for up to 100 hours. No user maintenance or replacement is required for this component.
7. Nchọpụta nsogbu
If you encounter issues with your ET2725C timer, refer to the following common troubleshooting steps:
| Nsogbu | Ihe nwere ike ime | Ngwọta |
|---|---|---|
| Ngosipụta oge efu. | Enweghị ike na unit; sekit mebiri emebi. | Check circuit breaker and ensure power is supplied to the timer. Verify wiring connections. |
| Mmemme anaghị arụ ọrụ. | Incorrect time/date setting; program not enabled; manual override active. | Verify current time and date. Ensure programs are correctly set and enabled. Check for active manual overrides. |
| Load does not switch ON/OFF. | Incorrect wiring; faulty load; timer malfunction. | Verify wiring connections (power off first). Test the load independently. If issues persist, contact Intermatic support. |
| Time/date resets after power outage. | Ike gitage exceeded 100-hour supercapacitor backup. | Reset the current time and date manually. This is normal behavior if the outage dị ogologo. |
If troubleshooting steps do not resolve the issue, please contact Intermatic customer support.
8. Nkọwapụta
| Njirimara | Nkọwa |
|---|---|
| Nọmba nlereanya | ET2725C |
| Voltage | 120 to 277 Vac, 60 Hz (Automatic Selection) |
| Ampoge | 30 Amps |
| Ụdị ọrụ | Ụbọchị 7/365 |
| Ọnụọgụ nke ọwa | 2 |
| Mmemme Mmemme | Up to 96 ON/OFF events |
| Holiday Blocks | Up to 50 with independent scheduling |
| Ike ndabere | 100-hour supercapacitor (no batteries required) |
| Ihe onwunwe | Plastic |
| Akụkụ ngwaahịa | 7"D x 7"W x 7"H (ihe dị ka) |
| Ibu Ibu | 0.01 Ounces (approximate) |
9. Akwụkwọ ikike na nkwado
For warranty information, technical support, or service inquiries regarding your Intermatic ET2725C Electronic Timer, please contact Intermatic customer service directly. Refer to the official Intermatic webNgwugwu saịtị ma ọ bụ ngwaahịa maka nkọwa kọntaktị kachasị ugbu a yana usoro akwụkwọ ikike.
Onye nrụpụta: Intermatic
Ụbọchị mbụ dị: Mee 13, 2019


