1. Okwu mmalite
This manual provides comprehensive instructions for the installation, operation, and maintenance of the Chacon DI-O 54515 Universal Dimmer White. This device allows you to wirelessly control your lighting, integrating seamlessly with existing light switches and the DiO 1.0 ecosystem.
The DI-O 54515 micro-module is designed to be installed behind your existing light switch, enabling wireless ON-OFF control of your lights. It supports control via the physical switch, a remote control, or automatically through compatible motion or opening sensors. When connected to a LiteBox or DiO Home+ hub, it offers smartphone app control, timers, and scenario programming, including voice control via Amazon Echo or Google Home.
2. Ozi nchekwa
Biko gụọ ntuziaka nchekwa niile nke ọma tupu etinye ma jiri ya. Ọ bụrụ na ị gbasoghị ntuziaka ndị a, ọ nwere ike ibute mgbawa eletriki, ọkụ, ma ọ bụ ihe egwu ndị ọzọ.
- Installation must be performed by a qualified electrician or in accordance with local electrical codes.
- Kwụpụ ike mgbe niile na ihe mgbawa sekit tupu ịwụnye ma ọ bụ rụzie ngwaọrụ ahụ.
- Do not exceed the maximum load ratings specified in the technical specifications.
- Emebere ngwaọrụ a maka naanị ime ụlọ.
- Debe ngwaọrụ ahụ pụọ na mmiri, mmiri, na oke okpomọkụ.
- Gbaa mbọ hụ na njikọ niile echekwara na mkpuchi nke ọma.
3. Ihe ngwugwu
Ngwungwu ahụ kwesịrị ịnwe ihe ndị a:
- Chacon DI-O 54515 Universal Dimmer White Module
- Akwụkwọ ntuziaka (akwụkwọ a)

Image 1: The Chacon DI-O 54515 Universal Dimmer White module, showing its compact design and wiring terminals.
4. Akụrụngwa Ngwaahịa
- Njikwa ikuku: Enables wireless ON-OFF control of lights when installed behind an existing switch.
- Multi-Control Options: Compatible with existing physical switches, DiO 1.0 remote controls, wireless switches, motion sensors, and opening sensors.
- Ngwakọta Smart Home: Connects to LiteBox or DiO Home+ for smartphone app control, timers, and scenario programming.
- Njikwa olu: Supports voice commands via Amazon Echo or Google Home when integrated with DiO Home+.
- Nwụnye dị mfe: Designed for simple connection behind an existing light switch, requiring no neutral wire.
- Nhazi kọmpat: Dimensions (L x W x H): 41 x 42 x 13 mm, allowing it to fit into standard electrical boxes.
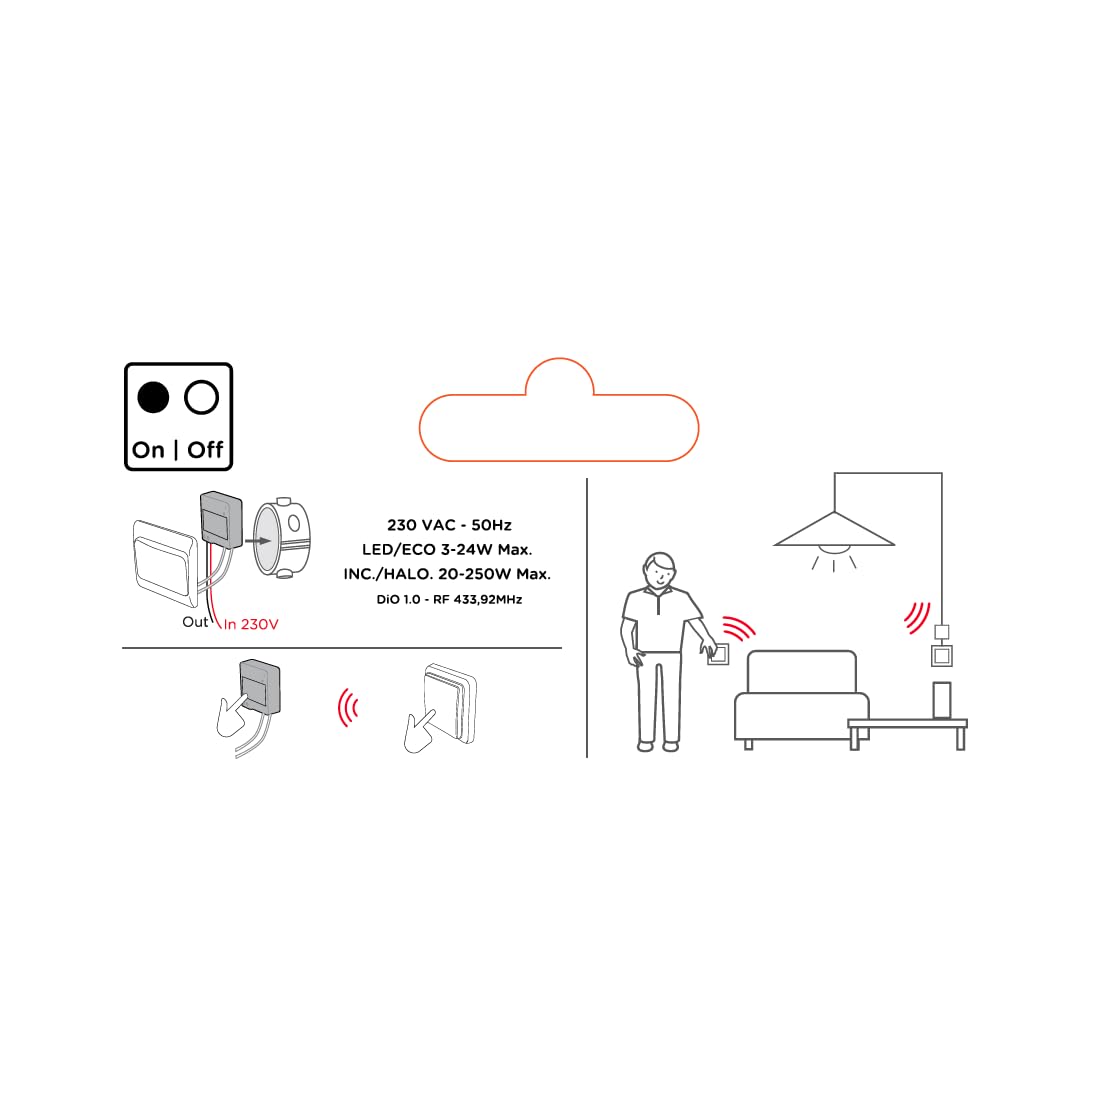
Image 2: An illustrative diagram detailing the wireless control capabilities and key electrical specifications of the module.
5. Ntọala na nwụnye
The installation of the Chacon DI-O 54515 module is designed to be straightforward. However, if you are unsure, consult a qualified electrician.
5.1 Ntuziaka waya
- Kwụpụ ike: Before starting any electrical work, ensure the power supply to the circuit is turned off at the main circuit breaker.
- Access Switch Box: Jiri nlezianya wepụ ihe mgba ọkụ gị dị ugbu a n'ime igbe mgbidi.
- Connect Module:
- Connect the Live (L) wire from your electrical supply to the 'L' terminal on the DiO module.
- Connect the wire going to your light fixture to the output terminal (often marked with a wave symbol or 'OUT') on the DiO module.
- Connect the two wires from your existing light switch to the designated switch input terminals on the DiO module. This module does not require a neutral wire for operation.
- Position Module: Carefully place the DiO module into the wall box behind your existing light switch. Ensure wires are not pinched.
- Tinyegharịa Mgbanwe: Reattach your existing light switch to the wall box.
- Weghachi ike: Gbanyụọ ọkụ azụ na ihe nbibi sekit.

Image 3: A visual representation of the DiO module being installed within a standard electrical wall box, positioned behind an existing light switch.

Foto 4: nkọwa zuru ezu view of the Chacon DI-O 54515 module, highlighting its wiring terminals for proper connection.
5.2 Pairing with DiO 1.0 Controls
To enable wireless control, you need to pair the module with a compatible DiO 1.0 remote control, wireless switch, or sensor.
- Tinye Ụdị Mmakọ: Refer to the specific instructions for your DiO 1.0 control device to put it into pairing mode. Typically, this involves pressing a pairing button on the module or performing a specific sequence with the existing switch.
- Activate Control: Once the module is in pairing mode, activate your DiO 1.0 control (e.g., press the 'ON' button on a remote or wireless switch).
- nkwenye: The light connected to the module should flash or turn on/off to confirm successful pairing.
- Repeat for Multiple Controls: You can pair multiple DiO 1.0 controls to the same module if desired.
6. Ntuziaka ọrụ
Once installed and paired, the Chacon DI-O 54515 module offers several ways to control your lighting:
- Existing Light Switch: You can continue to use your traditional wall switch to turn the lights on and off.
- DiO 1.0 Remote Control/Wireless Switch: Use any paired DiO 1.0 remote control or wireless switch to toggle the lights.
- DiO 1.0 Sensors: If paired with a DiO motion or opening sensor, the lights can be triggered automatically based on detected activity.
- Smartphone App (via DiO Home+ / LiteBox):
- Connect your DiO module to a DiO Home+ or LiteBox hub (sold separately).
- Download the free DiO smartphone app.
- Follow the app's instructions to add and configure your module.
- From the app, you can turn lights on/off, set timers, and create custom scenarios.
- Voice Control (via DiO Home+ and Smart Speaker):
- Ensure your DiO Home+ hub is integrated with Amazon Echo or Google Home.
- Use voice commands such as "Alexa, turn on the living room light" or "Hey Google, turn off the kitchen light."
7. Nlekọta
The Chacon DI-O 54515 module requires minimal maintenance. Follow these guidelines to ensure optimal performance:
- Nhicha: If necessary, gently wipe the module with a dry, soft cloth. Do not use liquid cleaners or solvents.
- Nyocha: Periodically check the wiring connections to ensure they remain secure. Always disconnect power before inspection.
- Mmelite femụwe: If using with a DiO Home+ or LiteBox, ensure your hub's firmware and the smartphone app are kept up to date for the best performance and security.
8. Nchọpụta nsogbu
| Nsogbu | Ihe nwere ike ime | Ngwọta |
|---|---|---|
| Ìhè anaghị agbanwu/ gbanyụọ. | No power to the module, incorrect wiring, module not paired, faulty bulb. | Check circuit breaker. Verify wiring according to Section 5.1. Re-pair the module with the control device (Section 5.2). Test with a known working bulb. |
| Wireless control not working. | Module not paired, control device out of range, battery low in remote/sensor. | Ensure module is correctly paired (Section 5.2). Move control device closer to the module. Replace batteries in remote/sensor. |
| Module indicator light flashing red. | Overload or short circuit detected. | Immediately disconnect power. Check the connected load does not exceed specifications. Inspect wiring for any short circuits. Consult a qualified electrician if the problem persists. |
| Njikwa olu anaghị aza. | DiO Home+ hub not connected, incorrect voice command, smart speaker issue. | Ensure DiO Home+ is online and linked to your smart speaker account. Verify the correct device name is used in commands. Check smart speaker's internet connection. |
9. Nkọwapụta
| Njirimara | Nkọwa |
|---|---|
| Nọmba nlereanya | 54515 |
| Ụdị | Dio |
| Ụdị ọrụ | ON-Gbanyụọ |
| Ogo dị ugbu a | 10 Amps |
| Ngbanwe Ụdị | Ngbanwe dimmer |
| Ụdị nkwụnye | Ugwu mgbidi |
| Ụdị Actuator | Njikwa anya |
| Ogo nchekwa mba ụwa | IP44 |
| Ụdị njikwa | Amazon Alexa |
| Usoro njikwa | Ime ime |
| Agba | Ọcha |
| Akụkụ (L x W x H) | 41 x 42 x 13 mm |
| Akwụkwọ ikike | afọ 2 |
Note on Dimming Functionality: While the product title includes "Dimmer" and "Switch Type" is listed as "Dimmer Switch", the official specifications list "Operation mode: ON-OFF". Some user reviews also indicate that newer versions of this module function as a simple ON/OFF switch rather than a dimmer. Please verify the specific functionality of your module upon receipt.
10. Akwụkwọ ikike na nkwado
This Chacon DI-O 54515 Universal Dimmer White module comes with a 2-afọ akwụkwọ ikike site na ụbọchị ịzụrụ, na-ekpuchi ntụpọ nrụpụta.
For technical support, troubleshooting assistance, or warranty claims, please contact your retailer or visit the official Dio website for contact information. Please have your proof of purchase and model number (54515) ready when contacting support.


