Okwu mmalite
This manual provides essential instructions for the proper installation, operation, and maintenance of your CAMRY Head and Needle 1113 and Cr 1114 phono cartridge and stylus. Designed for optimal audio reproduction, this product is easy to handle and features a modern design. Please read this manual thoroughly before use to ensure correct setup and to maximize the lifespan and performance of your audio component.
Akụkụ ndị bụ isi:
- Ọ dị mfe ijikwa
- Nhazi ọgbara ọhụrụ
- Ọ dị mfe iji
Ihe ngwugwu
Chọpụta na akụrụngwa niile dị na ngwugwu:
- 1 x CAMRY Head and Needle 1113 and Cr 1114 Phono Cartridge Assembly
- 1 x Stylus (needle)
- (Optional: Mounting hardware, if included with your specific purchase)

Foto nke 1: The CAMRY Head and Needle 1113 and Cr 1114 phono cartridge assembly. This image displays the complete unit, including the cartridge body (black and red sections) and the stylus assembly (white translucent cover with the cantilever and needle visible). The four pins for electrical connection are visible at the back.
Ntọala na nwụnye
Proper installation is crucial for optimal sound quality and to prevent damage to your records or equipment.
- Gbanyụọ: Ensure your turntable is powered off and unplugged from the mains electricity before beginning installation.
- Wepu Old Cartridge (ọ bụrụ na ọdabara): Carefully disconnect the wires from your old cartridge. Note the color coding (typically Red for Right+, Green for Right-, White for Left+, Blue for Left-). Unscrew and remove the old cartridge from the headshell.
- Attach New Cartridge:
- Align the CAMRY cartridge with the mounting holes on your turntable's headshell.
- Secure the cartridge using the provided screws and nuts (if applicable). Do not overtighten.
- Jikọọ waya: Connect the tonearm wires to the corresponding pins on the back of the CAMRY cartridge. Match the colors:
- Red wire to R+ (Right Channel Positive)
- Green wire to R- (Right Channel Ground)
- White wire to L+ (Left Channel Positive)
- Blue wire to L- (Left Channel Ground)
- Stylus Installation: If the stylus is separate, gently slide it onto the cartridge body until it clicks securely into place. Avoid touching the needle tip.
- Alignment and Tracking Force:
- Refer to your turntable's manual for specific instructions on cartridge alignment (e.g., using a protractor) and setting the tracking force.
- The recommended tracking force for this cartridge is typically between 1.5 to 2.5 grams. Start with the manufacturer's recommended setting for your turntable or cartridge.
- Adjust anti-skate according to your turntable's instructions, usually matching the tracking force.
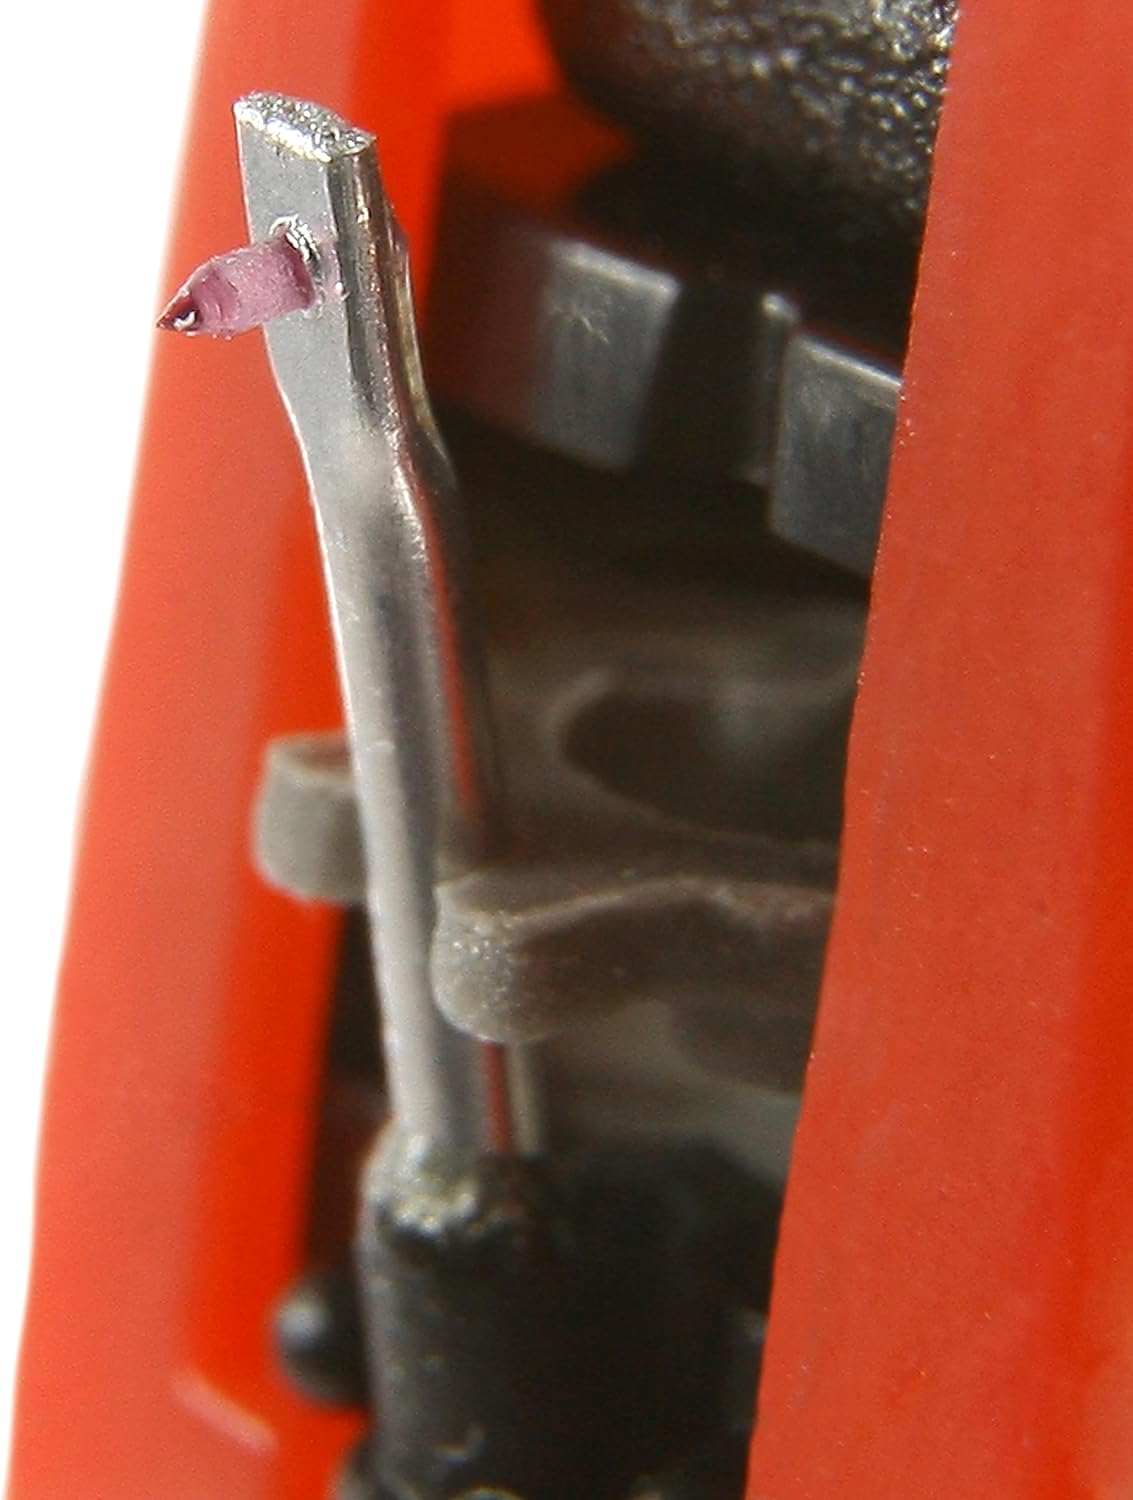
Foto nke 2: A nso-elu view of the CAMRY stylus (needle) tip. This image highlights the delicate cantilever and the small, conical or elliptical diamond tip responsible for tracking the record grooves. Handle with extreme care.
Ntuziaka ọrụ
Once installed and aligned, your CAMRY cartridge is ready for use.
- Ndekọ Dị Ọcha: Always ensure your records are clean and free of dust before playing to prevent damage to both the record and the stylus.
- Lower Tonearm Gently: Use the tonearm lift mechanism on your turntable to gently lower the stylus onto the record's lead-in groove. Avoid dropping the tonearm manually, as this can damage the stylus or record.
- Nkpọghachi: Allow the record to play through.
- Ogwe aka ebuli: At the end of the record, use the tonearm lift to raise the stylus from the record surface. Return the tonearm to its rest.
Mara: For optimal sound quality and to extend stylus life, avoid back-cueing or scratching with the stylus.
Nlekọta
Regular maintenance ensures consistent performance and extends the life of your stylus and records.
- Nhicha Stylus:
- Gently clean the stylus tip before or after each play using a dedicated stylus cleaning brush. Brush from back to front (from the pivot point towards the tip) only.
- For stubborn dirt, use a specialized stylus cleaning fluid sparingly, applied to the brush, not directly to the stylus.
- Never use your fingers to clean the stylus.
- Cartridge Body: Wipe the cartridge body with a soft, dry, lint-free cloth if it becomes dusty.
- Nnyocha Stịlọs: Periodically inspect the stylus tip for wear or damage using a magnifying glass. A worn stylus can damage your records and degrade sound quality. Replace the stylus if it appears worn or bent.
- Nchekwa: When not in use, ensure the tonearm is secured in its rest and, if available, use the stylus guard to protect the needle.
Nchọpụta nsogbu
Ọ bụrụ na ị na-enwe nsogbu, rụtụ aka na nsogbu ndị a na-ahụkarị na ngwọta ndị a:
| Nsogbu | Ihe nwere ike ime | Ngwọta |
|---|---|---|
| No sound or weak sound from one channel | Loose or incorrect wire connection; damaged stylus/cartridge | Check all wire connections to the cartridge and tonearm. Ensure they are secure and correctly matched (L+/L-, R+/R-). Inspect stylus for damage. |
| Distorted sound or skipping | Incorrect tracking force; dirty or worn stylus; dirty record; incorrect anti-skate | Verify tracking force setting. Clean stylus. Clean record. Adjust anti-skate. Inspect stylus for wear. |
| Mkpọtụ mkpọtụ ma ọ bụ mkpọtụ | Grounding issue; interference; loose connections | Ensure turntable is properly grounded to your amplifier/receiver. Check all audio cable connections. Move turntable away from other electronic devices. |
| Stylus not tracking groove | Incorrect tracking force; damaged stylus; tonearm balance issue | Re-balance tonearm and reset tracking force. Inspect stylus for damage. |
If problems persist after attempting these solutions, consult a qualified audio technician or contact CAMRY customer support.
Nkọwapụta
| Njirimara | Nkọwa |
|---|---|
| Ụdị | CAMRY |
| Aha Nlereanya | 1113 and Cr 1114 |
| Nọmba Nlereanya ihe | camry_CR 1113.1 |
| Agba | Multicolor |
| Ihe onwunwe | Glass (Note: This likely refers to the stylus tip material, e.g., sapphire or diamond, often described as 'glass' in general terms.) |
| Akụkụ ngwaahịa (L x W x H) | 11.81 x 11.81 x 3.94 inches (Note: This dimension seems unusually large for a cartridge and may refer to packaging. Actual cartridge dimensions are much smaller.) |
| Ibu Ibu | 0.704 ounces (ihe dị ka gram 20) |
| Onye nrụpụta | Adler Itd |
| Ụbọchị mbụ dị | Ọktoba 22, 2018 |
Akwụkwọ ikike na nkwado
Specific warranty information for the CAMRY Head and Needle 1113 and Cr 1114 is not provided in this manual. Please refer to your purchase documentation or the retailer's website for details regarding warranty coverage.
For technical support, inquiries, or to report issues, please contact the retailer from whom you purchased the product or visit the official CAMRY brand websaịtị maka ozi kọntaktị ọrụ ndị ahịa.


