1. Ntuziaka nchekwa dị mkpa
Read all instructions before using this appliance. To reduce the risk of fire, electric shock, or injury to persons when using your dryer, follow basic precautions, including the following:
- Install and store the dryer in a location where it will not be exposed to water or weather.
- Akpọla ihe ndị e sachara na mbụ, ndị e sachara na ha, ndị e tinyere n'ime ha, ma ọ bụ ndị e ji mmanụ ụgbọala, ihe ndị na-eme ka ihe dị ọcha na-ehicha ihe, ma ọ bụ ihe ndị ọzọ na-ere ọkụ ma ọ bụ ihe ndị na-agbawa agbawa, n'ihi na ha na-ewepụta uzuoku nke nwere ike ịgbawa ma ọ bụ gbawaa.
- Ekwela ka ụmụaka na-egwu egwu ma ọ bụ n'ime ngwa. Nleba anya dị nso nke ụmụaka dị mkpa mgbe a na-eji ngwa ngwa na nso ụmụaka.
- Tupu ewepụ igwe nkụ na ọrụ ma ọ bụ tụfuo ya, wepụ ụzọ ahụ na ngalaba ihicha.
- Abanyela n'ime ngwa ma ọ bụrụ na ịgbà na-akpụ akpụ.
- Do not install or operate this dryer without the exhaust duct connected.
- Debe ebe dị n'akụkụ oghere ikuku iyuzucha na akụkụ ndị gbara ya gburugburu ka ọ ghara ikpokọta lint, uzuzu na unyi.
- Ndị ọrụ ruru eru kwesịrị ịdị na-ehicha ime ngwa na ọwa ikpochapụ.
- Emezighachila ma ọ bụ dochie akụkụ ọ bụla nke ngwa ma ọ bụ nwaa ọrụ ọ bụla ma ọ bụrụ na akwadoro ya kpọmkwem na ntuziaka a ma ọ bụ na ntuziaka mmezi onye ọrụ nke ị ghọtara ma nwee nkà iji rụọ ya.
2. Ntọala na nwụnye
Proper installation is crucial for the safe and efficient operation of your dryer. Refer to the detailed installation instructions provided with your appliance for specific electrical, venting, and leveling requirements.
2.1 Nwepu
Carefully remove all packaging materials, including any shipping bolts or restraints. Inspect the dryer for any shipping damage. Report any damage immediately to your dealer.
2.2 Ọnọdụ chọrọ
The dryer must be installed in a location with adequate clearance for proper air circulation and maintenance. Ensure the floor is level and capable of supporting the dryer's weight (approximately 136 pounds). Proper ventilation is essential to prevent lint accumulation and ensure efficient drying.
2.3 Njikọ eletrik
This is an electric dryer requiring a dedicated 240V, 30A electrical supply. Ensure the electrical installation complies with all local codes and ordinances. A qualified electrician should perform the electrical connection.
2.4 entgba mbọ
The dryer must be vented to the outdoors using a rigid metal duct. Avoid using flexible plastic or foil ducts, as they can restrict airflow and pose a fire hazard. The vent system should be as short and straight as possible.
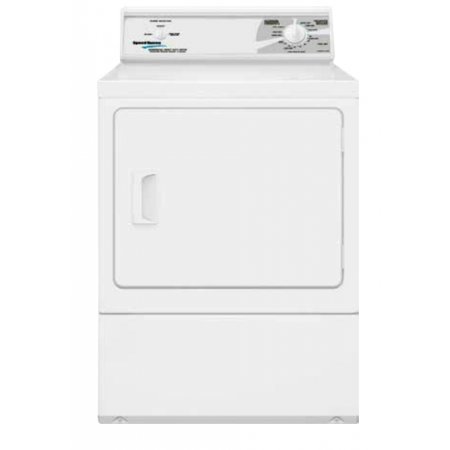
Foto: N'ihu view of the Speed Queen LDE30RGS173TW01 Home Style Mechanical Electric Dryer. This image shows the overall design of the appliance, including the front-loading door and the mechanical control panel located on the top rear of the unit.
3. Ntuziaka ọrụ
This section provides guidance on how to use your Speed Queen electric dryer effectively.
3.1 Na-ebunye draya
- Load items loosely into the dryer drum. Do not overload the dryer; the 18 lb capacity refers to dry weight. Overloading can reduce drying efficiency and increase wear on the appliance.
- Separate heavy items from lightweight items for more uniform drying.
- Ensure all items are suitable for machine drying according to their care labels.
3.2 Ogwe njikwa gafereview
The LDE30RGS173TW01 features mechanical controls for straightforward operation.
- Nchọgharị okirikiri: Used to select the desired drying cycle (e.g., Regular, Permanent Press, Delicate).
- Nchọta Okpomọkụ: Used to choose the drying temperature (e.g., High, Medium, Low, Air Fluff).
- Bọtịnụ mmalite: Press to begin the selected drying cycle.
3.3 Ịhọrọ usoro nkụ
- Load the dryer with items.
- Mechie ọnụ ụzọ igwe nkụ nke ọma.
- Turn the Cycle Selector Knob to the desired drying cycle based on the fabric type.
- Turn the Temperature Selector Knob to the appropriate heat setting.
- Press the Start Button to begin the cycle. The dryer will tumble and heat according to the selected settings.
The dryer will automatically stop when the selected cycle is complete. For optimal results, remove items promptly to reduce wrinkling.
4. Nlekọta
Regular maintenance ensures the longevity and efficient performance of your dryer.
4.1 Na-ehicha ihe nzacha lint
Clean the lint filter before or after every load. A clogged lint filter restricts airflow, increases drying time, and can be a fire hazard.
- Locate the lint filter, typically inside the dryer door opening.
- Dịrị nzacha ozugbo.
- Jiri aka wepụ ihe ọ bụla e ji ekpokọba ihe n'ime ya.
- Insert the filter back into its housing until it is securely in place.
4.2 Cleaning the Dryer Exterior
Jiri nwayọ hichaa elu mpụta, damp akwa . Zere ihe nhicha ma ọ bụ ihe mgbaze nke nwere ike imebi njedebe.
4.3 Na-ehicha Sistemụ Ntupu
Periodically inspect and clean the entire exhaust duct system to prevent lint buildup. This should be done at least once a year, or more frequently if drying large loads or lint-producing items. Professional service is recommended for thorough cleaning.
5. Nchọpụta nsogbu
Tupu ịkpọ oku maka ọrụ, regharịaview nsogbu ndị a na-ahụkarị na ihe ngwọta ha nwere ike ime.
| Nsogbu | Ihe nwere ike ime | Ngwọta |
|---|---|---|
| Drier anaghị ebido | Power cord unplugged; circuit breaker tripped; door not closed; Start button not pressed firmly. | Check power connection; reset breaker; ensure door is latched; press Start button firmly. |
| Drier anaghị ekpo ọkụ | No heat selected; thermal fuse blown; heating element failure; incorrect electrical connection. | Verify temperature setting; contact qualified service personnel for fuse/element check. |
| Uwe na-ewe ogologo oge iji kpoo | Lint filter clogged; exhaust vent restricted; dryer overloaded; incorrect cycle/temperature. | Clean lint filter; check/clean exhaust vent; reduce load size; select appropriate cycle/temperature. |
| Oke mkpọtụ | Ihe ndị mba ọzọ dị na drum; igwe nkụ anaghị adị larịị; ihe e ji agbanye drum ma ọ bụ bearings eme ochie. | Check drum for objects; level the dryer; contact service for internal component inspection. |
If these solutions do not resolve the issue, contact Speed Queen customer service or a qualified appliance technician.
6. Nkọwapụta
Key specifications for the Speed Queen LDE30RGS173TW01 Electric Dryer.
- Ụdị: LDE30RGS173TW01
- Akara: Ọsọ Queen
- Ụdị: Home Style Mechanical Electric Dryer
- Ike: 18 Pounds (dry weight)
- Ụdị mmanụ ụgbọala: Eletriki
- Ihe kpo oku: 5,350 Watt
- Ụdị njikwa: Mechanical
- Ihe eji agba agba: Galvanized Nchara
- Ụdị ọnụ ụzọ: Extra large 2.06 ft front load
- Ibu ihe: Ihe dị ka 136 pound
- Akụkụ (H x W x D): Ihe dị ka sentimita iri na itoolu na iri na isii na itoolu (Nha ngwugwu)
- Agba: Ọcha
- Asambodo: UL
7. Akwụkwọ ikike na nkwado
Your Speed Queen dryer is backed by a manufacturer's warranty. Please refer to the warranty card included with your purchase for specific terms, conditions, and registration information. Keep your proof of purchase for warranty claims.
Nkwado ndị ahịa
For technical assistance, service scheduling, or parts inquiries, please contact Speed Queen customer support. Contact information can typically be found on the manufacturer's websaịtị ma ọ bụ n'akwụkwọ ikike gị.
When contacting support, please have your dryer's model number (LDE30RGS173TW01) and serial number readily available.


